关于其构建过程理解,主要学习这篇文章:https://blog.csdn.net/qq_40882724/article/details/116860994
一、三个概念
首先,要理解三个重要的概念:
(1)webpack构建:一个独立项目通过 webpack 打包编译而产生资源包。
(2)remote:一个暴露模块供其他 webpack 构建消费的webpack构建。
(3)host:一个消费其他 remote 模块的 webpack 构建。
简言之:一个webpack构建可以是 remote(即服务的提供方),也可以是 host(即服务的消费方),也可以同时扮演服务提供者和服务消费者,完全看项目的架构。
二、host 与 remote 两个角色的依赖关系
可用下图表示:

需要指出的是,任何一个webpack构建既可以作为host消费方,也可以作为remote提供方,区别在于职责和webpack配置的不同。
三、案例实操解析
项目依赖关系介绍,一共有三个微应用:lib-app、component-app、main-app,角色分别是:
(1)lib-app 作为 remote, 暴露了两个模块 react 和 react-dom
(2)component-app 作为 remote 和 host, 依赖 lib-app,暴露了一些组件供 main-app 消费
(3)main-app 作为 host,依赖lib-app和component-app
1、lib-app 暴露模块
//webpack.config.js
module.exports = {
    //...省略
    plugins: [
        new ModuleFederationPlugin({
            name: "lib_app",
            filename: "remoteEntry.js",
            exposes: {
                "./react":"react",
                "./react-dom":"react-dom"
            }
        })
    ],
    //...省略
}
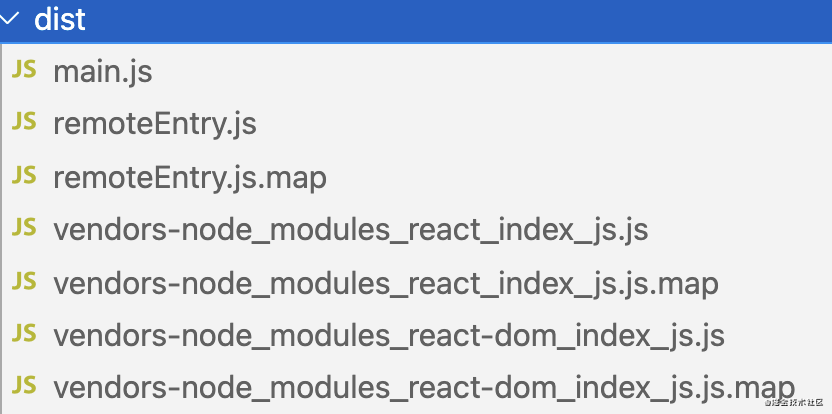
编译后的结果如下:

除去生成的 map文件,有四个文件:main.js、remoteEntry.js、...react_index.js、...react-dom_index.js;这里我们需要关注下:编译生成的各文件的意思。
(1)第一个是本项目的入口文件(该项目只是暴露接口,所以该文件为空)
(2)第二个是远程入口文件,其他webpack构建使用、访问本项目暴露的模块时,须通过它来加载
(3)第三个和第四个是暴露的模块,供其他项目消费
2、component-app的配置
依赖 lib-app 暴露三个模块组件 Button、Dialog、Logo
//webpack.config.js
module.exports = {
    //...省略
    plugins:[
        new ModuleFederationPlugin({
            name: "component_app",
            filename: "remoteEntry.js",
            exposes: {
              "./Button":"./src/Button.jsx",
              "./Dialog":"./src/Dialog.jsx",
              "./Logo":"./src/Logo.jsx"
            },
            remotes:{
                "lib-app":"lib_app@http://localhost:3000/remoteEntry.js"
            }
        }),
    ]
}
三个暴露的组件看原文章咯,这里只摘录我觉得有用的了解学习。
3、main-app的配置
main-app 依赖两个项目 lin-app、component-app。这里的 remotes 就加载了 2 个。
///webpack.config.js
module.exports = {
    //省略...
    plugins: [
        new ModuleFederationPlugin({
            name: "main_app",
            remotes:{
                "lib-app":"lib_app@http://localhost:3000/remoteEntry.js",
                "component-app":"component_app@http://localhost:3001/remoteEntry.js"
            },
        }),
        new HtmlWebpackPlugin({
          template: "./public/index.html",
        })
    ]
    //省略...
};
由于需要等待基础模块加载完毕,所以需要配置懒加载入口 bootstrap.js。
// 1、webpack打包入口文件
import("./bootstrap.js")

// 2、bootstrap.js
import App from './App.jsx'
import ReactDOM from 'lib-app/react-dom';
import React from 'lib-app/react'
ReactDOM.render(<App />, document.getElementById("app"));
// 3、根组件App.jsx
import React from 'lib-app/react';
import Button from 'component-app/Button'
import Dialog from 'component-app/Dialog'
import Logo from 'component-app/Logo'
export default class App extends React.Component{
  constructor(props) {
    super(props)
    //省略...
  }
  //省略...
  render(){
    return (<div>
      //省略...
    </div>)
  }
}
然后就会看到结论:
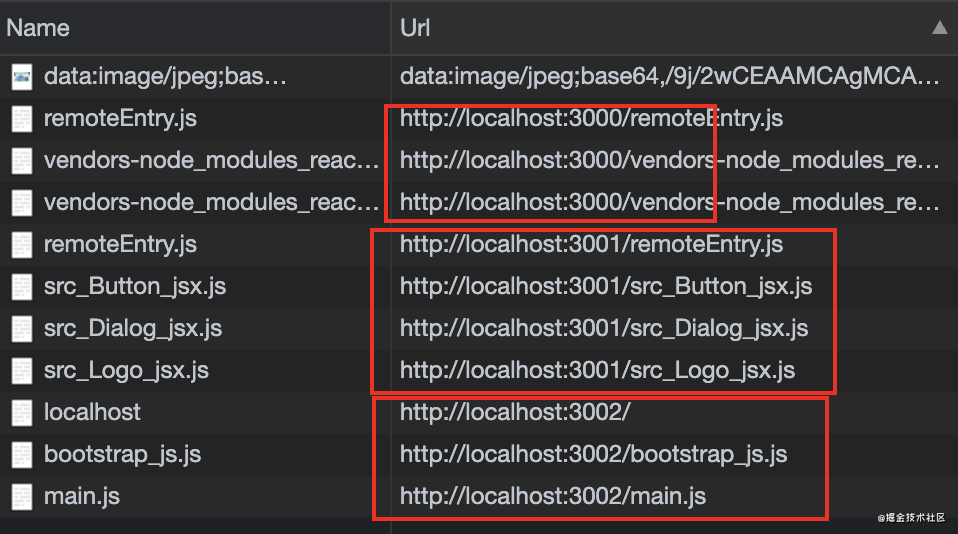
1、从对应项目加载到了需要的组件;
2、从查看控制台可以看到所需资源进行了很好的分离:

四、基本原理
从 host 的代码着手,简单分析这一切是如何交互、工作的。程序从 main.js 里的一段代码开始:
__webpack_require__.e("bootstrap_js").then(__webpack_require__.bind(__webpack_require__,"./bootstrap.js"))
__webpack_require__.e("bootstrap_js")是加载 id 为bootstrap_js的chunk的所有依赖,返回一个promise。等一切依赖就绪,再获取 ./bootstrap.js 模块并执行。这里是__webpack_require__.e的代码:
__webpack_require__.e = (chunkId) => {
    return Promise.all(Object.keys(__webpack_require__.f).reduce((promises, key) => {
        __webpack_require__.f[key](chunkId, promises);
        return promises;
    }, []));
};
上面一段代码做了一件事,遍历__webpack_require__.f 对象并依次执行对象里的成员函数,此时该对象有两个成员:
{
    remotes:(chunkId, promises) => {
        //查找chunkId bootstrap_js对应的所有远程模块并加载
        var chunkMapping = {
                    "bootstrap_js": [
                        "webpack/container/remote/lib-app/react",
                        "webpack/container/remote/component-app/Button",
                        //省略...
                    ]
                };
                var idToExternalAndNameMapping = {
                    "webpack/container/remote/lib-app/react": [
                        "default",
                        "./react",
                        "webpack/container/reference/lib-app"
                    ],
                    "webpack/container/remote/component-app/Button": [
                        "default",
                        "./Button",
                        "webpack/container/reference/component-app"
                    ],
                    //...省略
                };
    },
    j:(chunkId,promises)=>{
        //负责加载chunkId对应的本地模块
    }
}
综上,bootstrap_js 对应了两个promises:
1、一个负责远程依赖加载
2、另一个负责本地加载
等到所有依赖模块加载完准备就绪,才会 require 模块并执行。
当然,细节远不止此。现在这里先简单了解下,以后真要技术选型,或项目中使用的话,再按需学习、深入研究吧。