201871010107-公海瑜《面向对象程序设计(java)》第十三周学习总结
| 项目 | 内容 |
| 这个作业属于哪个课程 | https://www.cnblogs.com/nwnu-daizh/ |
| 这个作业的要求在哪里 | https://www.cnblogs.com/nwnu-daizh/p/11888568.html |
| 作业学习目标 |
(1) 掌握事件处理的基本原理,理解其用途; (2) 掌握AWT事件模型的工作机制; (3) 掌握事件处理的基本编程模型; (4) 了解GUI界面组件观感设置方法; (5) 掌握WindowAdapter类、AbstractAction类的用法; (6) 掌握GUI程序中鼠标事件处理技术。 |
第一部分:总结第十一章理论知识
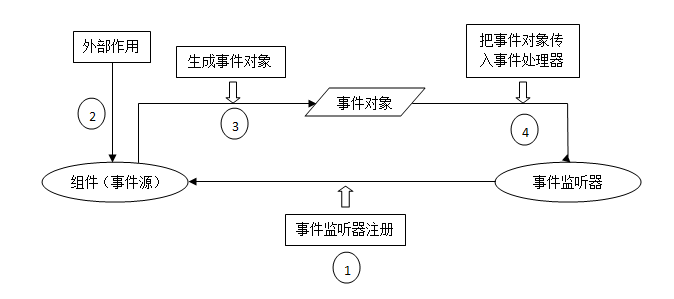
1、在Java的swing编程中,Java中的事件机制非常常用事件监听器的参与者:
1)事件对象:
一般继承自java.util.EventObject对象,由开发者自行定义
2)事件源:
就是触发事件的源头,不同的事件源会触发不同的事件类型.
3)事件监听器:
事件监听器负责监听事件源发出的事件。一个事件监听器通常实现java.util.EventListener这个标识接口.。
2、事件源可以注册事件监听器对象,并可以向事件监听器对象发送事件对象.事件发生后,事件源将事件对象发给已经注册的所有事件监听器.。
监听器对象随后会根据事件对象内的相应方法响应这个事件,以下为四种实现方式:
自身类作为事件监听器 ;外部类作为事件监听器 ;匿名内部类作为事件监听器;内部类作为事件监听器。
AWT事件处理机制的概要:
监听器对象:是一个实现了特定监听器接口(listener interface)的类实例。
事件源:是一个能够注册监听器对象并发送事件对象的对象。
当事件发生时,事件源将事件对象自动传递给所有注册的监听器。
监听器对象利用事件对象中的信息决定如何对事件做出响应。
GUI设计中,程序员需要对组件的某种事件进行响应和处理时,必须完成两个步骤:
1) 定义实现某事件监听器接口的事件监听器类,并具体化接口中声明的事件处理抽象方法。
2) 为组件注册实现了规定接口的事件监听器对象;
3、适配器(Adapter)类
有些监听器接口具有多种方法,当只对其中一种方法感兴趣时直接实现接口还需要提供其他方法的实现,十分的不方便,于是出现了适配器类,它为所有的方法都设置为默认方法,则可以通过扩展适配器类来指定某些事件的相应动作,而不需要实现接口中每个方法。
4、动作
Action接口扩展于ActionListener接口,可以时多个组件(如JButton/JMenu/JToolBar)具有相同功能。可实现监听功能。
一个动作封装了:
1)命令的说明(一个文本字符(用来表示菜单或按钮的文本标签)和一个可选图标)
2)执行命令所需要的参数。可被转换为按钮和菜单项。实际上在JButton的构造方法 public JButton(Action action )中、JToolBar的add(Action action) 、以及JMenu的add(Action action )方法中都可以看出,他们都能够使用Action对象为参数,将Action自动的转化为按钮或者菜单项,你要做的仅仅是定义一个Action对象,之后仅仅需要调用上面的方法就能够自动的将Action转化成组件了。
3)用同一个动作响应按钮、菜单项或按键的方法:
①创建一个AbstractAction类
②构建动作类对象
③用动作类对象创建按钮或菜单项,构造器从动作对象中读取标签文本和图标
Action blackAction = new colorAction("Black",Color.BLACK);
buttonPanel.add(new JButton(blackAction));
如果要将快捷键与动作关联起来:
1、得到顶层控件的输入映射(InputMap)
InputMap input = buttonPanel.getInputMap(JComponent.WHEN_ANCESTOR_OF_FOCUSED_COMPONENT);
2、为需要的按键创建KeyStrike对象,将(按键,动作键)添加至输入映射(实际上是将按键映射到任意对象上)
input.put(KeyStroke.getKeyStroke("ctrl L"), "black");
3、得到顶层空间的动作映射(ActionMap),将(动作键,动作对象)添加到映射中
ActionMap amap = buttonPanel.getActionMap();
amap.put("black", blackAction);
4、能够触发动作事件的动作,主要包括:
(1) 点击按钮
(2) 双击一个列表中的选项;
(3) 选择菜单项;
(4) 在文本框中输入回车。
第二部分:实验部分
实验1: 导入第11章示例程序,测试程序并进行代码注释。
测试程序1:
l 在elipse IDE中调试运行教材443页-444页程序11-1,结合程序运行结果理解程序;
l 在事件处理相关代码处添加注释;
l 用lambda表达式简化程序;
l 掌握JButton组件的基本API;
l 掌握Java中事件处理的基本编程模型。
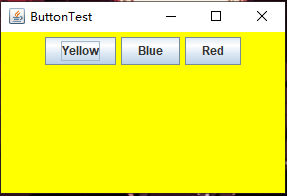
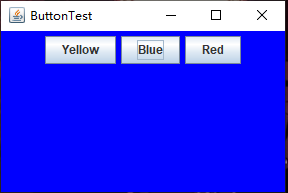
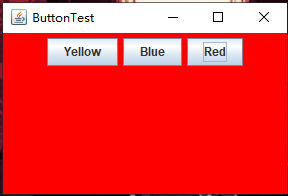
package button;

import java.awt.*;
import javax.swing.*;

/**
 * @version 1.35 2018-04-10
 * @author Cay Horstmann
 */
public class ButtonTest
{
   public static void main(String[] args)
   {
      EventQueue.invokeLater(() -> {
         var frame = new ButtonFrame();
         frame.setTitle("ButtonTest");
         frame.setDefaultCloseOperation(JFrame.EXIT_ON_CLOSE);
         frame.setVisible(true);
      });
   }
}
package button;

import java.awt.*;
import java.awt.event.*;
import javax.swing.*;

/**
 * A frame with a button panel.
 */
public class ButtonFrame extends JFrame
{
   private JPanel buttonPanel;
   private static final int DEFAULT_WIDTH = 300;
   private static final int DEFAULT_HEIGHT = 200;

   public ButtonFrame()
   {
      setSize(DEFAULT_WIDTH, DEFAULT_HEIGHT);

      // create buttons
      var yellowButton = new JButton("Yellow");
      var blueButton = new JButton("Blue");
      var redButton = new JButton("Red");

      // 生成三个按钮对象
      buttonPanel = new JPanel();

      // add buttons to panel
      buttonPanel.add(yellowButton);
      buttonPanel.add(blueButton);
      buttonPanel.add(redButton);


      // 用add方法添加三个按钮组件(只有容器组件有add方法)
      // add panel to frame

      add(buttonPanel);

      // create button actions
      var yellowAction = new ColorAction(Color.YELLOW);
      var blueAction = new ColorAction(Color.BLUE);
      var redAction = new ColorAction(Color.RED);

      // 生成三个类对象ColorAction,颜色值为静态常量值
      // associate actions with buttons


      yellowButton.addActionListener(yellowAction);
      blueButton.addActionListener(blueAction);
      redButton.addActionListener(redAction);
   }

   /**
    * An action listener that sets the panel's background color.
    */
   private class ColorAction implements ActionListener
   {
    // 定义一个私有类,监听器类对象(ColorAction)
      private Color backgroundColor;

      public ColorAction(Color c)
      {
         backgroundColor = c;
      }

      public void actionPerformed(ActionEvent event)
      {
         buttonPanel.setBackground(backgroundColor);
      }
   }
}
运行结果:
用lambda表达式简化程序;
import java.awt.*;
import java.awt.event.*;
import javax.swing.*;

/**
 * A frame with a button panel
 */
public class ButtonFrame extends JFrame {
    private JPanel buttonPanel;
    private static final int DEFAULT_WIDTH = 300;
    private static final int DEFAULT_HEIGHT = 200;

    public ButtonFrame() {
        setSize(DEFAULT_WIDTH, DEFAULT_HEIGHT);

        buttonPanel = new JPanel();

        add(buttonPanel);

        makeButton("yellow",Color.YELLOW);
        makeButton("blue",Color.BLUE);
        makeButton("red", Color.RED);
        makeButton("green", Color.GREEN);

    }

    public void makeButton(String name, Color backgroudColor) {
        JButton button = new JButton(name);
        buttonPanel.add(button);
        ColorAction action = new ColorAction(backgroudColor);
        button.addActionListener(action);
    }

    /**
     * An action listener that sets the panel's background color.
     */
    private class ColorAction implements ActionListener
    // 定义一个私有类,监听器类对象(ColorAction)
    {
        private Color backgroundColor;

        public ColorAction(Color c) {
            backgroundColor = c;
        }

        public void actionPerformed(ActionEvent event)
        //
        {
            buttonPanel.setBackground(backgroundColor);
        }
    }
}
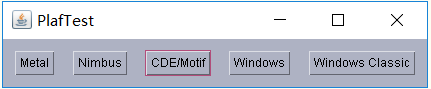
测试程序2:
l 在elipse IDE中调试运行教材449页程序11-2,结合程序运行结果理解程序;
l 在组件观感设置代码处添加注释;
l 了解GUI程序中观感的设置方法。
package Damo;

  import java.awt.*;
  import javax.swing.*;

  /**
   * @version 1.32 2015-06-12
   * @author Cay Horstmann
   */
 public class PlafTest
 {
    public static void main(String[] args)
    {
       EventQueue.invokeLater(() -> {
          JFrame frame = new JFrame();
          frame.setTitle("PlafTest");
          frame.setDefaultCloseOperation(JFrame.EXIT_ON_CLOSE);
          frame.setVisible(true);
       });
    }
 }
package Demo;

import javax.swing.JButton;
import javax.swing.JFrame;
import javax.swing.JPanel;
import javax.swing.SwingUtilities;
import javax.swing.UIManager;

/**
 * A frame with a button panel for changing look-and-feel
 */
public class PlafFrame extends JFrame
{
   private JPanel buttonPanel;

   public PlafFrame()
   {
      buttonPanel = new JPanel();
      //UIManager管理组件观感
      UIManager.LookAndFeelInfo[] infos = UIManager.getInstalledLookAndFeels();
      for (UIManager.LookAndFeelInfo info : infos)
         makeButton(info.getName(), info.getClassName());

      add(buttonPanel);
      pack();
   }

   /**
    * Makes a button to change the pluggable look-and-feel.
    * @param name the button name
    * @param className the name of the look-and-feel class
    */
   private void makeButton(String name, String className)
   {
      // 添加按钮至Panel

      JButton button = new JButton(name);
      buttonPanel.add(button);

      // 建立按钮操作

      button.addActionListener(event -> {
         // 按钮操作: 选择一个新的外观
         try
         {
            UIManager.setLookAndFeel(className);
            SwingUtilities.updateComponentTreeUI(this);
            pack();
         }
         catch (Exception e)
         {
            e.printStackTrace();
         }
      });
   }
}
运行结果:


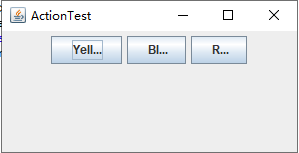
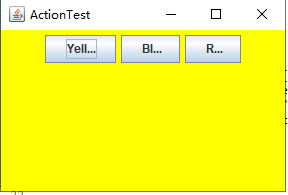
测试程序3:
l 在elipse IDE中调试运行教材457页-458页程序11-3,结合程序运行结果理解程序;
l 掌握AbstractAction类及其动作对象;
l 掌握GUI程序中按钮、键盘动作映射到动作对象的方法。
package action;

import java.awt.*;
import javax.swing.*;

/**
 * @version 1.34 2015-06-12
 * @author Cay Horstmann
 */
public class ActionTest
{
   public static void main(String[] args)
   {
      EventQueue.invokeLater(() -> {
         var frame = new ActionFrame();
         frame.setTitle("ActionTest");
         frame.setDefaultCloseOperation(JFrame.EXIT_ON_CLOSE);
         frame.setVisible(true);
      });
   }
}
package action;

import java.awt.*;
import java.awt.event.*;
import javax.swing.*;

/**
 * A frame with a panel that demonstrates color change actions.
 */
public class ActionFrame extends JFrame
{
   private JPanel buttonPanel;
   private static final int DEFAULT_WIDTH = 300;
   private static final int DEFAULT_HEIGHT = 200;

   public ActionFrame()
   {
      setSize(DEFAULT_WIDTH, DEFAULT_HEIGHT);

      buttonPanel = new JPanel();

      // define actions
      var yellowAction = new ColorAction("Yellow", new ImageIcon("yellow-ball.gif"),
            Color.YELLOW);
      var blueAction = new ColorAction("Blue", new ImageIcon("blue-ball.gif"), Color.BLUE);
      var redAction = new ColorAction("Red", new ImageIcon("red-ball.gif"), Color.RED);

      // add buttons for these actions
      buttonPanel.add(new JButton(yellowAction));
      buttonPanel.add(new JButton(blueAction));
      buttonPanel.add(new JButton(redAction));

      // add panel to frame
      add(buttonPanel);

      // associate the Y, B, and R keys with names
      InputMap inputMap = buttonPanel.getInputMap(JComponent.WHEN_ANCESTOR_OF_FOCUSED_COMPONENT);
      //获得将按键映射到动作键的输入映射
      inputMap.put(KeyStroke.getKeyStroke("ctrl Y"), "panel.yellow");
      inputMap.put(KeyStroke.getKeyStroke("ctrl B"), "panel.blue");
      inputMap.put(KeyStroke.getKeyStroke("ctrl R"), "panel.red");
    //根据一个便于人们阅读的说明创建一个按键(由空格分隔的字符串序列)
      // associate the names with actions
      ActionMap actionMap = buttonPanel.getActionMap();
      //返回关联动作映射键(可以是任意的对象)和动作对象的映射

      actionMap.put("panel.yellow", yellowAction);
      actionMap.put("panel.blue", blueAction);
      actionMap.put("panel.red", redAction);
   }

   public class ColorAction extends AbstractAction
   {
      /**
       * Constructs a color action.
       * @param name the name to show on the button
       * @param icon the icon to display on the button
       * @param c the background color
       */
      public ColorAction(String name, Icon icon, Color c)
      {
         putValue(Action.NAME, name);
         putValue(Action.SMALL_ICON, icon);
         putValue(Action.SHORT_DESCRIPTION, "Set panel color to " + name.toLowerCase());
         putValue("color", c);
       //将名/值对放置在动作对象前
      }

      public void actionPerformed(ActionEvent event)
      {
         var color = (Color) getValue("color");
       //返回被存储的名/值对的值
         buttonPanel.setBackground(color);
      }
   }
}
运行结果:


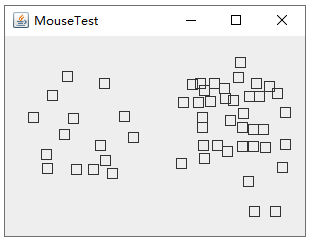
测试程序4:
l 在elipse IDE中调试运行教材462页程序11-4、11-5,结合程序运行结果理解程序;
l 掌握GUI程序中鼠标事件处理技术。
package mouse;

import java.awt.*;
import javax.swing.*;

/**
 * @version 1.35 2018-04-10
 * @author Cay Horstmann
 */
public class MouseTest
{
   public static void main(String[] args)
   {
      EventQueue.invokeLater(() -> {
         var frame = new MouseFrame();
         frame.setTitle("MouseTest");
         frame.setDefaultCloseOperation(JFrame.EXIT_ON_CLOSE);
         frame.setVisible(true);
      });
   }
}
package mouse;

import javax.swing.*;

/**
 * A frame containing a panel for testing mouse operations
 */
public class MouseFrame extends JFrame
{
   public MouseFrame()
   {
      add(new MouseComponent());
      pack();
   }
}
package mouse;

import java.awt.*;
import java.awt.event.*;
import java.awt.geom.*;
import java.util.*;
import javax.swing.*;

/**
 * A component with mouse operations for adding and removing squares.
 */
public class MouseComponent extends JComponent
{
   private static final int DEFAULT_WIDTH = 300;
   private static final int DEFAULT_HEIGHT = 200;

   private static final int SIDELENGTH = 10;
   private ArrayList<Rectangle2D> squares;
   private Rectangle2D current; // the square containing the mouse cursor

   public MouseComponent()
   {
      squares = new ArrayList<>();
      current = null;

      addMouseListener(new MouseHandler());
      addMouseMotionListener(new MouseMotionHandler());
   }

   public Dimension getPreferredSize()
   {
      return new Dimension(DEFAULT_WIDTH, DEFAULT_HEIGHT);
   }

   public void paintComponent(Graphics g)
   {
      var g2 = (Graphics2D) g;

      // draw all squares
      for (Rectangle2D r : squares)
         g2.draw(r);
   }

   /**
    * Finds the first square containing a point.
    * @param p a point
    * @return the first square that contains p
    */
   public Rectangle2D find(Point2D p)
   {
      for (Rectangle2D r : squares)
      {
         if (r.contains(p)) return r;
      }
      return null;
   }

   /**
    * Adds a square to the collection.
    * @param p the center of the square
    */
   public void add(Point2D p)
   {
      double x = p.getX();
      double y = p.getY();

      current = new Rectangle2D.Double(x - SIDELENGTH / 2, y - SIDELENGTH / 2,
         SIDELENGTH, SIDELENGTH);
      squares.add(current);
      repaint();
   }

   /**
    * Removes a square from the collection.
    * @param s the square to remove
    */
   public void remove(Rectangle2D s)
   {
      if (s == null) return;
      if (s == current) current = null;
      squares.remove(s);
      repaint();
   }

   private class MouseHandler extends MouseAdapter
   {
      public void mousePressed(MouseEvent event)
      {
         // add a new square if the cursor isn't inside a square
         current = find(event.getPoint());
       //返回事件发生时,事件源组件左上角的坐标x和y,或点的信息
         if (current == null) add(event.getPoint());
      }

      public void mouseClicked(MouseEvent event)
      {
         // remove the current square if double clicked
         current = find(event.getPoint());
         if (current != null && event.getClickCount() >= 2) remove(current);
       //返回与事件关联的鼠标连击次数
      }
   }

   private class MouseMotionHandler implements MouseMotionListener
   {
      public void mouseMoved(MouseEvent event)
      {
         // set the mouse cursor to cross hairs if it is inside a rectangle

         if (find(event.getPoint()) == null) setCursor(Cursor.getDefaultCursor());
         else setCursor(Cursor.getPredefinedCursor(Cursor.CROSSHAIR_CURSOR));
      }

      public void mouseDragged(MouseEvent event)
      {
         if (current != null)
         {
            int x = event.getX();
            int y = event.getY();

            // drag the current rectangle to center it at (x, y)
            current.setFrame(x - SIDELENGTH / 2, y - SIDELENGTH / 2, SIDELENGTH, SIDELENGTH);
            repaint();
         }
      }
   }
}
运行结果:
实验2:结对编程练习包含以下4部分:
1) 程序设计思路简述;
2) 符合编程规范的程序代码;
3) 程序运行功能界面截图;
4) 结对过程描述,提供两人在讨论、细化和编程时的结对照片(非摆拍)。
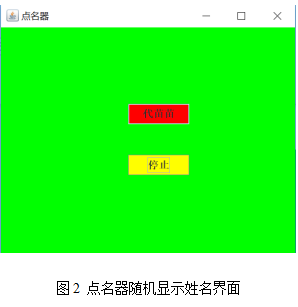
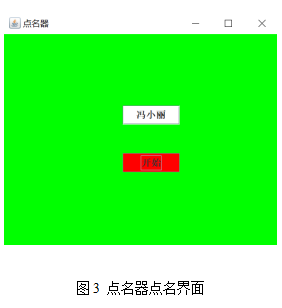
利用班级名单文件、文本框和按钮组件,设计一个有如下界面(图1)的点名器,要求用户点击开始按钮后在文本输入框随机显示2018级计算机科学与技术(1)班同学姓名,如图2所示,点击停止按钮后,文本输入框不再变换同学姓名,此同学则是被点到的同学姓名,如图3所示。
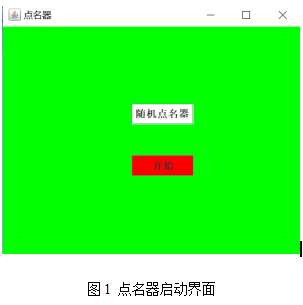
程序编写思路:创建随机点名器(名字为点名器);开始姓名(准备中);初始化图形用户界面;添加控件;写入文件位置在D:\\2019studentlist.txt。
代码:
import java.util.*;
import java.awt.*;
import javax.swing.*;
import java.awt.event.*;
import java.io.File;
import java.io.FileNotFoundException;

import javax.swing.event.*;
public class NameFrame extends JFrame implements ActionListener{
    private JLabel jla;
    private JLabel jlb;
    private JButton jba;
    private static boolean flag = true;
    public NameFrame(){
        this.setLayout(null);

        jla = new JLabel("姓名");
        jlb = new JLabel("准备中");
        jba = new JButton("开始");
        this.add(jla);
        this.add(jlb);
        jla.setFont(new Font("Courier",Font.PLAIN,22));
        jla.setHorizontalAlignment(JLabel.CENTER);
         jla.setVerticalAlignment(JLabel.CENTER);
         jla.setBounds(20,100,180,30);
         jlb.setOpaque(true);
         jlb.setBackground(Color.green);
         jlb.setFont(new Font("Courier",Font.PLAIN,22));
        jlb.setHorizontalAlignment(JLabel.CENTER);
         jlb.setVerticalAlignment(JLabel.CENTER);
         jlb.setBounds(150,100,130,30);

         this.add(jba);
         jba.setBounds(150,150,80,26);

         jba.addActionListener(this);

         this.setTitle("点名器");
        this.setBounds(100,100,600,500);
        this.setVisible(true);
        this.setDefaultCloseOperation(DISPOSE_ON_CLOSE);
    }
    public void actionPerformed(ActionEvent e){
        int i=0;
        String names[]=new String[50];
        try {
            Scanner in=new Scanner(new File("D:\\2019studentlist.txt"));
            while(in.hasNextLine())
            {
                names[i]=in.nextLine();
                i++;
            }
        } catch (FileNotFoundException e1) {
            // TODO Auto-generated catch block
            e1.printStackTrace();
        }
        if(jba.getText()=="开始"){
            jlb.setBackground(Color.yellow);
            flag = true;
            new Thread(){
                public void run(){
                    while(NameFrame.flag){
                    Random r = new Random();
                    int i= r.nextInt(47);
                    jlb.setText(names[i]);
                    }
                }
            }.start();
            jba.setText("停止");
            jba.setBackground(Color.blue);
        }
        else if(jba.getText()=="停止"){
            flag = false;
            jba.setText("开始");
            jba.setBackground(Color.blue);
            jlb.setBackground(Color.pink);
        }
     }
    public static void main(String arguments []){
        new NameFrame();
    }
}
运行结果:
结对编程照片:

实验总结:
通过本次实验我了解了事件处理的基本原理和AWT事件模型的工作机制;掌握了事件处理的基本编程模型;并且通过本次实验发现自己在实际编写代码中思维不够灵活,希望在今后的学习中可以得到这方面的提高。理论知识掌握还不够精到,希望自己能课后加强练习。