本文转自http://blog.csdn.net/liaisuo/article/details/9064527
今天在Eclipse搭建了Struts2 框架,并完成了一个很简单的例子程序。
搭建好的全局图如下:
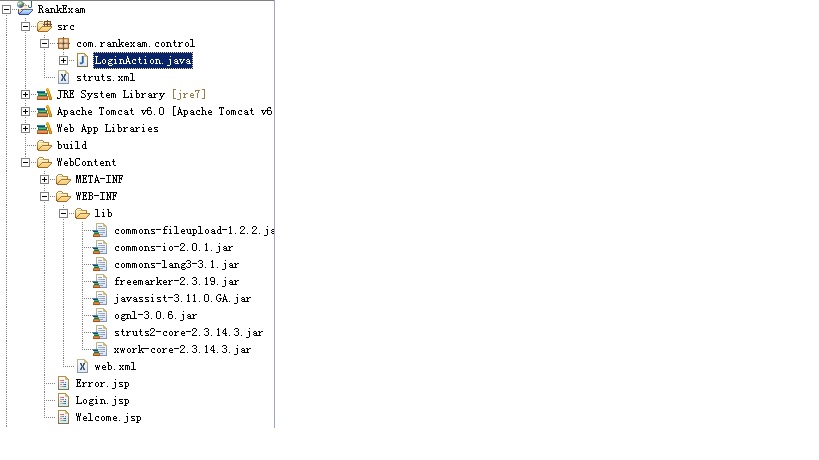
第一步:在http://struts.apache.org/download.cgi下载Struts2的最新版即下载Full Distribution,这是Struts2的完整版
第二步:解压下载的压缩包。在struts-2.3.14.3 -> lib路径下拷贝出上图所示的8个jar包,放入java工程下的lib目录内。
第三步:在web.xml配置文件中,配置Struts2的核心Filter。代码如下:
<filter>
<filter-name>struts2</filter-name>
<filter-class>
org.apache.struts2.dispatcher.ng.filter.StrutsPrepareAndExecuteFilter
</filter-class>
</filter>
<filter-mapping>
<filter-name>struts2</filter-name>
<url-pattern>/*</url-pattern>
</filter-mapping>
第四步:为了让Struts运行起来,在src目录下创建Struts.xml配置文件。代码如下:
<?xml version="1.0" encoding="UTF-8"?>
<!DOCTYPE struts PUBLIC
"-//Apache Software Foundation//DTD Struts Configuration 2.3//EN"
"http://struts.apache.org/dtds/struts-2.3.dtd">
<struts>
<package name="test" extends="struts-default">
<action name="login" class="com.rankexam.control.LoginAction">
<!-- 定义三个逻辑视图和物理资源之间的映射 -->
<result name="input">/Login.jsp</result>
<result name="error">/Error.jsp</result>
<result name="success">/Welcome.jsp</result>
</action>
</package>
</struts>
第五步:创建处理用户请求的Action类,该类继承于ActionSupport类。代码如下:
package com.rankexam.control;
import javax.servlet.http.HttpServletRequest;
import org.apache.struts2.ServletActionContext;
import com.opensymphony.xwork2.ActionContext;
import com.opensymphony.xwork2.ActionSupport;
public class LoginAction extends ActionSupport{
/**
* 默认版本序列号
*/
private static final long serialVersionUID = 1L;
private String username;
private String password;
public String getUsername() {
return username;
}
public void setUsername(String username) {
this.username = username;
}
public String getPassword() {
return password;
}
public void setPassword(String password) {
this.password = password;
}
public String execute() throws Exception {
if(getUsername().equals("baidu") && getPassword().equals("baidu")){
ActionContext.getContext().getSession().put("user", getUsername());
return "success";
}else{
return "error";
}
}
}
第六步:完成Welcome、Error、Login页面的编写。代码如下:
1.Login.jsp页面代码
<%@ page language="java" contentType="text/html; charset=UTF-8"
pageEncoding="UTF-8"%>
<%@taglib prefix="S" uri="/struts-tags" %>
<!DOCTYPE html PUBLIC "-//W3C//DTD HTML 4.01 Transitional//EN" "http://www.w3.org/TR/html4/loose.dtd">
<html>
<head>
<meta http-equiv="Content-Type" content="text/html; charset=UTF-8">
<title>登录页面</title>
</head>
<body>
<S:form action="login" method="post">
<S:textfield name="username" label="用户名"></S:textfield>
<S:password name="password" label="密码"></S:password>
<S:submit text="登录"></S:submit>
</S:form>
</body>
</html>
2.Welcome.jsp页面代码
<%@ page language="java" contentType="text/html; charset=UTF-8"
pageEncoding="UTF-8"%>
<%@taglib prefix="S" uri="/struts-tags" %>
<!DOCTYPE html PUBLIC "-//W3C//DTD HTML 4.01 Transitional//EN" "http://www.w3.org/TR/html4/loose.dtd">
<html>
<head>
<meta http-equiv="Content-Type" content="text/html; charset=UTF-8">
<title>登录成功页面</title>
</head>
<body>
${sessionScope.user}你好,您已经登录!
</body>
</html>
3.Error.jsp页面代码
<%@ page language="java" contentType="text/html; charset=UTF-8"
pageEncoding="UTF-8"%>
<!DOCTYPE html PUBLIC "-//W3C//DTD HTML 4.01 Transitional//EN" "http://www.w3.org/TR/html4/loose.dtd">
<html>
<head>
<meta http-equiv="Content-Type" content="text/html; charset=UTF-8">
<title>登录失败页面</title>
</head>
<body>
对不起,登录失败!
</body>
</html>
经过上述流程,就完成了在Eclipse中搭建Struts2框架及其简单的使用。