开头
相信不少用过appium的同学,对于使用appium的一些体会与感受是否与我相似
1. appium启动服务和app程序非常慢
2. appium多线程并发需要启动多个服务
3. appium必须连接usb线进行自动化测试
所以在Testerhome这个共享氛围很好,也有不少大牛的论坛上爬文章,发现了openatx这个开源项目,直接截图github的README介绍一下项目情况

github地址:https://github.com/openatx
有兴趣的同学可以去为开源项目添砖加瓦
总结一下atx:
1. 快速启动和操作手机端
2. 基于atx-agent的http协议,通过接口调用手机上的二进制atx程序去进行手机操作,实现WiFi无线连接
3. codeskyblue还搭建了atx-server集群管理,目前在用Python重写atxserver2,将支持跨网域连接设备和一些结构优化
4. 因无需启动多appium服务,只是通过http接口发送命令,支持大量终端同步并发操作
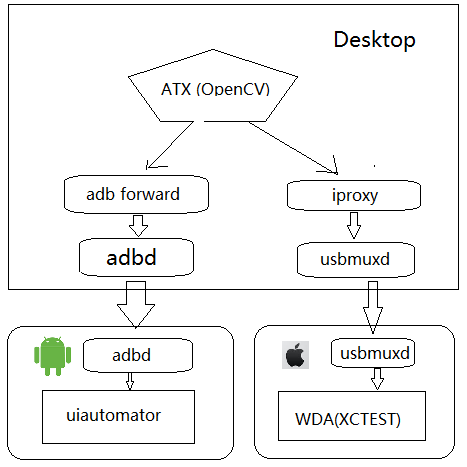
ATX介绍
atx架构图
安装
适用范围
Android手机 4.3+(sdk 18)
命令行CMD或Pycharm自己的venv环境中
pip install -U --pre uiautomator2
然后等待安装成功
初始化设备
手机连接上usb,运行初始化命令
python -m uiautomator2 init
如有atx-server设备集群管理,则可
python -m uiautomator2 init --server ip:port
ip和port为atx-server相应ip和端口
等待初始化成功即可。
基本操作
连接设备和操作
# coding: utf-8
import uiautomator2 as u2

u = u2.connect_usb()
或
u = u2.connect(ip)
driver = u.session("cn.vsx.vc")

driver(className="android.widget.Button", resourceId="cn.vsx.vc:id/ptt").long_click(duration=2, timeout=10)
assert driver(resourceId="cn.vsx.vc:id/ptt", text="按住 说话").exists
剩下的控制操作可参考官方文档: https://github.com/openatx/uiautomator2
结合Pytest单元测试框架与并发
思路:
之前的文章介绍过pytest单元测试框架如何进行并发,此处可以重复一下:
通过CMD命令启动pytest的时候,代入并发所需要的参数即可:
pytest.main(["../TestCases/", f"--cmdopt={Phone['ip']}", "--alluredir"])
在测试用例目录下的conftest加入cmdopt参数代入方法
def pytest_addoption(parser):  # 定义命令行传参参数
    parser.addoption("--cmdopt", action="store", default="device", help="None")


@pytest.fixture(scope="session")  # 命令行参数传递给pytest
def cmdopt(request):
    return request.config.getoption("--cmdopt")


@pytest.fixture(scope="session")  # 初始化开始连接设备
def connectDevice(cmdopt):
    address = cmdopt
    d = u2.connect(addr=address)
    d.set_fastinput_ime(True)
    driver = d.session("cn.vsx.vc")
    yield driver
    print("driver finished")
    driver.close()
然后通过concurrent.future的多线程ProcessPoolExcutor 去并发启动包含pytest.main的方法
def runnerPool(deviceIP_list):  # 启动多进程运行测试
    with ProcessPoolExecutor(len(getDevices())) as pool:
        pool.map(runPytest, deviceIP_list)
自此,整体的设计思路完成。 pytest的框架功能以及插件非常丰富,可以自己查找相关资料使用
如果有需要可仔细查看完整代码
地址:https://github.com/Grandlulu/atx-pytest