一 Ribbon简介
Ribbon是Netflix发布的负载均衡器,它有助于控制HTTP和TCP的客户端的行为。为Ribbon配置服务提供者地址后,Ribbon就可基于某种负载均衡算法,自动地帮助服务消费者去请求。Ribbon默认为我们提供了很多负载均衡算法,例如轮询、随机等。当然,我们也可为Ribbon实现自定义的负载均衡算法。
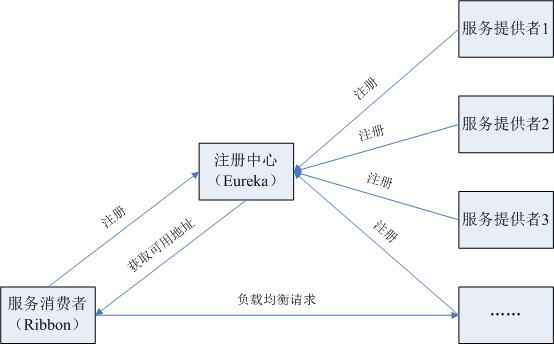
在Spring Cloud中,当Ribbon与Eureka配合使用时,Ribbon可自动从Eureka Server获取服务提供者地址列表,并基于负载均衡算法,请求其中一个服务提供者实例。
下图展示了Ribbon与Eureka配合使用时的架构
搭建负载均衡Ribbon (ribbon-consumer)
接到上篇 “SpringCloud之服务注册与发现Eureka(一)”
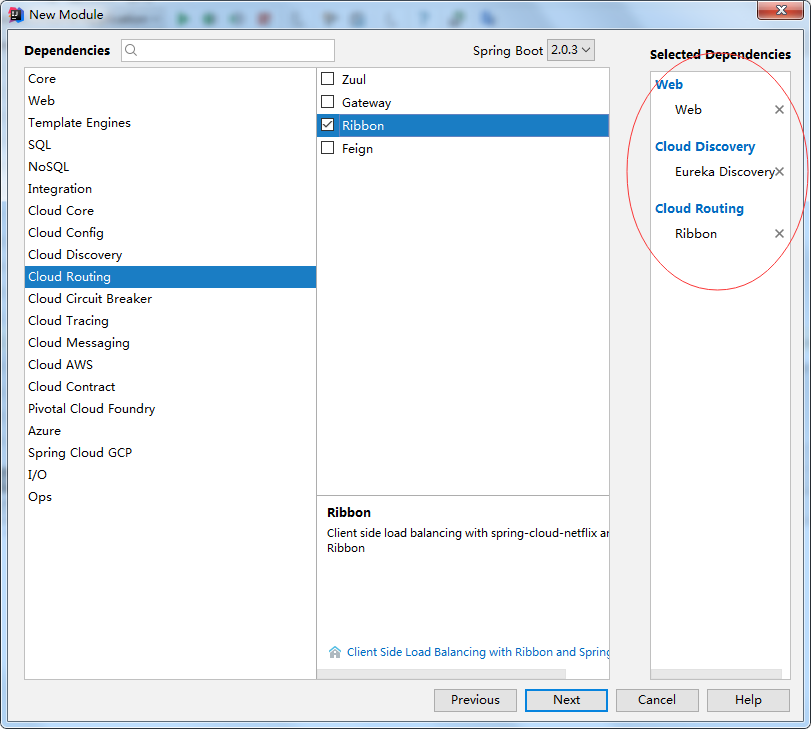
继续在springcloud工程中添加模块ribbon-consumer,也是通过start.spring.io提供的模板创建
新的目录
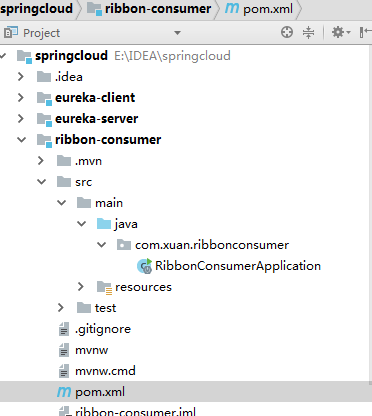
生成的pom.xml文件为
<?xml version="1.0" encoding="UTF-8"?>
<project xmlns="http://maven.apache.org/POM/4.0.0" xmlns:xsi="http://www.w3.org/2001/XMLSchema-instance"
    xsi:schemaLocation="http://maven.apache.org/POM/4.0.0 http://maven.apache.org/xsd/maven-4.0.0.xsd">
    <modelVersion>4.0.0</modelVersion>

    <groupId>com.xuan</groupId>
    <artifactId>ribbon-consumer</artifactId>
    <version>0.0.1-SNAPSHOT</version>
    <packaging>jar</packaging>

    <name>ribbon-consumer</name>
    <description>Demo project for Spring Boot</description>

    <parent>
        <groupId>org.springframework.boot</groupId>
        <artifactId>spring-boot-starter-parent</artifactId>
        <version>2.0.3.RELEASE</version>
        <relativePath/> <!-- lookup parent from repository -->
    </parent>

    <properties>
        <project.build.sourceEncoding>UTF-8</project.build.sourceEncoding>
        <project.reporting.outputEncoding>UTF-8</project.reporting.outputEncoding>
        <java.version>1.8</java.version>
        <spring-cloud.version>Finchley.RELEASE</spring-cloud.version>
    </properties>

    <dependencies>
        <dependency>
            <groupId>org.springframework.boot</groupId>
            <artifactId>spring-boot-starter-web</artifactId>
        </dependency>
        <dependency>
            <groupId>org.springframework.cloud</groupId>
            <artifactId>spring-cloud-starter-netflix-eureka-client</artifactId>
        </dependency>
        <dependency>
            <groupId>org.springframework.cloud</groupId>
            <artifactId>spring-cloud-starter-netflix-ribbon</artifactId>
        </dependency>

        <dependency>
            <groupId>org.springframework.boot</groupId>
            <artifactId>spring-boot-starter-test</artifactId>
            <scope>test</scope>
        </dependency>
    </dependencies>

    <dependencyManagement>
        <dependencies>
            <dependency>
                <groupId>org.springframework.cloud</groupId>
                <artifactId>spring-cloud-dependencies</artifactId>
                <version>${spring-cloud.version}</version>
                <type>pom</type>
                <scope>import</scope>
            </dependency>
        </dependencies>
    </dependencyManagement>

    <build>
        <plugins>
            <plugin>
                <groupId>org.springframework.boot</groupId>
                <artifactId>spring-boot-maven-plugin</artifactId>
            </plugin>
        </plugins>
    </build>


</project>
修改启动文件RibbonConsumerApplication.java,注意增加RestTemplate 的bean注解。
package com.xuan.ribbonconsumer;

import org.springframework.boot.SpringApplication;
import org.springframework.boot.autoconfigure.SpringBootApplication;
import org.springframework.cloud.client.discovery.EnableDiscoveryClient;
import org.springframework.cloud.client.loadbalancer.LoadBalanced;
import org.springframework.context.annotation.Bean;
import org.springframework.web.client.RestTemplate;

@EnableDiscoveryClient
@SpringBootApplication
public class RibbonConsumerApplication {
    @Bean
    @LoadBalanced
    RestTemplate restTemplate () {
        return new RestTemplate();
    }
    public static void main(String[] args) {
        SpringApplication.run(RibbonConsumerApplication.class, args);
    }
}
增加测试的消费接口ConsumerController.java
package com.xuan.ribbonconsumer;

import org.springframework.beans.factory.annotation.Autowired;
import org.springframework.web.bind.annotation.RequestMapping;
import org.springframework.web.bind.annotation.RequestMethod;
import org.springframework.web.bind.annotation.RestController;
import org.springframework.web.client.RestTemplate;

@RestController
public class ConsumerController {
    @Autowired
    RestTemplate restTemplate;

    @RequestMapping(value = "/ribbon-consumer", method = RequestMethod.GET)
    public String helloConsumer() {
        return restTemplate.getForEntity("http://eureka-client/hello",
                String.class).getBody();
    }
}
注意要去实现提供者的“hello”接口,在后面在描述具体实现过程。
修改配置文件”application.properties“,让消费者注册中心注册,并且通过注册中心找到服务提供者。
spring.application.name=ribbon-consumer
server.port=9000
eureka.client.serviceUrl.defaultZone=http://localhost:8080/eureka/
为了观察是否进行了负载均衡,在eureka-client模块,增加一个服务提供者接口HelloController.java实现hello接口。
package com.xuan.eurekaclient;

import com.netflix.appinfo.InstanceInfo;
import org.slf4j.Logger;
import org.slf4j.LoggerFactory;
import org.springframework.beans.factory.annotation.Autowired;
import org.springframework.beans.factory.annotation.Value;
import org.springframework.cloud.client.ServiceInstance;
import org.springframework.cloud.client.discovery.DiscoveryClient;
import org.springframework.web.bind.annotation.RequestMapping;
import org.springframework.web.bind.annotation.RequestMethod;
import org.springframework.web.bind.annotation.RestController;

import java.util.List;

@RestController
public class HelloController {
    private static final Logger logger = LoggerFactory.getLogger(HelloController.class);

    @Autowired
    private DiscoveryClient client;

    @Value("${server.port}")
    String port;

    @RequestMapping(value = "hello", method = RequestMethod.GET)
    public String index() {
    StringBuffer uriList = new StringBuffer("Hello World " + port + " 端口为您服务!<br>");

    return uriList.toString();
    }
}
如果需要打印服务端的详细明细可以修改为:
package com.xuan.eurekaclient;

import com.netflix.appinfo.InstanceInfo;
import org.slf4j.Logger;
import org.slf4j.LoggerFactory;
import org.springframework.beans.factory.annotation.Autowired;
import org.springframework.beans.factory.annotation.Value;
import org.springframework.cloud.client.ServiceInstance;
import org.springframework.cloud.client.discovery.DiscoveryClient;
import org.springframework.web.bind.annotation.RequestMapping;
import org.springframework.web.bind.annotation.RequestMethod;
import org.springframework.web.bind.annotation.RestController;

import java.util.List;

@RestController
public class HelloController {
    private static final Logger logger = LoggerFactory.getLogger(HelloController.class);

    @Autowired
    private DiscoveryClient discoveryClient;

    @Value("${server.port}")
    String port;

    @RequestMapping(value = "hello", method = RequestMethod.GET)
    public String index() {

        StringBuffer uriList = new StringBuffer("Hello World " + port + " 端口为您服务!<br>");

        List<ServiceInstance> list = discoveryClient.getInstances("eureka-client");
        uriList.append("<br>discoveryClient.getServices().size() = " + discoveryClient.getServices().size());
        for( String s :  discoveryClient.getServices()){
            List<ServiceInstance> serviceInstances =  discoveryClient.getInstances(s);
            for(ServiceInstance si : serviceInstances){
                uriList.append("<br>services:" + s + ":getHost()=" + si.getHost());
                uriList.append("<br>services:" + s + ":getPort()=" + si.getPort());
                uriList.append("<br>services:" + s + ":getServiceId()=" + si.getServiceId());
                uriList.append("<br>services:" + s + ":getUri()=" + si.getUri());
            }
        }

        return uriList.toString();
    }
}
在eureka-client模块再增加两个配置文件,使用不同的端口,从而在一天电脑可以启动多个服务提供者,方便测试
增加”application-peer1.properties“文件
spring.application.name=eureka-client
server.port=8091
eureka.client.serviceUrl.defaultZone=http://localhost:8080/eureka/
增加”application-peer1.properties“文件
spring.application.name=eureka-client
server.port=8092
eureka.client.serviceUrl.defaultZone=http://localhost:8080/eureka/
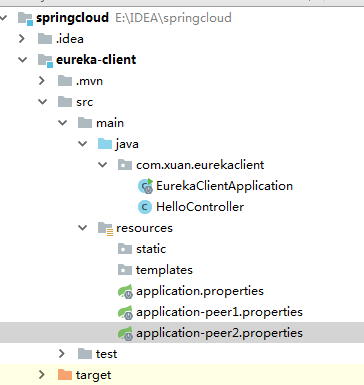
添加完成后eureka-client模块的目录结构为:
设置IDEA编辑器的Edit Configurations,增加两个启动配置,修改过完后的列表和注意的地方:
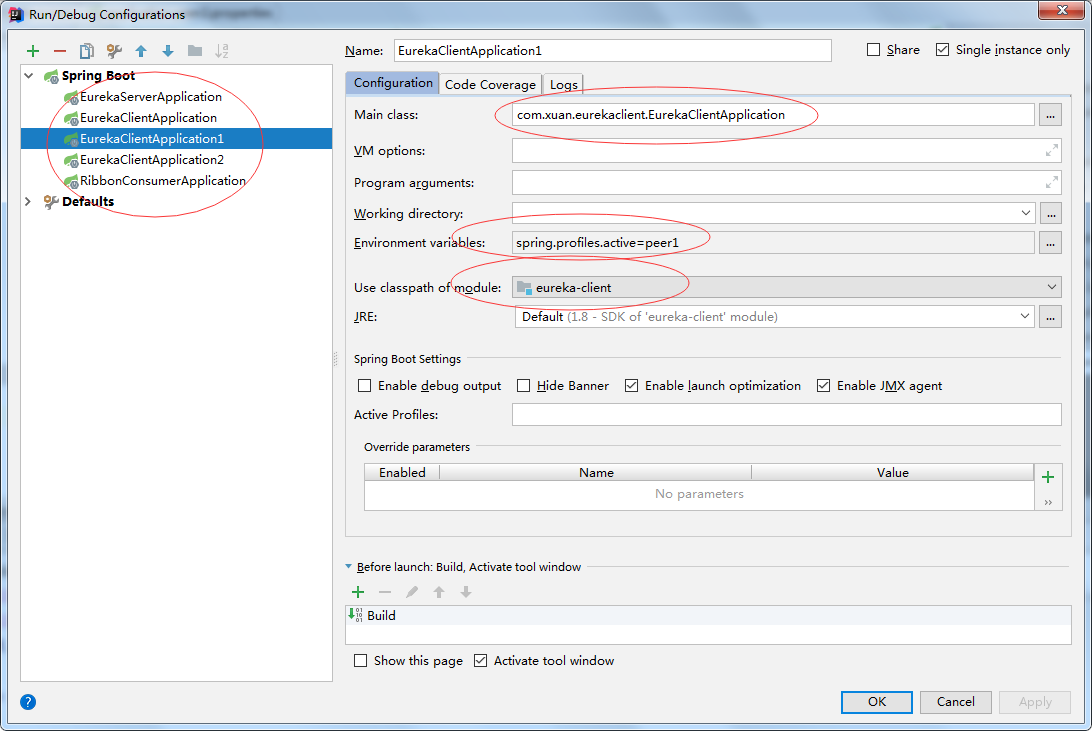
配置和环境都设置完成后:就可以分别启动模块了:
1.EurekaServerApplication
2.EurekaClientApplication,EurekaClientApplication1,EurekaClientApplication2
启动后打开http://localhost:8080/显示如图:

最后启动RibbonConsumerApplication模块在打开http://localhost:8080/显示如下
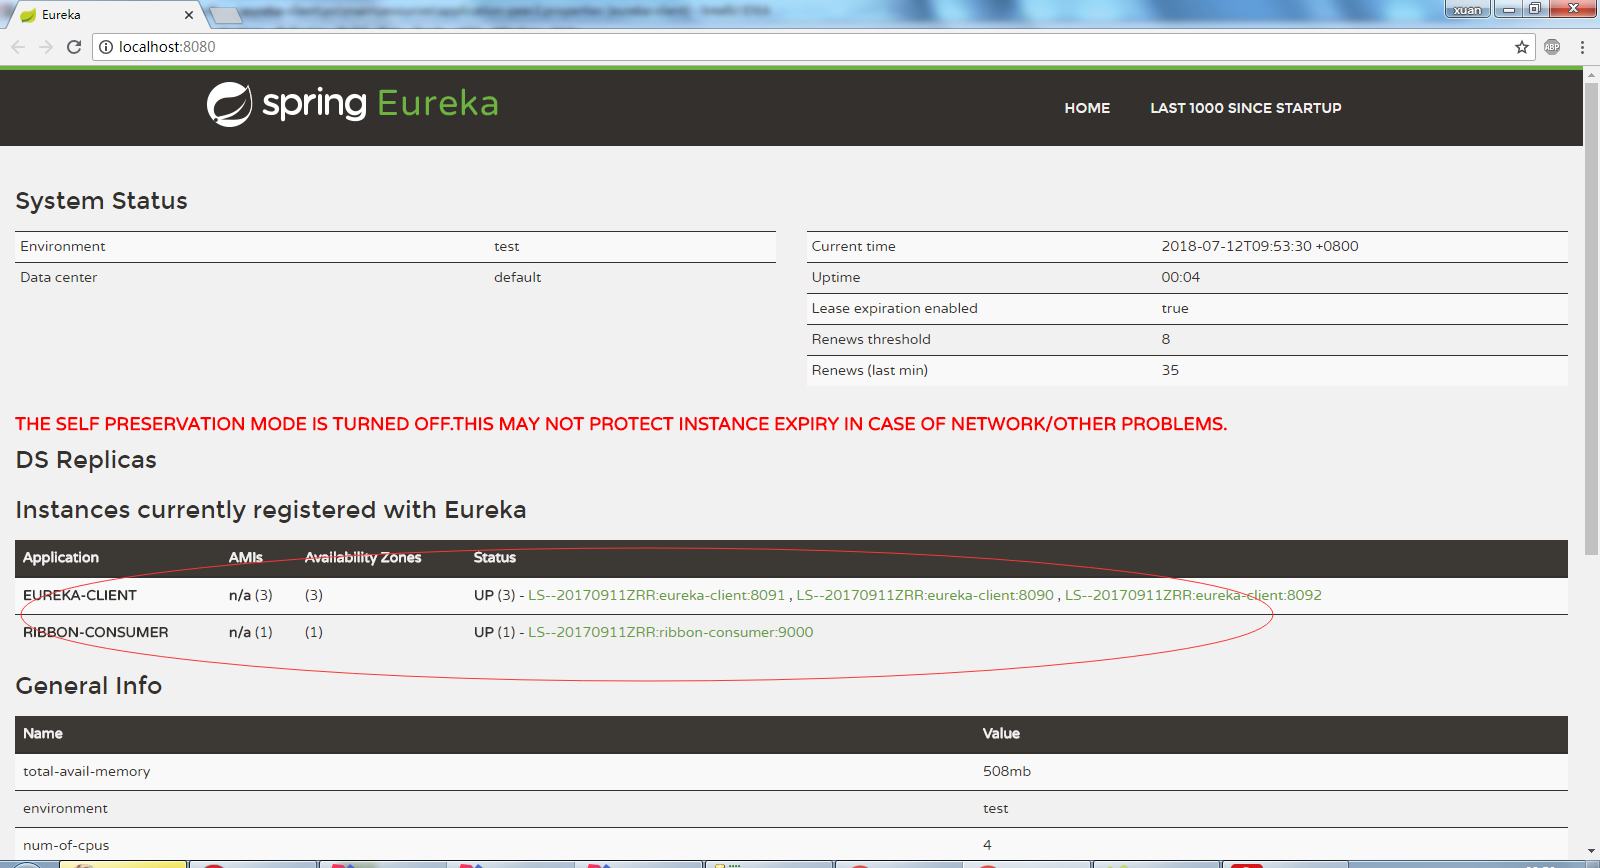
消费者RibbonConsumer也注册成功了。
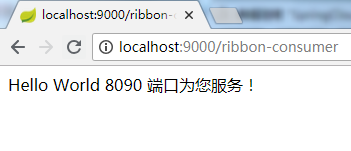
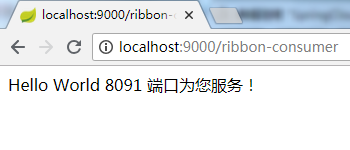
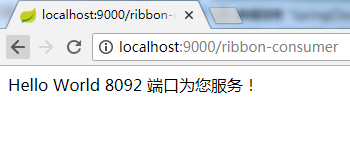
访问消费者提供的接口http://localhost:9000/ribbon-consumer,查看是否进行了负载均衡,刷新一次,端口就变化了一次,说明访问的是不同的服务提供者
源码下载地址:https://gitee.com/xuantest/SpringCloud-Ribbon