上面两篇博客已经详细的介绍了在IntelliJ IDEA 搭建SSM框架的整个过程,下面我们就要在搭建好的环境里实现我们想要的功能了。本文完成用户的登录功能,主要包括:用户注册,登录,编辑,退出,注销。
第一步:设计user表,并用mybatis-geneator生成user表对应的数据文件
首先,我们在test数据库里加一张user表,代码如下
use test;
CREATE TABLE `user` (
    `id` int(10) unsigned NOT NULL AUTO_INCREMENT,
    `name` varchar(40) NOT NULL,
    `password` varchar(255) NOT NULL,
    `age` int(4) NOT NULL,
    `description` varchar(255) NOT NULL,
    PRIMARY KEY (`id`)
)ENGINE=InnoDB AUTO_INCREMENT=1 DEFAULT CHARSET=utf8;

select * from user;
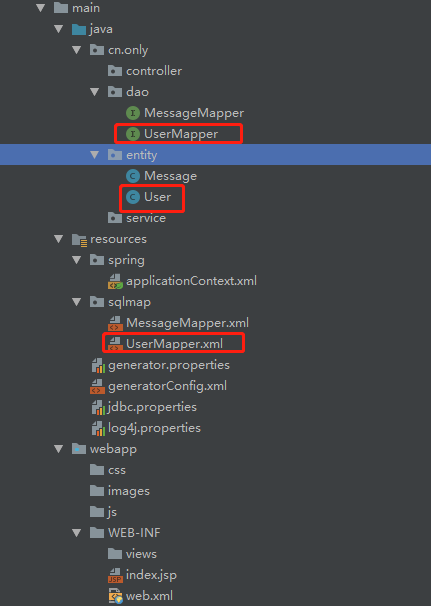
然后,用mybatis-geneator生成user表对应的数据文件。打开generator.properties文件,table=message改为table=user,点击IntelliJ IDEA右侧边栏的Maven Projects,双击 mybatis-generator:generate,运行成功以后会多user表的相关数据文件,如下图:
注意:如果需要一次生成所有表的数据文件,先把dao,entity,sqlmap里面的文件都清空,然后打开generatorConfig.xml,把table标签替换为下面的代码即可
<table schema="" tableName="%"  enableCountByExample="false"
       enableUpdateByExample="false" enableDeleteByExample="false"
       enableSelectByExample="false" selectByExampleQueryId="false"/>
现在,user数据表已经绑定成功。下面按照上一篇中测试message的方法,用junit测试工具,测一下数据能不能正常写入数据库。

第二步:新建文件
在controller文件夹下添加userController.java和homeController.java文件
userController.java:跟用户有关的路由都会写在这个文件里
homeController.java:写登录成功以后的路由
在service文件夹下,添加UserService.java文件和impl文件夹,在impl文件夹下,添加UserServiceImpl.javaUserService.java:存放业务层接口
UserServiceImpl.java:实现业务层接口
在js文件夹下添加jQuery文件引用,我这里加的是jquery-3.3.1.js
在views文件夹下添加:login.jsp,home.jsp,detail.jsp,register.jsp

login.jsp:登录页面

home.jsp:登录以后的页面

detail.jsp:编辑用户信息页面

register.jsp:用户注册页面
第三步:首页

index.jsp代码如下:


<%@ page contentType="text/html;charset=UTF-8" language="java" %>
<html>
<head>
    <meta http-equiv="Content-Type" content="text/html; charset=UTF-8">
</head>
<body>
<h2>欢迎来到首页,请先登录</h2>
<div>
    <a href="/user/login">登录</a>
    <a href="/user/register">注册</a>
</div>
    </body>
</html>
第四步:注册功能
1,写注册页面,在register.jsp中添加代码如下:
<%@ page contentType="text/html;charset=UTF-8" language="java" %>
<html>
<head>
    <title>Title</title>
</head>
<body>
<h2>用户注册</h2>
<form action="/user/register" method="post">
    用户名:<input type="text" name="name">
    密码:<input type="password" name="password">
    年龄:<input type="text" name="age">

    描述:<input type="text" name="description">
    <input type="submit"  value="保存">
</form>
</body>
<script>
        if(${status} == 0){
            alert("注册成功")
            location.href="/";
    }
</script>
</html>
2,dao中实现数据库操作
dao文件夹中的UserMapper已经有insert接口,sqlmap中的UserMapper.xml中已经实现insert,所以只需在
dao文件夹中的UserMapper中添加selectUserByName接口,在sqlmap中的UserMapper.xml中添加selectUserByName实现。代码如下:
List<User> selectUserByName(User record);
<select id="selectUserByName" resultMap="BaseResultMap" parameterType="cn.only.entity.User" >
    select *
    from user
    where name = #{name,jdbcType=VARCHAR}
  </select>
3,service层实现业务逻辑
在UserService.java中写注册接口insert,和根据用户名查找用户接口selectUserByName,代码如下:
package cn.only.service;

import cn.only.entity.User;

import java.util.List;

public interface UserService {
    int insert(User record);

    List<User> selectUserByName(User record);
}
4,在UserServiceImpl.java中实现以上接口,代码如下:
package cn.only.service.impl;
import cn.only.dao.UserMapper;
import cn.only.entity.User;
import cn.only.service.UserService;
import org.springframework.beans.factory.annotation.Autowired;
import org.springframework.stereotype.Service;

import java.util.List;

@Service
public class  UserServiceImpl implements  UserService{
    @Autowired
    private UserMapper mapper;
    public  int insert(User record){return mapper.insert(record);}
    public List<User> selectUserByName(User record){return mapper.selectUserByName(record);}
}
5,在userController.java中写路由,代码如下:
package cn.only.controller;
import cn.only.entity.User;
import cn.only.service.UserService;
import org.springframework.stereotype.Controller;
import org.springframework.ui.Model;
import org.springframework.web.bind.annotation.ModelAttribute;
import org.springframework.web.bind.annotation.RequestMapping;
import org.springframework.web.bind.annotation.RequestMethod;
import org.springframework.web.bind.annotation.ResponseBody;

import javax.annotation.Resource;
import javax.servlet.http.HttpServletRequest;
import javax.servlet.http.HttpSession;
import java.util.List;

@Controller
@RequestMapping("/user")
public class userController {
    @Resource
    private UserService userService;

    @RequestMapping(value="/register")
    public String register(HttpServletRequest request, Model model){
        return "register";
    }

    @RequestMapping(value="/register",method= RequestMethod.POST)
    public String addUser(@ModelAttribute User user, Model model){

        List<User> list=userService.selectUserByName(user);
        if(list.size()==0){
            if(userService.insert(user)==1){
                model.addAttribute("status",0);
            }else{
                model.addAttribute("status",1);
            }
        }else{
            model.addAttribute("status",2);
        }
        return "register";
    }
}
第五步:登录功能
1,写登录页面,在login.jsp文件,代码如下:
<%@ page contentType="text/html;charset=UTF-8" language="java" %>
<html>
<head>
    <title>登录</title>
</head>
<h2>登录</h2>
<form action="/user/login" method="post">
    用户名:<input type="text" name="name">
    密码:<input type="password" name="password">
    <input type="submit"  value="登录">
    <a href="/user/register">注册</a>
</form>
</body>
<script>
    if(${status} == 0){
        alert("登录成功");
        location.href="/home";
    }else{
        alert("登录失败,用户名或密码错误");
    }
</script>
</html>
2,dao中实现数据库操作
dao文件夹中的UserMapper中添加login接口,在sqlmap中的UserMapper.xml中添加login实现。代码如下:
User login(User record);
<select id="login" resultMap="BaseResultMap" parameterType="cn.only.entity.User" >
    select *
    from user
    where name = #{name,jdbcType=VARCHAR} AND password=#{password,jdbcType=VARCHAR}
  </select>
3,service层实现业务逻辑

在UserService.java中写登录接口login,代码如下:
User login(User record);
4,在UserServiceImpl.java中实现以上接口,代码如下:
public User login(User record){return mapper.login(record);}
5,在userController.java中写路由,添加代码如下:
 @RequestMapping(value="/login")
    public String loginPage(@ModelAttribute User user, Model model){
        return "login";
    }
    @RequestMapping(value="/login",method= RequestMethod.POST)
    public String login(@ModelAttribute User user, Model model, HttpSession session){
        User u=userService.login(user);
        if(u!=null){
            u.setPassword("");

            session.setAttribute("user", u);
            model.addAttribute("status",0);
            model.addAttribute("user",user);
        }else{
            model.addAttribute("status",1);
        }
        return "login";
    }
第六步:登录成功以后的页面home

home.jsp代码如下:
<%@ page contentType="text/html;charset=UTF-8" language="java" isELIgnored="false" %>
<html>
<head>
    <title>主页</title>
    <script src="/js/jquery-3.3.1.js"></script>
</head>
<body>
<script>

    function deleteUser() {
        if(confirm("用户一旦删除需要重新注册,确定删除用户?")){
            jQuery.ajax({url:"/user/delete",async:false,type:"DELETE",
            success:function (restult) {
                if(restult == 1){
                    alert("用户注销成功");
                    location.href="/user/login";
                }else{
                    alert("用户注销失败");
                }
            }
            });
        }
    }
</script>
<p style="margin-top:100px;text-align: center">欢迎<span style="font-weight: bolder">${user.name}</span>登录</p>
<a href="/user/detail">修改个人信息</a>
<a href="/user/logout">退出</a>
<a href="JavaScript:void(0)" onclick="deleteUser()">注销</a>
</body>
<script>

</script>
</html>
在homeController.java中写路由,添加代码如下:
package cn.only.controller;

import cn.only.entity.User;
import cn.only.service.UserService;
import org.springframework.stereotype.Controller;
import org.springframework.ui.Model;
import org.springframework.web.bind.annotation.RequestMapping;
import javax.annotation.Resource;
import javax.servlet.http.HttpSession;

@Controller
public class homeController {
    @Resource
    private UserService userService;
    @RequestMapping(value="/home")
    public String home(HttpSession session, Model model){
        User u = (User) session.getAttribute("user");
        if(u != null){
            model.addAttribute("user", u);
        }

        return "home";
    }

}
第七步:编辑用户
1,编辑页面,在detail.jsp文件,代码如下:
<%@ page contentType="text/html;charset=UTF-8" language="java" %>
<html>
<head>
    <title>用户信息</title>
</head>
<h2>用户信息修改</h2>
<form action="/user/detail" method="post">
    用户名:<input type="text" name="name" value="${user.name}" disabled>
    年龄:<input type="text" name="age" value="${user.age}">

    描述:<input type="text" name="description" value="${user.description}">
    <input type="submit"  value="保存">
</form>
</body>
<script>
    if(${status} == 0){
        alert("修改成功")
        location.href="/home";
    }
</script>
</html>
2,dao中实现数据库操作
dao文件夹中的UserMapper中默认已经添加了selectByPrimaryKey和updateByPrimaryKey两个接口
在sqlmap中的UserMapper.xml中也已经实现上面的接口。updateByPrimaryKey修改代码如下:
<update id="updateByPrimaryKey" parameterType="cn.only.entity.User" >
  update user
  set name = #{name,jdbcType=VARCHAR},
    age = #{age,jdbcType=INTEGER},
    description = #{description,jdbcType=VARCHAR}
  where id = #{id,jdbcType=INTEGER}
</update>
3,service层实现业务逻辑
在UserService.java中添加根据id查找用户接口selectByPrimaryKey和更新用户接口updateByPrimaryKey,代码如下:
  User selectByPrimaryKey(Integer id);
  int updateByPrimaryKey(User record);
4,在UserServiceImpl.java中实现以上接口,代码如下:
public User selectByPrimaryKey(Integer id){return  mapper.selectByPrimaryKey(id);}
public int updateByPrimaryKey(User record){return mapper.updateByPrimaryKey(record);}
5,在userController.java中写路由,添加代码如下:
 @RequestMapping(value="/detail")
    public String detail(HttpSession session, Model model){
        int id=((User)session.getAttribute("user")).getId();
        User u =userService.selectByPrimaryKey(id);
        model.addAttribute("user",u);
        return "detail";
    }

    @RequestMapping(value="/detail",method= RequestMethod.POST)
    public String editUser(@ModelAttribute User user, Model model,HttpSession session){
        User un = (User) session.getAttribute("user");
        User u=(User)userService.selectByPrimaryKey(un.getId());
        if(u!=null){
            user.setId(un.getId());
            user.setName(un.getName());
            if(userService.updateByPrimaryKey(user)==1){
                model.addAttribute("status",0);
            }else{
                model.addAttribute("status",1);
            }
        }else{
            model.addAttribute("status",2);
        }
        return "detail";
    }
第八步:退出
在userController.java中写退出路由,添加代码如下:
    @RequestMapping(value="/logout",method= RequestMethod.GET)
    public String logout(HttpSession session){
        session.invalidate();
        return "redirect:/user/login";
    }
第九步:注销

注销用户:删除用户
home.jsp中发送的ajax请求如下
 function deleteUser() {
        if(confirm("用户一旦删除需要重新注册,确定删除用户?")){
            jQuery.ajax({url:"/user/delete",async:false,type:"DELETE",
            success:function (restult) {
                if(restult == 1){
                    alert("用户注销成功");
                    location.href="/user/login";
                }else{
                    alert("用户注销失败");
                }
            }
            });
        }
    }
dao文件夹中的UserMapper中默认已经添加了deleteByPrimaryKey接口
在sqlmap中的UserMapper.xml中的实现代码如下:
<delete id="deleteByPrimaryKey" parameterType="java.lang.Integer" >
    delete from user
    where id = #{id,jdbcType=INTEGER}
</delete>
在userController.java中写路由,添加代码如下:
    @ResponseBody
    @RequestMapping(value="/delete",method= RequestMethod.DELETE)
    public Integer delete(HttpSession session, Model model){
        User u = (User) session.getAttribute("user");
       int result=0;
        if(u != null){
            result=   userService.deleteByPrimaryKey(u.getId());
            session.setAttribute("user",null);
            System.out.println("Result:"+result);
        }
        return result;
    }
到此已经完:用户注册,登录,编辑,退出,注销。
代码下载地址:https://github.com/greenteaone/helloworld