作者: Grey
原文地址:Spring的轻量级实现
本文是参考公众号:码农翻身 的从零开始造Spring 教程的学习笔记
源码
开发方法
使用TDD的开发方法,TDD的开发流程是:
-
写一个测试用例
-
运行:失败
-
写Just enough的代码,让测试通过
-
重构代码保持测试通过,
然后循环往复。
说明
-
仅实现核心功能
-
基于spring-framework-3.2.18.RELEASE版本
通过XML实例化一个对象
解析XML文件,拿到Bean的id和完整路径,通过反射方式实例化一个对象。
XML格式如下,文件名为:bean-v1.xml
<?xml version="1.0" encoding="UTF-8"?>
<beans xmlns="http://www.springframework.org/schema/beans"
       xmlns:xsi="http://www.w3.org/2001/XMLSchema-instance"
       xsi:schemaLocation="http://www.springframework.org/schema/beans
       http://www.springframework.org/schema/beans/spring-beans.xsd">
    <bean id="userService" class="org.spring.service.v1.UserService"></bean>
</beans>
需要解析上述XML并生成userService对象,调用者只需要做如下调用即可:
public class BeanFactoryV1Test {
    @Test
    public void testGetBean() {
        BeanFactory factory = new DefaultBeanFactory("bean-v1.xml");
        UserService userService = (UserService) factory.getBean("userService");
        assertNotNull(userService);
    }
}
思路为:
解析XML,并把XML中的类通过反射方式生成对象,最后,把这个生成的对象放到一个Map中,其中Map的key为beanId,如上例就是:userService, Map的Value是UserService的全路径org.spring.service.v1.UserService
实现细节参考代码见:step1
基础工作和基本封装
- 增加日志支持:log4j2 + SLF4j
- 增加异常处理,所有异常的父类设计为
BeansException - 封装BeanDefinition
由于DefaultBeanFactory中的BEAN_MAP目前只包括了beanClassName信息,后续如果要扩展其他的信息,肯定需要增加字段,所以我们需要抽象出一个接口BeanDefinition,方便后续扩展其他的字段。
- 封装Resource
在BeanFactory初始化的时候,传入的是XML格式的配置信息,比如bean-v1.xml, Spring会把这个抽象成一个Resource,常见Resource有
FileSystemResource: 从文件地址读配置
ClassPathResource: 从classpath下读配置
BeanFactory在创建Bean的时候,只关注Resource即可。
实现细节参考代码见:vstep4-2-resource
封装XML的解析逻辑和Bean的注册逻辑
设计XmlBeanDefinitionReader,用于解析XML,传入Resource,即可获取所有BeanDefinition,
public void loadBeanDefinitions(Resource resource) {
    // 从Resource中获取所有的BeanDefinition
    // 注册到BEAN_MAP中
}
由于要把BeanDefinition放入BEAN_MAP中,所以XmlBeanDefinitionReader需要持有一个DefaultBeanFactory,且DefaultBeanFactory需要有注册BeanDefinition和获取BeanDefintion的能力,这样DefaultBeanFactory的职责就不单一了,所以需要抽象出一个BeanDefinitionRegistry,这个BeanDefinitionRegistry专门负责注册BeanDefinition和获取BeanDefintion,
public interface BeanDefinitionRegistry {
    /**
     * 注册Bean
     * @param beanId
     * @param beanDefinition
     */
    void registerBeanDefinition(String beanId, BeanDefinition beanDefinition);
}
XmlBeanDefinitionReader只需要持有BeanDefinitionRegistry,即可将解析生成的BeanDefinition注入BEAN_MAP中。
实现细节参考代码见:vstep5-final
单例多例模式的配置实现
XML文件中会增加一个属性,如下:
<?xml version="1.0" encoding="UTF-8"?>
<beans xmlns="http://www.springframework.org/schema/beans"
       xmlns:xsi="http://www.w3.org/2001/XMLSchema-instance"
       xsi:schemaLocation="http://www.springframework.org/schema/beans
       http://www.springframework.org/schema/beans/spring-beans.xsd">

    <bean id="userService" class="org.spring.service.v1.UserService"></bean>
    <bean id="orgService" class="org.spring.service.v1.OrgService" scope="prototype"></bean>
</beans>
其中orgService这个bean配置成了prototype的属性,所以在BeanDefinition这个数据结构要增加是否单例,是否多例的逻辑
public interface BeanDefinition {
    ...
    boolean isSingleton();
    boolean isPrototype();
    ...
}
在DefaultBeanFactory调用getBean的时候,判断是否单例,如果是单例,则复用对象,如果是多例,则new新的对象。
@Override
    public Object getBean(String beanId) {
        // TODO bean存在与否判断
        // TODO 异常处理
        // TODO 构造函数带参数
        BeanDefinition definition = BEAN_MAP.get(beanId);
        if (definition.isSingleton()) {
            Object bean = this.getSingleton(beanId);
            if(bean == null){
                bean = createBean(definition);
                this.registerSingleton(beanId, bean);
            }
            return bean;
        }
        return createBean(definition);
    }
抽象SingletonBeanRegistry这个接口,专门用于注册和获取单例对象,
public interface SingletonBeanRegistry {
    void registerSingleton(String beanName, Object singletonObject);
    Object getSingleton(String beanName);
}
DefaultSingletonBeanRegistry实现这个接口,实现对单例对象的注册
public class DefaultSingletonBeanRegistry implements SingletonBeanRegistry {
    // TODO 考虑线程安全的容器
    private final Map<String, Object> singletonObjects = new HashMap<>();

    @Override
    public void registerSingleton(String beanName, Object singletonObject) {
        // 注册单例Bean
        ...
    }

    @Override
    public Object getSingleton(String beanName) {
  // 获取单例Bean
        return this.singletonObjects.get(beanName);
    }
}
DefaultBeanFactory继承DefaultSingletonBeanRegistry这个类,就有了获取单例Bean和注册单例Bean的能力。
实现细节参考代码见:vstep6-scope
整合并抽象出ApplicationContext
我们使用Spring的时候,一般是这样做的:
ApplicationContext ctx = new ClassPathXmlApplicationContext("mycontainer.xml");
UserService userService = (UserService) ctx.getBean("userService");
或
ApplicationContext ctx = new FileSystemApplicationContext("src\\test\\resources\\bean-v1.xml");
UserService userService = (UserService) ctx.getBean("userService");
现在,我们需要抽象出ApplicationContext这个接口来实现如上的功能,其中有如下两个类去实现这个接口。
ClassPathXmlApplicationContext
从classpath中读取配置文件
FileSystemApplicationContext
从文件中读取配置文件
这两个子类都需要持有DefaultBeanFactory才能有getBean的能力,
ClassPathXmlApplicationContext代码如下:
public class ClassPathXmlApplicationContext implements ApplicationContext {
    private final DefaultBeanFactory factory;

    public ClassPathXmlApplicationContext(String configPath) {
        factory = new DefaultBeanFactory();
        XmlBeanDefinitionReader reader = new XmlBeanDefinitionReader(factory);
        reader.loadBeanDefinitions(new ClassPathResource(configPath));
    }

    @Override
    public Object getBean(String beanId) {
        return factory.getBean(beanId);
    }
}
FileSystemApplicationContext代码如下:
public class FileSystemApplicationContext implements ApplicationContext {
    private final DefaultBeanFactory factory;

    public FileSystemApplicationContext(String configPath) {
        factory = new DefaultBeanFactory();
        XmlBeanDefinitionReader reader = new XmlBeanDefinitionReader(factory);
        reader.loadBeanDefinitions(new FileSystemResource(configPath));
    }
    @Override
    public Object getBean(String beanId) {
        return factory.getBean(beanId);
    }
}
实现细节参考代码见:vstep7-applicationcontext-v1
通过观察发现,ClassPathXmlApplicationContext和FileSystemApplicationContext大部分代码都是相同的,只有在获取Resource的时候,方法不一样,所以,我们通过模板方法这个设计模式,设计一个抽象类AbstractApplicationContext,代码如下:
public abstract class AbstractApplicationContext implements ApplicationContext {
    private DefaultBeanFactory factory;

    public AbstractApplicationContext(String configPath) {
        factory = new DefaultBeanFactory();
        XmlBeanDefinitionReader reader = new XmlBeanDefinitionReader(factory);
        reader.loadBeanDefinitions(getResourceByPath(configPath));
    }

    @Override
    public Object getBean(String beanId) {
        return factory.getBean(beanId);
    }
    protected abstract Resource getResourceByPath(String path);
}
这个抽象类实现除了获取Resource以外的所有逻辑,ClassPathXmlApplicationContext和FileSystemApplicationContext都继承这个抽象类,完成Resource的获取逻辑的编写即可。以FileSystemApplicationContext为例,示例代码如下:
public class FileSystemApplicationContext extends AbstractApplicationContext {
    public FileSystemApplicationContext(String configPath) {
        super(configPath);
    }

    @Override
    protected Resource getResourceByPath(String path) {
        return new FileSystemResource(path);
    }
}
实现细节参考代码见:vstep7-applicationcontext-v2
注入Bean和字符串常量
我们需要对于如下类型的XML配置文件进行解析:
<?xml version="1.0" encoding="UTF-8"?>
<beans xmlns="http://www.springframework.org/schema/beans"
       xmlns:xsi="http://www.w3.org/2001/XMLSchema-instance"
       xsi:schemaLocation="http://www.springframework.org/schema/beans
       http://www.springframework.org/schema/beans/spring-beans.xsd">

    <bean id="userService" class="org.spring.service.v2.UserService">
        <property name="accountDao" ref="accountDao"/>
        <property name="itemDao" ref="itemDao"/>
        <property name="owner" value="test"/>
        <property name="version" value="2"/>
        <property name="checked" value="on"/>
    </bean>
    <bean id="accountDao" class="org.spring.dao.v2.AccountDao">
    </bean>
    <bean id="itemDao" class="org.spring.dao.v2.ItemDao">
    </bean>
</beans>
需要达到的目的就是:可以把整型,字符串类型,简单对象类型注入到一个Bean中,我们需要解决如下两个问题:
第一个问题是:把字符串转成各种各样的Value,比如把String转换成Integer或者转换成Boolean。jdk中java.bean包中的PropertyEditorSupport这个类来完成的,我们新建了CustomBooleanEditor和CustomNumberEditor两个类,这两个类都继承于PropertyEditorSupport,分别实现了String类型转换成Boolean类型和String类型转换成Integer类型的功能。其他的类型转换也可以通过类似的方法来实现。然后抽象出了TypeConvert这个接口,并把这些转换器加入一个特定的Map中,Map的key就是要转换的目标的类型,Value就是对应的转换器的实现类,即可实现类型转换。
public interface TypeConverter {
    // TODO 抽象出:TypeMismatchException
    <T> T convertIfNecessary(Object value, Class<T> requiredType);
}
第二个问题是:我们调用Bean的setXXX方法把这些Value值set到目标Bean中,做法是抽象出PropertyValue
public class PropertyValue {
    private final String name;
    private final Object value;
    // 省略构造方法和get/set方法
}
BeanDefiniton需要增加方法获取PropertyValue的逻辑,BeanDefiniton的所有子类,例如:GenericBeanDefinition中需要增加
private List<PropertyValue> propertyValues = new ArrayList<>();
在解析XML文件的时候,就需要把List<PropertyValue>识别出来并加入BeanDefinition中(RuntimeBeanReference,TypedStringValue),使用BeanDefinitionValueResolver把对应的PropertyValue给初始化好,如下代码:
public class BeanDefinitionValueResolver {
    ...
    public Object resolveValueIfNecessary(Object value) {
        if (value instanceof RuntimeBeanReference) {
            ...
        } else if (value instanceof TypedStringValue) {
            return ((TypedStringValue) value).getValue();
        } else {
            //TODO
            throw new RuntimeException("the value " + value + " has not implemented");
        }
    }
    ...
}
而setXXX的背后实现利用的是jdk原生java.beans.Introspector来实现,见DefaultBeanFactory的populateBean方法
private void populateBean(BeanDefinition bd, Object bean) {
        ....
        try {
            for (PropertyValue pv : pvs) {
                String propertyName = pv.getName();
                Object originalValue = pv.getValue();
                Object resolvedValue = valueResolver.resolveValueIfNecessary(originalValue);
                BeanInfo beanInfo = Introspector.getBeanInfo(bean.getClass());
                PropertyDescriptor[] pds = beanInfo.getPropertyDescriptors();
                for (PropertyDescriptor pd : pds) {
                    if (pd.getName().equals(propertyName)) {
                        Object convertedValue = converter.convertIfNecessary(resolvedValue, pd.getPropertyType());
                        pd.getWriteMethod().invoke(bean, convertedValue);
                        break;
                    }
                }
            }
        } catch (Exception ex) {
            // TODO 封装Exception
            throw new RuntimeException("Failed to obtain BeanInfo for class [" + bd.getBeanClassName() + "]", ex);
        }
    }
其中
pd.getWriteMethod().invoke(bean, convertedValue);
就是对bean的属性进行赋值操作(即:setXXX方法)
实现细节参考代码见:vstep8-inject
实现构造器注入
处理形如以下的配置:
<bean id="userService" class="org.spring.service.v3.UserService">
    <constructor-arg ref="accountDao"/>
    <constructor-arg ref="itemDao"/>
    <constructor-arg value="1"/>
</bean>
<bean id="accountDao" class="org.spring.dao.v3.AccountDao"></bean>
<bean id="itemDao" class="org.spring.dao.v3.ItemDao"></bean>
和上例中注入Bean和字符串常量一样,我们抽象出ConstructorArgument用于表示一个构造函数信息,每个BeanDefinition中持有这个对象,
public class ConstructorArgument {
    private final List<ValueHolder> argumentValues = new LinkedList<>();
    public ConstructorArgument() {}
    public void addArgumentValue(ValueHolder valueHolder) {
        this.argumentValues.add(valueHolder);
    }
    public List<ValueHolder> getArgumentValues() {
        return Collections.unmodifiableList(this.argumentValues);
    }
    public int getArgumentCount() {
        return this.argumentValues.size();
    }
    public boolean isEmpty() {
        return this.argumentValues.isEmpty();
    }
    /**
     * Clear this holder, removing all argument values.
     */
    public void clear() {
        this.argumentValues.clear();
    }
    public static class ValueHolder {
        private Object value;
        private String type;
        private String name;
        // 省略get/set和构造方法
    }
}
在解析XML的时候,XmlBeanDefinitionReader需要负责解析出ConstuctorArgument,DefaultBeanFactory通过指定构造函数来生成Bean对象并通过ConstructorResolver注入Bean实例到构造方法中。
public class ConstructorResolver {
  ....
    public Object autowireConstructor(final BeanDefinition bd) {
       // ...通过bd找到一个合适的构造函数
        try {
            // 找到了一个合适的构造函数,则用这个构造函数初始化Bean对象初始化Bean对象
            return constructorToUse.newInstance(argsToUse);
        } catch (Exception e) {
            // TODO throw new BeanCreationException(bd.getID(), "can't find a create instance using " + constructorToUse);        }
            throw new RuntimeException(bd.getID() + "can't find a create instance using " + constructorToUse);
        }

    }
  ....
}
注:这里指定的构造函数的查找逻辑为:解析出XML的构造函数的参数列表,和通过反射拿到对应的构造函数的参数列表进行对比(每个参数的类型和个数必须一样)
Constructor<?>[] candidates = beanClass.getConstructors();
        BeanDefinitionValueResolver valueResolver = new BeanDefinitionValueResolver(this.beanFactory);
        ConstructorArgument cargs = bd.getConstructorArgument();
        TypeConverter typeConverter = new SimpleTypeConverter();
        for (int i = 0; i < candidates.length; i++) {
            // 匹配参数类型和个数,要完全对应上才可以
            Class<?>[] parameterTypes = candidates[i].getParameterTypes();
            if (parameterTypes.length != cargs.getArgumentCount()) {
                continue;
            }
            argsToUse = new Object[parameterTypes.length];
            boolean result = this.valuesMatchTypes(parameterTypes,
                    cargs.getArgumentValues(),
                    argsToUse,
                    valueResolver,
                    typeConverter);
            if (result) {
                constructorToUse = candidates[i];
                break;
            }
        }
实现细节参考代码见:vstep9-constructor
实现注解
实现两个注解:@Component @Autowired(只针对属性注入,暂时不考虑方法注入)
且需要实现如下的XML的解析,即实现某个包下的Bean扫描。
<?xml version="1.0" encoding="UTF-8"?>
<beans xmlns="http://www.springframework.org/schema/beans"
       xmlns:xsi="http://www.w3.org/2001/XMLSchema-instance"
       xmlns:context="http://www.springframework.org/schema/context"
       xsi:schemaLocation="http://www.springframework.org/schema/beans
         http://www.springframework.org/schema/beans/spring-beans.xsd
         http://www.springframework.org/schema/context
         http://www.springframework.org/schema/context/spring-context.xsd">
<context:component-scan base-package="org.spring.service.v4,org.spring.dao.v4"></context:component-scan>
</beans>
我们首先需要定义注解Component ,Autowired,代码如下:
@Target({ElementType.CONSTRUCTOR, ElementType.FIELD, ElementType.METHOD, ElementType.ANNOTATION_TYPE})
@Retention(RetentionPolicy.RUNTIME)
@Documented
public @interface Autowired {
    boolean required() default true;
}
@Target(ElementType.TYPE)
@Retention(RetentionPolicy.RUNTIME)
@Documented
public @interface Component {
    String value() default "";
}
其次,我们需要实现一个功能,即:给一个包名,扫描获取到这个包以及子包下面的所有Class,示例代码如下:
  public Resource[] getResources(String basePackage) throws IOException {
        Assert.notNull(basePackage, "basePackage  must not be null");
        // 把包名中的.转成/, 即可获取包的路径
        String location = ClassUtils.convertClassNameToResourcePath(basePackage);
        // TODO  ClassLoader cl = getClassLoader();
        URL url = Thread.currentThread().getContextClassLoader().getResource(location);
        File rootDir = new File(url.getFile());

        Set<File> matchingFiles = retrieveMatchingFiles(rootDir);
        Resource[] result = new Resource[matchingFiles.size()];
        int i = 0;
        for (File file : matchingFiles) {
            result[i++] = new FileSystemResource(file);
        }
        return result;
    }
主要思路是将包名转换成文件路径,然后递归获取路径下的Class文件。
protected Set<File> retrieveMatchingFiles(File rootDir) throws IOException {
        if (!rootDir.exists()) {
            // Silently skip non-existing directories.
            /*if (logger.isDebugEnabled()) {
                logger.debug("Skipping [" + rootDir.getAbsolutePath() + "] because it does not exist");
            }*/
            return Collections.emptySet();
        }
        if (!rootDir.isDirectory()) {
            // Complain louder if it exists but is no directory.
           /* if (logger.isWarnEnabled()) {
                logger.warn("Skipping [" + rootDir.getAbsolutePath() + "] because it does not denote a directory");
            }*/
            return Collections.emptySet();
        }
        if (!rootDir.canRead()) {
            /*if (logger.isWarnEnabled()) {
                logger.warn("Cannot search for matching files underneath directory [" + rootDir.getAbsolutePath() +
                        "] because the application is not allowed to read the directory");
            }*/
            return Collections.emptySet();
        }
  /*String fullPattern = StringUtils.replace(rootDir.getAbsolutePath(), File.separator, "/");
  if (!pattern.startsWith("/")) {
   fullPattern += "/";
  }
  fullPattern = fullPattern + StringUtils.replace(pattern, File.separator, "/");
  */
        Set<File> result = new LinkedHashSet<>(8);
        doRetrieveMatchingFiles(rootDir, result);
        return result;
    }

    protected void doRetrieveMatchingFiles(File dir, Set<File> result) throws IOException {
        File[] dirContents = dir.listFiles();
        if (dirContents == null) {
           /* if (logger.isWarnEnabled()) {
                logger.warn("Could not retrieve contents of directory [" + dir.getAbsolutePath() + "]");
            }*/
            return;
        }
        for (File content : dirContents) {
            if (content.isDirectory()) {
                if (!content.canRead()) {
             /*       if (logger.isDebugEnabled()) {
                        logger.debug("Skipping subdirectory [" + dir.getAbsolutePath() +
                                "] because the application is not allowed to read the directory");
                    }*/
                } else {
                    doRetrieveMatchingFiles(content, result);
                }
            } else {
                result.add(content);
            }

        }
    }
由于注解的Bean不像之前的xml定义的Bean那样,会对Bean配置一个id,所以,这里解析出来的Bean定义需要自动生成一个BeanId(默认先取注解中的value的配置,否则就就是类名第一个字母小写,抽象BeanNameGenerator来专门对Bean定义ID),同时,Spring中单独新建了一个AnnotatedBeanDefinition接口来定义包含注解的BeanDefinition。
我们得到了对应的Class文件,我们需要通过某种方式去解析这个Class文件,拿到这个Class中的所有信息,特别是注解信息。可以使用ASM这个来解析Class的信息,用ASM的原生方式解析不太方便,解析ClassMetaData和Annotation都需要定义一个Visitor,所以Spring抽象了一个接口MetadataReader来封装ASM的实现
public interface MetadataReader {
    /**
     * Read basic class metadata for the underlying class.
     */
    ClassMetadata getClassMetadata();

    /**
     * Read full annotation metadata for the underlying class,
     * including metadata for annotated methods.
     */
    AnnotationMetadata getAnnotationMetadata();
}
然后,我们需要拿到Bean中的所有Field(带注解的),并把他实例化成一个对象,并将这个对象注入目标Bean中,示例代码如下:
public class AutowiredFieldElement extends InjectionElement {
    ...
    @Override
    public void inject(Object target) {
        Field field = getField();
        try {
            DependencyDescriptor desc = new DependencyDescriptor(field, this.required);
            Object value = factory.resolveDependency(desc);
            if (value != null) {
                ReflectionUtils.makeAccessible(field);
                field.set(target, value);
            }
        } catch (Throwable ex) {
            // TODO 异常处理 throw new BeanCreationException("Could not autowire field: " + field, ex);
            throw new RuntimeException("Could not autowire field: " + field);
        }
    }
}
针对于XML的解析,新建了一个ScannedGenericBeanDefinition来处理扫描包下的所有Bean定义。
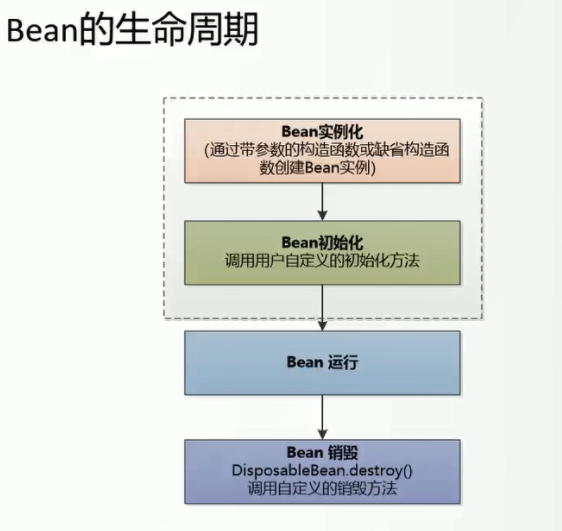
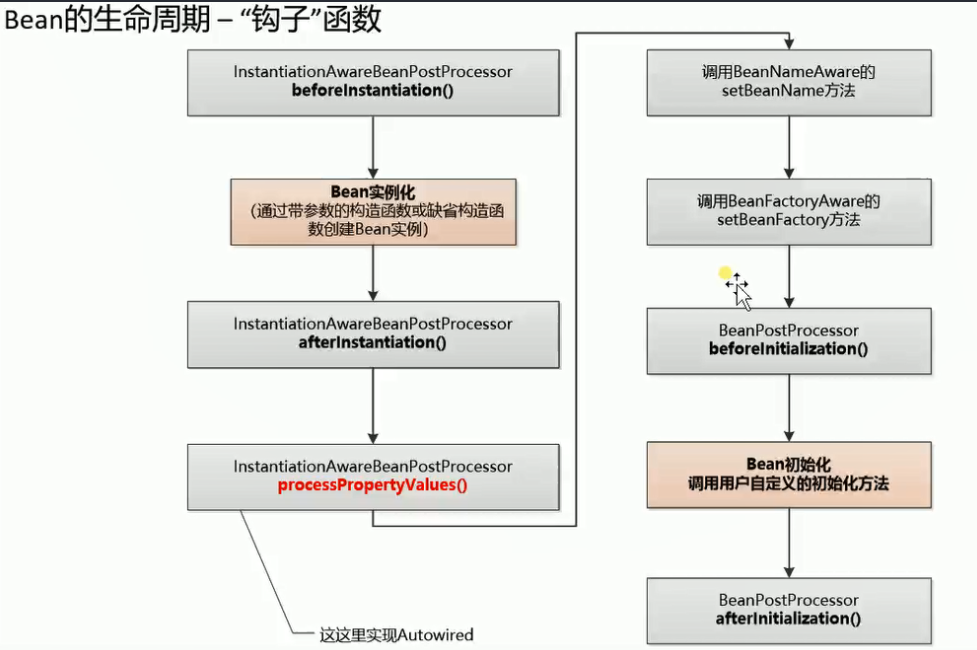
使用AutowiredAnnotationProcessor来将上述流程整合起来,同时涉及Bean生命周期的钩子函数设计, 相关示例代码如下:
public interface BeanPostProcessor {
    Object beforeInitialization(Object bean, String beanName) throws BeansException;

    Object afterInitialization(Object bean, String beanName) throws BeansException;
}
public interface InstantiationAwareBeanPostProcessor extends BeanPostProcessor {
    Object beforeInstantiation(Class<?> beanClass, String beanName) throws BeansException;

    boolean afterInstantiation(Object bean, String beanName) throws BeansException;

    void postProcessPropertyValues(Object bean, String beanName) throws BeansException;
}
public class AutowiredAnnotationProcessor implements InstantiationAwareBeanPostProcessor {
    // 实现Bean初始化,并且预留Bean的生命周期的钩子函数
}
关于Bean的生命周期和Bean生命周期中各个钩子函数,参考如下图
实现细节参考代码见:vstep10-annotation-final
实现AOP
即要实现如下XML格式的解析
<context:component-scan
  base-package="org.litespring.service.v5,org.litespring.dao.v5">
 </context:component-scan>
 <bean id="tx" class="org.litespring.tx.TransactionManager" />
 <aop:config>
  <aop:aspect ref="tx">
   <aop:pointcut id="placeOrder"  expression="execution(* org.litespring.service.v5.*.placeOrder(..))" />
   <aop:before pointcut-ref="placeOrder" method="start" />
   <aop:after-returning pointcut-ref="placeOrder" method="commit" />
   <aop:after-throwing pointcut-ref="placeOrder" method = "rollback"/>
  </aop:aspect>
 </aop:config>
首先,我们需要实现如下功能,即,给定一个表达式,然后判断某个类的某个方法是否匹配这个表达式,这需要依赖AspectJ这个组件来实现,具体使用参考AspectJExpressionPointcut和PointcutTest这两个类。
其次,我们需要通过Bean的名称("tx")和方法名("start")定位到这个Method,然后反射调用这个Method,具体可参考MethodLocatingFactoryTest
public class MethodLocatingFactoryTest {
    @Test
    public void testGetMethod() throws Exception{
        DefaultBeanFactory beanFactory = new DefaultBeanFactory();
        XmlBeanDefinitionReader reader = new XmlBeanDefinitionReader(beanFactory);
        Resource resource = new ClassPathResource("bean-v5.xml");
        reader.loadBeanDefinitions(resource);
        MethodLocatingFactory methodLocatingFactory = new MethodLocatingFactory();
        methodLocatingFactory.setTargetBeanName("tx");
        methodLocatingFactory.setMethodName("start");
        methodLocatingFactory.setBeanFactory(beanFactory);

        // 获取到目标方法
        Method m = methodLocatingFactory.getObject();

        Assert.assertEquals(TransactionManager.class, m.getDeclaringClass());
        Assert.assertEquals(m, TransactionManager.class.getMethod("start"));

    }
}
然后,我们需要使用AOP Alliance实现指定顺序的链式调用,即根据配置的不同advice顺序调用。

具体可查看ReflectiveMethodInvocation和ReflectiveMethodInvocationTest这两个类。
 @Test
    public void testMethodInvocation() throws Throwable{


        Method targetMethod = UserService.class.getMethod("placeOrder");

        List<MethodInterceptor> interceptors = new ArrayList<>();
        interceptors.add(beforeAdvice);
        interceptors.add(afterAdvice);


        ReflectiveMethodInvocation mi = new ReflectiveMethodInvocation(userService,targetMethod,new Object[0],interceptors);

        mi.proceed();


        List<String> msgs = MessageTracker.getMsgs();
        Assert.assertEquals(3, msgs.size());
        Assert.assertEquals("start tx", msgs.get(0));
        Assert.assertEquals("place order", msgs.get(1));
        Assert.assertEquals("commit tx", msgs.get(2));

    }
其中
  Assert.assertEquals(3, msgs.size());
        Assert.assertEquals("start tx", msgs.get(0));
        Assert.assertEquals("place order", msgs.get(1));
        Assert.assertEquals("commit tx", msgs.get(2));
就是验证我们配置的advice是否按指定顺序运行。
最后,我们需要实现动态代理,在一个方法前后增加一些逻辑,而不用改动原始代码。如果是普通类就使用CGLib实现,如果有接口的类可以使用JDK自带的动态代理,具体可参考CGlibTest和CglibAopProxyTest
实现细节参考代码见:vaop-v3