从逻辑上组织代码,将一些有联系,完成特定功能相关的代码组织在一起,这些自我包含并且有组织的代码片段就是模块,将其他模块中属性附加到你的模块的操作叫做导入。
那些一个或多个.py文件组成的代码集合就称为模块。如:os 是系统相关的模块;file是文件操作相关的模块
模块分为三种:
- 自定义模块
- 内置标准模块(又称标准库)
- 开源模块
自定义模块
一、定义与导入模块
一个或多个.py文件组成的代码集合,便是一个模块。
如定义目录:
└─module_test
    │  m1.py
    │  test.py
    │
    └─m2
            m2_chat.py
            m2_shopping.py
            __init__.py


 1 #!/usr/bin/env python
 2 # -*- coding: utf-8 -*-
 3
 4 """
 5 This module provides various functions to xxx.
 6 """
 7
 8
 9 def say_hello(name=None):
10     return "Hello:%s" % name
 1 #!/usr/bin/env python
 2 # -*- coding: utf-8 -*-
 3
 4 """
 5 This module provides various functions to xxx.
 6 """
 7
 8
 9 def chat(_from, _to, message):
10     print "%s tell %s something about %s" % (_from, _to, message)
 1 #!/usr/bin/env python
 2 # -*- coding: utf-8 -*-
 3
 4 """
 5 This module provides various functions to xxx.
 6 """
 7
 8
 9 def shopping(sb, something):
10     print "%s is buying %s" % (sb, something)
#!/usr/bin/env python
# -*- coding: utf-8 -*-

from m2_shopping import *
test.py
#!/usr/bin/env python
# -*- coding: utf-8 -*-

import m1
import m2
from m1 import say_hello
from m2.m2_chat import chat

print m1.say_hello("Milton")
m2.shopping("Milton", "dog")

print say_hello("Milton")
chat("Milton", "Cherish", "Love")
运行test.py输出结果:
Hello:Milton
Hello:Milton
Milton tell Cherish something about Love
Milton is buying dog
如上,m1 m2都可认为是一个模块,m1模块由一个m1.py文件组成,m2模块由m2_chat.py,m2_shopping.py,__init__.py 三个文件组成。
导入一个模块的方式有:
import module 导入一个模块,可通过module.function引用模块中的属性。
from module import function,从一个模块中导入具体某个属性,可直接使用function
如test.py 中,导入与使用模块方式有:
方式一:
import m1 后,可以运行 m1.say_hello("Milton"),通过m1.xx 可以运行m1.py 中定义的函数或属性
import m2 后,(注意,m2目录下的__init__.py 中,声明了 from m2_shopping import *),此时m2可以直接引用m2目录下的m2_shopping 中的所有函数或属性,
如m2.shopping("Milton","dog")
方式二:
当你使用 from m1 import say_hello 后,在当前名称空间可以直接使用say_hello,如 say_hello("Milton").
同理,当你使用from m2.m2_chat import chat 后,可以在当前名称空间直接使用chat,如chat("Milton","Cherish","Love")
核心风格:import 语句的模块顺序 (空行分割这三类模块的导入语句)
Python 标准库模块
Python 第三方模块
应用程序自定义模块
二、加载与重加载模块(load,reload)
一个模块只被加载一次,无论它被导入import多少次,加载只在第一次导入时方式。
例如,定义模块hello.py
#!/usr/bin/env python
# -*- coding: utf-8 -*-


print "Hello Module..."
导入时,只有首次导入会输出打印语句
>>> import hello
Hello Module...
>>> import hello
>>> import hello
>>>
reload()内建函数可以重新导入一个已经导入的模块,如:
>>> import hello
Hello Module...
>>> import hello
>>> import hello
>>> reload(hello)
Hello Module...
<module 'hello' from 'hello.pyc'>
>>>
内置标准模块
想要了解某个模块,最好的办法是阅读源码!!!
一、os 模块
os模块主要用于程序与操作系统之间的交互。
os.getcwd()          获取当前工作目录,即当前python脚本工作的目录路径
os.chdir("dirname")  改变当前脚本工作目录;相当于shell下cd
os.curdir            返回当前目录: ('.')
os.pardir            获取当前目录的父目录字符串名:('..')
os.makedirs('dirname1/dirname2') 可生成多层递归目录
os.removedirs('dirname1')        若目录为空,则删除,并递归到上一级目录,如若也为空,则删除,依此类推
os.mkdir('dirname')              生成单级目录;相当于shell中mkdir dirname
os.rmdir('dirname')              删除单级空目录,若目录不为空则无法删除,报错;相当于shell中rmdir dirname
os.listdir('dirname')            列出指定目录下的所有文件和子目录,包括隐藏文件,并以列表方式打印
os.remove()                      删除一个文件
os.rename("oldname","newname")   重命名文件/目录
os.stat('path/filename')         获取文件/目录信息
os.sep                           输出操作系统特定的路径分隔符,win下为"\",Linux下为"/"
os.linesep                       输出当前平台使用的行终止符,win下为"
",Linux下为"
"
os.pathsep                       输出用于分割文件路径的字符串
os.name                          输出字符串指示当前使用平台。win->'nt'; Linux->'posix'
os.system("bash command")        运行shell命令,直接显示
os.environ                       获取系统环境变量
os.path.abspath(path)                返回path规范化的绝对路径
os.path.split(path)                  将path分割成目录和文件名二元组返回
os.path.dirname(path)                返回path的目录。其实就是os.path.split(path)的第一个元素
os.path.basename(path)               返回path最后的文件名。如何path以/或结尾,那么就会返回空值。即os.path.split(path)的第二个元素
os.path.exists(path)                 如果path存在,返回True;如果path不存在,返回False
os.path.isabs(path)                  如果path是绝对路径,返回True
os.path.isfile(path)                 如果path是一个存在的文件,返回True。否则返回False
os.path.isdir(path)                  如果path是一个存在的目录,则返回True。否则返回False
os.path.join(path1[, path2[, ...]])  将多个路径组合后返回,第一个绝对路径之前的参数将被忽略
os.path.getatime(path)               返回path所指向的文件或者目录的最后存取时间
os.path.getmtime(path)               返回path所指向的文件或者目录的最后修改时间
二、sys 模块
sys模块主要用于程序与解释器之间的交互。
"""
This module provides access to some objects used or maintained by the
interpreter and to functions that interact strongly with the interpreter.

Dynamic objects:

argv -- command line arguments; argv[0] is the script pathname if known
path -- module search path; path[0] is the script directory, else ''
modules -- dictionary of loaded modules

displayhook -- called to show results in an interactive session
excepthook -- called to handle any uncaught exception other than SystemExit
  To customize printing in an interactive session or to install a custom
  top-level exception handler, assign other functions to replace these.

exitfunc -- if sys.exitfunc exists, this routine is called when Python exits
  Assigning to sys.exitfunc is deprecated; use the atexit module instead.

stdin -- standard input file object; used by raw_input() and input()
stdout -- standard output file object; used by the print statement
stderr -- standard error object; used for error messages
  By assigning other file objects (or objects that behave like files)
  to these, it is possible to redirect all of the interpreter's I/O.

last_type -- type of last uncaught exception
last_value -- value of last uncaught exception
last_traceback -- traceback of last uncaught exception
  These three are only available in an interactive session after a
  traceback has been printed.

exc_type -- type of exception currently being handled
exc_value -- value of exception currently being handled
exc_traceback -- traceback of exception currently being handled
  The function exc_info() should be used instead of these three,
  because it is thread-safe.

Static objects:

float_info -- a dict with information about the float inplementation.
long_info -- a struct sequence with information about the long implementation.
maxint -- the largest supported integer (the smallest is -maxint-1)
maxsize -- the largest supported length of containers.
maxunicode -- the largest supported character
builtin_module_names -- tuple of module names built into this interpreter
version -- the version of this interpreter as a string
version_info -- version information as a named tuple
hexversion -- version information encoded as a single integer
copyright -- copyright notice pertaining to this interpreter
platform -- platform identifier
executable -- absolute path of the executable binary of the Python interpreter
prefix -- prefix used to find the Python library
exec_prefix -- prefix used to find the machine-specific Python library
float_repr_style -- string indicating the style of repr() output for floats
dllhandle -- [Windows only] integer handle of the Python DLL
winver -- [Windows only] version number of the Python DLL
__stdin__ -- the original stdin; don't touch!
__stdout__ -- the original stdout; don't touch!
__stderr__ -- the original stderr; don't touch!
__displayhook__ -- the original displayhook; don't touch!
__excepthook__ -- the original excepthook; don't touch!

Functions:

displayhook() -- print an object to the screen, and save it in __builtin__._
excepthook() -- print an exception and its traceback to sys.stderr
exc_info() -- return thread-safe information about the current exception
exc_clear() -- clear the exception state for the current thread
exit() -- exit the interpreter by raising SystemExit
getdlopenflags() -- returns flags to be used for dlopen() calls
getprofile() -- get the global profiling function
getrefcount() -- return the reference count for an object (plus one :-)
getrecursionlimit() -- return the max recursion depth for the interpreter
getsizeof() -- return the size of an object in bytes
gettrace() -- get the global debug tracing function
setcheckinterval() -- control how often the interpreter checks for events
setdlopenflags() -- set the flags to be used for dlopen() calls
setprofile() -- set the global profiling function
setrecursionlimit() -- set the max recursion depth for the interpreter
settrace() -- set the global debug tracing function
"""

sys.argv           命令行参数List,第一个元素是程序本身路径
sys.exit(n)        退出程序,正常退出时exit(0)
sys.version        获取Python解释程序的版本信息
sys.maxint         最大的Int值
sys.path           返回模块的搜索路径,初始化时使用PYTHONPATH环境变量的值
sys.platform       返回操作系统平台名称
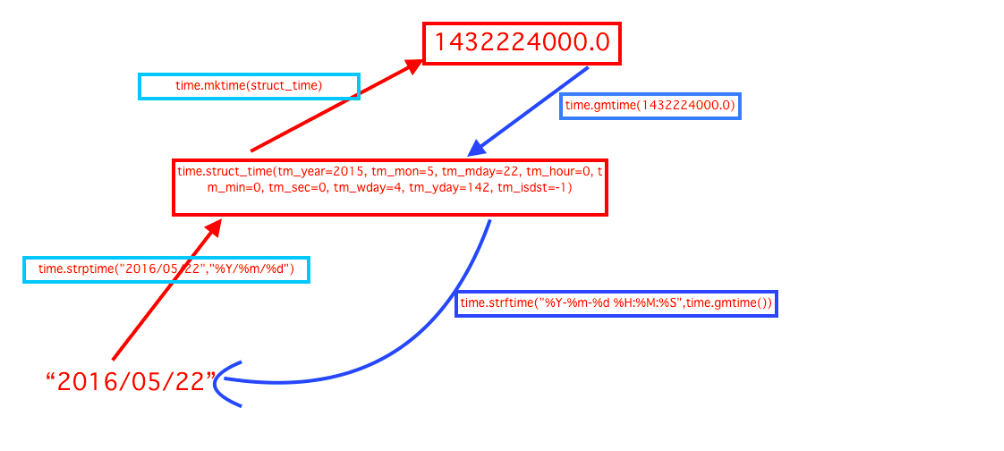
三、time & datetime 模块
time模块,提供各种函数来操作时间值
datetime模块,提供各种函数来操作日期值
#!/usr/bin/env python
# -*- coding: utf-8 -*-

import time
import datetime

# case1:获取当前时间并转换为指定日期格式,如"%Y-%m-%d %H:%M:%S"
timeStamp = int(time.time())  # 获得当前时间时间戳
timeArray = time.localtime(timeStamp)  # 返回 struct time 对象
print time.strftime("%Y-%m-%d %H:%M:%S", timeArray)  # 返回格式化时间如:2016-11-15 15:16:39
print time.strftime("%Y-%m-%d %H:%M:%S", time.localtime())

# case2:将字符串的时间转换为时间戳
now = "2016-11-15 15:17:53"
timeArray = time.strptime(now, "%Y-%m-%d %H:%M:%S")  # 返回 struct_time 对象
timeStamp = int(time.mktime(timeArray))
print timeArray, timeStamp

# case3:获取当前时间并转换为指定日期格式,如"%Y-%m-%d %H:%M:%S"
now = datetime.datetime.now()
print now.strftime("%Y-%m-%d %H:%M:%S")

# case4:时间戳直接转成日期格式 2016-11-15
print datetime.date.fromtimestamp(time.time())

# case5:获得三天前时间
threeDayAgo = (datetime.datetime.now() - datetime.timedelta(days=3))
timeStamp = int(time.mktime(threeDayAgo.timetuple()))  # 转换为时间戳
otherStyleTime = threeDayAgo.strftime("%Y-%m-%d %H:%M:%S")  # 转为其他字符串格式
print timeStamp, otherStyleTime
输出如下:

四、random 模块
random模块,提供各种函数生成各种指定随机数
#!/usr/bin/env python
# -*- coding: utf-8 -*-

import time
import datetime

# case1:获取当前时间并转换为指定日期格式,如"%Y-%m-%d %H:%M:%S"
timeStamp = int(time.time())  # 获得当前时间时间戳
timeArray = time.localtime(timeStamp)  # 返回 struct time 对象
print time.strftime("%Y-%m-%d %H:%M:%S", timeArray)  # 返回格式化时间如:2016-11-15 15:16:39

# case2:将字符串的时间转换为时间戳
now = "2016-11-15 15:17:53"
timeArray = time.strptime(now, "%Y-%m-%d %H:%M:%S")  # 返回 struct_time 对象
timeStamp = int(time.mktime(timeArray))
print timeArray, timeStamp

# case3:获取当前时间并转换为指定日期格式,如"%Y-%m-%d %H:%M:%S"
now = datetime.datetime.now()
print now.strftime("%Y-%m-%d %H:%M:%S")

# case4:时间戳直接转成日期格式 2016-11-15
print datetime.date.fromtimestamp(time.time())

# case5:获得三天前时间
threeDayAgo = (datetime.datetime.now() - datetime.timedelta(days=3))
timeStamp = int(time.mktime(threeDayAgo.timetuple()))  # 转换为时间戳
otherStyleTime = threeDayAgo.strftime("%Y-%m-%d %H:%M:%S")  # 转为其他字符串格式
print timeStamp, otherStyleTime

random常用方法源码解释
#!/usr/bin/env python
# -*- coding: utf-8 -*-

import random

checkcode = ''
for i in range(4):
    current = random.randrange(0, 4)
    if current != i:
        temp = chr(random.randint(65, 90))
    else:
        temp = random.randint(0, 9)
    checkcode += str(temp)
print checkcode
五、json & pickle 模块
序列化(Serialization):将对象的状态信息转换为可以存储或可以通过网络传输的过程,传输的格式可以是JSON、XML等。反序列化就是从存储区域(JSON,XML)读取反序列化对象的状态,重新创建该对象。
用于序列化的两个模块
- json,用于字符串 和 python数据类型间进行转换
- pickle,用于python特有的类型 和 python的数据类型间进行转换
Json模块提供了四个功能:dumps、dump、loads、load
pickle模块提供了四个功能:dumps、dump、loads、load
json dumps & json loads:
#!/usr/bin/env python
# -*- coding: utf-8 -*-

import json

data = {
    'name': 'ACME',
    'shares': 100,
    'price': 542.23
}

# json.dumps 将一个Python数据结构转换为JSON字符串
json_str = json.dumps(data)
print type(json_str), json_str

# json.loads 将一个JSON编码的字符串转换回一个Python数据结构:
dic_data = json.loads(json_str)
print type(dic_data), dic_data
json dump & json load:
#!/usr/bin/env python
# -*- coding: utf-8 -*-

import json

data = {
    'name': 'ACME',
    'shares': 100,
    'price': 542.23
}


# Writing JSON data
with open('data.json', 'w') as f:
    json.dump(data, f)

# Reading data back
with open('data.json', 'r') as f:
    data_read = json.load(f)

print data_read
pickle dumps & pickle loads:
#!/usr/bin/env python
# -*- coding: utf-8 -*-

try:
    import cPickle as pickle
except ImportError:
    import pickle

data = {
    'name': 'ACME',
    'shares': 100,
    'price': 542.23
}

# pickle.dumps 把任意python对象序列化成一个str
pic_str = pickle.dumps(data)
print type(pic_str), pic_str

# pickle.loads 反序列化出python对象
pic_read = pickle.loads(pic_str)
print type(pic_read), pic_read
pickle dump & pickle load:
#!/usr/bin/env python
# -*- coding: utf-8 -*-

try:
    import cPickle as pickle
except ImportError:
    import pickle

data = {
    'name': 'ACME',
    'shares': 100,
    'price': 542.23
}


# Writing file-like Object
with open('dump.txt', 'w') as f:
    pickle.dump(data, f)


# Reading file-like Object
with open('dump.txt', 'r') as f:
    pickle_read = pickle.load(f)

print pickle_read
六、shelve 模块
shelve类似于一个key-value数据库,可以很方便的用来保存Python的内存对象,其内部使用pickle来序列化数据
简单来说,使用者可以将一个列表、字典、或者用户自定义的类实例保存到shelve中,下次需要用的时候直接取出来,就是一个Python内存对象,不需要像传统数据库一样,先取出数据,然后用这些数据重新构造一遍所需要的对象。下面是简单示例:
>>> import shelve
>>> s=shelve.open("shelve.db")
>>> s
{}
>>> s["Milton"]={"age":28,"sex":"M"}
>>> s
{'Milton': {'age': 28, 'sex': 'M'}}
>>> s["score"]=[1,2,3]
>>> s
{'score': [1, 2, 3], 'Milton': {'age': 28, 'sex': 'M'}}
>>> s["score"].append(4)
>>> s
{'score': [1, 2, 3], 'Milton': {'age': 28, 'sex': 'M'}}
>>> temp=s["score"]
>>> temp.append(4)
>>> s["score"]=temp   #仅当对存储对象进行了赋值操作时,才算真正存储了。
>>> s
{'score': [1, 2, 3, 4], 'Milton': {'age': 28, 'sex': 'M'}}
>>> s.has_key("Milton")
True
>>> s.keys()
['score', 'Milton']
>>> del s["Milton"]
>>> s
{'score': [1, 2, 3, 4]}
>>>
>>> s.close()
>>>
>>> a=shelve.open("shelve.db")
>>> a
{'score': [1, 2, 3, 4]}
>>>
七、hashlib 模块
用于加密相关的操作,3.x里代替了md5模块和sha模块,主要提供 SHA1, SHA224, SHA256, SHA384, SHA512 ,MD5 算法
>>> import hashlib
>>>
>>> hash=hashlib.md5()
>>> hash.update("Milton")
>>> hash.hexdigest()
'7c6e8d16a121df9be3e30701e417d11b'
>>>
>>> hash=hashlib.sha1()
>>> hash.update("Milton")
>>> hash.hexdigest()
'dbcf6d6ba1c030decacef981a87a1ccc1e27fe38'
>>>
>>> hash=hashlib.sha256()
>>> hash.update("Milton")
>>> hash.hexdigest()
'8856d174978691a21f99f822bba5c8ae7fe1d25678f0e758d7be35f30bd79088'
>>>
>>> hash=hashlib.sha384()
>>> hash.update("Milton")
>>> hash.hexdigest()
'7449e979b3c964ea57e55b0703ce5b685744f8480d036a5bb020c7e9c7644a43c42358d68a23d4765797ede4b1e339b3'
>>>
>>> hash=hashlib.sha512()
>>> hash.update("Milton")
>>> hash.hexdigest()
'2c98694170af254719679831e8f21fb0e982c27f8c4dc4828b6373678d011faab01fb70673d2d4f068b3c0255f7bdd62c61408e4db4819481e962b6
0cb099562'
>>>
八、subprocess 模块
Python引入subprocess模块来管理子进程,以取代一些旧模块的方法:如 os.system、os.spawn*、os.popen*、popen2.*、commands.*不但可以调用外部的命令作为子进程,而且可以连接到子进程的input/output/error管道,获取相关的返回信息。
可以执行shell命令的相关模块和函数有:
- os.system
- os.spawn*
- os.popen* --废弃
- popen2.* --废弃
- commands.* --废弃,3.x中被移除
以上执行shell命令的相关的模块和函数的功能均在 subprocess 模块中实现,并提供了更丰富的功能。
call
执行命令,返回状态码
ret = subprocess.call(["ls", "-l"], shell=False)
ret = subprocess.call("ls -l", shell=True)
shell = True ,允许 shell 命令是字符串形式
check_call
执行命令,如果执行状态码是 0 ,则返回0,否则抛异常
subprocess.check_call(["ls", "-l"])
subprocess.check_call("exit 1", shell=True)
check_output
执行命令,如果状态码是 0 ,则返回执行结果,否则抛异常
subprocess.check_output(["echo", "Hello World!"])
subprocess.check_output("exit 1", shell=True)
subprocess.Popen(...)
用于执行复杂的系统命令
参数:
- args:shell命令,可以是字符串或者序列类型(如:list,元组)
- bufsize:指定缓冲。0 无缓冲,1 行缓冲,其他 缓冲区大小,负值 系统缓冲
- stdin, stdout, stderr:分别表示程序的标准输入、输出、错误句柄
- preexec_fn:只在Unix平台下有效,用于指定一个可执行对象(callable object),它将在子进程运行之前被调用
- close_sfs:在windows平台下,如果close_fds被设置为True,则新创建的子进程将不会继承父进程的输入、输出、错误管道。
所以不能将close_fds设置为True同时重定向子进程的标准输入、输出与错误(stdin, stdout, stderr)。 - shell:同上
- cwd:用于设置子进程的当前目录
- env:用于指定子进程的环境变量。如果env = None,子进程的环境变量将从父进程中继承。
- universal_newlines:不同系统的换行符不同,True -> 同意使用
- startupinfo与createionflags只在windows下有效
将被传递给底层的CreateProcess()函数,用于设置子进程的一些属性,如:主窗口的外观,进程的优先级等等
import subprocess
ret1 = subprocess.Popen(["mkdir","t1"])
ret2 = subprocess.Popen("mkdir t2", shell=True)
终端输入的命令分为两种:
- 输入即可得到输出,如:ifconfig
- 输入进行某环境,依赖再输入,如:python
import subprocess

obj = subprocess.Popen("mkdir t3", shell=True, cwd='/home/dev',)
import subprocess

obj = subprocess.Popen(["python"], stdin=subprocess.PIPE, stdout=subprocess.PIPE, stderr=subprocess.PIPE)
obj.stdin.write('print 1
 ')
obj.stdin.write('print 2
 ')
obj.stdin.write('print 3
 ')
obj.stdin.write('print 4
 ')
obj.stdin.close()

cmd_out = obj.stdout.read()
obj.stdout.close()
cmd_error = obj.stderr.read()
obj.stderr.close()

print cmd_out
print cmd_error
九、logging 模块
很多程序都有记录日志的需求,并且日志中包含的信息即有正常的程序访问日志,还可能有错误、警告等信息输出,python的logging模块提供了标准的日志接口,你可以通过它存储各种格式的日志,logging的日志可以分为 debug(), info(), warning(), error() and critical() 5个级别。
#!/usr/bin/env python
# -*- coding: utf-8 -*-

import logging, time


def log(title):
    # time and log file
    day = time.strftime("%Y%m%d", time.localtime(time.time()))
    day_log = "F:/tmp/%s.log" % day

    # 创建一个logger,全局日志等级为INFO
    logger = logging.getLogger(title)
    logger.setLevel(logging.INFO)

    # 创建一个handler,用于写入日志文件
    logfile = logging.FileHandler(day_log)
    logfile.setLevel(logging.INFO)

    # 再创建一个handler,用于输出到控制台
    control = logging.StreamHandler()
    control.setLevel(logging.DEBUG)

    # 定义handler的输出格式
    formatter = logging.Formatter('%(asctime)s - %(name)s - %(levelname)s - %(message)s')
    logfile.setFormatter(formatter)
    control.setFormatter(formatter)

    # 给logger添加handler
    logger.addHandler(logfile)
    logger.addHandler(control)

    return logger


logger = log("TEST-LOG")
logger.debug("This is debug message!")
logger.info("This is info message!")
logger.warning("This is warning message!")
logger.error("This is error message!")
logger.critical("This is critical message!")
2016-11-16 16:41:34,740 - TEST-LOG - INFO - This is info message!
2016-11-16 16:41:34,740 - TEST-LOG - WARNING - This is warning message!
2016-11-16 16:41:34,740 - TEST-LOG - ERROR - This is error message!
2016-11-16 16:41:34,740 - TEST-LOG - CRITICAL - This is critical message!
2016-11-16 16:41:34,740 - TEST-LOG - INFO - This is info message!
2016-11-16 16:41:34,740 - TEST-LOG - WARNING - This is warning message!
2016-11-16 16:41:34,740 - TEST-LOG - ERROR - This is error message!
2016-11-16 16:41:34,740 - TEST-LOG - CRITICAL - This is critical message!
十、re 模块
正则表达式(RE)为高级文本模式匹配,已经搜索-替代等功能提供了基础。正则表达式(RE)是一些由字符和特殊符号组成的字符串,他们描述了这些字符和字符的某种重复方式,因此能按某种模式匹配一个有相似特征的字符串的集合。
正则表达式使用的特殊符号和字符

re模块:核心函数与方法
1、匹配对象的方法:
group(num=0) 返回全部匹配对象(或指定编号是num的子组)
groups() 返回一个包含全部匹配的子组的元组(如果没有成功匹配,就返回一个空元组)
2.使用compile()编译正则表达式
#!/usr/bin/env python
# -*- coding: utf-8 -*-

import re

# 将正则表达式编译成Pattern对象
pattern = re.compile(r'hello')

# 使用Pattern匹配文本,获得匹配结果,无法匹配时将返回None
match = pattern.match('hello world!')

if match:
    # 使用Match获得分组信息
    print match.group()
核心笔记:RE编译(何时应该使用compile函数?)
大多数re模块函数都可以作为regex对象的方法,尽管我们建议预编译,但它并不是必需的。在模式匹配之前,正则表达式模式必须先被编译成regex对象,既然正则表达式的编译是必现的,那么使用预编译无疑是可以提升执行性能的。
3.re实例
#!/usr/bin/env python
# -*- coding: utf-8 -*-

import re

str1 = "Milton Will Love Cherish Forever  & Cherish is Nice! &1314"

# match(pattern,string,flags=0) 用正则表达式pattern匹配字符串string,从首字符开始匹配,如果匹配成功,返回一个匹配对象
m1 = re.match("Milton", str1)
if m1:
    print "m1 match:", m1.group()

m2 = re.match("Cherish", str1)
if m2:
    print "m2 match:", m2.group()

# search(pattern,string,flags=0) 在字符串中搜索正则表达式pattern的第一次出现,如果匹配成功,返回一个匹配对象
m3 = re.search("Cherish", str1)
if m3:
    print "m3 match:", m3.group()

# findall(pattern,string[,flags]) 在字符串string中搜索正则表达式模式pattern的所有(非重复)出现,返回一个匹配对象的列表
m4 = re.findall("Cherish", str1)
if m4:
    print "m4 match:", m4

# split(pattern,string,max=0) 根据正则表达式pattern中的分隔符把字符串string分割为一个列表,返回成功匹配的列表
m5 = re.split("&", str1)
if m5:
    print "m5 match:", m5

# sub(pattern,repl,string,max=0) 把字符串string中所有匹配正则表达式pattern的地方替换成字符串repl
m6 = re.sub("Cherish", "YangP", str1)
if m6:
    print "m6 match:", m6

# 匹配多个字符串(|)
m7 = re.search("love|Nice", str1)
if m7:
    print "m7 match:", m7.group()

# 匹配任意单个字符(.)
m8 = re.search(".ove", str1)
if m8:
    print "m8 match:", m8.group()

# 匹配字符集合[]
m9 = re.search("[1M][2i][3l][t4][o5][n6]", str1)
if m9:
    print "m9 match:", m9.group()

# 匹配重复
m10 = re.search("Wil{2}", str1)
if m10:
    print "m10 match:", m10.group()

# 匹配特殊字符与子组
m11 = re.search("&(d+)", str1)
if m11:
    print "m11 match:", m11.group(1)

# 匹配换行s
str2 = """
    Cherish,I Love U!
    Forever & 1314
"""
m12 = re.search("I Love U!s+(.*d+$)", str2)
if m12:
    print "m12 match:", m12.group(1)

# 贪婪匹配(?),正则表达式本身默认是贪心匹配的。将非贪婪操作符"?"用在"*","+"或"?"的后面,它的作用是要求正则表达式引擎匹配的字符越少越好。
str3 = "guanfuchang@4399.com::2016-11-17"
m13 = re.search(".+(d+-d+-d+)", str3)
if m13:
    print "m13 match:", m13.group(1)
m14 = re.search(".+?(d+-d+-d+)", str3)
if m14:
    print "m14 match:", m14.group(1)
开源模块
一、下载安装
下载安装有两种方式:
yum
pip
apt-get
...
下载源码
解压源码
进入目录
编译源码    python setup.py build
安装源码    python setup.py install
二、导入模块
三、使用模块