需达成目标:在服务器(192.168.18.211)端搭建 rsync 服务,
将 /root/rsync-server/ 目录同步到客户端 /root/rsync-local 目录
Linux系统:CentOS 6.5
一、由于CentOS6.5已经默认已经安装了 rsync,如若没有安装,可以参考如下方法:
1、检查是否安装了 rsync :
rpm -qa rsync
2、如果没有安装可以使用yum安装
yum install -y rsync
3、启动 rsync :
/etc/init.d/xinetd start
或 service xinetd start
二、服务端(192.168.18.211)[每个人的IP肯定都不一样]
1、建立 rsync 账号密码文件:
vim /root/rsync_user , 添加一行 账号 : 密码
root:123456
2、修改权限
chmod 600 rsync_user
3、创建 rsync 全局配置文件
vim /etc/rsyncd.conf (默认没有此配置文件,手动添加该文件),内容如下:

uid = nobody  // 传输文件时,执行的用户
gid = nobody      // 传输文件时,执行的用户组
use chroot = yes  // 在传输文件之前,服务器守护程序在将chroot 到文件系统中的目录中
pid file = /var/run/rsyncd.pid  // 告知进程写到 /var/run/rsyncd.pid 文件中
log file = /var/log/rsyncd.log  // 日志路径

[tools]            // 模块名,主要是定义服务器哪个目录要被同步
path = /root/rsync-server    // 指定文件目录所在位置,这是必须指定的
comment = Rsync share test      // 注释可以自己定义
auth users = root        // 认证用户是 root,必须是服务器上真实存在的用户
secrets file = /root/rsync_user  // 密码存在哪个文件
read only = yes  // 是只读选择,也就是说,不让客户端上传文件到服务器
4、修改 /etc/xinetd.d/rsync
vim /etc/xinetd.d/rsync
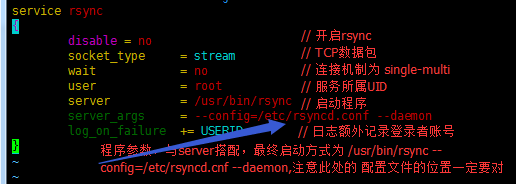
关于super daemon 配置文件更详细的内容请参考 《鸟哥的linux私房菜基础篇 559页》
三、客户端(192.168.19.25)
1、设置密码文件:
vim /root/rsync_pass // 只需写登录用户密码,要与服务器端设置密码一致
123456
2、修改权限
chmod 600 rsync_pass
3、创建接收服务器文件的目录
mkdir rsync-local
4、在同步服务文件之前,可以先浏览一下服务中带共享的文件,此处可以先查看一下共享的文件
rsync root@192.168.18.211::tools
5、手动同步共享目录
rsync -az --password-file=/root/rsync_pass root@192.168.18.211::tools /root/rsync-local
6、使用cron例行性任务定时从服务器同步文件
crontab -e
0 5 * * * /usr/bin/rsync -a --password-file=/root/rsync_pass root@192.168.18.211::tools /root/rsync-local
四、附rsyncd.conf服务器的配置详解
1、全局定义
uid = nobody
gid = nobdoy
注:服务器端传输文件时,要发哪个用户和用户组来执行,默认是nobody。 如果用nobody 用户和用户组,可能遇到权限问题,有些文件从服务器上拉不下来。所以我就偷懒,为了方便,用了root 。不过您可以在定义要同步的目录时定义的模块中指定用户来解决权限的问题。
use chroot = yes
注:用chroot,在传输文件之前,服务器守护程序在将chroot 到文件系统中的目录中,这样做的好处是可能保护系统被安装漏洞侵袭的可能。缺点是需要超级用户权限。另外对符号链接文件,将会排除在外。 也就是说,你在 rsync服务器上,如果有符号链接,你在备份服务器上运行客户端的同步数据时,只会把符号链接名同步下来,并不会同步符号链接的内容;这个需要自己来尝试
read only = yes
注:read only 是只读选择,也就是说,不让客户端上传文件到服务器上。还有一个 write only选项,自己尝试是做什么用的吧;
hosts allow=192.168.1.0/255.255.255.0 10.0.1.0/255.255.255.0
注:在您可以指定单个IP,也可以指定整个网段,能提高安全性。格式是ip 与ip 之间、ip和网段之间、网段和网段之间要用空格隔开;
pid file = /var/run/rsyncd.pid 注:告诉进程写到 /var/run/rsyncd.pid 文件中;
port = 873 注:指定运行端口,默认是873,您可以自己指定;
address = 192.168.18.211 注:指定服务器IP地址
max connections = 5 注:客户端最多连接数
motd file = /etc/rsyncd/rsyncd.motd
注:motd file 是定义服务器信息的,要自己写 rsyncd.motd 文件内容。当用户登录时会看到这个信息。比如我写的是:
log file = /var/log/rsync.log 注:rsync 服务器的日志;
2、模块定义
模块定义什么呢?主要是定义服务器哪个目录要被同步。每个模块都要以[name]形式。这个名字就是在rsync 客户端看到的名字,其实有点象Samba服务器提供的共享名。而服务器真正同步的数据是通过path 指定的。我们可以根据自己的需要,来指定多个模块。每个模块要指定认证用户,密码文件、但排除并不是必须的
下面是前面配置文件模块的例子:
[rhel4home]  #模块它为我们提供了一个链接的名字,在本模块中链接到了/home目录;要用[name] 形式
  path = /home #指定文件目录所在位置,这是必须指定的
  auth users = root   #认证用户是root  ,是必须在服务器上存在的用户
  list=yes   #list 意思是把rsync 服务器上提供同步数据的目录在服务器上模块是否显示列出来。默认是yes 。如果你不想列出来,就no ;如果是no是比较安全的,至少别人不知道你的服务器上提供了哪些目录。你自己知道就行了;
  ignore errors  #忽略IO错误
  secrets file = /etc/rsyncd.secrets   #密码存在哪个文件
  comment = linuxsir home  data  #注释可以自己定义
  exclude = beinan/ samba/  #exclude是排除的意思,也就是说,要把/home目录下的easylife和samba排除在外; easylife/和samba/目录之间有空格分开
五、防火墙的设置
Linux 防火墙是用iptables,所以我们至少在服务器端要让你所定义的rsync 服务器端口通过,客户端上也应该让通过。
iptables -A INPUT -p tcp -m state --state NEW  -m tcp --dport 873 -j ACCEPT
iptables -L  #查看一下防火墙是不是打开了 873端口
如果你不太懂防火墙的配置,可以先service iptables stop 将防火墙关掉。当然在生产环境这是很危险的,做测试就无所谓啦!
六、rsync语法详解
在配置完rsync服务器后,就可以从客户端发出rsync命令来实现各种同步的操作。rsync有很多功能选项,下面就对介绍一下常用的选项:
rsync的命令格式可以为:
1. rsync [OPTION]... SRC [SRC]... [USER@]HOST:DEST
2. rsync [OPTION]... [USER@]HOST:SRC DEST
3. rsync [OPTION]... SRC [SRC]... DEST
4. rsync [OPTION]... [USER@]HOST::SRC [DEST]
5. rsync [OPTION]... SRC [SRC]... [USER@]HOST::DEST
6. rsync [OPTION]... rsync://[USER@]HOST[:PORT]/SRC [DEST]
rsync有六种不同的工作模式:
1. 拷贝本地文件;当SRC和DES路径信息都不包含有单个冒号":"分隔符时就启动这种工作模式。
2.使用一个远程shell程序(如rsh、ssh)来实现将本地机器的内容拷贝到远程机器。当DST路径地址包含单个冒号":"分隔符时启动该模式。
3.使用一个远程shell程序(如rsh、ssh)来实现将远程机器的内容拷贝到本地机器。当SRC地址路径包含单个冒号":"分隔符时启动该模式。
4. 从远程rsync服务器中拷贝文件到本地机。当SRC路径信息包含"::"分隔符时启动该模式。
5. 从本地机器拷贝文件到远程rsync服务器中。当DST路径信息包含"::"分隔符时启动该模式。
6. 列远程机的文件列表。这类似于rsync传输,不过只要在命令中省略掉本地机信息即可。
rsync中的参数
-a 以archive模式操作、复制目录、符号连接 相当于-rlptgoD
-r 是递归
-l 是链接文件,意思是拷贝链接文件;-p 表示保持文件原有权限;-t 保持文件原有时间;-g 保持文件原有用户组;-o 保持文件原有属主;-D 相当于块设备文件;
-z 传输时压缩;
-P 传输进度;
-v 传输时的进度等信息,和-P有点关系,自己试试。可以看文档;
-e ssh的参数建立起加密的连接。
-u只进行更新,防止本地新文件被重写,注意两者机器的时钟的同时
--progress 是指显示出详细的进度情况
--delete 是指如果服务器端删除了这一文件,那么客户端也相应把文件删除,保持真正的一致
--password-file=/password/path/file来指定密码文件,这样就可以在脚本中使用而无需交互式地输入验证密码了,这里需要注意的是这份密码文件权限属性要设得只有属主可读。
七、rsync错误分析
我们都是通过错误日志查看,在/etc/log/rsyncd.log里面,大家可以用记事本打开查看。
注意windows下面我们需要给SvcwRsync用户,管理同步目录的所有权限,基本上这样就可以了
问题一:
@ERROR: chroot failed
rsync error: error starting client-server protocol (code 5) at main.c(1522) [receiver=3.0.3]
原因:
服务器端的目录不存在或无权限,创建目录并修正权限可解决问题。
问题二:
@ERROR: auth failed on module tee
rsync error: error starting client-server protocol (code 5) at main.c(1522) [receiver=3.0.3]
原因:
服务器端该模块(tee)需要验证用户名密码,但客户端没有提供正确的用户名密码,认证失败。
提供正确的用户名密码解决此问题。
问题三:
@ERROR: Unknown module ‘tee_nonexists'
rsync error: error starting client-server protocol (code 5) at main.c(1522) [receiver=3.0.3]
原因:
服务器不存在指定模块。提供正确的模块名或在服务器端修改成你要的模块以解决问题。
问题1:
在client上遇到问题:
rsync -auzv --progress --password-file=/etc/rsync.pas root@192.168.133.128::backup /home/
rsync: could not open password file "/etc/rsync.pas": No such file or directory (2)
Password:
@ERROR: auth failed on module backup
rsync error: error starting client-server protocol (code 5) at main.c(1506) [Receiver=3.0.7]
遇到这个问题:client端没有设置/etc/rsync.pas这个文件,而在使用rsync命令的时候,加了这个参数--
password-file=/etc/rsync.pas
问题2:
rsync -auzv --progress --password-file=/etc/rsync.pas root@192.168.133.128::backup /home/
@ERROR: auth failed on module backup
rsync error: error starting client-server protocol (code 5) at main.c(1506) [Receiver=3.0.7]
遇到这个问题:client端已经设置/etc/rsync.pas这个文件,里面也设置了密码111111,和服务器一致,但是
服务器段设置有错误,服务器端应该设置/etc/rsync.pas ,里面内容root:111111 ,这里登陆名不可缺少
问题3:
rsync -auzv --progress --password-file=/etc/rsync.pas root@192.168.133.128::backup /home/
@ERROR: chdir failed
rsync error: error starting client-server protocol (code 5) at main.c(1506) [Receiver=3.0.7]
遇到这个问题,是因为服务器端的/home/backup 其中backup这个目录并没有设置,所以提示:chdir failed
问题4:
rsync: write failed on "/home/backup2010/wensong": No space left on device (28)
rsync error: error in file IO (code 11) at receiver.c(302) [receiver=3.0.7]
rsync: connection unexpectedly closed (2721 bytes received so far) [generator]
rsync error: error in rsync protocol data stream (code 12) at io.c(601) [generator=3.0.7]
磁盘空间不够,所以无法操作。
可以通过df /home/backup2010 来查看可用空间和已用空间
问题5:网络收集问题
1、权限问题
类似如下的提示:rsync: opendir "/kexue" (in dtsChannel) failed: Permission denied (13)注意查看同步的目录权限是否为755
2、time out
rsync: failed to connect to 203.100.192.66: Connection timed out (110)
rsync error: error in socket IO (code 10) at clientserver.c(124) [receiver=3.0.5]
检查服务器的端口netstat –tunlp,远程telnet测试。
可能因为客户端或者服务端的防火墙开启 导致无法通信,可以设置规则放行 rsync(873端口) 或者直接关闭防火墙。
还有一种在同步过程中可能会提示没有权限 (将同步目录加上SvcwRsync全部权限即可,更简单的方法就是将SvcwRsync设为管理员即可)
3、服务未启动
rsync: failed to connect to 10.10.10.170: Connection refused (111)
rsync error: error in socket IO (code 10) at clientserver.c(124) [receiver=3.0.5]
启动服务:rsync --daemon --config=/etc/rsyncd.conf
4、磁盘空间满
rsync: recv_generator: mkdir "/teacherclubBackup/rsync……" failed: No space left on device (28)
*** Skipping any contents from this failed directory ***
5、Ctrl+C或者大量文件
rsync error: received SIGINT, SIGTERM, or SIGHUP (code 20) at rsync.c(544) [receiver=3.0.5]
rsync error: received SIGINT, SIGTERM, or SIGHUP (code 20) at rsync.c(544) [generator=3.0.5]
说明:导致此问题多半是服务端服务没有被正常启动,到服务器上去查查服务是否有启动,然后查看下 /var/run/rsync.pid 文件是否存在,最干脆的方法是杀死已经启动了服务,然后再次启动服务或者让脚本加入系统启动服务级别然后shutdown -r now服务器
6、xnetid启动
rsync: read error: Connection reset by peer (104)
rsync error: error in rsync protocol data stream (code 12) at io.c(759) [receiver=3.0.5]
查看rsync日志
rsync: unable to open configuration file "/etc/rsyncd.conf": No such file or directory
xnetid查找的配置文件位置默认是/etc下,根据具体情况创建软链接。例如:
ln -s /etc/rsyncd/rsyncd.conf /etc/rsyncd.conf
或者更改指定默认的配置文件路径,在/etc/xinetd.d/rsync配置文件中。
我自己的解决方案是:查看 /etc/xinetd.d/rsync 中 server_args 的配置 ,应该是 --config=/etc/rsyncd.conf 这个路径写错了
Rsync configure:
配置一:
ignore errors
说明:这个选项最好加上,否则再很多crontab的时候往往发生错误你也未可知,因为你不可能天天去看每时每刻去看log,不加上这个出现错误的几率相对会很高,因为任何大点的项目和系统,磁盘IO都是一个瓶颈
Rsync error:
错误一:
@ERROR: auth failed on module xxxxx
rsync: connection unexpectedly closed (90 bytes read so far)
rsync error: error in rsync protocol data stream (code 12) at io.c(150)
说明:这是因为密码设置错了,无法登入成功,检查一下rsync.pwd,看客服是否匹配。还有服务器端没启动rsync 服务也会出现这种情况。
错误二:
password file must not be other-accessible
continuing without password file
Password:
说明:这是因为rsyncd.pwd rsyncd.sec的权限不对,应该设置为600。如:chmod 600 rsyncd.pwd
错误三:
@ERROR: chroot failed
rsync: connection unexpectedly closed (75 bytes read so far)
rsync error: error in rsync protocol data stream (code 12) at io.c(150)
说明:这是因为你在 rsync.conf 中设置的 path 路径不存在,要新建目录才能开启同步
错误四:
rsync: failed to connect to 218.107.243.2: No route to host (113)
rsync error: error in socket IO (code 10) at clientserver.c(104) [receiver=2.6.9]
说明:防火墙问题导致,这个最好先彻底关闭防火墙,排错的基本法就是这样,无论是S还是C,还有ignore errors选项问题也会导致
错误五:
@ERROR: access denied to www from unknown (192.168.1.123)
rsync: connection unexpectedly closed (0 bytes received so far) [receiver]
rsync error: error in rsync protocol data stream (code 12) at io.c(359)
说明:此问题很明显,是配置选项host allow的问题,初学者喜欢一个允许段做成一个配置,然后模块又是同一个,致使导致
错误六:
rsync error: received SIGINT, SIGTERM, or SIGHUP (code 20) at rsync.c(244) [generator=2.6.9]
rsync error: received SIGUSR1 (code 19) at main.c(1182) [receiver=2.6.9]
说明:导致此问题多半是服务端服务没有被正常启动,到服务器上去查查服务是否有启动,然后查看下 /var/run/rsync.pid 文件是否存在,最干脆的方法是杀死已经启动了服务,然后再次启动服务或者让脚本加入系统启动服务级别然后shutdown -r now服务器
错误七:
rsync: read error: Connection reset by peer (104)
rsync error: error in rsync protocol data stream (code 12) at io.c(604) [sender=2.6.9]
说明:原数据目录里没有数据存在