实验环境:
两台编译安装的mysql 一台编译安装的nginx
192.168.3.1 192.168.3.3
192.168.3.2
首先解压nginx1.11版本的包
如果已经安装过nginx但版本不到1.9的话使用平滑升级
yum install -y pcre-devel zilb-devel
tar zxf nginx-1.11.1.tar.gz
cd nginx-1.11.1
./configure --prefix=/usr/local/nginx/ --user=nginx --group=nginx --with-http_stub_status_module --with-http_ssl_module --with-http_realip_module --with-http_flv_module --with-http_gzip_static_module --with-stream
——绿色的安装是必不可少的 make && make install
进入主配置文件里添加:
stream {
upstream mysql {
server 192.168.3.1:3306 max_fails=3 fail_timeout=30s;
server 192.168.3.2:3306 max_fails=3 fail_timeout=30s;
}
server {
listen 3306;
proxy_pass mysql;
}
}
在全局模式下添加!!!
192.168.3.1 192.168.3.2 都是两台编译安装好的mysql
保存退出
killall -s HUP nginx ——重启nginx服务
在192.168.3.1 192.168.3.2 mysql里给一个授权。
grant all on *.* to 'zhangsan'@'192.168.3.%' identified by '123.com';
flush privileges;
grant all on *.* to 'zhangsan'@'192.168.3.%' identified by '123.com';
flush privileges;
两台都需要授权
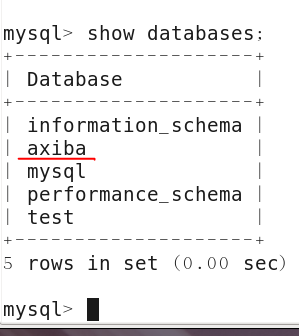
为了验证效果我们在192.168.3.1上创建一个axiba库
create database axiba ;
用nginx连接mysql
mysql -u zhangsan -h 192.168.3.3 -p ——192.168.3.3 是nginx的ip地址

有axiba这个库说明我们连接到了192.168.3.1的mysql上
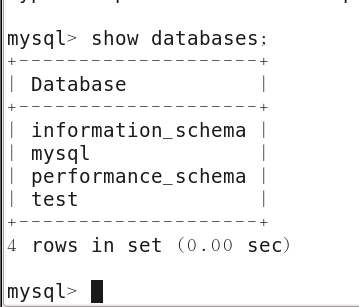
之后再从新远程:
mysql -u zhangsan -h 192.168.3.3 -p

没有axiba这个库说明我们连接到了192.168.3.2这个mysql上
出现这个效果即为nginx代理成功。