本文开始从源码的层面,讲解一些Spring Security Oauth2的认证流程。本文较长,适合在空余时间段观看。且涉及了较多的源码,非关键性代码以…代替。
准备工作
首先开启debug信息:
logging:
  level:
    org.springframework: DEBUG
可以完整的看到内部的运转流程。
client模式稍微简单一些,使用client模式获取token http://localhost:8080/oauth/token?client_id=client_1&client_secret=123456&scope=select&grant_type=client_credentials
由于debug信息太多了,我简单按照顺序列了一下关键的几个类:
ClientCredentialsTokenEndpointFilter
DaoAuthenticationProvider
TokenEndpoint
TokenGranter
@EnableAuthorizationServer
上一篇博客中我们尝试使用了password模式和client模式,有一个比较关键的endpoint:/oauth/token。从这个入口开始分析,spring security oauth2内部是如何生成token的。获取token,与第一篇文章中的两个重要概念之一有关,也就是AuthorizationServer与ResourceServer中的AuthorizationServer。
在之前的配置中
@Configuration
@EnableAuthorizationServer
protected static class AuthorizationServerConfiguration extends AuthorizationServerConfigurerAdapter {}
出现了AuthorizationServerConfigurerAdapter 关键类,他关联了三个重要的配置类,分别是
public class AuthorizationServerConfigurerAdapter implements AuthorizationServerConfigurer {

    @Override
    public void configure(AuthorizationServerSecurityConfigurer security <1>) throws Exception {
    }

    @Override
    public void configure(ClientDetailsServiceConfigurer clients <2>) throws Exception {
    }

    @Override
    public void configure(AuthorizationServerEndpointsConfigurer endpoints <3>) throws Exception {
    }

}
<1> 配置AuthorizationServer安全认证的相关信息,创建ClientCredentialsTokenEndpointFilter核心过滤器
<2> 配置OAuth2的客户端相关信息
<3> 配置AuthorizationServerEndpointsConfigurer众多相关类,包括配置身份认证器,配置认证方式,TokenStore,TokenGranter,OAuth2RequestFactory
我们逐步分析其中关键的类
客户端身份认证核心过滤器ClientCredentialsTokenEndpointFilter(掌握)
截取关键的代码,可以分析出大概的流程
在请求到达/oauth/token之前经过了ClientCredentialsTokenEndpointFilter这个过滤器,关键方法如下
public Authentication attemptAuthentication(HttpServletRequest request, HttpServletResponse response)
        throws AuthenticationException, IOException, ServletException {
    ...
    String clientId = request.getParameter("client_id");
    String clientSecret = request.getParameter("client_secret");

    ...
    clientId = clientId.trim();
    UsernamePasswordAuthenticationToken authRequest = new UsernamePasswordAuthenticationToken(clientId,
            clientSecret);

    return this.getAuthenticationManager().authenticate(authRequest);

}
顶级身份管理者AuthenticationManager(掌握)
用来从请求中获取client_id,client_secret,组装成一个UsernamePasswordAuthenticationToken作为身份标识,使用容器中的顶级身份管理器AuthenticationManager去进行身份认证(AuthenticationManager的实现类一般是ProviderManager。而ProviderManager内部维护了一个List,真正的身份认证是由一系列AuthenticationProvider去完成。而AuthenticationProvider的常用实现类则是DaoAuthenticationProvider,DaoAuthenticationProvider内部又聚合了一个UserDetailsService接口,UserDetailsService才是获取用户详细信息的最终接口,而我们上一篇文章中在内存中配置用户,就是使用了UserDetailsService的一个实现类InMemoryUserDetailsManager)。UML类图可以大概理解下这些类的关系,省略了授权部分。 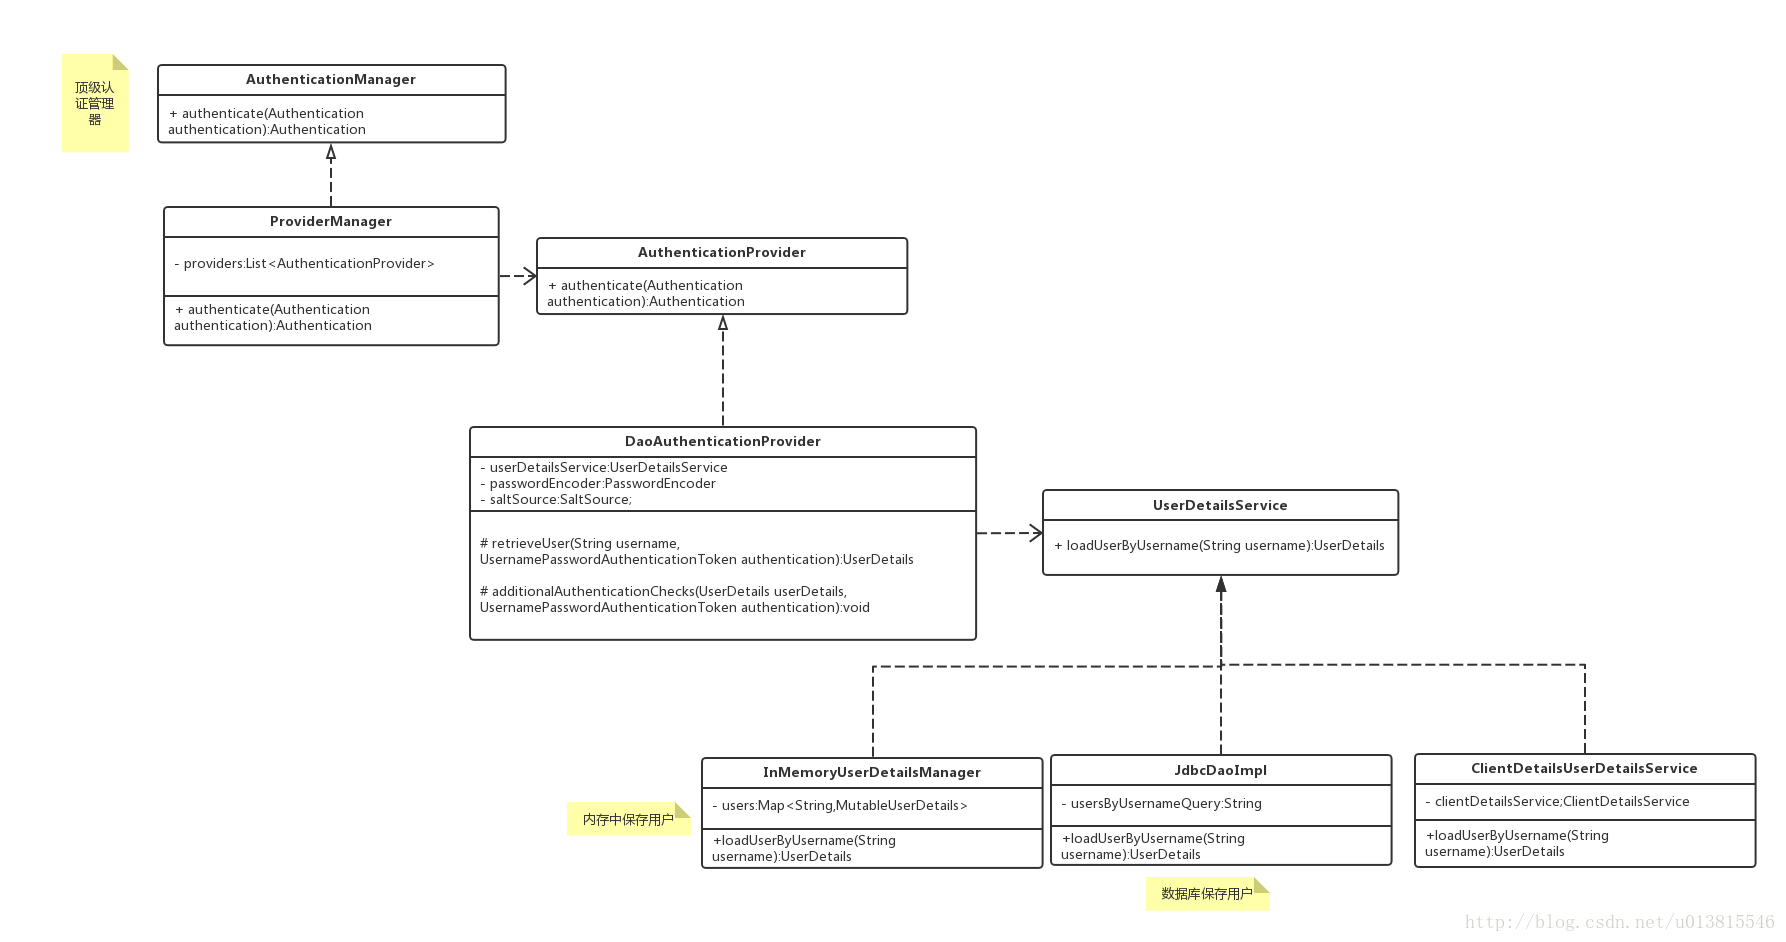
可能机智的读者会发现一个问题,我前面一篇文章已经提到了client模式是不存在“用户”的概念的,那么这里的身份认证是在认证什么呢?debug可以发现UserDetailsService的实现被适配成了ClientDetailsUserDetailsService,这个设计是将client客户端的信息(client_id,client_secret)适配成用户的信息(username,password),这样我们的认证流程就不需要修改了。
经过ClientCredentialsTokenEndpointFilter之后,身份信息已经得到了AuthenticationManager的验证。接着便到达了
TokenEndpoint。
Token处理端点TokenEndpoint(掌握)
前面的两个ClientCredentialsTokenEndpointFilter和AuthenticationManager可以理解为一些前置校验,和身份封装,而这个类一看名字就知道和我们的token是密切相关的。
@FrameworkEndpoint
public class TokenEndpoint extends AbstractEndpoint {

    @RequestMapping(value = "/oauth/token", method=RequestMethod.POST)
    public ResponseEntity<OAuth2AccessToken> postAccessToken(Principal principal, @RequestParam
    Map<String, String> parameters) throws HttpRequestMethodNotSupportedException {
         ...
        String clientId = getClientId(principal);
        ClientDetails authenticatedClient = getClientDetailsService().loadClientByClientId(clientId);//<1>
        ...
        TokenRequest tokenRequest = getOAuth2RequestFactory().createTokenRequest(parameters, authenticatedClient);//<2>
        ...
        OAuth2AccessToken token = getTokenGranter().grant(tokenRequest.getGrantType(), tokenRequest);//<3>
        ...
        return getResponse(token);

    }

    private TokenGranter tokenGranter;
}
<1> 加载客户端信息
<2> 结合请求信息,创建TokenRequest
<3> 将TokenRequest传递给TokenGranter颁发token
省略了一些校验代码之后,真正的/oauth/token端点暴露在了我们眼前,其中方法参数中的Principal经过之前的过滤器,已经被填充了相关的信息,而方法的内部则是依赖了一个TokenGranter 来颁发token。其中OAuth2AccessToken的实现类DefaultOAuth2AccessToken就是最终在控制台得到的token序列化之前的原始类:
public class DefaultOAuth2AccessToken implements Serializable, OAuth2AccessToken {

    private static final long serialVersionUID = 914967629530462926L;

    private String value;

    private Date expiration;

    private String tokenType = BEARER_TYPE.toLowerCase();

    private OAuth2RefreshToken refreshToken;

    private Set<String> scope;

    private Map<String, Object> additionalInformation = Collections.emptyMap();

    //getter,setter
}


@org.codehaus.jackson.map.annotate.JsonSerialize(using = OAuth2AccessTokenJackson1Serializer.class)
@org.codehaus.jackson.map.annotate.JsonDeserialize(using = OAuth2AccessTokenJackson1Deserializer.class)
@com.fasterxml.jackson.databind.annotation.JsonSerialize(using = OAuth2AccessTokenJackson2Serializer.class)
@com.fasterxml.jackson.databind.annotation.JsonDeserialize(using = OAuth2AccessTokenJackson2Deserializer.class)

public interface OAuth2AccessToken {

    public static String BEARER_TYPE = "Bearer";

    public static String OAUTH2_TYPE = "OAuth2";

    /**
     * The access token issued by the authorization server. This value is REQUIRED.
     */
    public static String ACCESS_TOKEN = "access_token";

    /**
     * The type of the token issued as described in <a
     * href="http://tools.ietf.org/html/draft-ietf-oauth-v2-22#section-7.1">Section 7.1</a>. Value is case insensitive.
     * This value is REQUIRED.
     */
    public static String TOKEN_TYPE = "token_type";

    /**
     * The lifetime in seconds of the access token. For example, the value "3600" denotes that the access token will
     * expire in one hour from the time the response was generated. This value is OPTIONAL.
     */
    public static String EXPIRES_IN = "expires_in";

    /**
     * The refresh token which can be used to obtain new access tokens using the same authorization grant as described
     * in <a href="http://tools.ietf.org/html/draft-ietf-oauth-v2-22#section-6">Section 6</a>. This value is OPTIONAL.
     */
    public static String REFRESH_TOKEN = "refresh_token";

    /**
     * The scope of the access token as described by <a
     * href="http://tools.ietf.org/html/draft-ietf-oauth-v2-22#section-3.3">Section 3.3</a>
     */
    public static String SCOPE = "scope";

    ...
}
一个典型的样例token响应,如下所示,就是上述类序列化后的结果:
{
    "access_token":"950a7cc9-5a8a-42c9-a693-40e817b1a4b0",
    "token_type":"bearer",
    "refresh_token":"773a0fcd-6023-45f8-8848-e141296cb3cb",
    "expires_in":27036,
    "scope":"select"
}
TokenGranter(掌握)
先从UML类图对TokenGranter接口的设计有一个宏观的认识
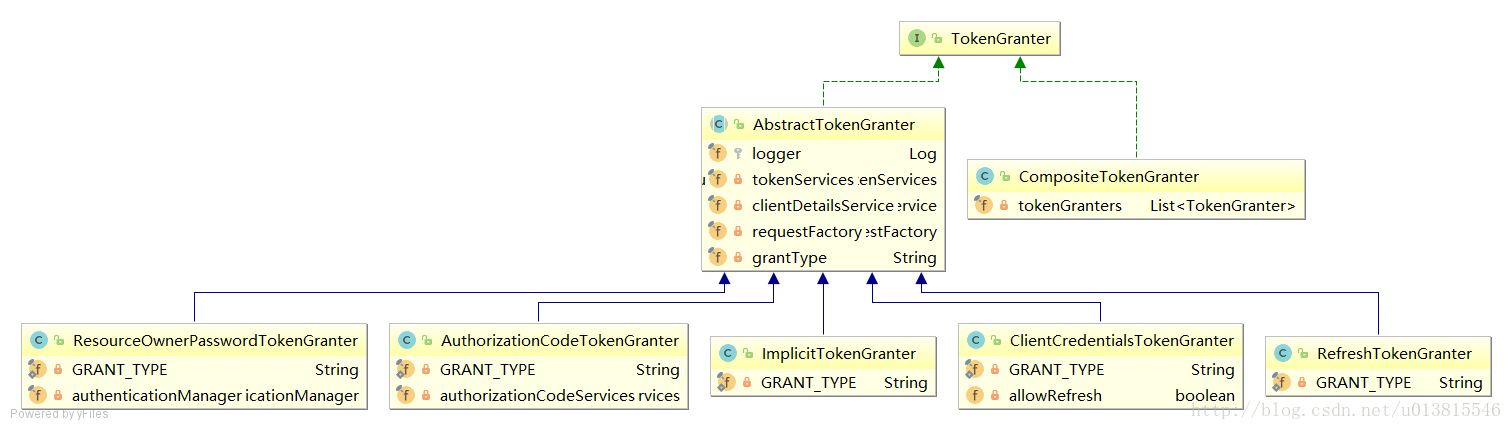
TokenGranter的设计思路是使用CompositeTokenGranter管理一个List列表,每一种grantType对应一个具体的真正授权者,在debug过程中可以发现CompositeTokenGranter 内部就是在循环调用五种TokenGranter实现类的grant方法,而granter内部则是通过grantType来区分是否是各自的授权类型。
public class CompositeTokenGranter implements TokenGranter {

    private final List<TokenGranter> tokenGranters;

    public CompositeTokenGranter(List<TokenGranter> tokenGranters) {
        this.tokenGranters = new ArrayList<TokenGranter>(tokenGranters);
    }

    public OAuth2AccessToken grant(String grantType, TokenRequest tokenRequest) {
        for (TokenGranter granter : tokenGranters) {
            OAuth2AccessToken grant = granter.grant(grantType, tokenRequest);
            if (grant!=null) {
                return grant;
            }
        }
        return null;
    }
}
五种类型分别是:
- ResourceOwnerPasswordTokenGranter ==> password密码模式
- AuthorizationCodeTokenGranter ==> authorization_code授权码模式
- ClientCredentialsTokenGranter ==> client_credentials客户端模式
- ImplicitTokenGranter ==> implicit简化模式
- RefreshTokenGranter ==>refresh_token 刷新token专用
以客户端模式为例,思考如何产生token的,则需要继续研究5种授权者的抽象类:AbstractTokenGranter
public abstract class AbstractTokenGranter implements TokenGranter {

    protected final Log logger = LogFactory.getLog(getClass());

    //与token相关的service,重点
    private final AuthorizationServerTokenServices tokenServices;
    //与clientDetails相关的service,重点
    private final ClientDetailsService clientDetailsService;
    //创建oauth2Request的工厂,重点
    private final OAuth2RequestFactory requestFactory;

    private final String grantType;
    ...

    public OAuth2AccessToken grant(String grantType, TokenRequest tokenRequest) {

        ...
        String clientId = tokenRequest.getClientId();
        ClientDetails client = clientDetailsService.loadClientByClientId(clientId);
        validateGrantType(grantType, client);

        logger.debug("Getting access token for: " + clientId);

        return getAccessToken(client, tokenRequest);

    }

    protected OAuth2AccessToken getAccessToken(ClientDetails client, TokenRequest tokenRequest) {
        return tokenServices.createAccessToken(getOAuth2Authentication(client, tokenRequest));
    }

    protected OAuth2Authentication getOAuth2Authentication(ClientDetails client, TokenRequest tokenRequest) {
        OAuth2Request storedOAuth2Request = requestFactory.createOAuth2Request(client, tokenRequest);
        return new OAuth2Authentication(storedOAuth2Request, null);
    }

    ...
}
回过头去看TokenEndpoint中,正是调用了这里的三个重要的类变量的相关方法。由于篇幅限制,不能延展太多,不然没完没了,所以重点分析下AuthorizationServerTokenServices是何方神圣。
AuthorizationServerTokenServices(了解)
AuthorizationServer端的token操作service,接口设计如下:
public interface AuthorizationServerTokenServices {
    //创建token
    OAuth2AccessToken createAccessToken(OAuth2Authentication authentication) throws AuthenticationException;
    //刷新token
    OAuth2AccessToken refreshAccessToken(String refreshToken, TokenRequest tokenRequest)
            throws AuthenticationException;
    //获取token
    OAuth2AccessToken getAccessToken(OAuth2Authentication authentication);

}
在默认的实现类DefaultTokenServices中,可以看到token是如何产生的,并且了解了框架对token进行哪些信息的关联。
@Transactional
public OAuth2AccessToken createAccessToken(OAuth2Authentication authentication) throws AuthenticationException {

    OAuth2AccessToken existingAccessToken = tokenStore.getAccessToken(authentication);
    OAuth2RefreshToken refreshToken = null;
    if (existingAccessToken != null) {
        if (existingAccessToken.isExpired()) {
            if (existingAccessToken.getRefreshToken() != null) {
                refreshToken = existingAccessToken.getRefreshToken();
                // The token store could remove the refresh token when the
                // access token is removed, but we want to
                // be sure...
                tokenStore.removeRefreshToken(refreshToken);
            }
            tokenStore.removeAccessToken(existingAccessToken);
        }
        else {
            // Re-store the access token in case the authentication has changed
            tokenStore.storeAccessToken(existingAccessToken, authentication);
            return existingAccessToken;
        }
    }

    // Only create a new refresh token if there wasn't an existing one
    // associated with an expired access token.
    // Clients might be holding existing refresh tokens, so we re-use it in
    // the case that the old access token
    // expired.
    if (refreshToken == null) {
        refreshToken = createRefreshToken(authentication);
    }
    // But the refresh token itself might need to be re-issued if it has
    // expired.
    else if (refreshToken instanceof ExpiringOAuth2RefreshToken) {
        ExpiringOAuth2RefreshToken expiring = (ExpiringOAuth2RefreshToken) refreshToken;
        if (System.currentTimeMillis() > expiring.getExpiration().getTime()) {
            refreshToken = createRefreshToken(authentication);
        }
    }

    OAuth2AccessToken accessToken = createAccessToken(authentication, refreshToken);
    tokenStore.storeAccessToken(accessToken, authentication);
    // In case it was modified
    refreshToken = accessToken.getRefreshToken();
    if (refreshToken != null) {
        tokenStore.storeRefreshToken(refreshToken, authentication);
    }
    return accessToken;

}
简单总结一下AuthorizationServerTokenServices的作用,他提供了创建token,刷新token,获取token的实现。在创建token时,他会调用tokenStore对产生的token和相关信息存储到对应的实现类中,可以是redis,数据库,内存,jwt。
总结
本篇总结了使用客户端模式获取Token时,spring security oauth2内部的运作流程,重点是在分析AuthenticationServer相关的类。其他模式有一定的不同,但抽象功能是固定的,只是具体的实现类会被相应地替换。阅读spring的源码,会发现它的设计中出现了非常多的抽象接口,这对我们理清楚内部工作流程产生了不小的困扰,我的方式是可以借助UML类图,先从宏观理清楚作者的设计思路,这会让我们的分析事半功倍。
下一篇文章重点分析用户携带token访问受限资源时,spring security oauth2内部的工作流程。即ResourceServer相关的类。
原文:https://blog.csdn.net/u013815546/article/details/76977239