原文:https://www.cnblogs.com/guxingy/p/13444886.html
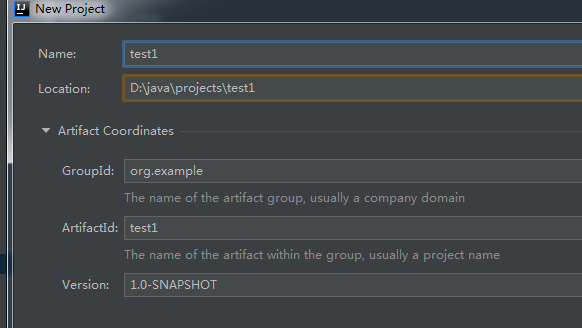
1、创建项目

2、引用相关的包
我的idea是打开了自动导入包的,如果没有打开,就需要点一下导入包,一般在右下角会有提示的

打开自动导入包

3、创建包
在java目录上点击右键,添加包

之前有个名字没有改对,现在改一下。把pom.xml里面的org.example改为com.example

接着继续建立包com.example.test1
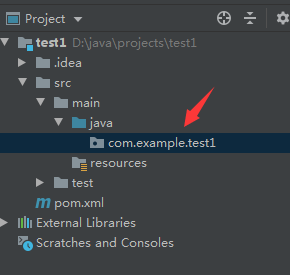
4、在包com.example.test1下,添加一个类User
package com.example.test1;

import java.io.Serializable;
import java.util.Date;

public class User implements Serializable {
    private int id;
    private String username;// 用户姓名
    private String sex;// 性别
    private Date birthday;// 生日
    private String address;// 地址

    public int getId() {
        return id;
    }

    public void setId(int id) {
        this.id = id;
    }

    public String getUsername() {
        return username;
    }

    public void setUsername(String username) {
        this.username = username;
    }

    public String getSex() {
        return sex;
    }

    public void setSex(String sex) {
        this.sex = sex;
    }

    public Date getBirthday() {
        return birthday;
    }

    public void setBirthday(Date birthday) {
        this.birthday = birthday;
    }

    public String getAddress() {
        return address;
    }

    public void setAddress(String address) {
        this.address = address;
    }

    @Override
    public String toString() {
        return "User [id=" + id + ", username=" + username + ", sex=" + sex
                + ", birthday=" + birthday + ", address=" + address + "]";
    }

}

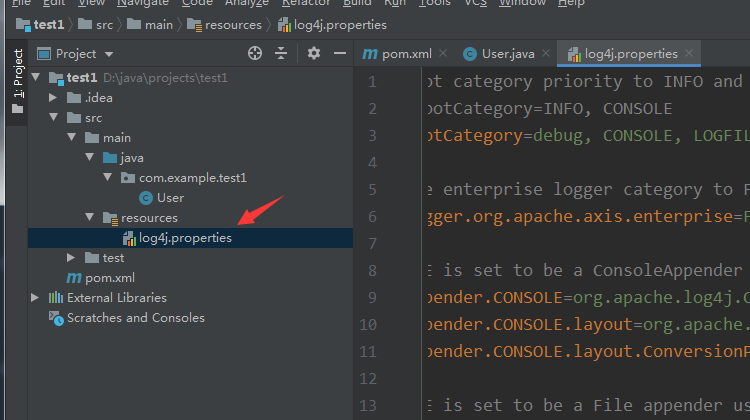
5、在resources中,添加日志的配置文件,log4j.properties
添加方法:https://www.cnblogs.com/guxingy/p/13444342.html
代码如下
# Set root category priority to INFO and its only appender to CONSOLE.
#log4j.rootCategory=INFO, CONSOLE            debug   info   warn error fatal
log4j.rootCategory=debug, CONSOLE, LOGFILE

# Set the enterprise logger category to FATAL and its only appender to CONSOLE.
log4j.logger.org.apache.axis.enterprise=FATAL, CONSOLE

# CONSOLE is set to be a ConsoleAppender using a PatternLayout.
log4j.appender.CONSOLE=org.apache.log4j.ConsoleAppender
log4j.appender.CONSOLE.layout=org.apache.log4j.PatternLayout
log4j.appender.CONSOLE.layout.ConversionPattern=%d{ISO8601} %-6r [%15.15t] %-5p %30.30c %x - %m


# LOGFILE is set to be a File appender using a PatternLayout.
log4j.appender.LOGFILE=org.apache.log4j.FileAppender
log4j.appender.LOGFILE.File=d:axis.log
log4j.appender.LOGFILE.Append=true
log4j.appender.LOGFILE.layout=org.apache.log4j.PatternLayout
log4j.appender.LOGFILE.layout.ConversionPattern=%d{ISO8601} %-6r [%15.15t] %-5p %30.30c %x - %m

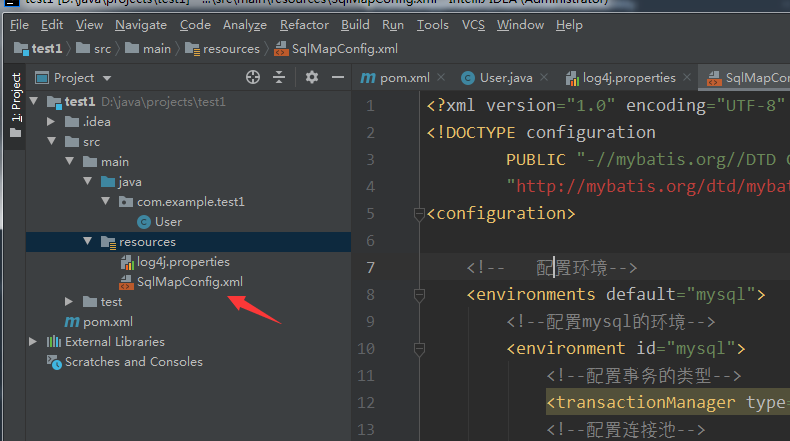
6、在resources中,添加数据库的配置文件,SqlMapConfig.xml
添加方法:https://www.cnblogs.com/guxingy/p/13444274.html
代码如下
<?xml version="1.0" encoding="UTF-8" ?>
<!DOCTYPE configuration
        PUBLIC "-//mybatis.org//DTD Config 3.0//EN"
        "http://mybatis.org/dtd/mybatis-3-config.dtd">
<configuration>

    <!--   配置环境-->
    <environments default="mysql">
        <!--配置mysql的环境-->
        <environment id="mysql">
            <!--配置事务的类型-->
            <transactionManager type="JDBC"></transactionManager>
            <!--配置连接池-->
            <dataSource type="POOLED">
                <!--配置连接数据库的4个基本信息-->
                <property name="driver" value="com.mysql.jdbc.Driver"/>
                <property name="url" value="jdbc:mysql://127.0.0.1:3306/mybatis"/>
                <property name="username" value="root"/>
                <property name="password" value="root"/>
            </dataSource>
        </environment>
    </environments>

    <!--指定映射配置文件的位置,映射配置文件指的是每个dao独立的配置文件-->
    <mappers>
        <mapper resource="User.xml"/>
    </mappers>

</configuration>

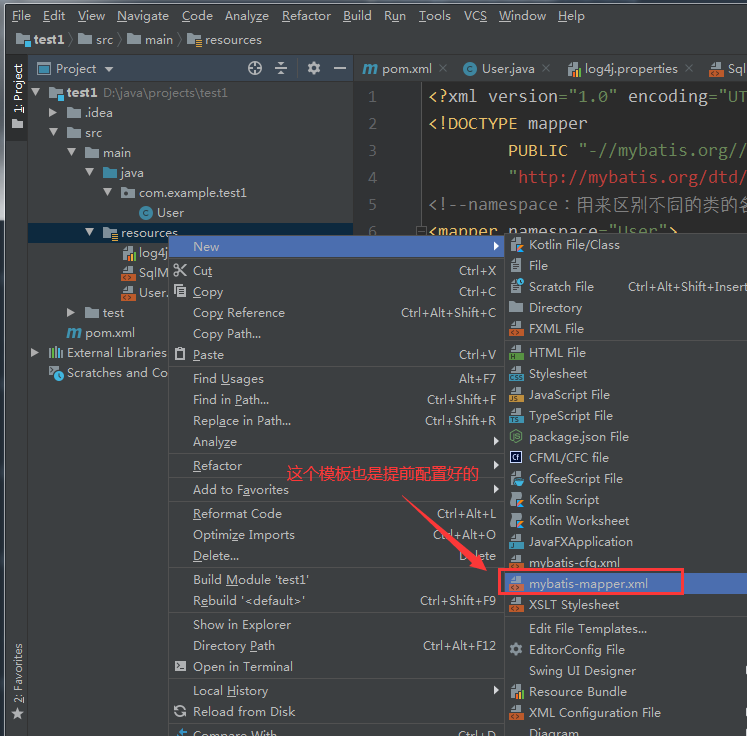
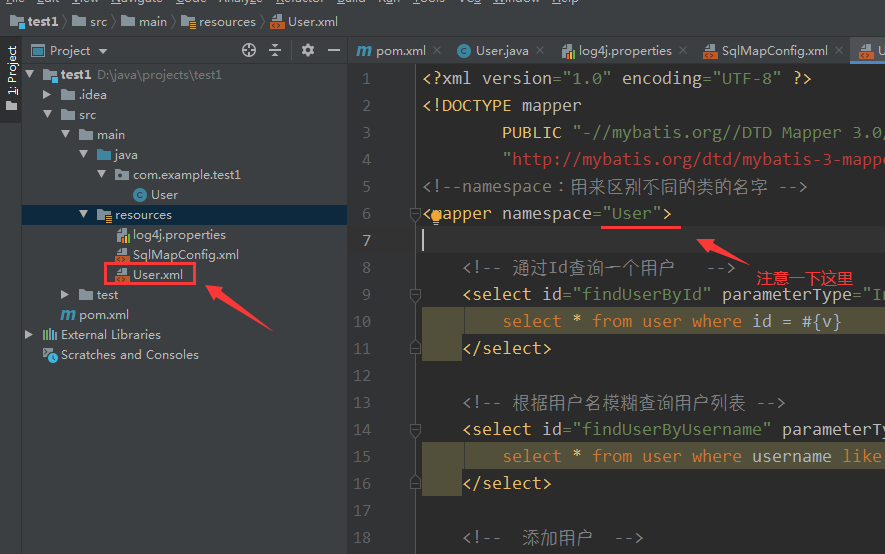
7、在resources中,添加映射文件,User.xml
这个映射文件,里面大部分是些sql语句,只是把实体的属性插入到了sql语句中。相当于sql语句是个模板引擎,只是对里面的字符串做了一个替换而已。
添加方法:https://www.cnblogs.com/guxingy/p/13444381.html
代码如下
<?xml version="1.0" encoding="UTF-8" ?>
<!DOCTYPE mapper
        PUBLIC "-//mybatis.org//DTD Mapper 3.0//EN"
        "http://mybatis.org/dtd/mybatis-3-mapper.dtd">
<!--namespace:用来区别不同的类的名字 -->
<mapper namespace="User">

    <!-- 通过Id查询一个用户   -->
    <select id="findUserById" parameterType="Integer" resultType="com.example.test1.User">
        select * from user where id = #{v}
    </select>

    <!-- 根据用户名模糊查询用户列表 -->
    <select id="findUserByUsername" parameterType="String" resultType="com.example.test1.User">
        select * from user where username like CONCAT('%',#{username},'%')
    </select>

    <!--  添加用户  -->
    <insert id="insertUser" parameterType="com.example.test1.User">
        <selectKey keyProperty="id" resultType="Integer" order="AFTER">
            select LAST_INSERT_ID()
        </selectKey>
        insert into user (username,birthday,address,sex) values(#{username},#{birthday},#{address},#{sex})
    </insert>

    <!-- 更新用户 -->
    <update id="updateUserById" parameterType="com.example.test1.User">
		update user
		set username = #{username},sex = #{sex},birthday = #{birthday},address = #{address}
		where id = #{id}
	</update>

    <!-- 删除用户   -->
    <delete id="deleteUserById" parameterType="Integer">
		delete from user
		where id = #{vvvvv}
	</delete>

</mapper>
8、添加测试文件,MybatisTest.java
import com.example.test1.User;
import org.apache.ibatis.io.Resources;
import org.apache.ibatis.session.SqlSession;
import org.apache.ibatis.session.SqlSessionFactory;
import org.apache.ibatis.session.SqlSessionFactoryBuilder;
import org.junit.Test;
import java.io.IOException;
import java.io.InputStream;
import java.util.Date;
import java.util.List;
/**
* @ClassName: MybatisTest
* @author: benjamin
* @version: 1.0
* @description: TODO
* @createTime: 2019/07/13/11:50
*/
public class MybatisTest {
public static void main(String[] args) {
}
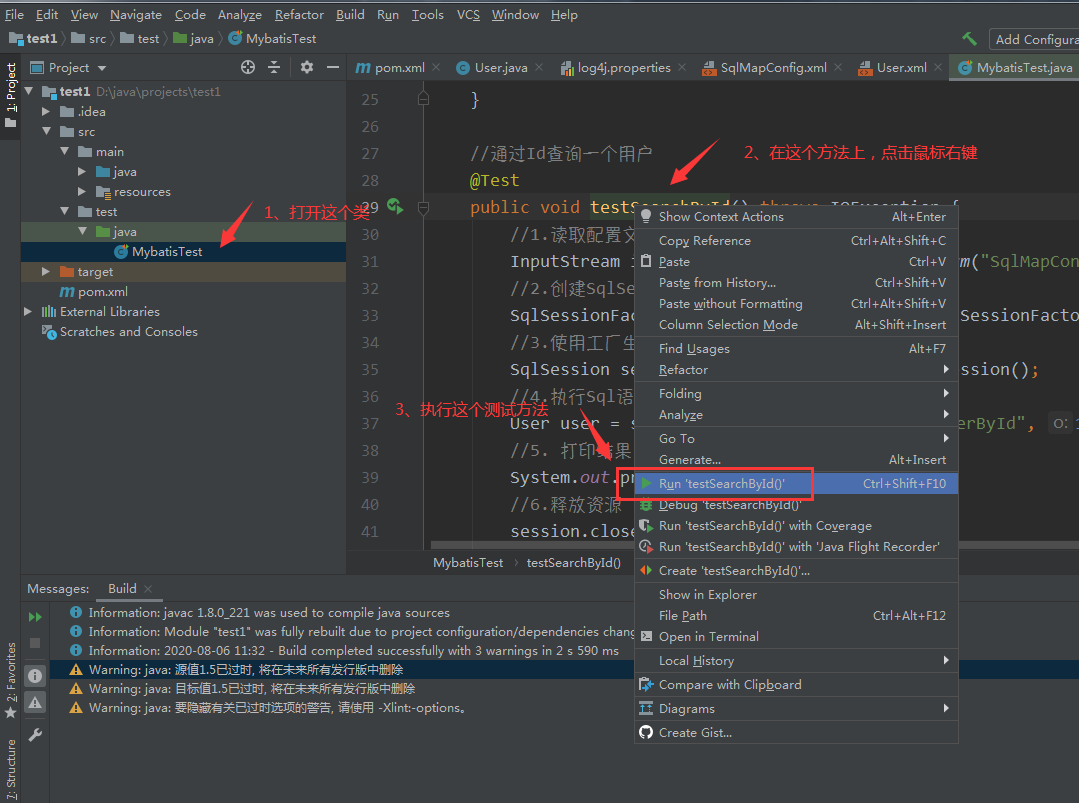
//通过Id查询一个用户
@Test
public void testSearchById() throws IOException {
//1.读取配置文件
InputStream in = Resources.getResourceAsStream("SqlMapConfig.xml");
//2.创建SqlSessionFactory工厂
SqlSessionFactory sqlSessionFactory = new SqlSessionFactoryBuilder().build(in);
//3.使用工厂生产SqlSession对象
SqlSession session = sqlSessionFactory.openSession();
//4.执行Sql语句
User user = session.selectOne("User.findUserById", 1);
//5. 打印结果
System.out.println(user);
//6.释放资源
session.close();
in.close();
}
//根据用户名模糊查询用户列表
@Test
public void testFindUserByUsername() throws IOException {
//1.读取配置文件
InputStream in = Resources.getResourceAsStream("SqlMapConfig.xml");
//2.创建SqlSessionFactory工厂
SqlSessionFactory sqlSessionFactory = new SqlSessionFactoryBuilder().build(in);
//3.使用工厂生产SqlSession对象
SqlSession session = sqlSessionFactory.openSession();
//4.执行Sql语句
List<User> list = session.selectList("User.findUserByUsername", "测试");
//5. 打印结果
for (User user:list) {
System.out.println(user);
}
//6.释放资源
session.close();
in.close();
}
//添加用户
@Test
public void testInsertUser() throws IOException {
//1.读取配置文件
InputStream in = Resources.getResourceAsStream("SqlMapConfig.xml");
//2.创建SqlSessionFactory工厂
SqlSessionFactory sqlSessionFactory = new SqlSessionFactoryBuilder().build(in);
//3.使用工厂生产SqlSession对象
SqlSession sqlSession = sqlSessionFactory.openSession();
//4.执行Sql语句
User user = new User();
user.setUsername("小强");
user.setBirthday(new Date());
user.setAddress("广州");
user.setSex("男");
int i = sqlSession.insert("User.insertUser", user);
sqlSession.commit();
//5. 打印结果
// 刚保存用户,此时用户ID需要返回。执行完上面insert程序后,此时就能知道用户的ID是多少
// 需要在User.xml文件中配置
System.out.println("插入id:"+user.getId());//插入id:30
//6.释放资源
sqlSession.close();
in.close();
}
//更新用户
@Test
public void testUpdateUserById() throws IOException {
//1.读取配置文件
InputStream in = Resources.getResourceAsStream("SqlMapConfig.xml");
//2.创建SqlSessionFactory工厂
SqlSessionFactory sqlSessionFactory = new SqlSessionFactoryBuilder().build(in);
//3.使用工厂生产SqlSession对象
SqlSession sqlSession = sqlSessionFactory.openSession();
//4.执行Sql语句
User user = new User();
user.setId(3);
user.setUsername("小李");
user.setBirthday(new Date());
user.setAddress("深圳");
user.setSex("女");
int i = sqlSession.insert("User.updateUserById", user);
sqlSession.commit();
//5. 打印结果
System.out.println(user.getId());
//6.释放资源
sqlSession.close();
in.close();
}
//删除用户
@Test
public void testDeleteUserById() throws IOException {
//1.读取配置文件
InputStream in = Resources.getResourceAsStream("SqlMapConfig.xml");
//2.创建SqlSessionFactory工厂
SqlSessionFactory sqlSessionFactory = new SqlSessionFactoryBuilder().build(in);
//3.使用工厂生产SqlSession对象
SqlSession sqlSession = sqlSessionFactory.openSession();
//4.执行Sql语句
int i = sqlSession.insert("User.deleteUserById", 3);
sqlSession.commit();
//5. 打印结果
System.out.println(i);
//6.释放资源
sqlSession.close();
in.close();
}
}

9、添加数据库和测试数据
数据库对应的表
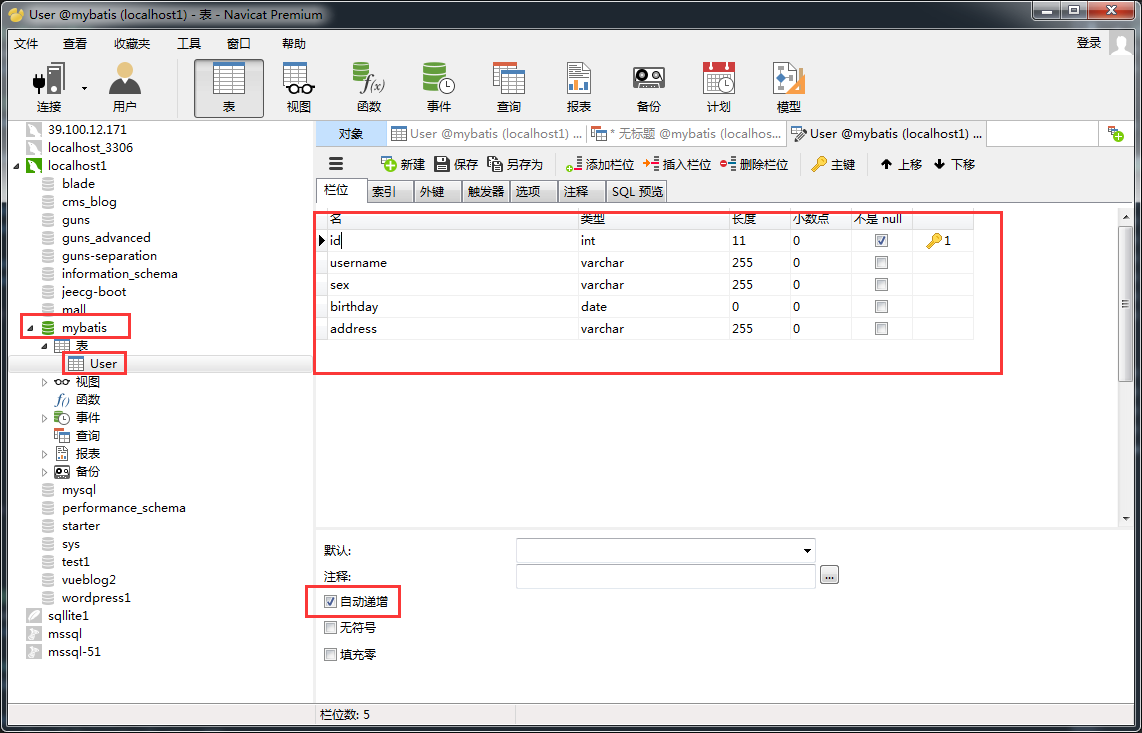
初始数据

10、测试
先编译一下项目,没有导入包,还是要导入一下哈,没有报错即可。

11、源码和数据库脚本
https://files-cdn.cnblogs.com/files/guxingy/Mybatis-增删改查.rar
12、GitHub地址
https://github.com/guxingy/MyBatis-Example
13、总结
第一次使用后的感觉,其核心还是在User.xml,里面配置了SQL语句,
这里SQL语句注入的参数和Model的属性对应,这里的SQL语句相当于是个模板,感觉就有点像dapper那种