vagrant的学习 之 LNMP和LAMP
本文根据慕课网的视频教程练习,感谢慕课网!
慕课的参考文档地址:https://github.com/apanly/mooc/tree/master/vagrant。
(1)安装nginx:
搜索nginx:
apt-cache search nginx
安装nginx:
sudo apt-get install nginx
查看nginx版本,检测是否安装成功:
vagrant@vagrant-ubuntu-trusty:/etc/apt$ nginx -v
nginx version: nginx/1.4.6 (Ubuntu)
测试nginx,查看是否成功,,执行 curl 127.0.0.1:
vagrant@vagrant-ubuntu-trusty:/etc/apt$ curl  '127.0.0.1'
<!DOCTYPE html>
<html>
<head>
<title>Welcome to nginx!</title>
<style>
    body {
         35em;
        margin: 0 auto;
        font-family: Tahoma, Verdana, Arial, sans-serif;
    }
</style>
</head>
<body>
<h1>Welcome to nginx!</h1>
<p>If you see this page, the nginx web server is successfully installed and
working. Further configuration is required.</p>

<p>For online documentation and support please refer to
<a href="http://nginx.org/">nginx.org</a>.<br/>
Commercial support is available at
<a href="http://nginx.com/">nginx.com</a>.</p>

<p><em>Thank you for using nginx.</em></p>
</body>
如果执行时加上参数 -I,则返回如下:
vagrant@vagrant-ubuntu-trusty:/etc/apt$ curl -I '127.0.0.1'
HTTP/1.1 200 OK
Server: nginx/1.4.6 (Ubuntu)
Date: Wed, 29 Aug 2018 07:09:14 GMT
Content-Type: text/html
Content-Length: 612
Last-Modified: Tue, 04 Mar 2014 11:46:45 GMT
Connection: keep-alive
ETag: "5315bd25-264"
Accept-Ranges: bytes
证明安装成功!
(2)安装apache:
sudo apt-get install apache2
会有一些错误,是80端口被刚安装的nginx占用了,启动失败:
 * Starting web server apache2                                                                                               (98)Address already in use: AH00072: make_sock: could not bind to address [::]:80
(98)Address already in use: AH00072: make_sock: could not bind to address 0.0.0.0:80
no listening sockets available, shutting down
AH00015: Unable to open logs
Action 'start' failed.
The Apache error log may have more information.
 *
 * The apache2 instance did not start within 20 seconds. Please read the log files to discover problems
invoke-rc.d: initscript apache2, action "start" failed.
Setting up ssl-cert (1.0.33) ...
Processing triggers for libc-bin (2.19-0ubuntu6) ...
Processing triggers for ufw (0.34~rc-0ubuntu2) ...
Processing triggers for ureadahead (0.100.0-16) ...
停掉nginx服务:
sudo /etc/init.d/nginx stop
启动apache服务:
sudo /etc/init.d/apache2 start
然后测试apache,服务安装成功!
vagrant@vagrant-ubuntu-trusty:/etc/apt$ curl -I 'http://127.0.0.1'
HTTP/1.1 200 OK
Date: Wed, 29 Aug 2018 07:23:45 GMT
Server: Apache/2.4.7 (Ubuntu)
Last-Modified: Wed, 29 Aug 2018 07:17:17 GMT
ETag: "2cf6-5748dbfa366e3"
Accept-Ranges: bytes
Content-Length: 11510
Vary: Accept-Encoding
Content-Type: text/html
(3)安装mysql:
安装服务端:
sudo apt-get install mysql-server
过程中需要设置数据库的root的密码。
安装客户端:
sudo apt-get install mysql-client
测试mysql是否安装成功:
mysql -uroot -p
然后输入密码,连接mysql成功!
查看mysql版本:
mysql> select version();
+-------------------------+
| version() |
+-------------------------+
| 5.5.61-0ubuntu0.14.04.1 |
+-------------------------+
1 row in set (0.00 sec)
输入 exit 退出,继续安装下一软件。
(4)安装PHP:
sudo apt-get install php5-cli
使用php -v查看php版本:
vagrant@vagrant-ubuntu-trusty:~$ php -v
PHP 5.5.9-1ubuntu4.25 (cli) (built: May 10 2018 14:37:18)
Copyright (c) 1997-2014 The PHP Group
Zend Engine v2.5.0, Copyright (c) 1998-2014 Zend Technologies
    with Zend OPcache v7.0.3, Copyright (c) 1999-2014, by Zend Technologies
安装php扩展:
sudo apt-get install php5-mcrypt
sudo apt-get install php5-mysql
sudo apt-get install php5-gd
(5)配置apache支持php
sudo apt-get install libapache2-mod-php5
(6)配置nginx支持php
sudo apt-get install php5-cgi php5-fpm
查看apache 是否在启动状态:
ps -ef | grep apache
查看nginx 是否在启动状态:
ps -ef | grep nginx
修改apache的默认端口为8888:
sudo vim /etc/apache2/ports.conf
重启apache:
sudo /etc/init.d/apache2 restart
这样两个服务可以同时运行。
配置端口转发:
注意:前提是虚拟机里的ip不是静态地址,不然无法配置端口转发。
打开本地文件 Vagrantfile,
找到:config.vm.box = "ubuntu1404"
在后边添加:
config.vm.network "forwarded_port" ,guest:80,host:8888
config.vm.network "forwarded_port" ,guest:8888,host:8889
含义为:
本地主机访问8888端口,对应的虚拟机的端口为80端口(刚配置的nginx端口为80),
本地主机访问8889端口,对应的虚拟机的端口为8888端口(刚配置的apache端口为8888),
执行vagrant reload 重启虚拟机,
可以看到如下内容:
==> default: Forwarding ports... default: 80 (guest) => 8888 (host) (adapter 1)
default: 8888 (guest) => 8889 (host) (adapter 1)
这样就可以在本机上
使用127.0.0.1:8888访问虚拟机的nginx服务,
使用127.0.0.1:8889访问虚拟机的apache服务。
虚拟机的【设置】-->【网络】-->【高级】-->【端口转发】就会自动出现如下信息:
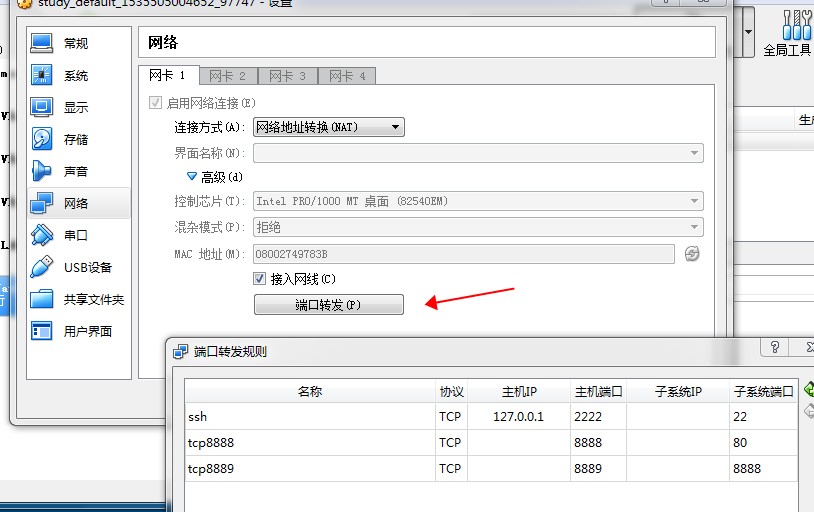
如果先去这个地方配置,则只会生效一次,重启之后就没了,通过文件配置,可以一直生效。
配置共享目录(未成功,略过)
打开本地文件 Vagrantfile,增加共享同步的配置:
config.vm.synced_folder "D:/study/web/","/home/www",:nfs=>true