WebSocket介绍
WebSocket 是 HTML5 开始提供的一种在单个 TCP 连接上进行全双工通讯的协议。
WebSocket 使得客户端和服务器之间的数据交换变得更加简单,允许服务端主动向客户端推送数据。在 WebSocket API 中,浏览器和服务器只需要完成一次握手,两者之间就直接可以创建持久性的连接,并进行双向数据传输。
在 WebSocket API 中,浏览器和服务器只需要做一个握手的动作,然后,浏览器和服务器之间就形成了一条快速通道。两者之间就直接可以数据互相传送。
现在,很多网站为了实现推送技术,所用的技术都是 Ajax 轮询。轮询是在特定的的时间间隔(如每1秒),由浏览器对服务器发出HTTP请求,然后由服务器返回最新的数据给客户端的浏览器。这种传统的模式带来很明显的缺点,即浏览器需要不断的向服务器发出请求,然而HTTP请求可能包含较长的头部,其中真正有效的数据可能只是很小的一部分,显然这样会浪费很多的带宽等资源。
HTML5 定义的 WebSocket 协议,能更好的节省服务器资源和带宽,并且能够更实时地进行通讯。
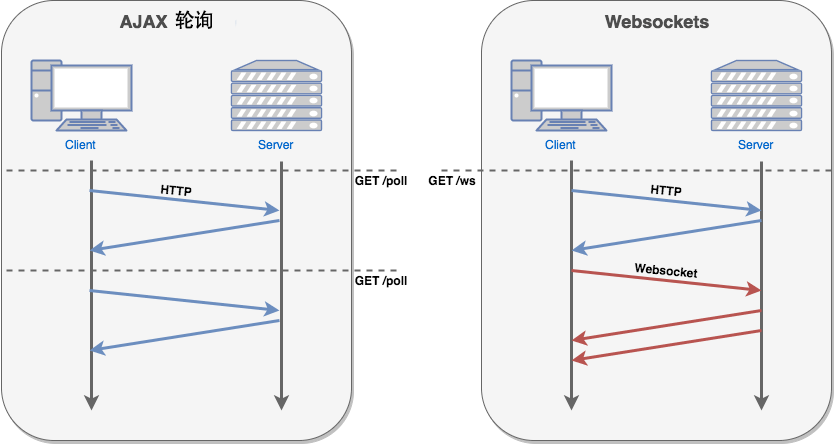
浏览器通过 JavaScript 向服务器发出建立 WebSocket 连接的请求,连接建立以后,客户端和服务器端就可以通过 TCP 连接直接交换数据。
当你获取 Web Socket 连接后,你可以通过 send() 方法来向服务器发送数据,并通过 onmessage 事件来接收服务器返回的数据。
以下 API 用于创建 WebSocket 对象。
var Socket = new WebSocket(url, [protocol] );
以上代码中的第一个参数 url, 指定连接的 URL。第二个参数 protocol 是可选的,指定了可接受的子协议。
WebSocket 客户端页面实现
 1 <!DOCTYPE HTML>
 2 <html>
 3 <head>
 4 <meta charset="utf-8">
 5 <title>WebSocket测试</title>
 6 </head>
 7 <body style="text-align: center;">
 8     <h2>WebSocket测试</h2>
 9     <div>
10         <input type="text" id="txt"/>
11         <button onclick="sendWebSocket()">发送</button><br>
12         <button onclick="checkWebSocket()">测试WebSocket</button>
13         <button onclick="connectWebSocket()">连接WebSocket</button>
14         <button onclick="closeWebSocket()">关闭WebSocket</button><br>
15         <hr>
16         <div id="message"></div>
17     </div>
18 </body>
19 <script type="text/javascript">
20
21     var websocket = null;
22
23     function checkWebSocket(){
24         if ("WebSocket" in window) {
25             // alert("您的浏览器支持 WebSocket!");
26             setMessageInnerHTML("您的浏览器支持 WebSocket!");
27         }
28         else {
29             // 浏览器不支持 WebSocket
30             // alert("您的浏览器不支持 WebSocket!");
31             setMessageInnerHTML("您的浏览器不支持 WebSocket!");
32         }
33     }
34
35     // 连接  WebSocket
36     function connectWebSocket(){
37         // 打开一个 web socket
38         websocket = new WebSocket("ws://localhost:8080/test-websocket/websocket");
39         websocket.onopen = function() {
40             // Web Socket 已连接上,使用 send() 方法发送数据
41             setMessageInnerHTML("WebSocket 已连接...");
42         };
43         websocket.onmessage = function(evt) {
44             var received_msg = evt.data;
45             setMessageInnerHTML("收到消息:" + received_msg);
46         };
47         websocket.onclose = function()
48          {
49             setMessageInnerHTML("WebSocket 已关闭...");
50          };
51     }
52
53     // 向WebSocket服务端发送消息
54     function sendWebSocket(){
55         if (websocket){
56             if (websocket.readyState == websocket.OPEN) {
57                 var message = document.getElementById('txt').value;
58                 websocket.send(message);
59             } else {
60                 setMessageInnerHTML("WebSocket 未连接...");
61             }
62         }else {
63             setMessageInnerHTML("WebSocket 未创建...");
64         }
65     }
66
67     // 监听窗口关闭事件,当窗口关闭时,主动去关闭websocket连接,防止连接还没断开就关闭窗口,server端会抛异常。
68     window.onbeforeunload = function() {
69         closeWebSocket();
70     }
71
72     // 关闭WebSocket连接
73     function closeWebSocket() {
74         websocket.close();
75     }
76
77     // 将消息显示在网页上
78     function setMessageInnerHTML(innerHTML) {
79         document.getElementById('message').innerHTML += innerHTML + '<br/>';
80     }
81 </script>
82 </html>
WebSocket 服务端Java实现
java 实现websocket的两种方式,一种使用tomcat的websocket实现,一种使用spring的websocket
一、Tomcat的WebSocket实现
1、新建一个Maven Web工程,参考:【Maven】Eclipse 使用Maven创建Java Web项目,添加websocket依赖如下:
<dependency>
    <groupId>javax.websocket</groupId>
    <artifactId>javax.websocket-api</artifactId>
    <version>1.1</version>
    <scope>provided</scope>
</dependency>
2、编辑一个WebSocket服务端类,MyWebSocket.class
 1 package com.test.websocket;
 2
 3 import java.io.IOException;
 4
 5 import javax.websocket.OnClose;
 6 import javax.websocket.OnError;
 7 import javax.websocket.OnMessage;
 8 import javax.websocket.OnOpen;
 9 import javax.websocket.Session;
10 import javax.websocket.server.ServerEndpoint;
11
12 @ServerEndpoint("/websocket")
13 public class MyWebSocket {
14
15     private Session session;
16
17     /**
18      * 连接建立后触发的方法
19      */
20     @OnOpen
21     public void onOpen(Session session) {
22         this.session = session;
23         WebSocketMapUtil.put(session.getId(), this);
24         System.out.println("-------- onOpen: 当前在线人数 " + WebSocketMapUtil.getOnlineCount() + ",连接人 " + session.getId() + " --------");
25     }
26
27     /**
28      * 连接关闭后触发的方法
29      */
30     @OnClose
31     public void onClose() {
32         // 从map中删除
33         WebSocketMapUtil.remove(session.getId());
34         System.out.println("-------- onClose: 当前在线人数 " + WebSocketMapUtil.getOnlineCount() + ",关闭人 " + session.getId() + " --------");
35     }
36
37     /**
38      * 接收到客户端消息时触发的方法
39      */
40     @OnMessage
41     public void onMessage(String message, Session session) throws Exception {
42         // 获取服务端到客户端的通道
43         MyWebSocket myWebSocket = WebSocketMapUtil.get(session.getId());
44         System.out.println("收到来自 " + session.getId() + " 的消息:" + message);
45
46         // 返回消息给Web Socket客户端(浏览器)
47         myWebSocket.sendMessageAll("服务端已收到消息:" + message);
48     }
49
50     /**
51      * 发生错误时触发的方法
52      */
53     @OnError
54     public void onError(Session session, Throwable error) {
55         System.out.println("-------- onError: 当前在线人数 " + WebSocketMapUtil.getOnlineCount() + ",连接发生错误 " + session.getId() + "-"+ error.getMessage() + " --------");
56         // error.printStackTrace();
57     }
58
59     /**
60      * 给单个客户端发送消息
61      * @param message
62      * @param sessionId
63      * @throws IOException
64      */
65     public void sendMessageSingle(String message, String sessionId) throws IOException {
66
67         // session.getBasicRemote().sendText(message); 同步消息
68         // session.getAsyncRemote().sendText(message); 异步消息
69
70         MyWebSocket myWebSocket = WebSocketMapUtil.get(sessionId);
71         if(myWebSocket != null) {
72             myWebSocket.session.getBasicRemote().sendText(message);
73         }
74     }
75
76     /**
77      * 给所有客户端发送消息
78      * @param message
79      * @throws IOException
80      */
81     public void sendMessageAll(String message) throws IOException {
82         for (MyWebSocket item : WebSocketMapUtil.getValues() ) {
83             item.session.getAsyncRemote().sendText(message);
84             System.out.println(item.session.getId());
85             System.out.println(item.session.isSecure());
86             System.out.println(item.session.isOpen());
87         }
88     }
89
90 }
3、编辑一个WebSocket 工具类,WebSocketMapUtil.class
 1 package com.test.websocket;
 2
 3 import java.util.Collection;
 4 import java.util.concurrent.ConcurrentHashMap;
 5 import java.util.concurrent.ConcurrentMap;
 6
 7 public class WebSocketMapUtil {
 8
 9     public static ConcurrentMap<String, MyWebSocket> webSocketMap = new ConcurrentHashMap<>();
10
11     public static void put(String key, MyWebSocket myWebSocket) {
12         webSocketMap.put(key, myWebSocket);
13     }
14
15     public static MyWebSocket get(String key) {
16         return webSocketMap.get(key);
17     }
18
19     public static void remove(String key) {
20         webSocketMap.remove(key);
21     }
22
23     public static Collection<MyWebSocket> getValues() {
24         return webSocketMap.values();
25     }
26
27     public static int getOnlineCount() {
28         return webSocketMap.size();
29     }
30 }
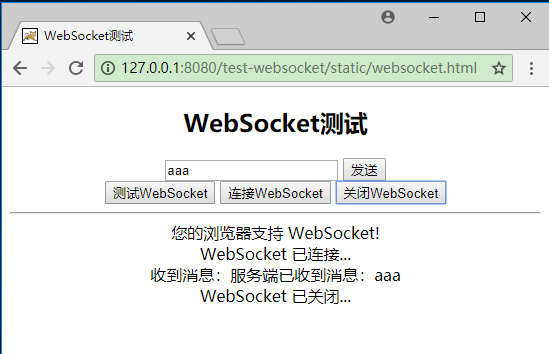
4、将项目发布到Tomcat中,使用浏览器访问界面(http://127.0.0.1:8080/test-websocket/static/websocket.html)
界面输出如下:
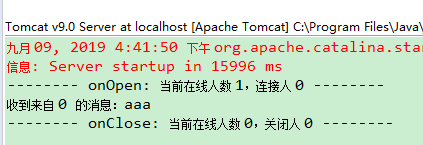
服务端输出如下:
二、Spring的WebSocket实现
1、新建一个Maven Web工程,参考:【Maven】Eclipse 使用Maven创建SpringMVC Web项目,添加Spring-Websocket依赖如下:
1 <!--Spring WebSocket -->
2 <dependency>
3     <groupId>org.springframework</groupId>
4     <artifactId>spring-websocket</artifactId>
5     <version>4.3.13.RELEASE</version>
6 </dependency>


  1 <project xmlns="http://maven.apache.org/POM/4.0.0"
  2     xmlns:xsi="http://www.w3.org/2001/XMLSchema-instance"
  3     xsi:schemaLocation="http://maven.apache.org/POM/4.0.0 http://maven.apache.org/maven-v4_0_0.xsd">
  4     <modelVersion>4.0.0</modelVersion>
  5     <groupId>com.test</groupId>
  6     <artifactId>test-websocket</artifactId>
  7     <packaging>war</packaging>
  8     <version>0.0.1-SNAPSHOT</version>
  9     <name>test-websocket Maven Webapp</name>
 10     <url>http://maven.apache.org</url>
 11
 12     <!-- 定义maven变量 -->
 13     <properties>
 14         <!-- spring -->
 15         <spring.version>5.0.0.RELEASE</spring.version>
 16
 17         <!-- log -->
 18         <commons-logging.version>1.1.3</commons-logging.version>
 19
 20         <!-- Servlet -->
 21         <servlet.version>3.0.1</servlet.version>
 22         <jsp-api.version>2.2</jsp-api.version>
 23
 24         <!-- jstl -->
 25         <jstl.version>1.2</jstl.version>
 26         <standard.version>1.1.2</standard.version>
 27
 28         <!-- test -->
 29         <junit.version>3.8.1</junit.version>
 30
 31         <!-- jdk -->
 32         <jdk.version>1.7</jdk.version>
 33         <maven.compiler.plugin.version>2.3.2</maven.compiler.plugin.version>
 34     </properties>
 35
 36
 37     <dependencies>
 38         <!--Spring WebSocket -->
 39         <dependency>
 40             <groupId>org.springframework</groupId>
 41             <artifactId>spring-websocket</artifactId>
 42             <version>4.3.13.RELEASE</version>
 43         </dependency>
 44
 45         <dependency>
 46             <groupId>javax.websocket</groupId>
 47             <artifactId>javax.websocket-api</artifactId>
 48             <version>1.1</version>
 49             <scope>provided</scope>
 50         </dependency>
 51
 52         <dependency>
 53             <groupId>org.java-websocket</groupId>
 54             <artifactId>Java-WebSocket</artifactId>
 55             <version>1.4.0</version>
 56         </dependency>
 57
 58         <dependency>
 59             <groupId>org.springframework</groupId>
 60             <artifactId>spring-core</artifactId>
 61             <version>${spring.version}</version>
 62         </dependency>
 63
 64         <dependency>
 65             <groupId>org.springframework</groupId>
 66             <artifactId>spring-beans</artifactId>
 67             <version>${spring.version}</version>
 68         </dependency>
 69
 70         <dependency>
 71             <groupId>org.springframework</groupId>
 72             <artifactId>spring-context</artifactId>
 73             <version>${spring.version}</version>
 74         </dependency>
 75
 76         <dependency>
 77             <groupId>org.springframework</groupId>
 78             <artifactId>spring-jdbc</artifactId>
 79             <version>${spring.version}</version>
 80         </dependency>
 81
 82
 83         <dependency>
 84             <groupId>org.springframework</groupId>
 85             <artifactId>spring-expression</artifactId>
 86             <version>${spring.version}</version>
 87         </dependency>
 88
 89         <dependency>
 90             <groupId>org.springframework</groupId>
 91             <artifactId>spring-web</artifactId>
 92             <version>${spring.version}</version>
 93         </dependency>
 94
 95         <dependency>
 96             <groupId>org.springframework</groupId>
 97             <artifactId>spring-webmvc</artifactId>
 98             <version>${spring.version}</version>
 99         </dependency>
100
101         <dependency>
102             <groupId>org.springframework</groupId>
103             <artifactId>spring-tx</artifactId>
104             <version>${spring.version}</version>
105         </dependency>
106
107
108         <!-- Servlet -->
109         <dependency>
110             <groupId>javax.servlet</groupId>
111             <artifactId>javax.servlet-api</artifactId>
112             <version>${servlet.version}</version>
113             <scope>provided</scope>
114         </dependency>
115         <dependency>
116             <groupId>javax.servlet.jsp</groupId>
117             <artifactId>jsp-api</artifactId>
118             <version>${jsp-api.version}</version>
119             <scope>provided</scope>
120         </dependency>
121
122         <!-- jstl -->
123         <dependency>
124             <groupId>javax.servlet</groupId>
125             <artifactId>jstl</artifactId>
126             <version>${jstl.version}</version>
127         </dependency>
128
129         <dependency>
130             <groupId>taglibs</groupId>
131             <artifactId>standard</artifactId>
132             <version>${standard.version}</version>
133         </dependency>
134
135         <!-- test -->
136         <dependency>
137             <groupId>junit</groupId>
138             <artifactId>junit</artifactId>
139             <version>${junit.version}</version>
140             <scope>test</scope>
141         </dependency>
142
143
144         <dependency>
145             <groupId>org.slf4j</groupId>
146             <artifactId>slf4j-api</artifactId>
147             <version>1.7.5</version>
148             <type>jar</type>
149             <scope>compile</scope>
150         </dependency>
151
152         <dependency>
153             <groupId>ch.qos.logback</groupId>
154             <artifactId>logback-core</artifactId>
155             <version>0.9.30</version>
156             <type>jar</type>
157         </dependency>
158
159         <dependency>
160             <groupId>ch.qos.logback</groupId>
161             <artifactId>logback-classic</artifactId>
162             <version>0.9.30</version>
163             <type>jar</type>
164         </dependency>
165
166         <dependency>
167             <groupId>ch.qos.logback</groupId>
168             <artifactId>logback-access</artifactId>
169             <version>0.9.30</version>
170         </dependency>
171
172     </dependencies>
173
174
175     <build>
176         <plugins>
177             <!-- define the project compile level -->
178             <plugin>
179                 <groupId>org.apache.maven.plugins</groupId>
180                 <artifactId>maven-compiler-plugin</artifactId>
181                 <version>${maven.compiler.plugin.version}</version>
182                 <configuration>
183                     <source>${jdk.version}</source>
184                     <target>${jdk.version}</target>
185                 </configuration>
186             </plugin>
187         </plugins>
188         <finalName>test-websocket</finalName>
189     </build>
190
191
192 </project>
2、新建一个websocket消息处理类,MyWebSocketHandler.java
 1 package com.test.socket.handler;
 2
 3 import java.io.IOException;
 4
 5 import org.springframework.web.socket.CloseStatus;
 6 import org.springframework.web.socket.TextMessage;
 7 import org.springframework.web.socket.WebSocketSession;
 8 import org.springframework.web.socket.handler.AbstractWebSocketHandler;
 9
10
11 public class MyWebSocketHandler extends AbstractWebSocketHandler {
12
13     @Override
14     public void afterConnectionEstablished(WebSocketSession session) {
15         WebSocketHandlerUtil.put(session.getId(), session);
16         System.out.println("-------- onOpen: 当前在线人数 " + WebSocketHandlerUtil.getOnlineCount() + ",连接人 "
17                 + session.getId() + " --------");
18     }
19
20
21     @Override
22     public void afterConnectionClosed(WebSocketSession session, CloseStatus closeStatus) {
23         // 从map中删除
24         WebSocketHandlerUtil.remove(session.getId());
25          System.out.println("-------- onClose: 当前在线人数 " + WebSocketHandlerUtil.getOnlineCount() + ",关闭人 " + session.getId() + " --------");
26     }
27
28
29     /**
30      * 在UI在用js调用websocket.send()时候,会调用该方法
31      */
32     @Override
33     protected void handleTextMessage(WebSocketSession session, TextMessage message) throws Exception {
34         // super.handleTextMessage(session, message);
35         // 获取服务端到客户端的通道
36         System.out.println("收到来自 " + session.getId() + " 的消息:" + message.getPayload());
37
38         // 返回消息给Web Socket客户端(浏览器)
39         sendMessageAll("服务端已收到消息:" + message);
40     }
41
42     /**
43      *  发生错误时触发的方法
44      */
45     @Override
46     public void handleTransportError(WebSocketSession session, Throwable exception) throws Exception {
47         if (session.isOpen()) {
48             session.close();
49         }
50         System.out.println("-------- onError: 当前在线人数 " + WebSocketHandlerUtil.getOnlineCount() + ",连接发生错误 " + session.getId() + "-"+ exception.getMessage() + " --------");
51     }
52
53     /**
54      * 给单个客户端发送消息
55      * @param message
56      * @param sessionId
57      * @throws IOException
58      */
59     public void sendMessageSingle(String message, String sessionId) throws IOException {
60
61         WebSocketSession session = WebSocketHandlerUtil.get(sessionId);
62         if(session != null) {
63             session.sendMessage(new TextMessage(message));
64         }
65     }
66
67     /**
68      * 给所有客户端发送消息
69      * @param message
70      * @throws IOException
71      */
72     public void sendMessageAll(String message) throws IOException {
73         for (WebSocketSession session : WebSocketHandlerUtil.getValues() ) {
74
75             session.sendMessage(new TextMessage(message));
76         }
77     }
78
79 }
3、WebSocketHandlerUtil.java,工具类
 1 package com.test.socket.handler;
 2
 3 import java.util.Collection;
 4 import java.util.concurrent.ConcurrentHashMap;
 5 import java.util.concurrent.ConcurrentMap;
 6
 7 import org.springframework.web.socket.WebSocketSession;
 8
 9 public class WebSocketHandlerUtil {
10
11     public static ConcurrentMap<String, WebSocketSession> webSocketMap = new ConcurrentHashMap<>();
12
13     public static void put(String key, WebSocketSession webSocketSession) {
14         webSocketMap.put(key, webSocketSession);
15     }
16
17     public static WebSocketSession get(String key) {
18         return webSocketMap.get(key);
19     }
20
21     public static void remove(String key) {
22         webSocketMap.remove(key);
23     }
24
25     public static Collection<WebSocketSession> getValues() {
26         return webSocketMap.values();
27     }
28
29     public static int getOnlineCount() {
30         return webSocketMap.size();
31     }
32 }
4、新建一个拦截器,WebSocketHandshakeInterceptor.java ,可以处理请求到达websocket前的逻辑
 1 package com.test.socket.handler;
 2
 3 import java.util.Map;
 4
 5 import javax.servlet.http.HttpServletRequest;
 6
 7 import org.springframework.http.server.ServerHttpRequest;
 8 import org.springframework.http.server.ServerHttpResponse;
 9 import org.springframework.http.server.ServletServerHttpRequest;
10 import org.springframework.web.socket.WebSocketHandler;
11 import org.springframework.web.socket.server.HandshakeInterceptor;
12
13
14 public class WebSocketHandshakeInterceptor implements HandshakeInterceptor {
15
16     @Override
17     public boolean beforeHandshake(ServerHttpRequest request, ServerHttpResponse response, WebSocketHandler wsHandler,
18             Map<String, Object> attributes) throws Exception {
19         // 请求 进入WebSocket处理器,处理相关逻辑
20         return true;
21     }
22
23     @Override
24     public void afterHandshake(ServerHttpRequest request, ServerHttpResponse response, WebSocketHandler wsHandler,
25             Exception exception) {
26         // TODO Auto-generated method stub
27
28     }
29
30 }
5、WebSocket配置类,WebSocketConfig.java,需要让SpringMvc扫描到这个类
 1 package com.test.socket.handler;
 2
 3 import org.springframework.context.annotation.Bean;
 4 import org.springframework.context.annotation.Configuration;
 5 import org.springframework.web.socket.config.annotation.EnableWebSocket;
 6 import org.springframework.web.socket.config.annotation.WebSocketConfigurer;
 7 import org.springframework.web.socket.config.annotation.WebSocketHandlerRegistration;
 8 import org.springframework.web.socket.config.annotation.WebSocketHandlerRegistry;
 9
10 @Configuration
11 @EnableWebSocket
12 public class WebSocketConfig implements WebSocketConfigurer {
13
14     /**
15      *
16      * @param registry 该对象可以调用addHandler()来注册信息处理器。
17      */
18     @Override
19     public void registerWebSocketHandlers(WebSocketHandlerRegistry registry) {
20         WebSocketHandlerRegistration handler = registry.addHandler(myWebSocketHandler(), "/myWebSocket");
21         handler.addInterceptors(webSocketHandshakeInterceptor()); // 声明拦截器
22         handler.setAllowedOrigins("*"); // 声明允许访问的主机列表
23     }
24
25     @Bean
26     public MyWebSocketHandler myWebSocketHandler() {
27         return new MyWebSocketHandler();
28     }
29
30     @Bean
31     public WebSocketHandshakeInterceptor webSocketHandshakeInterceptor() {
32         return new WebSocketHandshakeInterceptor();
33     }
34
35 }
6、spring-mvc.xml,文件如下:
 1 <?xml version="1.0" encoding="UTF-8" standalone="no"?>
 2 <beans xmlns="http://www.springframework.org/schema/beans"
 3     xmlns:context="http://www.springframework.org/schema/context"
 4     xmlns:websocket="http://www.springframework.org/schema/websocket"
 5     xmlns:aop="http://www.springframework.org/schema/aop" xmlns:mvc="http://www.springframework.org/schema/mvc"
 6     xmlns:p="http://www.springframework.org/schema/p" xmlns:xsi="http://www.w3.org/2001/XMLSchema-instance"
 7     xsi:schemaLocation="http://www.springframework.org/schema/beans  http://www.springframework.org/schema/beans/spring-beans-4.0.xsd
 8         http://www.springframework.org/schema/context http://www.springframework.org/schema/context/spring-context-4.0.xsd
 9         http://www.springframework.org/schema/mvc http://www.springframework.org/schema/mvc/spring-mvc-4.0.xsd
10         http://www.springframework.org/schema/websocket http://www.springframework.org/schema/websocket/spring-websocket-4.0.xsd
11         http://www.springframework.org/schema/aop http://www.springframework.org/schema/aop/spring-aop-4.0.xsd">
12
13     <!-- 自动扫描的包名 -->
14     <context:component-scan base-package="com.test.socket.handler" />
15
16     <!-- 默认的注解映射的支持 -->
17     <mvc:annotation-driven>
18         <mvc:message-converters>
19             <bean class="org.springframework.http.converter.StringHttpMessageConverter" />
20             <bean
21                 class="org.springframework.http.converter.ResourceHttpMessageConverter" />
22         </mvc:message-converters>
23     </mvc:annotation-driven>
24
25
26
27     <!-- 视图解释类,定义跳转的文件的前后缀 -->
28     <!-- <bean class="org.springframework.web.servlet.view.InternalResourceViewResolver">
29         <property name="viewClass" value="org.springframework.web.servlet.view.JstlView"
30         /> <property name="prefix" value="/views/" /> <property name="suffix" value=".jsp"
31         /> <property name="requestContextAttribute" value="rc" /> </bean> -->
32     <bean id="viewResolver"
33         class="org.springframework.web.servlet.view.InternalResourceViewResolver">
34         <property name="viewClass"
35             value="org.springframework.web.servlet.view.JstlView" />
36         <property name="prefix" value="/view/" />
37         <property name="suffix" value=".jsp" />
38     </bean>
39
40
41     <!-- 拦截器 -->
42     <!-- <mvc:interceptors> <bean class="com.fpx.ce.foundation.preference.PreferenceChangeInterceptor"
43         /> <mvc:interceptor> <mvc:mapping path="/page/home"/> <bean class="com.fpx.ce.foundation.user.UserInterceptor"
44         /> </mvc:interceptor> <mvc:interceptor> <mvc:mapping path="/service/**" />
45         <bean class="com.fpx.ce.foundation.log.LogHandlerInterceptor" /> </mvc:interceptor>
46         <mvc:interceptor> <mvc:mapping path="/test/**" /> <mvc:mapping path="/service/**"
47         /> <bean class="com.lemon.finder.web.SharedRenderVariableInterceptor" />
48         </mvc:interceptor> </mvc:interceptors> -->
49
50
51     <!-- 对静态资源文件的访问 方案一 (二选一) -->
52     <mvc:default-servlet-handler />
53
54     <!-- 对静态资源文件的访问 方案二 (二选一) -->
55     <!-- <mvc:resources mapping="/images/**" location="/images/" cache-period="31556926"/>
56         <mvc:resources mapping="/js/**" location="/js/" cache-period="31556926"/>
57         <mvc:resources mapping="/css/**" location="/css/" cache-period="31556926"/> -->
58
59     <!-- <bean id="myWebSocket" class="com.test.socket.handler.MyWebSocketHandler" />
60
61     <websocket:handlers>
62         <websocket:mapping handler="myWebSocket" path="/myWebSocket"/>
63     </websocket:handlers> -->
64
65 </beans>
7、将项目发布到Tomcat中,使用浏览器访问界面(http://127.0.0.1:8080/test-websocket/static/websocket.html),将界面中WebSocket连接地址改为:ws://localhost:8080/test-websocket/myWebSocket

WebSocket 客户端Java实现
1、新建一个Java Maven项目,引入依赖
1 <dependency>
2     <groupId>org.java-websocket</groupId>
3     <artifactId>Java-WebSocket</artifactId>
4     <version>1.4.0</version>
5 </dependency>
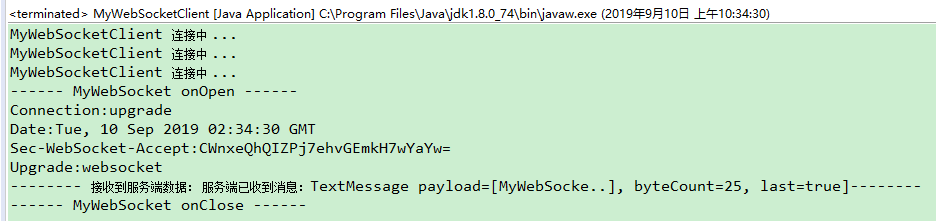
2、编辑Java WebSocket类
 1 package com.test.websocket;
 2
 3 import java.net.URI;
 4 import java.net.URISyntaxException;
 5 import java.util.Iterator;
 6
 7 import org.java_websocket.client.WebSocketClient;
 8 import org.java_websocket.enums.ReadyState;
 9 import org.java_websocket.handshake.ServerHandshake;
10
11 public class MyWebSocketClient extends WebSocketClient {
12
13     public MyWebSocketClient(URI serverUri) {
14         super(serverUri);
15     }
16
17     @Override
18     public void onOpen(ServerHandshake handshakedata) {
19         // TODO Auto-generated method stub
20         System.out.println("------ MyWebSocket onOpen ------");
21         for (Iterator<String> it = handshakedata.iterateHttpFields(); it.hasNext();) {
22             String key = it.next();
23             System.out.println(key + ":" + handshakedata.getFieldValue(key));
24         }
25     }
26
27     @Override
28     public void onClose(int code, String reason, boolean remote) {
29         // TODO Auto-generated method stub
30         System.out.println("------ MyWebSocket onClose ------");
31     }
32
33     @Override
34     public void onError(Exception ex) {
35         // TODO Auto-generated method stub
36         System.out.println("------ MyWebSocket onError ------");
37     }
38
39     @Override
40     public void onMessage(String message) {
41         // TODO Auto-generated method stub
42         System.out.println("-------- 接收到服务端数据: " + message + "--------");
43     }
44
45     public static void main(String[] arg0) throws URISyntaxException, InterruptedException {
46         MyWebSocketClient myClient = new MyWebSocketClient(new URI("ws://localhost:8080/test-websocket/myWebSocket"));
47         // 连接
48         myClient.connect();
49
50         while (!myClient.getReadyState().equals(ReadyState.OPEN)) {
51             System.out.println("MyWebSocketClient 连接中 ...");
52         }
53
54         // 往websocket服务端发送数据
55         myClient.send("MyWebSocketClient Message");
56
57         // 调用此方法保持住连接
58         myClient.sendPing();
59
60         Thread.sleep(3000);
61         myClient.close();
62     }
63 }
3、测试,运行main方法