本章介绍SpringBoot与Redis整合,对缓存不太了解的可以参考【SpringBoot】SpringBoot 缓存(十八)
Redis安装参考:【Redis】安装及简单使用
Redis整合
1、SpringBoot Web项目搭建,参考【SpringBoot】SpringBoot 缓存(十八)


 1 <?xml version="1.0" encoding="UTF-8"?>
 2 <project xmlns="http://maven.apache.org/POM/4.0.0"
 3          xmlns:xsi="http://www.w3.org/2001/XMLSchema-instance"
 4          xsi:schemaLocation="http://maven.apache.org/POM/4.0.0 http://maven.apache.org/xsd/maven-4.0.0.xsd">
 5     <modelVersion>4.0.0</modelVersion>
 6
 7     <groupId>com.test</groupId>
 8     <artifactId>test-springboot-cache</artifactId>
 9     <version>1.0-SNAPSHOT</version>
10
11     <parent>
12         <groupId>org.springframework.boot</groupId>
13         <artifactId>spring-boot-starter-parent</artifactId>
14         <version>2.1.8.RELEASE</version>
15     </parent>
16
17     <properties>
18
19         <project.build.sourceEncoding>UTF-8</project.build.sourceEncoding>
20         <project.reporting.outputEncoding>UTF-8</project.reporting.outputEncoding>
21         <java.version>1.8</java.version>
22     </properties>
23
24     <dependencies>
25
26         <dependency>
27             <groupId>org.springframework.boot</groupId>
28             <artifactId>spring-boot-starter-web</artifactId>
29         </dependency>
30
31         <dependency>
32             <groupId>org.springframework.boot</groupId>
33             <artifactId>spring-boot-starter-data-redis</artifactId>
34         </dependency>
35
36
37         <dependency>
38             <groupId>org.mybatis.spring.boot</groupId>
39             <artifactId>mybatis-spring-boot-starter</artifactId>
40             <version>2.0.1</version>
41         </dependency>
42
43
44
45         <!-- mysql -->
46         <dependency>
47             <groupId>mysql</groupId>
48             <artifactId>mysql-connector-java</artifactId>
49             <version>8.0.12</version>
50         </dependency>
51
52         <dependency>
53             <groupId>org.springframework.boot</groupId>
54             <artifactId>spring-boot-starter-test</artifactId>
55             <scope>test</scope>
56         </dependency>
57
58     </dependencies>
59
60
61     <!-- SpringBoot打包插件,可以将代码打包成一个可执行的jar包 -->
62     <build>
63         <plugins>
64             <plugin>
65                 <groupId>org.springframework.boot</groupId>
66                 <artifactId>spring-boot-maven-plugin</artifactId>
67             </plugin>
68         </plugins>
69     </build>
70
71 </project>
2、引入SpringBoot的redis启动器
1 <dependency>
2     <groupId>org.springframework.boot</groupId>
3     <artifactId>spring-boot-starter-data-redis</artifactId>
4 </dependency>
查看依赖,启动器依赖了jedis
1 <dependency>
2     <groupId>redis.clients</groupId>
3     <artifactId>jedis</artifactId>
4     <version>${jedis}</version>
5     <optional>true</optional>
6 </dependency>
3、application.yml配置redis连接地址
redis单机配置
1 spring:
2   redis:
3     # 主机地址
4     host: 127.0.0.1
5     # 默认端口
6     port: 6379
7     # 密码
8     password:123456
redis集群模式配置
spring:
  redis:
    database: 0 # Redis数据库索引(默认为0)
    #host: 192.168.1.8
    #port: 6379
    password: 123456
    timeout: 10000 # 连接超时时间(毫秒)
    pool:
      max-active: 8 # 连接池最大连接数(使用负值表示没有限制)
      max-idle: 8 # 连接池中的最大空闲连接
      max-wait: -1 # 连接池最大阻塞等待时间(使用负值表示没有限制)
      min-idle: 0 # 连接池中的最小空闲连接
    cluster:
      nodes:
      - 192.168.1.8:9001
      - 192.168.1.8:9002
      - 192.168.1.8:9003
redis哨兵模式配置
spring:
  redis:
    database: 0 # Redis数据库索引(默认为0)
    #host: 192.168.1.8
    #port: 6379
    password: 123456
    timeout: 10000 # 连接超时时间(毫秒)
    pool:
      max-active: 8 # 连接池最大连接数(使用负值表示没有限制)
      max-idle: 8 # 连接池中的最大空闲连接
      max-wait: -1 # 连接池最大阻塞等待时间(使用负值表示没有限制)
      min-idle: 0 # 连接池中的最小空闲连接
    sentinel:
      master: mymaster # master名称
      nodes:
      - 192.168.1.8:9001
      - 192.168.1.8:9002
      - 192.168.1.8:9003
4、查看RedisAutoConfiguration类,此类事redis的自动配置来,可以看到它自动注册了redisTemplate和stringRedisTemplate,2个类
 1 @Configuration
 2 @ConditionalOnClass(RedisOperations.class)
 3 @EnableConfigurationProperties(RedisProperties.class)
 4 @Import({ LettuceConnectionConfiguration.class, JedisConnectionConfiguration.class })
 5 public class RedisAutoConfiguration {
 6
 7     @Bean
 8     @ConditionalOnMissingBean(name = "redisTemplate")
 9     public RedisTemplate<Object, Object> redisTemplate(RedisConnectionFactory redisConnectionFactory)
10             throws UnknownHostException {
11         RedisTemplate<Object, Object> template = new RedisTemplate<>();
12         template.setConnectionFactory(redisConnectionFactory);
13         return template;
14     }
15
16     @Bean
17     @ConditionalOnMissingBean
18     public StringRedisTemplate stringRedisTemplate(RedisConnectionFactory redisConnectionFactory)
19             throws UnknownHostException {
20         StringRedisTemplate template = new StringRedisTemplate();
21         template.setConnectionFactory(redisConnectionFactory);
22         return template;
23     }
24
25 }
5、编写测试类,使用redisTemplate和stringRedisTemplate操作数据库
 1 package com.test.springboot.cache;
 2
 3 import com.test.springboot.cache.bean.Employee;
 4 import com.test.springboot.cache.mapper.EmployeeMapper;
 5 import org.junit.Test;
 6 import org.junit.runner.RunWith;
 7 import org.springframework.beans.factory.annotation.Autowired;
 8 import org.springframework.boot.test.context.SpringBootTest;
 9 import org.springframework.data.redis.core.RedisTemplate;
10 import org.springframework.data.redis.core.StringRedisTemplate;
11 import org.springframework.test.context.junit4.SpringRunner;
12
13 import javax.sound.midi.Soundbank;
14
15 @RunWith(SpringRunner.class)
16 @SpringBootTest
17 public class TestApplication {
18
19     @Autowired
20     EmployeeMapper employeeMapper;
21
22     // 操作k-v都是字符串的
23     @Autowired
24     StringRedisTemplate stringRedisTemplate;
25
26     // 操作k-v都是对象
27     @Autowired
28     RedisTemplate redisTemplate;
29
30
31     @Test
32     public void test01(){
33         // 给redis中保存数据
34         stringRedisTemplate.opsForValue().append("msg", "hello world");
35         System.out.println(stringRedisTemplate.opsForValue().get("msg"));
36     }
37
38     // 测试保存对象
39     @Test
40     public void test02(){
41
42         Employee emp = employeeMapper.getEmpById(1);
43         redisTemplate.opsForValue().set("emp-02", emp);
44         System.out.println(redisTemplate.opsForValue().get("emp-01"));
45     }
46
47 }
48
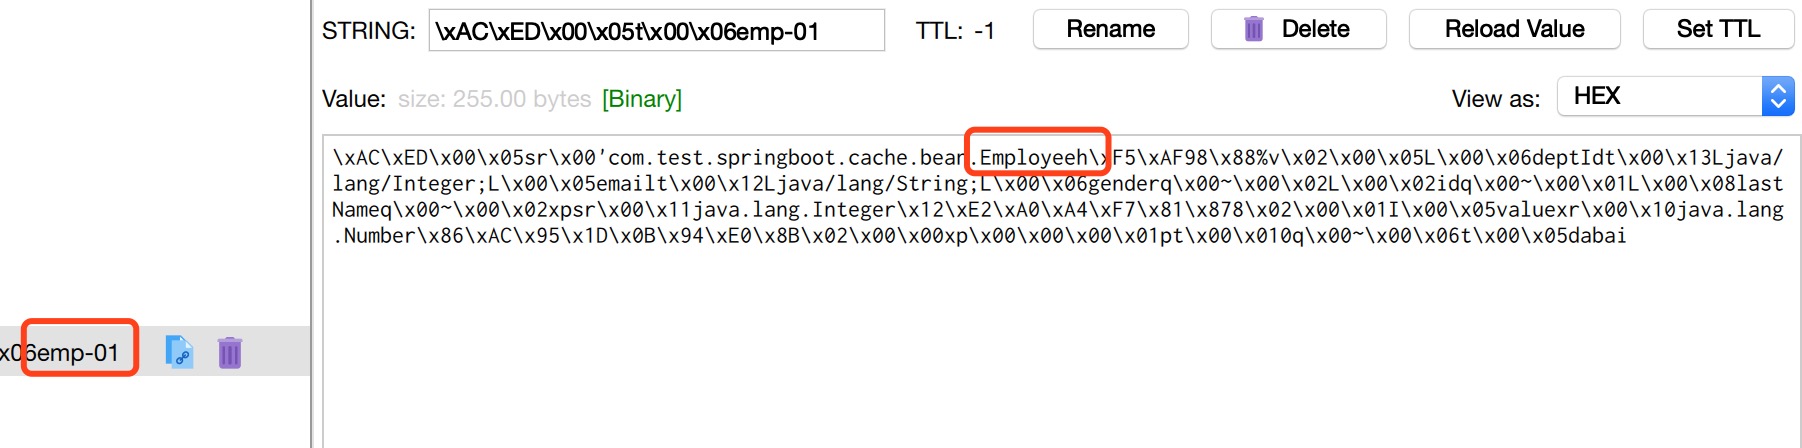
注意:
测试方法test02中,保存对象时,会对Employee对象序列化,保存到redis中,所以Employee类必须实现Serializable接口,否则会报错,下图为emp对象保存在redis中的数据。
将数据以json的方式保存
a、自己将对象转为json(此种就时将对象转成json字符串)
b、redisTmplate默认规则
分析redisTmplate默认规则:在RedisAutoConfiguration类中,RedisTemplate是通过简单的new出来的,其中defaultSerializer默认序列化器是使用JDK自带的,查看RedisTemplate类
 1 public class RedisTemplate<K, V> extends RedisAccessor implements RedisOperations<K, V>, BeanClassLoaderAware {
 2
 3     ...
 4
 5     public RedisTemplate() {}
 6
 7     @Override
 8     public void afterPropertiesSet() {
 9
10         super.afterPropertiesSet();
11
12         boolean defaultUsed = false;
13
14         if (defaultSerializer == null) {
15             // 使用jdk自带的解析器
16             defaultSerializer = new JdkSerializationRedisSerializer(
17                     classLoader != null ? classLoader : this.getClass().getClassLoader());
18         }
19
20         ...
21
22     }
23
24     ...
25 }
如果想将数据以json的方式保存在redis中,需要自己注入一个redisTemplate,且此redisTemplate使用json的序列化器。
 1 @Bean
 2 public RedisTemplate<Object, Object> jsonRedisTemplate(RedisConnectionFactory redisConnectionFactory)
 3         throws UnknownHostException {
 4
 5     RedisTemplate<Object, Object> template = new RedisTemplate<>();
 6     template.setConnectionFactory(redisConnectionFactory);
 7     // 使用json的序列化器
 8     template.setDefaultSerializer(new Jackson2JsonRedisSerializer<Object>(Object.class));
 9     return template;
10 }
测试,使用jsonRedisTemplate来操作对象
 1 @Autowired
 2 RedisTemplate jsonRedisTemplate;
 3
 4
 5 // 测试保存对象
 6 @Test
 7 public void test02(){
 8
 9     Employee emp = employeeMapper.getEmpById(1);
10     // 给redis中保存对象
11     // 默认如果保存对象,使用jdk序列号机制,序列化的数据保存在redis中
12     jsonRedisTemplate.opsForValue().set("emp-02", emp);
13     System.out.println(jsonRedisTemplate.opsForValue().get("emp-02"));
14 }
结果如下:

使用RestTemplate操作redis
redisTemplate.opsForValue();//操作字符串
redisTemplate.opsForHash();//操作hash
redisTemplate.opsForList();//操作list
redisTemplate.opsForSet();//操作set
redisTemplate.opsForZSet();//操作有序set
SpringBoot使用Redis做缓存
1、使用debug=true的模式启动项目,查看日志,发现RedisCacheConfiguration匹配上了,而默认的

2、 查看RedisCacheConfiguration类,可以看到,在容器不存在CacheManager的时候,它就会自动注入了RedisCacheManager,通过前一章(【SpringBoot】SpringBoot 缓存(十八))SpringBoot缓存的学习,知道CacheManager是用来管理缓存的Cache的。其中CacheManager也是使用的JDK自动的序列化器
@Configuration
@ConditionalOnClass(RedisConnectionFactory.class)
@AutoConfigureAfter(RedisAutoConfiguration.class)
@ConditionalOnBean(RedisConnectionFactory.class)
// 条件在不存在CacheManager Bean的时候生效
@ConditionalOnMissingBean(CacheManager.class)
@Conditional(CacheCondition.class)
class RedisCacheConfiguration {

    private final CacheProperties cacheProperties;

    private final CacheManagerCustomizers customizerInvoker;

    private final org.springframework.data.redis.cache.RedisCacheConfiguration redisCacheConfiguration;

    RedisCacheConfiguration(CacheProperties cacheProperties, CacheManagerCustomizers customizerInvoker,
            ObjectProvider<org.springframework.data.redis.cache.RedisCacheConfiguration> redisCacheConfiguration) {
        this.cacheProperties = cacheProperties;
        this.customizerInvoker = customizerInvoker;
        this.redisCacheConfiguration = redisCacheConfiguration.getIfAvailable();
    }

    // 注入CacheManager
    @Bean
    public RedisCacheManager cacheManager(RedisConnectionFactory redisConnectionFactory,
            ResourceLoader resourceLoader) {
        RedisCacheManagerBuilder builder = RedisCacheManager.builder(redisConnectionFactory)
                .cacheDefaults(determineConfiguration(resourceLoader.getClassLoader()));
        List<String> cacheNames = this.cacheProperties.getCacheNames();
        if (!cacheNames.isEmpty()) {
            builder.initialCacheNames(new LinkedHashSet<>(cacheNames));
        }
        return this.customizerInvoker.customize(builder.build());
    }

    private org.springframework.data.redis.cache.RedisCacheConfiguration determineConfiguration(
            ClassLoader classLoader) {
        if (this.redisCacheConfiguration != null) {
            return this.redisCacheConfiguration;
        }
        Redis redisProperties = this.cacheProperties.getRedis();
        org.springframework.data.redis.cache.RedisCacheConfiguration config = org.springframework.data.redis.cache.RedisCacheConfiguration
                .defaultCacheConfig();
        config = config.serializeValuesWith(
                // 使用默认的JDK序列化器
                SerializationPair.fromSerializer(new JdkSerializationRedisSerializer(classLoader)));
        if (redisProperties.getTimeToLive() != null) {
            config = config.entryTtl(redisProperties.getTimeToLive());
        }
        if (redisProperties.getKeyPrefix() != null) {
            config = config.prefixKeysWith(redisProperties.getKeyPrefix());
        }
        if (!redisProperties.isCacheNullValues()) {
            config = config.disableCachingNullValues();
        }
        if (!redisProperties.isUseKeyPrefix()) {
            config = config.disableKeyPrefix();
        }
        return config;
    }

}
3、测试缓存,使用@Cacheable标签,如下,调用getEmp方法,查看缓存内容
1 @Cacheable(cacheNames="emp", key = "emp#id" /*keyGenerator = "myKeyGenerator"*/)
2 public Employee getEmp(Integer id){
3     System.out.println("===查询" + id + "号员工");
4     return employeeMapper.getEmpById(id);
5 }
缓存内容如下,存储的也是emp对象的序列化结果

4、自己注入一个CacheManager的Bean,并且使用json序列化的方式
 1 /**
 2  * 缓存管理器
 3  */
 4 @Bean
 5 public CacheManager cacheManager(RedisConnectionFactory redisConnectionFactory) {
 6
 7     //初始化一个RedisCacheWriter
 8     RedisCacheWriter redisCacheWriter = RedisCacheWriter.nonLockingRedisCacheWriter(redisConnectionFactory);
 9
10     //设置CacheManager的值序列化方式为json序列化
11     RedisSerializer<Object> jsonSerializer = new Jackson2JsonRedisSerializer<Object>(Object.class);
12     RedisSerializationContext.SerializationPair<Object> pair = RedisSerializationContext.SerializationPair
13             .fromSerializer(jsonSerializer);
14     RedisCacheConfiguration defaultCacheConfig=RedisCacheConfiguration.defaultCacheConfig()
15             .serializeValuesWith(pair);
16
17     //设置默认超过期时间是30秒
18     defaultCacheConfig.entryTtl(Duration.ofSeconds(30));
19     //初始化RedisCacheManager
20     return new RedisCacheManager(redisCacheWriter, defaultCacheConfig);
21
22 }
5、测试缓存,使用@Cacheable标签,如下,测试时,先将原有缓存情况,避免影响测试,调用getEmp方法,查看缓存内容
