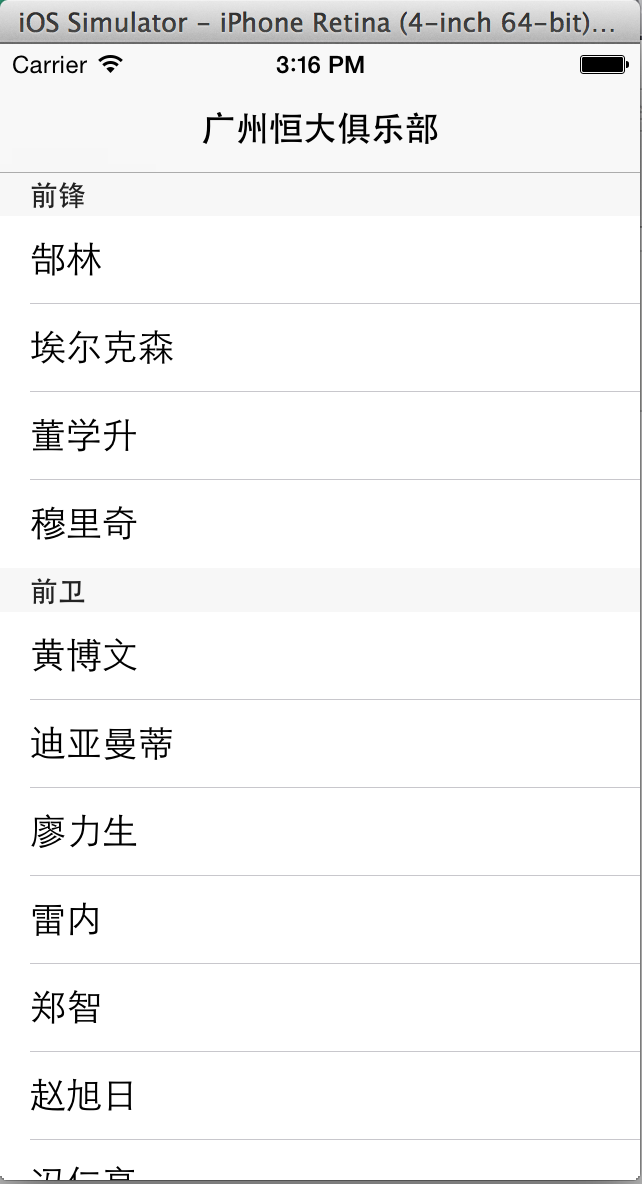
我们可以采用名字分段法,名字分段会在之后的小节中显示,这是转而使用球员的角色分段发,以最直接的入手点讲解好UITableView的分段使用方法。本节示例时基于上节的SimpleTableViewController可以作为这里的父类,创建一个名为SectionTableViewController的类,继承自SimpleTableViewController,头文件声明如下:
#import "HBSimpleTableViewController.h"

@interface HBSectionTableViewController : HBSimpleTableViewController

@end
随后有必要对数据源的制作进行改善,使其变成分角色的类别
-(void)initData
{
    //承认SimpleTableView中的数据源有效性
    [super initData];

    //最终的新数据源
    NSMutableArray *arrSectionDatasource=[NSMutableArray arrayWithCapacity:0];
    //记录着当前已经使用的段名
    NSMutableArray *arrSection = [NSMutableArray arrayWithCapacity:0];
    //临时存放一个段名下的所有球员对象
    NSMutableArray *arrTmp = [NSMutableArray arrayWithCapacity:0];

    //对于所有球员进行遍历
    for (HBPlayerInfo *onePlayer in self.datasource) {
        NSString *role=onePlayer.role;
        //如果当前球员的role已经被作为段名只做好,则continue
        //也意味着当前球员已经被加入到最终数据源中
        if([arrSection containsObject:role])
        {
            continue;
        }

        //新的role
        //再次遍历球员
        for (HBPlayerInfo *rolePlayer in self.datasource) {
            if([rolePlayer.role isEqualToString:role])
            {
                [arrTmp addObject:rolePlayer];
            }
        }

        //此role被作为一个段名,制作完成
        [arrSection addObject:role];

        //arrTmp中包含着所有满足当前role段名的球员对象
        //加到最终的数据源中
        [arrSectionDatasource addObject:arrTmp];

        //重置arrTmp
        //等待新的role将所有满足的球员对象加进来
        arrTmp=[NSMutableArray arrayWithCapacity:0];
    }

    //重置数据源
    if (_datasource) {
        _datasource=nil;
    }
    _datasource=[[NSArray alloc] initWithArray:arrSectionDatasource];
}
(1)告诉UITableView一共分成几段,之前SimpleTableViewController没有实现此方法,所以默认的时一段,多段的代码如下:
-(NSInteger)numberOfSectionsInTableView:(UITableView *)tableView
{
    return self.datasource.count;
}
(2)告诉UITableView每段的段名。由于每个子数组中元素的role内容都相同,可以取第一个元素访问
-(NSString *)tableView:(UITableView *)tableView titleForHeaderInSection:(NSInteger)section
{
    HBPlayerInfo *onePlay=[((NSArray *)[self.datasource objectAtIndex:section]) objectAtIndex:0];
    return onePlay.role;
}
表视图“行制作”回调函数重新访问新数据源,修改如下
-(NSInteger)tableView:(UITableView *)tableView numberOfRowsInSection:(NSInteger)section
{
    return ((NSArray *)[self.datasource objectAtIndex:section]).count;
}

-(UITableViewCell *)tableView:(UITableView *)tableView cellForRowAtIndexPath:(NSIndexPath *)indexPath
{
    static NSString *CellIdentifier=@"sectionTableViewCellId";
    UITableViewCell *cell=[tableView dequeueReusableCellWithIdentifier:CellIdentifier];
    if(cell==nil)
    {
        cell=[[UITableViewCell alloc]initWithStyle:UITableViewCellStyleDefault reuseIdentifier:CellIdentifier];
    }

    //取得每个球员的方法和SimpleTableViewController有所不同
    HBPlayerInfo *onePlayer=nil;
    NSArray *arrSectionPlayer=[self.datasource objectAtIndex:indexPath.section];
    if(arrSectionPlayer && arrSectionPlayer.count>indexPath.row)
    {
        onePlayer =[arrSectionPlayer objectAtIndex:indexPath.row];
    }
    if (onePlayer) {
        cell.textLabel.text=onePlayer.name;
    }
    return cell;
}
程序运行效果如下: