如果你花了很长时间的跟着我这个教程,你知道我们已经走的相当远了。 现在,您应该能够构建一个iPhone应用程序,能使用标签栏(Tab Bat) , 导航控制器(navigation controller) 和 表视图(table view) ,并使用故事板串连视图。 可能很多人会说,原来的详细视图太普通。 我们如何能显示更多的信息,包括图像吗? 如果你理解了教程,这应该不难,而且我有意地忽略了这部分一是演示需要,二是给你们更多创造空间,三是我偷懒了哈哈。
你有办法创建自己的菜谱应用的详细视图吗? 无论如何,我们将重新构建它,并向您展示如何完善详细信息页面。 但是在那之前,我不得不向你介绍面向对象编程的基本知识。 在后面的教程中,我们将完善详细信息视图屏幕。
不要害怕术语“面向对象编程”或简称OOP。 这不是一种新的编程语言,而是一个编程概念/技术。 当我第一次开始写iOS编程教程时我有意地忽略了OOP概念。 我是想让事情变得简单,只向您展示(即使你没有任何编程背景)如何创建一个应用程序。我不想把你被技术术语吓。 然而,我认为是时候介绍这个概念。 如果你还在阅读这篇文章,我相信你决定学习iOS编程,你想把你编程水平提升到下一个级别。
好吧,我们开始吧。
面向对象编程——一些理论
objective - c被认为是一个面向对象编程(OOP)语言。 面向对象程序设计是一种构建软件应用程序的方法。 换句话说,大部分代码编写的应用程序是在某些方面处理某种类型的对象。 UIViewController,UIButton,UINavigationController和UITableView是一些iOS SDK对象。 你不仅可以使用在你的iOS应用程序内置的对象,您也可以使用已经创建了的一些自己的对象,如RecipeDetailViewController和SimpleTableCell等。
那么为什么要OOP吗? 一个重要的原因是,我们想把复杂的软件(或构建块)分解成小块,以更容易开发和管理。 在这里,小块就是对象。 每个对象都有自己的责任,为了使软件工作对象相互协调。 这是面向对象的基本概念。
以Hello World应用程序作为一个例子。 这个UIViewController对象负责应用程序视图的显示作为一个占位符为Hello World按钮。 这个UIButton(即:Hello World按钮)对象负责显示一个标准的iOS按钮屏幕和监听任何触摸事件。另一方面, UIAlertView的对象,负责显示警告消息给用户。 最重要的是,所有这些对象一起工作组成了Hello World应用程序。
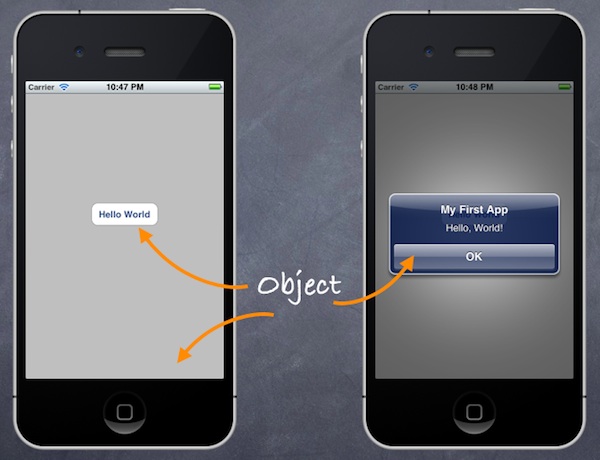
在Hello World应用程序示例对象
在面向对象的编程,对象拥有两个特点:属性(Properties)和功能(functional)。 让我们考虑一个真实世界的对象——汽车。 一辆车有它自己的颜色,模型,最高速度,制造商,等等。这些都是汽车的性能。 在功能方面,汽车应该提供基本的功能,比如加速、制动、转向等。
如果我们回到iOS的世界,让我们看看在Hello world应用程序这个UIButton对象的特性和功能:
>属性 ——背景、大小、颜色和字体属性的例子是UIButton
>功能 ——当按钮被窃听了,它认识到水龙头事件并显示一条警告信息在屏幕上。 所以“showMessage”按钮的功能。
在我们的教程,你总是遇到术语“方法”。 在objective - c中,我们创建方法来提供一个对象的功能。 通常一个方法对应于一个特定对象的函数。
类(Class)、对象(Object)和实例(Instance)
除了方法和对象,你可能会在OOP遇到诸如实例,类。 让我给一个简短的解释。
一个 类 是创建对象的一个蓝图或原型。 基本上,一个类包含属性和方法。 比如说我们要定义一个课程类。 一个课程类包含属性,比如名字、课程代码和选课最大人数,已选 学生的数量。 这个类代表一个课程的蓝图。 我们可以使用它来创建不同的课程像iOS编程课程,课程代码IPC101、烹饪课程,课程代码CC101等等。在这里,“iOS编程课程”和“烹饪课程”是众所周知的 课程类的对象。 有时,我们还引用它们类的 课程实例 。 为简单起见,您可以考虑 实例 作为另一个单词 对象 。
重新定制表格单元的教程
那么我们怎么说明OOP呢? 学习编程,例子是最好的方法。 让我们重新审视 “定制表单元格”教程 。
在viewDidLoad方法表格单元的教程中,我们创建了三个数组来存储不同类型的数据:配方名称,菜单缩略图和准备时间。 如果你理解了OOP概念,这些数据可以被称作菜单属性。
| 1 2 3 4 5 6 7 8 9 10 11 12 | - (void)viewDidLoad { [super viewDidLoad]; // Initialize(初始化) table data tableData = [NSArray arrayWithObjects:@"Egg Benedict", @"Mushroom Risotto", @"Full Breakfast", @"Hamburger", @"Ham and Egg Sandwich", @"Creme Brelee", @"White Chocolate Donut", @"Starbucks Coffee", @"Vegetable Curry", @"Instant Noodle with Egg", @"Noodle with BBQ Pork", @"Japanese Noodle with Pork", @"Green Tea", @"Thai Shrimp Cake", @"Angry Birds Cake", @"Ham and Cheese Panini", nil]; // Initialize thumbnails thumbnails = [NSArray arrayWithObjects:@"egg_benedict.jpg", @"mushroom_risotto.jpg", @"full_breakfast.jpg", @"hamburger.jpg", @"ham_and_egg_sandwich.jpg", @"creme_brelee.jpg", @"white_chocolate_donut(炸面圈).jpg", @"starbucks_coffee.jpg", @"vegetable_curry.jpg", @"instant_noodle_with_egg.jpg", @"noodle_with_bbq_pork.jpg", @"japanese_noodle_with_pork.jpg", @"green_tea.jpg", @"thai_shrimp_cake.jpg", @"angry_birds_cake.jpg", @"ham_and_cheese_panini.jpg", nil]; // Initialize(初始化) Preparation Time prepTime = [NSArray arrayWithObjects:@"30 min", @"30 min", @"20 min", @"30 min", @"10 min", @"1 hour", @"45 min", @"5 min", @"30 min", @"8 min", @"20 min", @"20 min", @"5 min", @"1.5 hour", @"4 hours", @"10 min", nil]; } |
把名称(即tableData),缩略图(即菜单图像)和准备时间(即prepTime)都与食谱联系,而不是在不同的数组存储这些数据,最好创建一个食谱类模型。
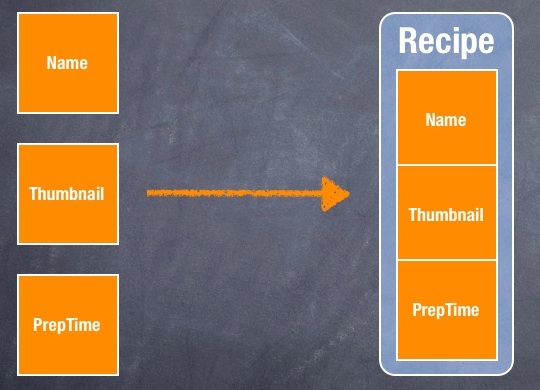
食谱类
我们将再次使用“定制表单元格”项目并将其转换为使用新的食谱类。 如果你还没有阅读教程,回去看看 把 。
创建Recipe类
首先,我们将创建Recipe类。 右键单击SimpleTable文件夹,然后选择“新文件…”。 选择“objective - c类”模板(在Cocoa Touch),然后单击“下一步”。 类的名字“食谱”,作为一个子类的“NSObject”。 点击“下一步”,保存文件在你的Xcode项目文件夹。
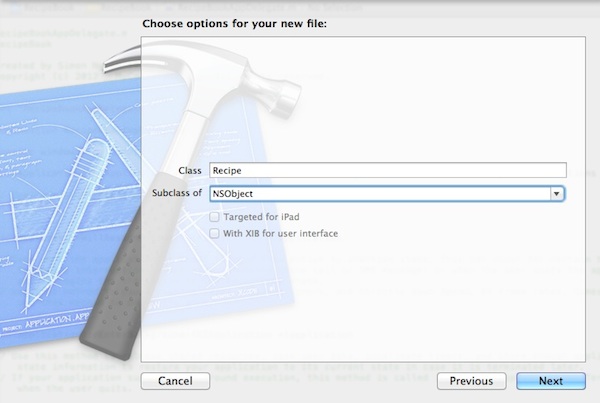
创建Recipe类继承自NSObject
一旦完成,,Xcode将创建Recipe. h和Recipe.m文件。 在头文件,添加食谱类的属性:
| 1 2 3 4 5 6 7 |
在实现文件(即Recipe.m),我们添加@synthesis指令。 这个@synthesize指令告诉编译器生成setter和getter方法来访问属性我们定义的标题。
| 1 2 3 4 5 6 7 | @implementation Recipe @synthesize name; @synthesize prepTime; @synthesize imageFile; @end |
现在我们已经创建了一个食谱类与三个属性。 稍后,我们将利用它来实例化不同配方的对象。 但是我们如何能将数组对象转换成食谱呢? 这三个数据数组可以描述如下:
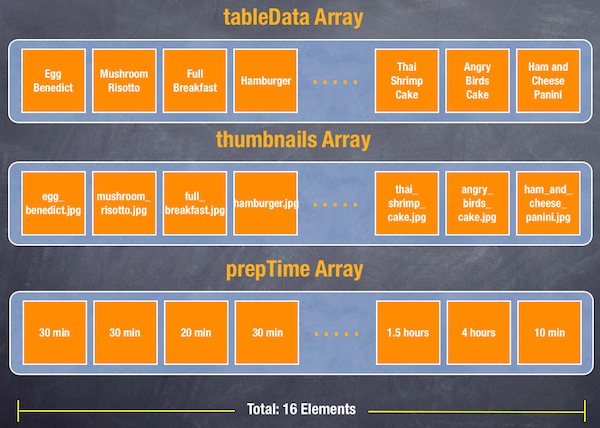
三个存储配方名称,缩略图和准备时间的数组
使用新的食谱类,我们可以把三个数组转换成一个数组对象,每个对象存储食谱菜单数据。
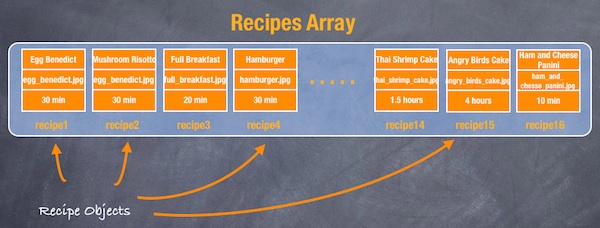
一个数组对象的菜单
初始化数组对象的菜单
回到编码部分。 而不是宣布三个数组(tableData,thumbnail,prepTime),我们将声明一个菜单变量的数组对象。
| 1 2 3 4 |
在SimpleTableView.m的ControllerviewDidLoad方法里,我们初始化菜单对象(共16个菜单对象)并把它们放进“食谱”数组。
| 1 2 3 4 5 6 7 8 9 10 11 12 13 14 15 16 17 18 19 20 21 22 23 24 25 26 27 28 29 30 31 32 33 34 35 36 37 38 39 40 41 42 43 44 45 46 47 48 49 50 51 52 53 54 55 56 57 58 59 60 61 62 63 64 65 66 67 68 69 70 71 72 73 74 75 76 77 78 79 80 81 82 83 84 85 86 87 | - (void)viewDidLoad { [super viewDidLoad]; Recipe *recipe1 = [Recipe new]; recipe1.name = @"Egg Benedict"; recipe1.prepTime = @"30 min"; recipe1.imageFile = @"egg_benedict.jpg"; Recipe *recipe2 = [Recipe new]; recipe2.name = @"Mushroom Risotto"; recipe2.prepTime = @"30 min"; recipe2.imageFile = @"mushroom_risotto.jpg"; Recipe *recipe3 = [Recipe new]; recipe3.name = @"Full Breakfast"; recipe3.prepTime = @"20 min"; recipe3.imageFile = @"full_breakfast.jpg"; Recipe *recipe4 = [Recipe new]; recipe4.name = @"Hamburger"; recipe4.prepTime = @"30 min"; recipe4.imageFile = @"hamburger.jpg"; Recipe *recipe5 = [Recipe new]; recipe5.name = @"Ham and Egg Sandwich"; recipe5.prepTime = @"10 min"; recipe5.imageFile = @"ham_and_egg_sandwich.jpg"; Recipe *recipe6 = [Recipe new]; recipe6.name = @"Creme Brelee"; recipe6.prepTime = @"1 hour"; recipe6.imageFile = @"creme_brelee.jpg"; Recipe *recipe7 = [Recipe new]; recipe7.name = @"White Chocolate Donut"; recipe7.prepTime = @"45 min"; recipe7.imageFile = @"white_chocolate_donut(炸面圈).jpg"; Recipe *recipe8 = [Recipe new]; recipe8.name = @"Starbucks Coffee"; recipe8.prepTime = @"5 min"; recipe8.imageFile = @"starbucks_coffee.jpg"; Recipe *recipe9 = [Recipe new]; recipe9.name = @"Vegetable Curry"; recipe9.prepTime = @"30 min"; recipe9.imageFile = @"vegetable_curry.jpg"; Recipe *recipe10 = [Recipe new]; recipe10.name = @"Instant Noodle with Egg"; recipe10.prepTime = @"8 min"; recipe10.imageFile = @"instant_noodle_with_egg.jpg"; Recipe *recipe11 = [Recipe new]; recipe11.name = @"Noodle with BBQ Pork"; recipe11.prepTime = @"20 min"; recipe11.imageFile = @"noodle_with_bbq_pork.jpg"; Recipe *recipe12 = [Recipe new]; recipe12.name = @"Japanese Noodle with Pork"; recipe12.prepTime = @"20 min"; recipe12.imageFile = @"japanese_noodle_with_pork.jpg"; Recipe *recipe13 = [Recipe new]; recipe13.name = @"Green Tea"; recipe13.prepTime = @"5 min"; recipe13.imageFile = @"green_tea.jpg"; Recipe *recipe14 = [Recipe new]; recipe14.name = @"Thai Shrimp Cake"; recipe14.prepTime = @"1.5 hours"; recipe14.imageFile = @"thai_shrimp_cake.jpg"; Recipe *recipe15 = [Recipe new]; recipe15.name = @"Angry Birds Cake"; recipe15.prepTime = @"4 hours"; recipe15.imageFile = @"angry_birds_cake.jpg"; Recipe *recipe16 = [Recipe new]; recipe16.name = @"Ham and Cheese Panini"; recipe16.prepTime = @"10 min"; recipe16.imageFile = @"ham_and_cheese_panini.jpg"; recipes = [NSArray arrayWithObjects:recipe(食谱)1, recipe2, recipe3, recipe4, recipe5, recipe5, recipe6, recipe7, recipe8, recipe9, recipe10, recipe11, recipe12, recipe13, recipe14, recipe15, recipe16, nil]; } |
在Objective C,我们使用“new”方法(实际上这是NSObjects提供的)来实例化一个对象。 你有两种方法可以设置该属性的值。 在上面的代码中,我们使用dot语法来赋值。 例如,
| 1 | recipe1.name = @"Egg Benedict"; |
或者,您可以调用setName方法使用方括号([])。 这里是等价的代码
| 1 | [recipe1 setName:@"Egg Benedict"]; |
两个语法执行完全相同的事情。 但在我们的教程我们将使用dot语法。
TableData取代食谱数组
为了使用食谱数组我们还有一些事情需要改变。 对于numberOfRowsInSection方法,我们改变”tableData”为“recipes”:
| 1 2 3 4 5 | - (NSInteger)tableView:(UITableView *)tableView numberOfRowsInSection:(NSInteger)section { // DELETE THIS LINE return [tableData count]; return [recipes count]; } |
对于“cellForRowAtIndexPath”的方法,我们将用recipes数组代替“tableData”、“thumbnails”和“prepTime”:
| 1 2 3 4 5 6 7 8 9 10 11 12 13 14 15 16 17 18 19 20 21 22 23 24 25 | - (UITableViewCell *)tableView:(UITableView *)tableView cellForRowAtIndexPath:(NSIndexPath *)indexPath { static NSString *simpleTableIdentifier = @"SimpleTableCell"; SimpleTableCell *cell = (SimpleTableCell *)[tableView dequeueReusableCellWithIdentifier:simpleTableIdentifier]; if (cell == nil) { NSArray *nib = [[NSBundle mainBundle] loadNibNamed:@"SimpleTableCell" owner:self options:nil]; cell = [nib objectAtIndex:0]; } /* DELETE THIS SECTION cell.nameLabel.text = [tableData objectAtIndex:indexPath.row]; cell.thumbnailImageView.image = [UIImage imageNamed:[thumbnails objectAtIndex:indexPath.row]]; cell.prepTimeLabel.text = [prepTime objectAtIndex:indexPath.row]; */ // Locate the current recipe object and assign the label, image & prepTime Recipe *recipe = [recipes objectAtIndex:indexPath.row]; cell.nameLabel.text = recipe.name; cell.thumbnailImageView.image = [UIImage imageNamed:recipe.imageFile]; cell.prepTimeLabel.text = recipe.prepTime; return cell; } |
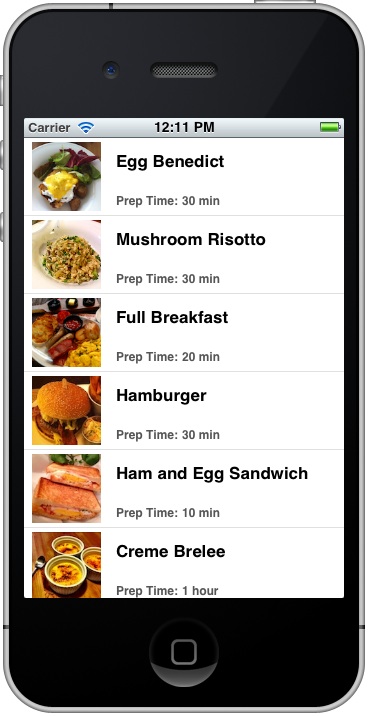
正如您可以从代码看到的,通过改变三个数组,该食谱代码更可读,更易理解的。 现在您可以运行您的应用程序,,虽然外观上和我们以前教程里创建的一模一样, 然而,在内部我们通过创建我们自己的食谱对象美化了我们的代码。
即将到来的下一个是什么?
我希望你对于今日的教程不是很无聊。 这仅仅是OOP的基本概念。 还需要大量的实践和研究你才能变得熟练。 未来,在我们下一个教程中,我将向您展示如何基于我们已经学会的,去提高细节视图屏幕。 这将是有趣的!