出自:https://www.jianshu.com/p/7025bf0f7a2a?utm_campaign=haruki
连接ADB设备:
可以通过USB或Wifi与ADB设备进行连接,进而调用Uiautomator2框架,支持同时连接单个或多个ADB设备。
- USB连接:只有一个设备也可以省略参数,多个设备则需要序列号来区分
import uiautomator2 as u2


d = u2.connect("--serial-here--")
d = u2.connect()
d = u2.connect("10.1.2.3")
d = u2.connect_adb_wifi("10.0.0.1:5555")
#等同于
 + Shell: adb connect 10.0.0.1:5555
 + Python: u2.connect_usb("10.0.0.1:5555")
APP操作:用于启动或停止某个APP
1、获取前台应用 packageName, activity
d.app_current()
am start -n $package/$activity启动)d.app_start("com.example.app")
am start -n com.example.hello_world/.MainActivityd.app_start("com.example.hello_world", ".MainActivity")
monkey -p com.example.hello_world -c android.intent.category.LAUNCHER 1 启动,这种方法有个副作用,它自动会将手机的旋转锁定给关掉d.app_start("com.example.hello_world", use_monkey=True)
d.app_start("com.example.app", stop=True)
am force-stop,此方法会丢失应用数据d.app_stop("com.example.app")
pm cleard.app_clear('com.example.hello_world')
d.app_stop_all()
d.app_stop_all(excludes=['com.examples.demo'])
img = d.app_icon("com.examples.demo")
img.save("icon.png")
d.app_list_running()
pid = d.app_wait("com.example.android") # 等待应用运行, return pid(int)
if not pid:
    print("com.example.android is not running")
else:
    print("com.example.android pid is %d" % pid)

d.app_wait("com.example.android", front=True) # 等待应用前台运行
d.app_wait("com.example.android", timeout=20.0) # 最长等待时间20s(默认)

or
d.wait_activity(".ApiDemos", timeout=10) # default timeout 10.0 seconds
Session操作:一般用于测试某个特定的APP,首先将某个APP设定为一个Session,所有的操作都基于此Session,当Session退出时,代表APP退出
1、启动应用并获取session
session的用途是操作的同时监控应用是否闪退,当闪退时操作,会抛出SessionBrokenErrorsess = d.session("com.example.app") # start app
sess.close() # 停止app
sess.restart() # 冷启app
with d.session("com.netease.cloudmusic") as sess:
    sess(text="Play").click()
# launch app if not running, skip launch if already running
sess = d.session("com.netease.cloudmusic", attach=True)
# raise SessionBrokenError if not running
sess = d.session("com.netease.cloudmusic", attach=True, strict=True)
# check if session is ok.
# Warning: function name may change in the future
sess.running() # True or False
# When app is still running
sess(text="Music").click() # operation goes normal

# If app crash or quit
sess(text="Music").click() # raise SessionBrokenError
# other function calls under session will raise SessionBrokenError too
截图与hierarchy提取:用于获取Android当前的截图和界面元素。
1、截图
# take screenshot and save to a file on the computer, require Android>=4.2.
d.screenshot("home.jpg")

# get PIL.Image formatted images. Naturally, you need pillow installed first
image = d.screenshot() # default format="pillow"
image.save("home.jpg") # or home.png. Currently, only png and jpg are supported

# get opencv formatted images. Naturally, you need numpy and cv2 installed first
import cv2
image = d.screenshot(format='opencv')
cv2.imwrite('home.jpg', image)

# get raw jpeg data
imagebin = d.screenshot(format='raw')
open("some.jpg", "wb").write(imagebin)
2、获取hierarchy
# get the UI hierarchy dump content (unicoded).
xml = d.dump_hierarchy()
模拟触控操作:用于模拟用户对手机的点击或滑动等操作
1.1 XY坐标点击
d.click(10, 20)
1.2 XY坐标双击
d.double_click(x, y)
d.double_click(x, y, 0.1) # default duration between two click is 0.1s
d.long_click(x, y)
d.long_click(x, y, 0.5) # long click 0.5s (default)
# click on the center of the specific ui object
d(text="Settings").click()
d(Text="Settings").double_click()
d(Text="Settings").long_click()

# wait element to appear for at most 10 seconds and then click
d(text="Settings").click(timeout=10)

# click with offset(x_offset, y_offset)
# click_x = x_offset * width + x_left_top
# click_y = y_offset * height + y_left_top
d(text="Settings").click(offset=(0.5, 0.5)) # Default center
d(text="Settings").click(offset=(0, 0)) # click left-top
d(text="Settings").click(offset=(1, 1)) # click right-bottom

# click when exists in 10s, default timeout 0s
clicked = d(text='Skip').click_exists(timeout=10.0)

# click until element gone, return bool
is_gone = d(text="Skip").click_gone(maxretry=10, interval=1.0) # maxretry default 10, interval default 1.0
d.swipe(10, 20, 80, 90)
d.swipe(sx, sy, ex, ey, 0.5)

d(text="Settings").swipe("right")
d(text="Settings").swipe("left", steps=10)
d(text="Settings").swipe("up", steps=20) # 1 steps is about 5ms, so 20 steps is about 0.1s
d(text="Settings").swipe("down", steps=20)


# swipe from point(x0, y0) to point(x1, y1) then to point(x2, y2)
# time will speed 0.2s bwtween two points
d.swipe_points([(x0, y0), (x1, y1), (x2, y2)], 0.2))
d.swipe_ext("right")
d.swipe_ext("right", scale=0.9)
d.drag(sx, sy, ex, ey)
d.drag(sx, sy, ex, ey, 0.5) # swipe for 0.5s(default)
d.touch.down(10, 10) # 模拟按下
time.sleep(.01) # down 和 move 之间的延迟,自己控制
d.touch.move(15, 15) # 模拟移动
d.touch.up() # 模拟抬起
# notes : pinch can not be set until Android 4.3.
# from edge to center. here is "In" not "in"
d(text="Settings").pinch_in(percent=100, steps=10)
# from center to edge
d(text="Settings").pinch_out()

or

d().pinch_in(percent=100, steps=10)
d().pinch_out()
硬按键操作:用于模拟用户对手机硬按键或系统按键的操作。
1、模拟按 Home 或 Back 键
home
back
left
right
up
down
center
menu
search
enter
delete ( or del)
recent (recent apps)
volume_up
volume_down
volume_mute
camera
power
d.press("back")
d.press("home")
d.press(0x07, 0x02)
# press keycode 0x07('0') with META ALT(0x02)
#具体可查询:
#https://developer.android.com/reference/android/view/KeyEvent.html
d.unlock()
# This is equivalent to
# 1. launch activity: com.github.uiautomator.ACTION_IDENTIFY
# 2. press the "home" key
d.set_fastinput_ime(True) # 切换成FastInputIME输入法
d.send_keys("你好123abcEFG") # adb广播输入
d.clear_text() # 清除输入框所有内容(Require android-uiautomator.apk version >= 1.0.7)
d.set_fastinput_ime(False) # 切换成正常的输入法
d.send_action("search") # 模拟输入法的搜索
d.clear_text()
执行ADB shell命令:直接通过Python来执行ADB shell中的指令,并得到反馈。
1、执行shell命令,获取输出和exitCode
output, exit_code = d.shell("ps -A", timeout=60)
2、仅得到输出
output = d.shell("pwd").output
3、仅得到Exitcode
exit_code = d.shell("pwd").exit_code
4、推送文件到ADB设备中
# push to a folder
d.push("foo.txt", "/sdcard/")
# push and rename
d.push("foo.txt", "/sdcard/bar.txt")
# push fileobj
with open("foo.txt", 'rb') as f:
   d.push(f, "/sdcard/")
# push and change file access mode
d.push("foo.sh", "/data/local/tmp/", mode=0o755)
5、获取文件到本地
d.pull("/sdcard/tmp.txt", "tmp.txt")

# FileNotFoundError will raise if the file is not found on the device
d.pull("/sdcard/some-file-not-exists.txt", "tmp.txt")
元素操作或Selector:这是Uiautomator2最为关键的核心功能,测试者可以根据界面中的元素来判断当前画面是否符合预期或基于界面元素进行点按滑动等操作。
text, textContains, textMatches, textStartsWith
className, classNameMatches
description, descriptionContains, descriptionMatches, descriptionStartsWith
checkable, checked, clickable, longClickable
scrollable, enabled,focusable, focused, selected
packageName, packageNameMatches
resourceId, resourceIdMatches
index, instance
# Select the object with text 'Clock' and its className is 'android.widget.TextView'
d(text='Clock', className='android.widget.TextView').click()
# children
# get the children or grandchildren
d(className="android.widget.ListView").child(text="Bluetooth")
# get the children or grandchildren
d(className="android.widget.ListView").child(text="Bluetooth")
也可以根据子节点的Text或 Description或Instance来定位元素, 特别提下下面代码中的这个allow_scroll_search功能,它调用UT2自动滚动直到找到对应元素:
# get the child matching the condition className="android.widget.LinearLayout"
# and also its children or grandchildren with text "Bluetooth"
d(className="android.widget.ListView", resourceId="android:id/list")
.child_by_text("Bluetooth", className="android.widget.LinearLayout")

# get children by allowing scroll search
d(className="android.widget.ListView", resourceId="android:id/list")
.child_by_text(
   "Bluetooth",
   allow_scroll_search=True,
   className="android.widget.LinearLayout"
 )
例子:
下面有另一个实例来展示UT2的定位,以下为Android的系统设置界面及它的hierarchy:
系统设置界面:
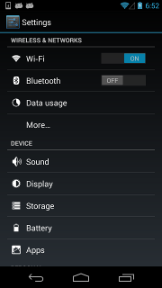
hierarchy:
<node index="0" text="" resource-id="android:id/list" class="android.widget.ListView" ...>
 <node index="0" text="WIRELESS & NETWORKS" resource-id="" class="android.widget.TextView" .../>
 <node index="1" text="" resource-id="" class="android.widget.LinearLayout" ...>
   <node index="1" text="" resource-id="" class="android.widget.RelativeLayout" ...>
     <node index="0" text="Wi‑Fi" resource-id="android:id/title" class="android.widget.TextView" .../>
   </node>
   <node index="2" text="ON" resource-id="com.android.settings:id/switchWidget" class="android.widget.Switch" .../>
 </node>
 ...
</node>
通过child_by_text + child组合后可以定位到WIFI的开关。
d(className="android.widget.ListView", resourceId="android:id/list")
 .child_by_text("Wi‑Fi", className="android.widget.LinearLayout")
 .child(className="android.widget.Switch")
 .click()
d(A).left(B), selects B on the left side of A.
d(A).right(B), selects B on the right side of A.
d(A).up(B), selects B above A.
d(A).down(B), selects B under A.
## select "switch" on the right side of "Wi‑Fi"
d(text="Wi‑Fi").right(className="android.widget.Switch").click()
还有可以通过元素的instances来定位,比如一个界面中有多个switch,我们可以通过下面的形式来定位是第一个还是第二个
d(className="android.widget.Switch", instance=0)
d(className="android.widget.Switch")[0]

or


# get the count of views with text "Add new" on current screen
d(text="Add new").count

# same as count property
len(d(text="Add new"))

# get the instance via index
d(text="Add new")[0]
d(text="Add new")[1]
...

# iterator
for view in d(text="Add new"):
   view.info  # ...
d(text="Settings").exists # True if exists, else False
d.exists(text="Settings") # alias of above property. 上述属性的别名

# advanced usage
d(text="Settings").exists(timeout=3) # wait Settings appear in 3s, same as .wait(3)

d.xpath("立即开户").wait() # 等待元素,最长等10s(默认)
d.xpath("立即开户").wait(timeout=10) # 修改默认等待时间
2、xpath操作
具体可以参考:https://github.com/openatx/uiautomator2/blob/master/XPATH.md
# xpath操作
d.xpath("立即开户").click() # 包含查找等待+点击操作,匹配text或者description等于立即开户的按钮
d.xpath("//*[@text='私人FM']/../android.widget.ImageView").click()

d.xpath('//*[@text="私人FM"]').get().info # 获取控件信息

for el in d.xpath('//android.widget.EditText').all():
   print("rect:", el.rect) # output tuple: (left_x, top_y, width, height)
   print("bounds:", el.bounds) # output tuple: (left, top, right, bottom)
   print("center:", el.center())
   el.click() # click operation
   print(el.elem) # 输出lxml解析出来的Node
3.输入框的操作
d(text="Settings").get_text()  # get widget text
d(text="Settings").set_text("My text...")  # set the text
d(text="Settings").clear_text()  # clear the text
4、等待某个元素出现或消失
# wait until the ui object appears
d(text="Settings").wait(timeout=3.0) # return bool
# wait until the ui object gone
d(text="Settings").wait_gone(timeout=1.0)
Setting
1、默认控件等待时间(原生操作,xpath插件的等待时间)
d.settings['wait_timeout'] = 20.0
or
d.implicitly_wait(20.0)
2、点击的等待延时
d.click_post_delay = 1.5 # default no delay
3、配置accessibility服务的最大空闲时间,超时将自动释放。默认3分钟。(如果两个步骤需要等待较长时间,且不希望下一次发送指令时重启UT2,则可以将此时间加大)
d.set_new_command_timeout(300)
守护:用于处理非预期的弹出框,如崩溃窗口,一些确定或取消弹出框。
# 常用写法,注册匿名监控
d.watcher.when("安装").click()

# 注册名为ANR的监控,当出现ANR和Force Close时,点击Force Close
d.watcher("ANR").when(xpath="ANR").when("Force Close").click()

# 其他回调例子
d.watcher.when("抢红包").press("back")
d.watcher.when("//*[@text = 'Out of memory']").call(lambda d: d.shell('am force-stop com.im.qq'))

# 移除ANR的监控
d.watcher.remove("ANR")

# 移除所有的监控
d.watcher.remove()

# 开始后台监控
d.watcher.start()
d.watcher.start(2.0) # 默认监控间隔2.0s

# 强制运行所有监控
d.watcher.run()

# 停止监控
d.watcher.stop()

# 停止并移除所有的监控,常用于初始化
d.watcher.reset()
toast:
展示toast:
d.toast.show("Hello world")
d.toast.show("Hello world", 1.0) # show for 1.0s, default 1.0s
获取toast:
# [Args]
# 5.0: max wait timeout. Default 10.0
# 10.0: cache time. return cache toast if already toast already show up in recent 10 seconds. Default 10.0 (Maybe change in the furture)
# "default message": return if no toast finally get. Default None  #未获取到toast,展示default message
d.toast.get_message(5.0, 10.0, "default message")

# common usage 通常用法:断言
assert "Short message" in d.toast.get_message(5.0, default="")

# clear cached toast
d.toast.reset()
# Now d.toast.get_message(0) is None
插件
Performance 性能采集(记录CPU,RAM等数据)
https://github.com/openatx/uiautomator2/blob/6e0d75d778a86c626df778e0432c8e339e3d9be4/uiautomator2/ext/perf/README.md
Aircv 图像比对插件(有较多限制,推荐自己单独截图后调用Aircv来实现图像比对或点击等功能,或用ATX来实现)
https://github.com/openatx/uiautomator2/blob/436404119fafce303ad8f3a07811c044d101b9eb/uiautomator2/ext-archived/aircv/README.md
Htmlreport插件(将操作生成HTML文件)
https://github.com/openatx/uiautomator2/tree/6e0d75d778a86c626df778e0432c8e339e3d9be4/uiautomator2/ext/htmlreport