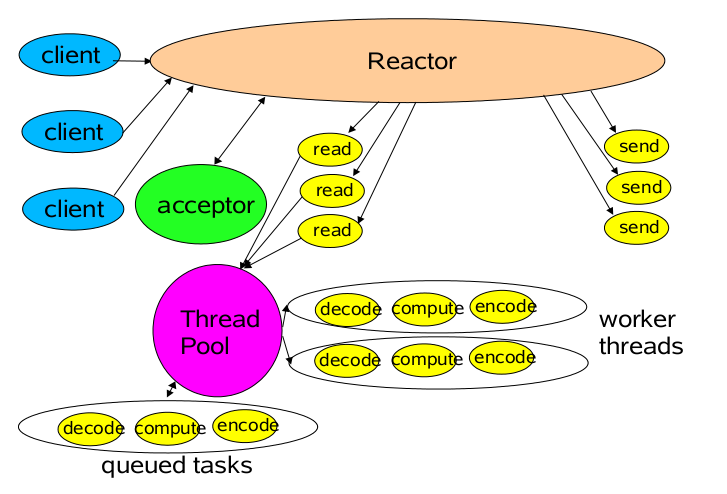
反应器(Reactor)模式
http://blog.csdn.net/linxcool/article/details/7771952
概述
Java NIO非堵塞技术实际是采取反应器模式,或者说是观察者(observer)模式为我们监察I/O端口,如果有内容进来,会自动通知我们,这样,我们就不必开启多个线程死等,从外界看,实现了流畅的I/O读写,不堵塞了。
同步和异步区别:有无通知(是否轮询)
堵塞和非堵塞区别:操作结果是否等待(是否马上有返回值),只是设计方式的不同
NIO 有一个主要的类Selector,这个类似一个观察者,只要我们把需要探知的socketchannel告诉Selector,我们接着做别的事情,当有事件发生时,他会通知我们,传回一组SelectionKey,我们读取这些Key,就会获得我们刚刚注册过的socketchannel,然后,我们从这个Channel中读取数据,接着我们可以处理这些数据。
反应器模式与观察者模式在某些方面极为相似:当一个主体发生改变时,所有依属体都得到通知。不过,观察者模式与单个事件源关联,而反应器模式则与多个事件源关联 。
一般模型
我们想象以下情形:长途客车在路途上,有人上车有人下车,但是乘客总是希望能够在客车上得到休息。
传统的做法是:每隔一段时间(或每一个站),司机或售票员对每一个乘客询问是否下车。
反应器模式做法是:汽车是乘客访问的主体(Reactor),乘客上车后,到售票员(acceptor)处登记,之后乘客便可以休息睡觉去了,当到达乘客所要到达的目的地后,售票员将其唤醒即可。
代码实现
- package com.linxcool.reactor;
- import java.io.IOException;
- import java.net.InetAddress;
- import java.net.InetSocketAddress;
- import java.nio.channels.SelectionKey;
- import java.nio.channels.Selector;
- import java.nio.channels.ServerSocketChannel;
- import java.util.Iterator;
- import java.util.Set;
- /**
- * 反应器模式
- * 用于解决多用户访问并发问题
- *
- * 举个例子:餐厅服务问题
- *
- * 传统线程池做法:来一个客人(请求)去一个服务员(线程)
- * 反应器模式做法:当客人点菜的时候,服务员就可以去招呼其他客人了,等客人点好了菜,直接招呼一声“服务员”
- *
- * @author linxcool
- */
- public class Reactor implements Runnable{
- public final Selector selector;
- public final ServerSocketChannel serverSocketChannel;
- public Reactor(int port) throws IOException{
- selector=Selector.open();
- serverSocketChannel=ServerSocketChannel.open();
- InetSocketAddress inetSocketAddress=new InetSocketAddress(InetAddress.getLocalHost(),port);
- serverSocketChannel.socket().bind(inetSocketAddress);
- serverSocketChannel.configureBlocking(false);
- //向selector注册该channel
- SelectionKey selectionKey=serverSocketChannel.register(selector, SelectionKey.OP_ACCEPT);
- //利用selectionKey的attache功能绑定Acceptor 如果有事情,触发Acceptor
- selectionKey.attach(new Acceptor(this));
- }
- @Override
- public void run() {
- try {
- while(!Thread.interrupted()){
- selector.select();
- Set<SelectionKey> selectionKeys= selector.selectedKeys();
- Iterator<SelectionKey> it=selectionKeys.iterator();
- //Selector如果发现channel有OP_ACCEPT或READ事件发生,下列遍历就会进行。
- while(it.hasNext()){
- //来一个事件 第一次触发一个accepter线程
- //以后触发SocketReadHandler
- SelectionKey selectionKey=it.next();
- dispatch(selectionKey);
- selectionKeys.clear();
- }
- }
- } catch (IOException e) {
- e.printStackTrace();
- }
- }
- /**
- * 运行Acceptor或SocketReadHandler
- * @param key
- */
- void dispatch(SelectionKey key) {
- Runnable r = (Runnable)(key.attachment());
- if (r != null){
- r.run();
- }
- }
- }
- package com.linxcool.reactor;
- import java.io.IOException;
- import java.nio.channels.SocketChannel;
- public class Acceptor implements Runnable{
- private Reactor reactor;
- public Acceptor(Reactor reactor){
- this.reactor=reactor;
- }
- @Override
- public void run() {
- try {
- SocketChannel socketChannel=reactor.serverSocketChannel.accept();
- if(socketChannel!=null)//调用Handler来处理channel
- new SocketReadHandler(reactor.selector, socketChannel);
- } catch (IOException e) {
- e.printStackTrace();
- }
- }
- }
- package com.linxcool.reactor;
- import java.io.IOException;
- import java.nio.ByteBuffer;
- import java.nio.channels.SelectionKey;
- import java.nio.channels.Selector;
- import java.nio.channels.SocketChannel;
- public class SocketReadHandler implements Runnable{
- private SocketChannel socketChannel;
- public SocketReadHandler(Selector selector,SocketChannel socketChannel) throws IOException{
- this.socketChannel=socketChannel;
- socketChannel.configureBlocking(false);
- SelectionKey selectionKey=socketChannel.register(selector, 0);
- //将SelectionKey绑定为本Handler 下一步有事件触发时,将调用本类的run方法。
- //参看dispatch(SelectionKey key)
- selectionKey.attach(this);
- //同时将SelectionKey标记为可读,以便读取。
- selectionKey.interestOps(SelectionKey.OP_READ);
- selector.wakeup();
- }
- /**
- * 处理读取数据
- */
- @Override
- public void run() {
- ByteBuffer inputBuffer=ByteBuffer.allocate(1024);
- inputBuffer.clear();
- try {
- socketChannel.read(inputBuffer);
- //激活线程池 处理这些request
- //requestHandle(new Request(socket,btt));
- } catch (IOException e) {
- e.printStackTrace();
- }
- }
- }