1.简介
什么是LNMP?
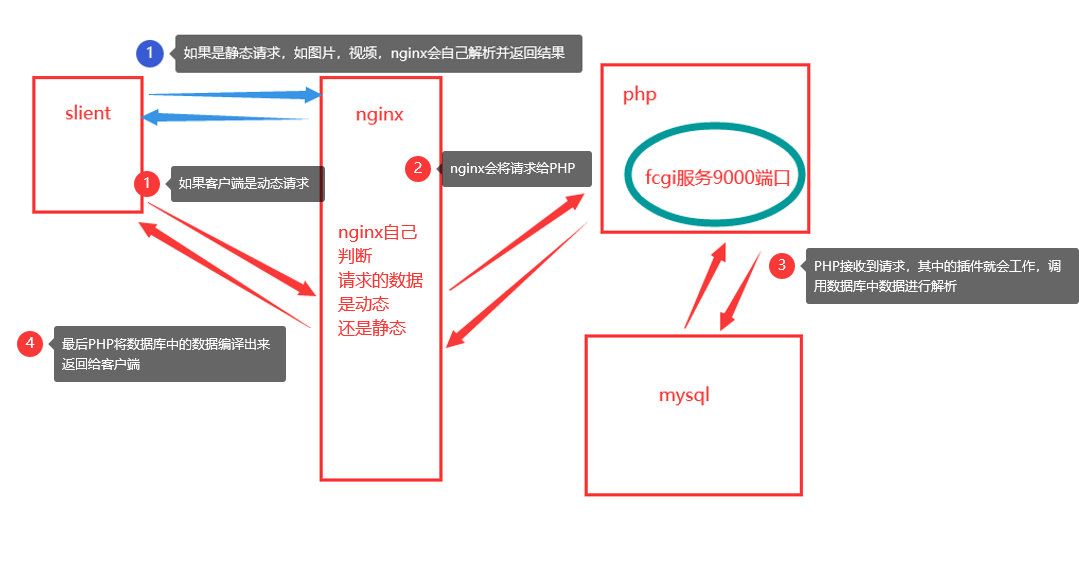
在linux中,LNMP是目前网站的主流架构之一,LNMP所指的是linux系统,nginx网站前端服务,php-fpm解析静态网页和外部程序解析动态页面,mysql后台的数据库组合。
流程是怎样的呢?
首先,浏览器发送请求给nginx服务器,服务器响应并处理web请求,nginx根据自己的判断哪些是静态页面,哪些是动态页面,如果是静态页面直接由nginx自己处理就可以返回结果给客户端了,比如图片,视频等,如果是动态的请求(比如:博客中的互动),它就会将请求给PHP-fpm服务器进行处理,php-fpm会调用它自身的中间件服务器,连接mysql,进行调用数据,完成页面的编译,编译完成后php-fpm会将处理完的信息页面返回给nginx,nginx再返回给客户端。流程图如下下面我就用编译安装搭建LNMP服务器:
首先安装nginx,其次安装mysql(编译安装mysql需要先安cmake),最后安装PHP(nginx和mysql安装没有安装顺序,但是PHP一定要安装在mysql的后面,因为PHP编译安装的过程中,需要mysql的支持)
我将需要编译安装的文件都放在了 tools目录下(此目录自行创建)

相关软件包放在如下位置,可自行下载
链接: https://pan.baidu.com/s/1qJ9TAQ2oDWk35mkJgXobDw 提取码:iuuz
2.nginx的安装
在安装nginx之前,需要我们去安装相应的外部支持程序,pcre-devel ,zlib-devel,openssl-devel。只要有了这些支持,nginx就会每次启动之后,自动加载一些东西。
pcre-devel:兼容正则表达式,nginx中药支持http rewrite模块,所以需要安装
zlib-devel:模块需要的库
openssl-devel:支持加密模块相关的东西。
- 安装nginx的外部支持程序
-
[root@lnmp tools]# yum install -y pcre-devel openssl-devel zlib-devel
- 解压nginx的源码包,并将其放入/usr/src/目录下,此目录主要放Linux的源码包文件
-
[root@lnmp tools]# tar xf nginx-1.6.0.tar.gz -C /usr/src/
- 新建用户,这里做用户支持,在编译安装的过程中需要用户支持
-
[root@lnmp nginx-1.6.0]# useradd -M -s /sbin/nologin nginx
- 进入nginx目录下,进行编译安装
-
[root@lnmp nginx-1.6.0]# cd /usr/src/nginx-1.6.0/
[root@lnmp nginx-1.6.0]# ./configure --prefix=/usr/local/nginx --user=nginx --group=nginx --with-file-aio --with-http_mp4_module --with-http_ssl_module && make && make install -
          --prefix=/usr/local/nginx 指定nginx安装的路径

          --user=nginx

           --group=nginx 指定用户组
--with-http_mp4_module 指定支持的格式
--with-http_ssl_module 指定安全模式
&& make && make install 编译安装 - 编译安装成功后一定要记得给nginx创建软链接(因为不创建软链接会报系统找不到命令的错误如下)

软链接的作用就是将nginx里的内置命令变成全局命令
这个错误有两种解决方法:
第一种:
编辑vim /etc/profile,将文件的路径/usr/local/nginx/sbin/nginx加入
第二种:
创建软链接
echo $PATH
将安装的nginx软链接到显示出来的PATH中的/usr/local/sbin/
这里我用第二种,创建软链接
-
[root@lnmp ~]# ln -s /usr/local/nginx/sbin/nginx /usr/local/sbin/nginx
- 创建成功之后检测一下
-
[root@lnmp ~]# nginx -t
nginx: the configuration file /usr/local/nginx/conf/nginx.conf syntax is ok
nginx: configuration file /usr/local/nginx/conf/nginx.conf test is successful
必须出现两条信息,才能证明你的文件和格式都没有问题。
- 启动服务
-
[root@lnmp ~]# nginx
- 查看端口(这里我用了三种方式查看,请记住这三种查看端口的方式)
-
[root@lnmp ~]# netstat -anput|grep nginx
tcp 0 0 0.0.0.0:80 0.0.0.0:* LISTEN 12498/nginx: master[root@lnmp ~]# ss -antp|grep nginx
LISTEN 0 128 *:80 *:* users:(("nginx",pid=12499,fd=6),("nginx",pid=12498,fd=6)),("nginx",pid=12498,fd=6))[root@lnmp ~]# lsof -i :80
COMMAND PID USER FD TYPE DEVICE SIZE/OFF NODE NAME
nginx 12498 root 6u IPv4 46589 0t0 TCP *:http (LISTEN)
nginx 12499 nginx 6u IPv4 46589 0t0 TCP *:http (LISTEN) -
进入谷歌访问自己IP,看是否显示如下界面。这时nginx已经成功。
-

3.数据库的安装
-
在安装数据库之前我需要一个模板的支持
- ncurses(new curses)是一套编程库,它提供了一系列的函数以便使用者调用它们去生成基于文本的用户界面。
-
[root@lnmp ~]# yum install -y ncurses-devel
-
这个还需要安装cmake,方便进行编译安装mysql
-
[root@lnmp tools]# tar xf cmake-2.8.6.tar.gz -C /usr/src/
[root@lnmp ~]# cd /usr/src/cmake-2.8.6/
[root@lnmp cmake-2.8.6]# ./configure && gmake && gmake install
[root@lnmp cmake-2.8.6]#  echo $?
0
cmake安装成功
-
解压数据包,进入mysql的目录下进行安装mysql
-
[root@lnmp ~]# cd /tools/
[root@lnmp tools]# tar xf mysql-5.5.22.tar.gz -C /
usr/src/
[root@lnmp tools]# cd /usr/src/mysql-5.5.22/
[root@lnmp mysql-5.5.22]# cmake -DCMAKE_INSTALL_PREFIX=/usr/local/mysql -DDEFAULT_CHARSET=utf8 -DDEFAULT_COLLATION=utf8_general_ci -DWITH_EXTRA_CHARSETS=all -DSYSCONFDIR=/etc && make && make install
安装过程中有多个警告,不用在意。
- 不会看报错的可以直接echo $?
[root@lnmp mysql-5.5.22]# echo $?
0
- 创建软链接或者将路径直接输入配置文件中
-
[root@lnmp mysql-5.5.22]# echo "PATH=$PATH:/usr/local/mysql/bin" >> /etc/profile
- 启动配置文件
-
[root@lnmp mysql-5.5.22]# . /etc/profile
- 将mysql的配置文件复制到/etc/下、(/bin/cp 的意思是取消cp别名,因为产品本身就是cp -i 的别名)
-
[root@lnmp ~]#  /bin/cp -p /usr/src/mysql-5.5.22/support-files/my-medium.cnf /etc/my.cnf

[root@lnmp ~]# /bin/cp -p /usr/src/mysql-5.5.22/support-files/mysql.server /etc/init.d/mysqld
- 给文件增加权限,并将其 增加所指定的系统服务,让chkconfig指令得以管理它,并同时在系统启动的叙述文件内增加相关数据。
-
[root@lnmp ~]# chmod +x /etc/init.d/mysqld
[root@lnmp ~]# chkconfig --add mysqld
[root@lnmp ~]# chkconfig mysqld on
- 增加用户,将其用户授权能够对/usr/local/mysql/有操作
-
[root@lnmp ~]#  useradd -M -s /sbin/nologin mysql
[root@lnmp ~]# chown -R mysql:mysql /usr/local/mysql/
- 初始化脚本mysql_install_db
-
[root@lnmp ~]# /usr/local/mysql/scripts/mysql_install_db --basedir=/usr/local/mysql/ --datadir=/usr/local/mysql/data/ --user=mysql
- 启动mysql(如下,启动成功)
-
[root@lnmp ~]# /etc/init.d/mysqld start
Starting MySQL.. SUCCESS!
- 查看端口
-
[root@lnmp ~]# netstat -anptu|grep 3306
tcp        0      0 0.0.0.0:3306            0.0.0.0:*               LISTEN      31251/mysqld
- 创建用户及密码
-
[root@lnmp ~]# mysqladmin -uroot password "123123"
4.安装PHP
- 安装PHP的外部支持程序
- gd库可以提供处理图片的功能
-
libxml2-devel libjpeg-devel libpng-devel提供了php编译源码时需要的库
-
[root@lnmp ~]# yum -y install gd libxml2-devel libjpeg-devel libpng-devel
- 解压源码包
-
[root@lnmp ~]# cd /tools/
[root@lnmp tools]# tar xf php-5.3.28.tar.gz -C /usr/src/[root@lnmp tools]# cd /usr/src/php-5.3.28/
- 安装PHP服务
-
[root@lnmp php-5.3.28]# ./configure --prefix=/usr/local/php5 --with-gd --with-zlib --with-mysql=/usr/local/mysql/ --with-config-file-path=/usr/local/php5 --enable-mbstring --enable-fpm --with-jpeg-dir=/usr/lib && make && make install
- 创建软链接
-
[root@lnmp php-5.3.28]# ln -s /usr/local/php5/bin/* /usr/local/bin/
[root@lnmp php-5.3.28]# ln -s /usr/local/php5/sbin/* /usr/local/sbin/
- 修改配置文件
-
[root@lnmp php-5.3.28]# cd /usr/local/php5/etc/
[root@lnmp etc]# cp -p php-fpm.conf.default php-fpm.conf
[root@lnmp etc]# vim php-fpm.conf
25 pid = run/php-fpm.pid //指定 pid 文件位置
140 user = nginx //程序用户
141 group = nginx //程序组
217 pm.max_children = 50 //子进程的最大数
222 pm.start_servers = 20 //启动时开启的进程数
227 pm.min_spare_servers = 5 //最少空闲进程数
232 pm.max_spare_servers = 35 //最大空闲进程数
- 启动PHP
-
[root@lnmp etc]# php-fpm
[root@lnmp etc]# netstat -anput|grep php
tcp        0      0 127.0.0.1:9000          0.0.0.0:*               LISTEN      126253/php-fpm: mas
最后整合一下lnmp
-
[root@lnmp etc]#  vim /usr/local/nginx/conf/nginx.conf
46             index  index.php index.html index.htm;
60
   location ~ .php$ {
               root html;
                fastcgi_pass 127.0.0.1:9000;
                fastcgi_index index.php;
                include fastcgi.conf;
65         }

[root@lnmp etc]# nginx -t
nginx: the configuration file /usr/local/nginx/conf/nginx.conf syntax is ok
nginx: configuration file /usr/local/nginx/conf/nginx.conf test is successful
[root@lnmp etc]# nginx -s reload
[root@lnmp etc]# vim /usr/local/nginx/html/test.php
[root@lnmp etc]# cat /usr/local/nginx/html/test.php
<?php
$link=mysql_connect('localhost','root','123123');
if($link) echo "<h1>successful</h1>";
mysql_close();
?> -
注:若解析PHP页面出现什么都不显示修改fastcgi的配置文件:
-
[root@lnmp etc]# vim /usr/local/nginx/conf/fastcgi_params
fastcgi_param SCRIPT_FILENAME 	$document_root$fastcgi_script_name;
fastcgi_param PATH_INFO                $fastcgi_script_name;

[root@lnmp etc]# curl http://192.168.2.10/test.php
<h1>successful</h1>

- 至此成功搭建LNMP架构。