删除评论
现在发布评论,评论不会消失,评论越来越多并不是什么好事。所以我们给评论组件加上删除评论的功能,这样就可以删除不想要的评论了。修改 src/Comment.js 的 render 方法,新增一个删除按钮:
...
  render () {
    const { comment } = this.props
    return (
      <div className='comment'>
        <div className='comment-user'>
          <span className='comment-username'>
            {comment.username}
          </span>:
        </div>
        <p>{comment.content}</p>
        <span className='comment-createdtime'>
          {this.state.timeString}
        </span>
        <span className='comment-delete'>
          删除
        </span>
      </div>
    )
  }
...
我们在后面加了一个删除按钮,因为 index.css 定义了样式,所以鼠标放到特定的评论上才会显示删除按钮,让用户体验好一些。
我们知道评论列表数据是放在 CommentApp 当中的,而这个删除按钮是在 Comment当中的,现在我们要做的事情是用户点击某条评论的删除按钮,然后在 CommentApp中把相应的数据删除。但是 CommentApp 和 Comment 的关系是这样的:
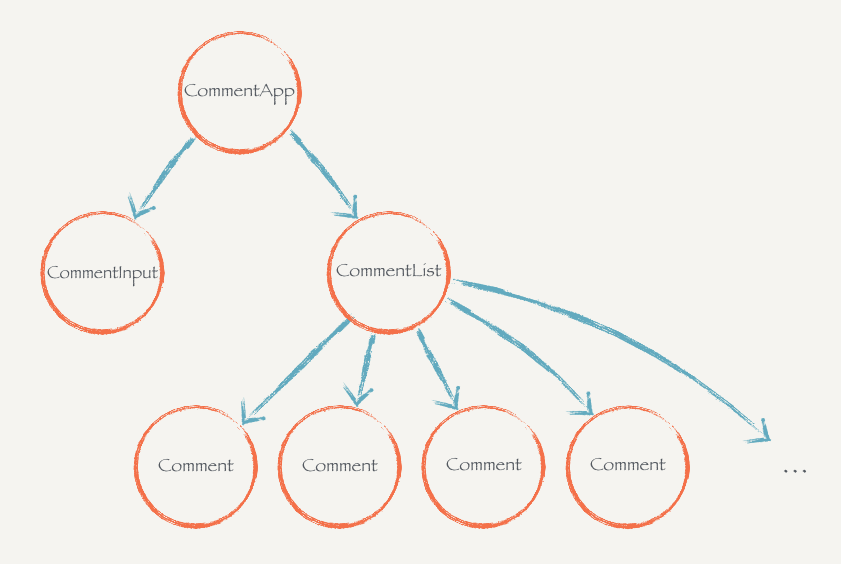
Comment 和 CommentApp 之间隔了一个 CommentList,Comment 无法直接跟 CommentApp 打交道,只能通过 CommentList 来转发这种删除评论的消息。修改 Comment 组件,让它可以把删除的消息传递到上一层:
class Comment extends Component {
  static propTypes = {
    comment: PropTypes.object.isRequired,
    onDeleteComment: PropTypes.func,
    index: PropTypes.number
  }
...
  handleDeleteComment () {
    if (this.props.onDeleteComment) {
      this.props.onDeleteComment(this.props.index)
    }
  }

  render () {
    ...
        <span
          onClick={this.handleDeleteComment.bind(this)}
          className='comment-delete'>
          删除
        </span>
      </div>
    )
  }
现在在使用 Comment 的时候,可以传入 onDeleteComment 和 index 两个参数。index 用来标志这个评论在列表的下标,这样点击删除按钮的时候我们才能知道你点击的是哪个评论,才能知道怎么从列表数据中删除。用户点击删除会调用 handleDeleteComment ,它会调用从上层传入的 props. onDeleteComment 函数告知上一层组件删除的消息,并且把评论下标传出去。现在修改 src/CommentList.js 让它把这两个参数传进来:
class CommentList extends Component {
  static propTypes = {
    comments: PropTypes.array,
    onDeleteComment: PropTypes.func
  }

  static defaultProps = {
    comments: []
  }

  handleDeleteComment (index) {
    if (this.props.onDeleteComment) {
      this.props.onDeleteComment(index)
    }
  }

  render() {
    return (
      <div>
        {this.props.comments.map((comment, i) =>
          <Comment
            comment={comment}
            key={i}
            index={i}
            onDeleteComment={this.handleDeleteComment.bind(this)} />
        )}
      </div>
    )
  }
}
当用户点击按钮的时候,Comment 组件会调用 props.onDeleteComment,也就是 CommentList 的 handleDeleteComment 方法。而 handleDeleteComment 会调用 CommentList 所接受的配置参数中的 props.onDeleteComment,并且把下标传出去。
也就是说,我们可以在 CommentApp 给 CommentList 传入一个 onDeleteComment 的配置参数来接受这个删除评论的消息,修改 CommentApp.js:
...
  handleDeleteComment (index) {
    console.log(index)
  }

  render() {
    return (
      <div className='wrapper'>
        <CommentInput onSubmit={this.handleSubmitComment.bind(this)} />
        <CommentList
          comments={this.state.comments}
          onDeleteComment={this.handleDeleteComment.bind(this)} />
      </div>
    )
  }
}
...
现在点击删除按钮,可以在控制台看到评论对应的下标打印了出来。其实这就是这么一个过程:CommentList 把下标 index 传给 Comment。点击删除按钮的时候,Comment 把 index 传给了 CommentList,CommentList 再把它传给 CommentApp。现在可以在 CommentApp 中删除评论了:
...
  handleDeleteComment (index) {
    const comments = this.state.comments
    comments.splice(index, 1)
    this.setState({ comments })
    this._saveComments(comments)
  }
...
我们通过 comments.splice 删除特定下标的评论,并且通过 setState 重新渲染整个评论列表;当然了,还需要把最新的评论列表数据更新到 LocalStorage 中,所以我们在删除、更新以后调用了 _saveComments 方法把数据同步到 LocalStorage 中。
现在就可以愉快地删除评论了。但是,你删除评论以后 5 秒钟后就会在控制台中看到报错了:
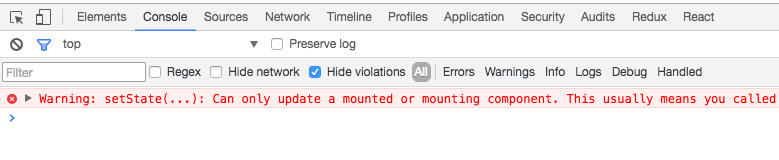
这是因为我们忘了清除评论的定时器,修改 src/Comment.js,新增生命周期 commentWillUnmount 在评论组件销毁的时候清除定时器:
...
  componentWillUnmount () {
    clearInterval(this._timer)
  }
...
这才算完成了第 5 个需求。
显示代码块
用户在的输入内容中任何以 `` 包含的内容都会用 <code> 包含起来显示到页面上。<code> 这是一个 HTML 结构,需要往页面动态插入 HTML 结构我们只能用 dangerouslySetInnerHTML 了,修改 src/Comment.js,把原来 render() 函数中的:
<p>{comment.content}</p>
修改成:
<p dangerouslySetInnerHTML={{
  __html: this._getProcessedContent(comment.content)
}} />
我们把经过 this._getProcessedContent 处理的评论内容以 HTML 的方式插入到 <p>元素中。this._getProcessedContent 要把 `` 包含的内容用 <code> 包裹起来,一个正则表达式就可以做到了:
...
  _getProcessedContent (content) {
    return content
      .replace(/`([Ss]+?)`/g, '<code>$1</code>')
  }
...
但是这样做会有严重的 XSS 漏洞,用户可以输入任意的 HTML 标签,用 <script>执行任意的 JavaScript 代码。所以在替换代码之前,我们要手动地把这些 HTML 标签进行转义:
... _getProcessedContent (content) { return content .replace(/&/g, "&") .replace(/</g, "<") .replace(/>/g, ">") .replace(/"/g, """) .replace(/'/g, "'") .replace(/`([Ss]+?)`/g, '<code>$1</code>') } ...
前 5 个 replace 实际上是把类似于 <、> 这种内容替换转义一下,防止用户输入 HTML 标签。最后一行代码才是实现功能的代码。
这时候在评论框中输入:
这是代码块 `console.log`,这是 <h1>正常内容</h1>。
然后点击发布,看看效果:
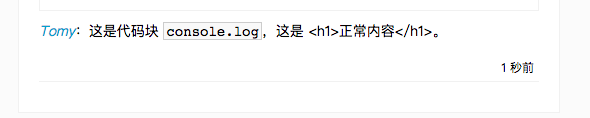
我们安全地完成了第 6 个需求。到目前为止,第二阶段的实战已经全部完成,你可以在这里找到完整的代码。
总结
到这里第二阶段已经全部结束,我们已经掌握了全部 React.js 实战需要的入门知识。接下来我们会学习两个相对比较高级的 React.js 的概念,然后进入 React-redux 的世界,让它们配合 React.js 来构建更成熟的前端页面。