参考Ansible权威指南:https://ansible-tran.readthedocs.io/en/latest/index.html
以下内容学习自马哥教育
Ansible:
运维工作:系统安装(物理机、虚拟机)--> 程序包安装、配置、服务启动 --> 批量操作(程序升级) --> 程序发布 --> 监控
运维大致分为三个层面
- OS Provisioning:提供操作系统
物理机:PXE、Cobbler
虚拟机:Image Templates(映像文件模板)
- Configration:系统配置(自动完成程序包安装、配置文件提供、服务启动)
puppet (ruby语言研发)
saltstack (python语言研发)
chef
cfengine
- Command and Control:批量操作
task exec运行所需要实现的工具有fanc(有agent)和fabric(agentless)
fabric(python语言研发的命令行工具)
程序发布
- 预发布验正:
新版本的代码先发布到服务器(跟线上环境配置完全相同,只是未接入到调度器);
- 程序发布:
不能影响用户体验;
系统不能停机;
不能导致系统故障或造成系统完全不可用;
- 灰度发布:
发布路径:发布的时候会有不同的版本,这样就设置多个路径
/webapp/tuangou-1.1
/web/app/tuangou //这是线上用到的路径,这个路径指向目前最新版本的符号链接,比如1.2是最新版本,则指向1.2,如果新版本出现问题,则把这个路径指向1.1,叫回滚。
/webapp/tuangou-1.2
发布步骤:在调度器上下线一批主机(处于maintanance模式) --> 关闭服务 --> 部署新版本的应用程序 --> 启动服务 --> 在调度器上启用这一批服务器;(常见的发布模型)
如果更新后出故障,则将更新的服务器回滚到更新版本之前。
自动化灰度发布:脚本、发布平台;

运维工具的分类:
agent:有代理的管理工具,在被管理的节点上安装一个代理程序
puppet, func
agentless:无代理的管理工具,需要依靠ssh
ansible, fabric
agent和agentless的区别:
agentless需要确保每一个被管理主机启动ssh服务就可以了,但不是所有的agentless都依赖于ssh服务的。有agent的需要在被管控主机上提前部署上agent。
虽然看上去依赖agent的比agentless的更重量级,但是有agent更安全、方便一些。因为有了agent(被管控主机上有代理),并不需要用到目标(被管控)主机上的特权,只要让agent在目标服务器上在必要时以root用户的权限运行就可以,并不需要在本地(管控)主机上连接到远程(被管控)主机,所以也不需要获取root(被管控)的账号和密码,这样有agent的管理操作就非常安全,因为是master端向agent端发指令,agent可以认证master端,这只是这两端交互时的账号和密码(不是被管控主机的账号和密码)。而在被管控端,agent只需要以管理员的身份来运行就可以,无需在管控段利用root(被管控端)的密码去连接到远程主机,这样就更安全。
agentless中的ansible要想基于ssh服务远程管理主机上的一些功能,比如安装程序包,必须要有远端主机(被管控)的管理员权限,不然无法安装。即便不给管理员(可以理解为被管控端的root的权限)权限,那么所授权的用户账号(这个用户是在管控端,授权被管控端sudo权限)还需要有sudo的能力,同时还需要在目标主机上做sudo配置。危害是,在管理端一旦其他用户拿到了具有sudo权限的用户的权限,那么其他用户(在管控端)也一样可以进行sudo操作,还是有安全漏洞。
ansible特性:
高度模块化,调用特定的模块,完成特定的任务;ansible是依靠调用模块实现,ansible本身是一个平台/框架
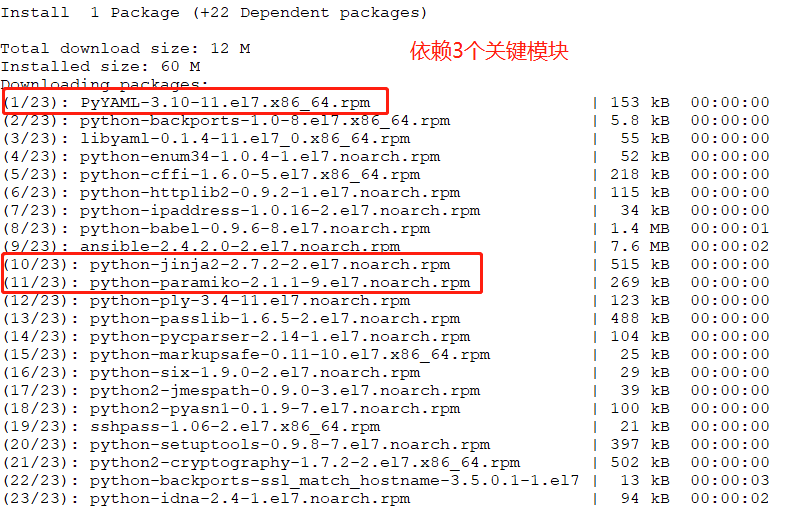
基于Python语言实现,由Paramiko、PyYAML和Jinja2三个关键模块;
部署简单,agentless;
默认使用ssh协议
主从模式
支持自定义模块
支持Playbook
ansible架构:
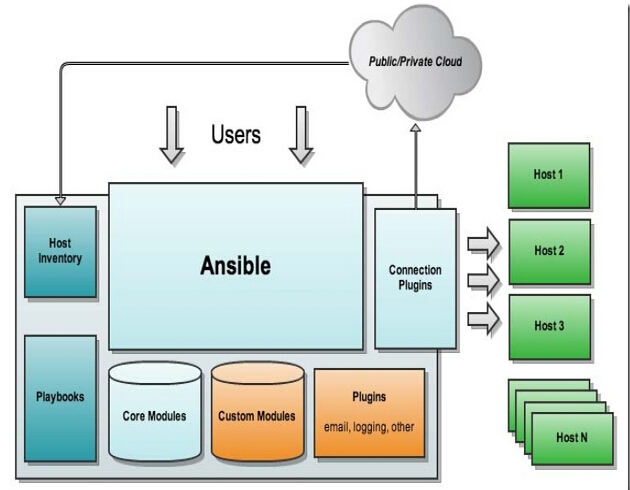
Ansible工作原理
ansible是高度模块化的,absible的基础框架就是ansible本身,它是一个平台,整合了多个模块。absible自带了核心模块(Core Modules)完成常见的系统配置、管理等相关功能。另外自定义模块(Custom Modules)可以支持任何编程语言。同时ansible支持基于插件(Plugins)方式完成额外的功能扩展,如果想要基于ansible平台增加自己的功能,就要经过插件。而插件中最常用的是连接插件(Connection Plugins),连接插件是用来连接被管理主机的。ssh是ansible最核心的连接插件,同时也可以扩展基于别的插件去连接被管理主机。连接插件可以连接哪些主机是需要主机清单(Host Inventory)来定义,这个需要事先定义的。如果想要被管理的主机一次执行多个任务,那么就要借助于剧本(PlayBooks),把每一个需要实现的功能一个一个的编排到剧本中,让ansible自动读取剧本,并利用连接插件接上主机清单中定义的主机,然后对这些被管理的主机做管理操作。
核心模块(Core Module): 参考自:https://yq.aliyun.com/articles/219196
完成系统最常用的配置、管理功能。和大多数运维工具一样,将系统和应用提供的能力模块化,一个模块有点像编程中一个功能接口,要使用的时候调用接口并传参就可以了。比如Ansible的service模块,你要保证名为nginx的service处于启动状态,只需要调用service模块,并配置参数name: nginx,state: started即可。
自定义模块(Custom Modules):
支持任何编程语言,显而易见,如果Ansible的核心模块满足不了你的需求,你可以添加自定义化的模块。
插件(Plugins):
模块功能的补充,如循环插件、变量插件、过滤插件等,也和模块一样支持自定义,如果想利用ansible支持自己的功能,需要利用插件。
剧本(playbooks):
把每一个模块所要实现的功能一个一个编排放置在playbooks中,让absible自动读取playbooks进行管理。Ansible完成任务的两种方式,一种是Ad-Hoc,就是ansible命令,另一种就是ansible-playbook,也就是ansible-playbook命令。他们的区别就像是Command命令行和Shell Scripts。
连接插件(connectior plugins):
Ansible默认是基于SSH连接到管理主机执行操作的。同样,Ansible也支持不同的连接方法,这就需要连接插件来帮助我们完成连接了。但是连接插件只是用来连接主机的,可以连接哪些主机就要实现定义好被管理主机的清单,这个清单就由host inventory定义。
主机清单(host inventory):
为Ansible定义了管理主机的策略。一般小型环境下我们只需要在host文件中写入主机的IP地址即可,但是到了中大型环境我们有可能需要使用动态主机清单来生成所需要执行的目标主机(需要云环境支持动态生成Ansible host inventory)。
Ansible的结构:
1、Inventory:首先指明一个或几个任务需要哪个被管理主机来执行
2、Moudles:调用哪些模块
3、Ad Hoc Commands:执行哪些命令
4、Playbooks:下面是Playbooks执行:
Tasks:指明要执行的任务,即调用模块完成的某操作
Variables:变量
Templates:模板
Handlers:处理器,由某事件出发执行的操作
Roles:角色
幂等性:一个任务重复执行N边的结果是一样的,当安装程序包时,只需指明程序包的名字,至于如何安装,由操作系统指定的provider来决定。
参考:http://www.zsythink.net/archives/2523

安装和使用ansible
实验环境:
管理端:
192.168.184.141 centos7
被管理端:
192.168.184.142 centos7
192.168.184.143 centos7
192.168.184.145 centos6
# yum info ansible
Loaded plugins: fastestmirror
Loading mirror speeds from cached hostfile
 * base: mirrors.nwsuaf.edu.cn
 * extras: mirrors.neusoft.edu.cn
 * updates: mirrors.neusoft.edu.cn
Available Packages
Name        : ansible
Arch        : noarch
Version     : 2.4.2.0
Release     : 2.el7
Size        : 7.6 M
Repo        : extras/7/x86_64
Summary     : SSH-based configuration management, deployment, and task execution
            : system
URL         : http://ansible.com
License     : GPLv3+
Description :
            : Ansible is a radically simple model-driven configuration management,
            : multi-node deployment, and remote task execution system. Ansible
            : works over SSH and does not require any software or daemons to be
            : installed on remote nodes. Extension modules can be written in any
            : language and are transferred to managed machines automatically.
# yum install ansible -y
# rpm -ql ansible | less
/etc/ansible
/etc/ansible/ansible.cfg //主配置文件
/etc/ansible/hosts //主机清单文件
/etc/ansible/roles //角色配置文件
/usr/bin/ansible //主程序
/usr/bin/ansible-config
/usr/bin/ansible-connection
/usr/bin/ansible-console
/usr/bin/ansible-doc //用来查找文档
/usr/bin/ansible-galaxy //支持卫星主机,其他主机模式
编译安装
ansible依赖于Python 2.6或更高的版本、paramiko、PyYAML及Jinja2。
解决依赖关系
# yum -y install python-jinja2 PyYAML python-paramiko python-babel python-crypto
# tar xf ansible-1.5.4.tar.gz
# cd ansible-1.5.4
# python setup.py build
# python setup.py install
# mkdir /etc/ansible
# cp -r examples/* /etc/ansible
注意:不同版本的ansible的功能差异可能较大。
简单应用
ansible通过ssh实现配置管理、应用部署、任务执行等功能,因此,需要事先配置ansible端能基于密钥认证的方式联系各被管理节点(并不是必须的,因为可以在主机清单中明文的写出联系主机使用的账号和密码,但是非常不安全)。
ansible <host-pattern> [-f forks] [-m module_name] [-a args]
-m module:默认为command
ansible-doc: Show Ansible module documentation
-l, --list List available modules
-s, --snippet Show playbook snippet for specified module(s)
实验
管理端即192.168.184.141操作
# ssh-keygen -t rsa -P '' //首先在管理端生成一个密钥,把此密钥的公钥发送到各被管理端的主机上
# vim /etc/hosts //首先配置IP地址与域名快速解析的文件,每个主机都要进行此配置,以便管理端直接可以解析被管理端的主机名
192.168.184.141 node1
192.168.184.142 node2
192.168.184.143 node3
192.168.184.145 COS6
# ssh-copy-id -i ~/.ssh/id_rsa.pub node1 //也要复制到本机,因为也可能管理本机,也是通过远程连接的
# ssh-copy-id -i ~/.ssh/id_rsa.pub node2 //分别把管理端的公钥copy到被管理端实现直接交互
# ssh-copy-id -i ~/.ssh/id_rsa.pub node3
# ssh-copy-id -i ~/.ssh/id_rsa.pub COS6
# ssh node1 'date'; ssh node2 'date'; ssh node3 'date'; ssh COS6 'date' //在管理测试管理端是否可以基于主机密钥的方式与被管理端进行交互
或
# for i in 141 142 143 145; do ssh 192.168.184.$i 'date'; done
Sat Dec 29 22:47:45 CST 2018
Sat Dec 29 22:47:45 CST 2018
Sat Dec 29 22:47:45 CST 2018
Sat Dec 29 22:47:45 CST 2018
Absible语法
ansible <host-pattern> [-f forks] [-m module_name] [-a args]
//host-pattern:指明要管理的主机,如果没有指明,也可以基于主机清单。
//-f forks:当有大批量被管理主机时,管理端是无法一次性全部进行联系的,所以可以分批量进行联系、管理。默认是5个
//-m module:调用一个模块做管理操作,默认为command。
//-a args:指所调用模块特有的参数
# man ansible //上述用法可以使用此命令进行查看,非常清晰
# ansible-doc -l //列出ansible支持的核心模块
# ansible-doc -s command //如果想要了解某个模块的具体用法,可以在-s后面加上此模块的名称,比如默认模块command
- name: Executes a command on a remote node
  command:
      chdir:                 # Change into this directory before running the command.
      creates:               # A filename or (since 2.0) glob pattern, when it already exists, this step will *not* be run.
      free_form:             # (required) The command module takes a free form command to run.  There is no parameter actually named
                               'free form'. See the examples!
      removes:               # A filename or (since 2.0) glob pattern, when it does not exist, this step will *not* be run.
      stdin:                 # Set the stdin of the command directly to the specified value.
      warn:                  # If command_warnings are on in ansible.cfg, do not warn about this particular line if set to `no'.
# ansible-doc -s redis //比如了解redis如何使用
- name: Various redis commands, slave and flush
  redis:
      command:               # (required) The selected redis command
      db:                    # The database to flush (used in db mode) [flush command]
      flush_mode:            # Type of flush (all the dbs in a redis instance or a specific one) [flush command]
      login_host:            # The host running the database
      login_password:        # The password used to authenticate with (usually not used)
      login_port:            # The port to connect to
      master_host:           # The host of the master instance [slave command]
      master_port:           # The port of the master instance [slave command]
      name:                  # A redis config key.
      slave_mode:            # the mode of the redis instance [slave command]
      value:                 # A redis config value.
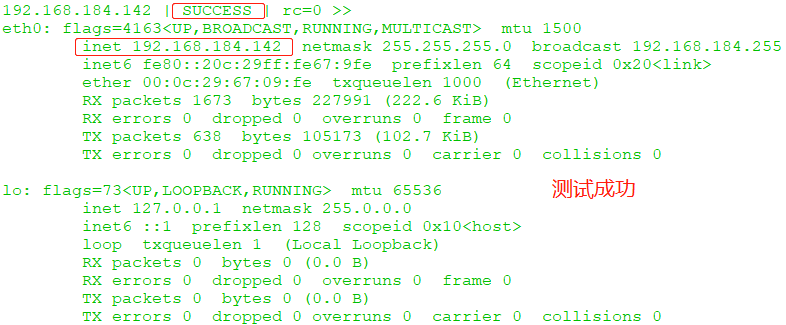
# ansible 192.168.184.142 -m command -a 'ifconfig' //简单使用ansible运行一个命令,指定142主机上运行,-m就是调用一个模块即调用命令,使用-a指明 //具体的命令
# ansible node2 -m command -a 'ifconfig' //注意,这里不可以把192.168.184.142换成node2
[WARNING]: Could not match supplied host pattern, ignoring: all //无法匹配142,因为主机清单中没有定义
[WARNING]: provided hosts list is empty, only localhost is available
[WARNING]: Could not match supplied host pattern, ignoring: node2
[WARNING]: No hosts matched, nothing to do
# cd /etc/ansible //下面开始编辑主机清单的配置文件
# cp ansible.cfg{,.backup}
# cp hosts{,.backup} //先备份主机清单文件,定义主机清单总共有三种方式
# Ex 1: Ungrouped hosts, specify before any group headers.   //把可管理的主机直接列在这里

## green.example.com
## blue.example.com
## 192.168.100.1
## 192.168.100.10

# Ex 2: A collection of hosts belonging to the 'webservers' group   //第二种方式是把可管理的主机进行分组

## [webservers]
## alpha.example.org
## beta.example.org
## 192.168.1.100
## 192.168.1.110

# If you have multiple hosts following a pattern you can specify
# them like this:

## www[001:006].example.com   //第三种方式使用通配的方式,001:006会自动展开为www.001.example.com、www.002.example.com等等

# Ex 3: A collection of database servers in the 'dbservers' group

## [dbservers]
##
## db01.intranet.mydomain.net
## db02.intranet.mydomain.net
## 10.25.1.56
## 10.25.1.57

# Here's another example of host ranges, this time there are no
# leading 0s:

## db-[99:101]-node.example.com
对配置文件进行修改,如下:
# This is the default ansible 'hosts' file.
#
# It should live in /etc/ansible/hosts
#
#   - Comments begin with the '#' character
#   - Blank lines are ignored
#   - Groups of hosts are delimited by [header] elements
#   - You can enter hostnames or ip addresses
#   - A hostname/ip can be a member of multiple groups

192.168.184.141    //这台主机不分组

[websrvs]
192.168.184.142
192.168.184.143
[dbsrvs] //这里主机做了分类
192.168.184.142 //同时一个主机也可以属于多个组
192.168.184.145
# ansible 192.168.184.142 -m command -a 'ifconfig' //再次进行测试
# ansible all -m command -a 'ifconfig' //同时也可以让三台主机同时批量运行此命令
# ansible all -a 'ifconfig' //-m command是可以省略的