<a href="网址">内容</a> 跳转到该地址
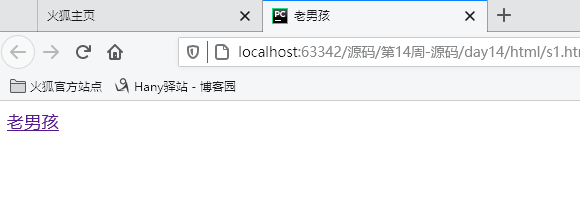
<a href="http://www.oldboyedu.com">老男孩</a>
<p>内容</p>
使用 p 段落标签,表示段落,可以添加 br 标签,进行换行
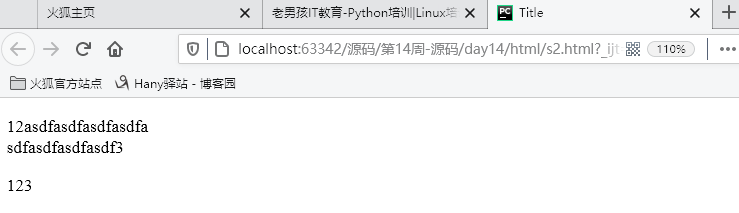
<p>12asdfasdfasdfasdfa<br />sdfasdfasdfasdf3</p>

<p>123</p>
hn 系列标签
<h1> 内容 </h1>

    <h1>Alex</h1>
    <h2>Alex</h2>
    <h3>Alex</h3>
    <h4>Alex</h4>
    <h5>Alex</h5>
    <h6>eric</h6>

<span>内容</span>
span 标签,白板,行内标签
<span>hello</span>
<span>hello</span>
<span>hello</span>
<span>hello</span>

<div> 内容,代码块 </div>
div 最常用的白板标签,块级标签

    <div>1</div>
    <div>2</div>
    <div>3</div>
<input type="text" name="需要使用的姓名" />
input 标签,用于用户输入姓名,密码,按钮,文件上传等

<input type="text" name="user" />

type 可以具有
text
password
button
submit
<!DOCTYPE html>
<html lang="en">
<head>
    <meta charset="UTF-8">
    <title>Title</title>
</head>
<body>
    <form action="http://192.168.16.35:8888/index" method="POST">
        <input type="text" name="user" />
        <input type="text" name="email"/>
        <input type="password" name="pwd"/>
        <!--{'user': '用户输入的用户','email': 'xx', 'pwd': 'xx' }-->
        <input type="button"  value="登录1"/>
        <input type="submit"  value="登录2"/>
    </form>
    <br/>
    <form>
        <input type="text" />
        <input type="password" />
        <input type="button"  value="登录1"/>
        <input type="submit"  value="登录2"/>
    </form>
</body>
</html>

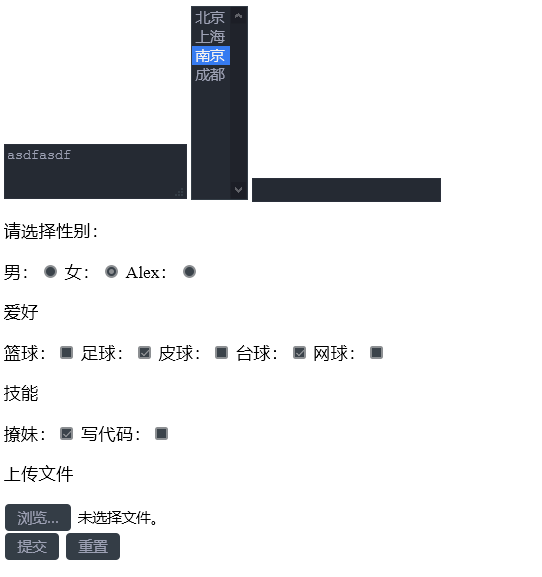
多选框
使用 select 和 option 进行创建,selected 为默认选择
multiple 属性为 multiple 表示,进行多选

            <select name="city" size="10" multiple="multiple">
                <option value="1">北京</option>
                <option value="2">上海</option>
                <option value="3" selected="selected">南京</option>
                <option value="4">成都</option>
            </select>
<textarea> 内容 </textarea>
多行文本框,可以输入多行文本

<textarea name="meno" >asdfasdf</textarea>
input 使用 radio 属性,实现单选框(name 值要相同)
checked="checked" 表示进行勾选

            男:<input type="radio" name="gender" value="1"  />
            女:<input type="radio" name="gender" value="2" checked="checked"/>
            Alex:<input type="radio" name="gender" value="3"/>
input 使用 checkbox 属性,实现多选框(name 值要相同)
checked="checked" 表示进行勾选

            篮球:<input type="checkbox" name="favor"  value="1" />
            足球:<input type="checkbox" name="favor"  value="2" checked="checked" />
            皮球:<input type="checkbox" name="favor"  value="3" />
            台球:<input type="checkbox" name="favor"  value="4" checked="checked"/>
            网球:<input type="checkbox" name="favor"  value="5" />
上传文件使用 input 标签的 file 属性
注:在 form 中 添加 enctype="multipart/form-data"

<input type="file" name="fname"/>

<form enctype="multipart/form-data">
重置 使用 input 标签的 type="reset" 属性

<input type="reset" value="重置" />
<!DOCTYPE html>
<html lang="en">
<head>
    <meta charset="UTF-8">
    <title>Title</title>
</head>
<body>
    <form enctype="multipart/form-data">
        <div>

            <textarea name="meno" >asdfasdf</textarea>

            <select name="city" size="10" multiple="multiple">
                <option value="1">北京</option>
                <option value="2">上海</option>
                <option value="3" selected="selected">南京</option>
                <option value="4">成都</option>
            </select>


            <input type="text" name="user" />
            <p>请选择性别:</p>
            男:<input type="radio" name="gender" value="1"  />
            女:<input type="radio" name="gender" value="2" checked="checked"/>
            Alex:<input type="radio" name="gender" value="3"/>
            <p>爱好</p>
            篮球:<input type="checkbox" name="favor"  value="1" />
            足球:<input type="checkbox" name="favor"  value="2" checked="checked" />
            皮球:<input type="checkbox" name="favor"  value="3" />
            台球:<input type="checkbox" name="favor"  value="4" checked="checked"/>
            网球:<input type="checkbox" name="favor"  value="5" />
            <p>技能</p>
            撩妹:<input type="checkbox" name="skill" checked="checked" />
            写代码:<input type="checkbox" name="skill"/>
            <p>上传文件</p>
            <input type="file" name="fname"/>
        </div>

        <input type="submit" value="提交" />
        <input type="reset" value="重置" />
    </form>
</body>
</html>
a 标签根据 id 进行跳转
# id 名称

<a href="#i1">第一章</a>
<div id="i1" style="height:600px;">第一章的内容</div>
<!DOCTYPE html>
<html lang="en">
<head>
    <meta charset="UTF-8">
    <title>Title</title>
</head>
<body>
    <a href="#i1">第一章</a>
    <a href="#i2">第二章</a>
    <a href="#i3">第三章</a>
    <a href="#i4">第四章</a>

    <div id="i1" style="height:600px;">第一章的内容</div>
    <div id="i2" style="height:600px;">第二章的内容</div>
    <div id="i3" style="height:600px;">第三章的内容</div>
    <div id="i4" style="height:600px;">第四章的内容</div>
</body>
</html>

在 a 标签使用 img 图片进行跳转
img 标签中 src 指定文件位置,title 为鼠标停留在上面显示的字段,style 表示应用了样式,alt 为不能正常显示时,会出现的内容
    <a href="http://www.oldboyedu.com">
        <img src="1.jpg" title="大美女" style="height: 200px; 200px;" alt="美女">
    </a>

<ul><li>内容</li></ul>
ul 创建无序列表

    <ul>
        <li>asdf</li>
        <li>asdf</li>
        <li>asdf</li>
        <li>asdf</li>
    </ul>
ol 创建有序列表
此处的 ul 和 ol 都可以进行变换样式

    <ol>
        <li>asdf</li>
        <li>asdf</li>
        <li>asdf</li>
        <li>asdf</li>
    </ol>
使用 dl dt dd 实现类似于菜单界面(分级)

    <dl>
        <dt>ttt</dt>
        <dd>ddd</dd>
        <dd>ddd</dd>
        <dd>ddd</dd>
        <dt>ttt</dt>
        <dd>ddd</dd>
        <dd>ddd</dd>
        <dd>ddd</dd>
    </dl>
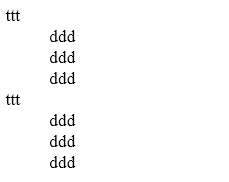
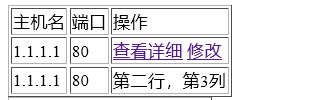
table 标签,内部具有 th头 和 td 单元格,tr 换行
在 td 中可以使用 a 标签,进行跳转
a 内的 # 表示当前页面
<table border="1">
    <tr>
        <td>主机名</td>
        <td>端口</td>
        <td>操作</td>
    </tr>
    <tr>
        <td>1.1.1.1</td>
        <td>80</td>
        <td>
            <a href="s2.html">查看详细</a>
            <a href="#">修改</a>
        </td>
    </tr>
    <tr>
        <td>1.1.1.1</td>
        <td>80</td>
        <td>第二行,第3列</td>
    </tr>
</table>
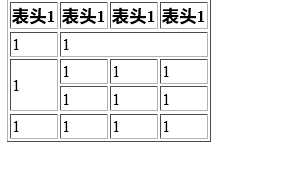
在 table 中使用 thead 和 tbody 并利用 colspan 和 rowspan 进行单元格合并
<table border="1">
    <thead>
        <tr>
            <th>表头1</th>
            <th>表头1</th>
            <th>表头1</th>
            <th>表头1</th>
        </tr>
    </thead>
    <tbody>
        <tr>
            <td>1</td>
            <td colspan="3">1</td>
        </tr>
        <tr>
            <td rowspan="2">1</td>
            <td>1</td>
            <td>1</td>
            <td>1</td>
        </tr>
        <tr>
            <td>1</td>
            <td>1</td>
            <td>1</td>
        </tr>
        <tr>
            <td>1</td>
            <td>1</td>
            <td>1</td>
            <td>1</td>
        </tr>
    </tbody>
</table>
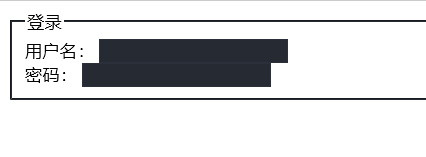
fieldset 登录外的包裹的线

使用 for 保证点击内容跳转到对应的 id 名称处
    <fieldset>
        <legend>登录</legend>
        <label for="username">用户名:</label>
        <input id="username" type="text" name="user" />
        <br />
        <label for="pwd">密码:</label>
        <input id="pwd" type="text" name="user" />
    </fieldset>
head 内的 styly 标签 设置样式

.名称 对应 class 为对应名称的属性

#名称 对应 id 为对应名称的属性

可以多个 class 一起设置,使用
.c1[属性='名称']{ 样式 } 也可以进行设置
.c1 div 表示为 class为 c1 的下一个 div 标签设置样式
<!DOCTYPE html>
<html lang="en">
<head>
<meta charset="UTF-8">
<title>Title</title>
<style>
/*
#i1{
background-color: #2459a2;
height: 48px;
}
#i2{
background-color: #2459a2;
height: 48px;
}
#i3{
background-color: #2459a2;
height: 48px;
}
.c1{
background-color: #2459a2;
height: 10px;
}
*/
/*#c2{*/
/*background-color: black;*/
/*color: white;*/
/*}*/
/*.c1 div{*/
/*background-color: black;*/
/*color: white;*/
/*}*/
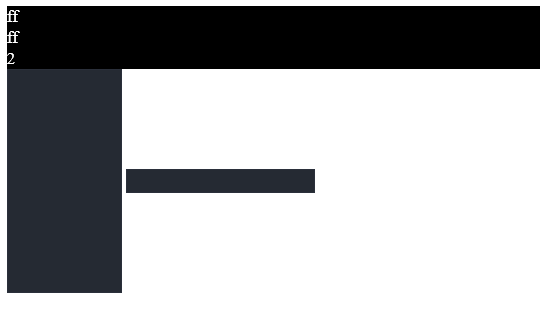
.i1,.i2,.i3{
background-color: black;
color: white;
}
.c1[n='alex']{ 100px; height:200px; }
</style>
</head>
<body>
<div class="i1">ff</div>
<div class="i2">ff</div>
<div class="i3">2</div>
<input class="c1" type="text" n="alex">
<input class="c1" type="password">
</body>
</html>
使用 link 标签连接外部 css 样式
<link rel="stylesheet" href="路径/文件名.css" />

<link rel="stylesheet" href="css/commons.css" />
commons.css 内容

.c2{
    font-size: 58px;
    color: black;
}

.c1{
    background-color: red;
    color: white;
}
<!DOCTYPE html>
<html lang="en">
<head>
    <meta charset="UTF-8">
    <title>Title</title>
    <link rel="stylesheet" href="css/commons.css" />
</head>
<body>
    <div class="c1 c2" style="color: pink">asdf</div>
    <div class="c1 c2" style="color: pink">asdf</div>
    <div class="c1 c2" style="color: pink">asdf</div>
    <div class="c1 c2" style="color: pink">asdf</div>
    <div class="c1 c2" style="color: pink">asdf</div>
    <div class="c1 c2" style="color: pink">asdf</div>
    <div class="c1 c2" style="color: pink">asdf</div>
    <div class="c1 c2" style="color: pink">asdf</div>
</body>
</html>
div 标签在 style 属性中 设置边框 border

style="border: 1px solid red;"
style="height: 48px;
    80%;
    border: 1px solid red;
    font-size: 16px;
    text-align: center;
    line-height: 48px;
    font-weight: bold;
    "
属性 注:
height 设置高度
width 宽度
border 边框
font-size 字体大小
text-align 文本位置
line-height 高度
font-weight 粗体
<!DOCTYPE html>
<html lang="en">
<head>
    <meta charset="UTF-8">
    <title>Title</title>
</head>
<body>
    <div style="border: 1px solid red;">
        asdfasdf
    </div>
    <div style="height: 48px;
    80%;
    border: 1px solid red;
    font-size: 16px;
    text-align: center;
    line-height: 48px;
    font-weight: bold;
    ">asdf</div>
</body>
</html>

style 使用 float 属性
width 宽度,20%
float 悬浮,float:left
<body>
    <div style=" 20%;background-color: red;float: left">1</div>
    <div style=" 20%;background-color: black;float: left">2</div>
</body>

设置 class 为  pg-header 的标签样式

    <style>
        .pg-header{
        样式
        }
    </style>
styly 属性 width 宽度,margin 设置外边距
margin: 0 auto;
float 的两种方式,可以设置在 div 中
float: left;
float: right;
style="clear: both" 在 float 下部编写内容
设置宽度 width ,border 设置边框 , float 页面布局

style=" 300px;border: 1px solid red;"

style=" 96px;height:30px;border: 1px solid green;float: left;
<!DOCTYPE html>
<html lang="en">
<head>
    <meta charset="UTF-8">
    <title>Title</title>
    <style>
        .pg-header{
            height: 38px;
            background-color: #dddddd;
            line-height: 38px;
        }
    </style>
</head>

<body style="margin: 0">
    <div class="pg-header">
        <div style=" 980px;margin: 0 auto;">
            <div style="float: left;">收藏本站</div>
            <div style="float: right;">
                <a>登录</a>
                <a>注册</a>
            </div>
            <div style="clear: both"></div>
        </div>
    </div>
    <div>
        <div style=" 980px;margin: 0 auto;">
            <div style="float: left">
                Logo
            </div>
            <div style="float: right">
                <div style="height: 50px; 100px;background-color: #dddddd"></div>
            </div>
            <div style="clear: both"></div>
        </div>
    </div>
    <div style="background-color: red;">
         <div style=" 980px;margin: 0 auto;">
             asdfsdf
         </div>
    </div>
    <div style=" 300px;border: 1px solid red;">
        <div style=" 96px;height:30px;border: 1px solid green;float: left;"></div>
        <div style=" 96px;height:30px;border: 1px solid green;float: left;"></div>
        <div style=" 96px;height:30px;border: 1px solid green;float: left;"></div>
        <div style=" 96px;height:30px;border: 1px solid green;float: left;"></div>
        <div style=" 96px;height:30px;border: 1px solid green;float: left;"></div>
        <div style=" 96px;height:30px;border: 1px solid green;float: left;"></div>
        <div style=" 96px;height:30px;border: 1px solid green;float: left;"></div>
        <div style=" 96px;height:30px;border: 1px solid green;float: left;"></div>
        <div style=" 96px;height:30px;border: 1px solid green;float: left;"></div>
        <div style=" 96px;height:30px;border: 1px solid green;float: left;"></div>
        <div style=" 96px;height:30px;border: 1px solid green;float: left;"></div>
        <div style="clear: both;"></div>
    </div>
</body>
</html>
style 样式设置 display
display 可以设置
inline , block , inline-block
<!DOCTYPE html>
<html lang="en">
<head>
    <meta charset="UTF-8">
    <title>Title</title>
</head>
<body>
    <div style="background-color: red;display: inline;">asdf</div>
    <span style="background-color: red;display: block;">asdf</span>
    <span style="display:inline-block;background-color: red;height: 50px; 70px;">Alex</span>
    <a style="background-color: red;">Eric</a>
</body>
</html>
知识点总结
HTML
1、一套规则,浏览器认识的规则。
2、开发者:
学习Html规则
开发后台程序:
- 写Html文件(充当模板的作用) ******
- 数据库获取数据,然后替换到html文件的指定位置(Web框架)
3、本地测试
- 找到文件路径,直接浏览器打开
- pycharm打开测试
4、编写Html文件
- doctype对应关系
- html标签,标签内部可以写属性 ====> 只能有一个
- 注释: <!-- 注释的内容 -->
5、标签分类
- 自闭合标签
<meta charset="UTF-8">
- 主动闭合标签
title>老男孩</title>
6、
head标签中
- <meta -> 编码,跳转,刷新,关键字,描述,IE兼容
<meta http-equiv="X-UA-Compatible" content="IE=IE9;IE=IE8;" />
- title标签
7、body标签
- 图标, > <
- p标签,段落
- br,换行
======== 小总结 =====
所有标签分为:
块级标签: div(白板),H系列(加大加粗),p标签(段落和段落之间有间距)
行内标签: span(白板)
标签之间可以嵌套
标签存在的意义,css操作,js操作
ps:chorme审查元素的使用
- 定位
- 查看样式
- h系列
- div
- span
- input系列 + form标签
input type='text' - name属性,value="值"
input type='password' - name属性,value="值"
input type='submit' - value='提交' 提交按钮,表单
input type='button' - value='登录' 按钮
input type='radio' - 单选框 value,checked="checked",name属性(name相同则互斥)
input type='checkbox' - 复选框 value, checked="checked",name属性(批量获取数据)
input type='file' - 依赖form表单的一个属性 enctype="multipart/form-data"
input type='rest' - 重置
<textarea >默认值</textarea> - name属性
select标签 - name,内部option value, 提交到后台,size,multiple
- a标签
- 跳转
- 锚 href='#某个标签的ID' 标签的ID不允许重复
- img
src
alt
title
- 列表
ul
li
ol
li
dl
dt
dd
- 表格
table
thead
tr
th
tbody
tr
td
colspan = ''
rowspan = ''
- label
用于点击文件,使得关联的标签获取光标
<label for="username">用户名:</label>
<input id="username" type="text" name="user" />
- fieldset
legend
- 20个标签
CSS
在标签上设置style属性:
background-color: #2459a2;
height: 48px;
...
编写css样式:
1. 标签的style属性
2. 写在head里面 style标签中写样式
- id选择区
#i1{
background-color: #2459a2;
height: 48px;
}
- class选择器 ******
.名称{
...
}
<标签 class='名称'> </标签>
- 标签选择器
div{
...
}
所有div设置上此样式
- 层级选择器(空格) ******
.c1 .c2 div{
}
- 组合选择器(逗号) ******
#c1,.c2,div{
}
- 属性选择器 ******
对选择到的标签再通过属性再进行一次筛选
.c1[n='alex']{ 100px; height:200px; }
PS:
- 优先级,标签上style优先,编写顺序,就近原则
2.5 css样式也可以写在单独文件中
<link rel="stylesheet" href="commons.css" />
3、注释
/* */
4、边框
- 宽度,样式,颜色 (border: 4px dotted red;)
- border-left
5、
height, 高度 百分比
width, 宽度 像素,百分比
text-align:ceter, 水平方向居中
line-height,垂直方向根据标签高度
color、 字体颜色
font-size、 字体大小
font-weight 字体加粗
6、float
让标签浪起来,块级标签也可以堆叠
老子管不住:
<div style="clear: both;"></div>
7、display
display: none; -- 让标签消失
display: inline;
display: block;
display: inline-block;
具有inline,默认自己有多少占多少
具有block,可以设置无法设置高度,宽度,padding margin
******
行内标签:无法设置高度,宽度,padding margin
块级标签:设置高度,宽度,padding margin
8、padding margin(0,auto)
a 标签内部使用图片,设置样式

<a href="网址">
    <img src="图片路径/图片名.jpg" style="200px;height:300px;">
</a>
<!DOCTYPE html>
<html lang="en">
<head>
    <meta charset="UTF-8">
    <title>Title</title>
    <style>
        img{
            border: 0;
        }
    </style>
</head>
<body>
    <a href="http://www.oldboyedu.com" >asdf</a>
    <a href="http://www.oldboyedu.com">
        <img src="1.jpg" style=" 200px;height: 300px;">
    </a>
</body>
</html>

返回顶部
function GoTop(){
            document.documentElement.scrollTop = 0;
        }
使用 document.documentElement.scrollTop = 0;
<!DOCTYPE html>
<html lang="en">
<head>
    <meta charset="UTF-8">
    <title>Title</title>
</head>
<body>
    <div onclick="GoTop();" style=" 50px;height: 50px;background-color: black;color: white;
    position: fixed;
    bottom:20px;
    right: 20px;
    ">返回顶部</div>
    <div style="height: 5000px;background-color: #dddddd;">
        asdfasdf
    </div>
    <script>
        function GoTop(){
            document.documentElement.scrollTop = 0;
        }
    </script>
</body>
</html>

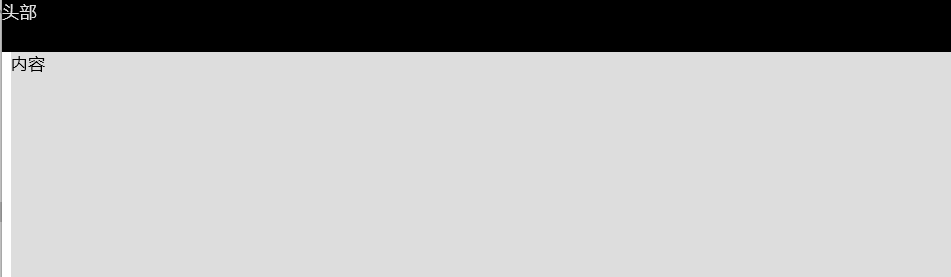
style 标签内部使用
position: fixed; 固定位置
margin-top: 48px;与上部模块之间的距离
<!DOCTYPE html>
<html lang="en">
<head>
    <meta charset="UTF-8">
    <title>Title</title>
    <style>
        .pg-header{
            height: 48px;
            background-color: black;
            color: #dddddd;
            position: fixed;
            top:0;
            right: 0;
            left: 0;
        }
        .pg-body{
            background-color: #dddddd;
            height: 5000px;
            margin-top: 48px;
        }
    </style>
</head>
<body>
    <div class="pg-header">头部</div>
    <div class="pg-body">内容</div>
</body>
</html>
position 使用绝对定位

position: absolute;
<!DOCTYPE html>
<html lang="en">
<head>
    <meta charset="UTF-8">
    <title>Title</title>
</head>
<body>
    <div style=" 50px;height: 50px;background-color: black;position: absolute;right: 0;bottom: 0;">asdf</div>
    <div style="height: 5000px;background-color: #dddddd;">
        asdfasdf
    </div>
</body>
</html>

使用 div 嵌套使用 position
外层使用 relative,内部使用 absolute
    <div style="position: relative;.......">
        <div style="position: absolute;......."></div>
    </div>
<!DOCTYPE html>
<html lang="en">
<head>
    <meta charset="UTF-8">
    <title>Title</title>
</head>
<body>

    <div style="position: relative; 500px;height: 200px;border: 1px solid red;margin: 0 auto;">
        <div style="position: absolute;left:0;bottom:0; 50px;height: 50px;background-color: black;"></div>
    </div>
    <div style="position: relative; 500px;height: 200px;border: 1px solid red;margin: 0 auto;">

        <div style="position: absolute;right:0;bottom:0; 50px;height: 50px;background-color: black;"></div>
    </div>
    <div style="position: relative; 500px;height: 200px;border: 1px solid red;margin: 0 auto;">

        <div style="position: absolute;right:0;top:0; 50px;height: 50px;background-color: black;"></div>
    </div>
</body>
</html>
style 可以设置属性

style="display:none;z-index:10; position: fixed;top: 50%;left:50%;
    margin-left: -250px;margin-top: -200px; background-color:white;height: 400px;500px;


style="display:none;z-index:9; position: fixed;background-color: black;
    top:0;
    bottom: 0;
    right: 0;
    left: 0;
    opacity: 0.5;
    "
overflow 的两种属性的区别
auto 会加入滚动条

overflow: auto
overflow: hidden
<!DOCTYPE html>
<html lang="en">
<head>
    <meta charset="UTF-8">
    <title>Title</title>
</head>
<body>
    <div style="height: 200px; 300px;overflow: auto">
        <img src="1.jpg">
    </div>

    <div style="height: 200px; 300px;overflow: hidden">
        <img src="1.jpg">
    </div>
</body>
</html>
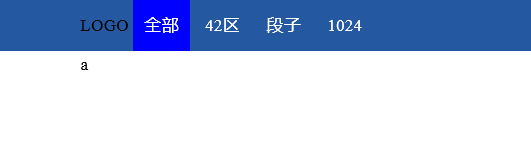
使用 position: fixed 固定头部
设置高度 line-height: 48px;
设置距离上部距离 margin-top: 50px;
设置块级元素在同一行显示 display: inline-block;
设置鼠标碰到时,发生的变化 :hover

.pg-header .menu:hover{
            background-color: blue;
        }
<!DOCTYPE html>
<html lang="en">
<head>
    <meta charset="UTF-8">
    <title>Title</title>
    <style>
        .pg-header{
            position: fixed;
            right: 0;
            left: 0;
            top: 0;
            height: 48px;
            background-color: #2459a2;
            line-height: 48px;
        }
        .pg-body{
            margin-top: 50px;
        }
        .w{
             980px;
            margin: 0 auto;
        }
        .pg-header .menu{
            display: inline-block;
            padding: 0 10px 0 10px;
            color: white;
        }
        /*当鼠标移动到当前标签上时,以下css属性才生效*/
        .pg-header .menu:hover{
            background-color: blue;
        }
    </style>
</head>
<body>
    <div class="pg-header">
        <div class="w">
            <a class="logo">LOGO</a>
            <a class="menu">全部</a>
            <a class="menu">42区</a>
            <a class="menu">段子</a>
            <a class="menu">1024</a>
        </div>
    </div>
    <div class="pg-body">
        <div class="w">a</div>
    </div>
</body>
</html>
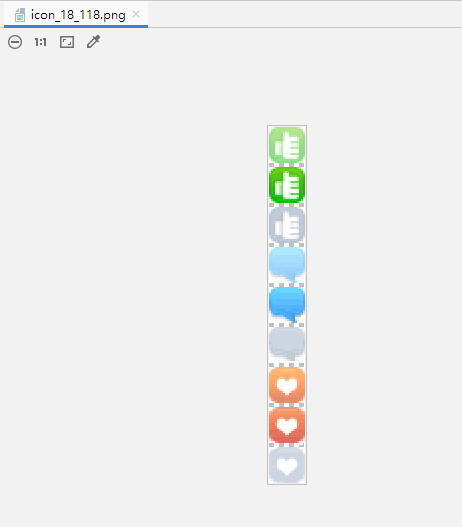
style 样式
background-image: url(icon_18_118.png);
设置图片的 url , 可以为本地图片

background-repeat 设置是否重复背景图像
<!DOCTYPE html>
<html lang="en">
<head>
    <meta charset="UTF-8">
    <title>Title</title>
</head>
<body>
    <div style="height: 100px;"></div>
    <div style="background-image: url(icon_18_118.png);background-repeat:no-repeat;height: 20px;20px;border: 1px solid red;"></div>
</body>
</html>

可以为不同的标签设置相同的 class 属性,但是 id 必须不同
<!DOCTYPE html>
<html lang="en">
<head>
    <meta charset="UTF-8">
    <title>Title</title>
</head>
<body>
    <div>
        <input class="c1" type="radio" name="gender" value="1" />
        <input type="radio" name="gender" value="2" />
    </div>
</body>
</html>

输入框嵌入图片(注:图片目前和输入的内容会重叠)
<!DOCTYPE html>
<html lang="en">
<head>
    <meta charset="UTF-8">
    <title>Title</title>
</head>
<body>

    <div style="height: 35px; 400px;position: relative;">
        <input type="text" style="height: 35px; 400px; margin-right: 20px;" />
        <span style="position:absolute;right:0;top:10px;background-image: url(i_name.jpg);height: 16px; 16px;display: inline-block; "></span>
    </div>
</body>
</html>

在标签中使用 onclick=函数名(); 可以进行调用该函数
onclick="GetData();
使用 document.getElementById('id名称') 可以获取该数据
document.getElementById('user')
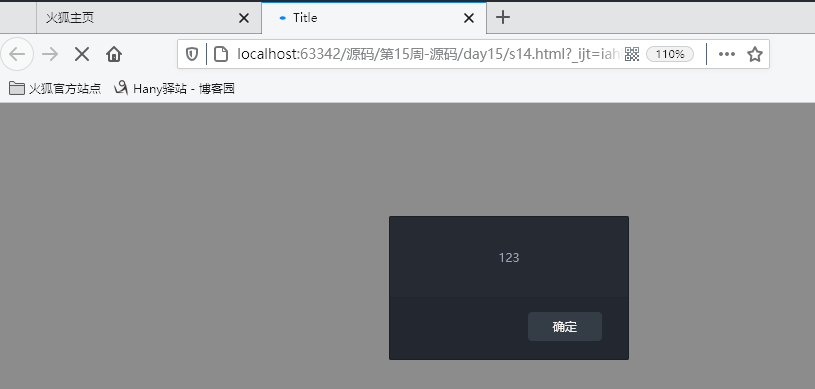
function GetData(){
var i = document.getElementById('user');
alert(i.value);
}
使用 .value 获取值
<!DOCTYPE html>
<html lang="en">
<head>
    <meta charset="UTF-8">
    <title>Title</title>
</head>
<body>
    <input type="text" id="user" >
    <input type="button" onclick="GetData();" value="点我" />
    <script>
        function GetData(){
            var i = document.getElementById('user');
            alert(i.value);
        }
    </script>
</body>
</html>


使用外部 js 文件
<script src="文件名.js"></script>

<script src="commons.js"></script>
可以添加 type="text/javascript" 进行声明 script 语句

    <script type="text/javascript">
        //javascript代码

    </script>
<!DOCTYPE html>
<html lang="en">
<head>
    <meta charset="UTF-8">
    <title>Title</title>
    <script src="commons.js"></script>
    <script type="text/javascript">
        //javascript代码
        alert(123);
    </script>
</head>
<body>

</body>
</html>
声明全局变量
age = "18";

转换为 int 类型使用 parseInt(变量);
i = parseInt(age);

定义局部变量
var name = 'eric'
<!DOCTYPE html>
<html lang="en">
<head>
<meta charset="UTF-8">
<title>Title</title>
</head>
<body>
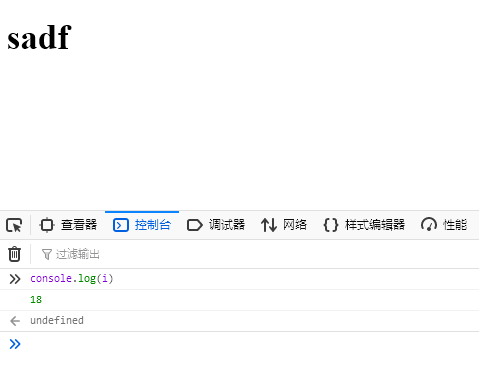
<h1>sadf</h1>
<script>
/*
name = 'alex';
function func(){
var name = 'eric'
}*/
age = "18";
i = parseInt(age);
</script>
</body>
</html>
setInterval 设置定时器
setInterval("函数名();",毫秒);

函数定义
function 函数名(参数){
  代码块;
}
<!DOCTYPE html>
<html lang="en">
<head>
    <meta charset="UTF-8">
    <title>Title</title>
</head>
<body>

    <script>
        function f1(){
            console.log(1);
        }

        // 创建一个定时器
        //setInterval("alert(123);", 5000);
        setInterval("f1();", 1000);
    </script>
</body>
</html>
使用 function 定义函数 func 函数名称
var 定义局部变量,需要注意变量的作用域
document.getElementById 通过指定的 id 名称进行获取
.innerText 获取文本内容
.charAt(0) 获取第一个字符
content.substring(1,content.length) 获取第二个字符到最后
使用 + 号进行字符串的拼接
<!DOCTYPE html>
<html lang="en">
<head>
<meta charset="UTF-8">
<title>Title</title>
</head>
<body>
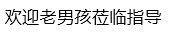
<div id="i1">欢迎老男孩莅临指导</div>
<script>
function func(){
// 根据ID获取指定标签的内容,定于局部变量接受
var tag = document.getElementById('i1');
// 获取标签内部的内容
var content = tag.innerText;
var f = content.charAt(0);
var l = content.substring(1,content.length);
var new_content = l + f;
tag.innerText = new_content;
}
setInterval('func()', 500);
</script>
</body>
</html>

div 内部嵌套 div
<!DOCTYPE html>
<html lang="en">
<head>
    <meta charset="UTF-8">
    <title>Title</title>
</head>
<body>
    <div>
        <div></div>
        <div>
            c1
        </div>
    </div>
    <div>
        <div></div>
        <div id="i1">
            c2
        </div>
    </div>
    <div>
        <div></div>
        <div>
            c3
        </div>
    </div>
</body>
</html>
position: fixed; 固定位置
opacity: 0.6; 透明度
z-index: 9; 显示的优先级
margin-left: -250px;距离左面距离
margin-top: -200px;距离顶部距离
添加按钮绑定 js 函数
<input type="button" value="功能" onclick="函数名();" />

<input type="button" value="添加" onclick="ShowModel();" />
获取到指定的 id 之后,使用 classList 获取 class 列表,
删除 class 属性使用  remove
添加 class 属性使用 add

document.getElementById('i1').classList.remove('hide');

document.getElementById('i1').classList.add('hide');
多选框选中 使用 checked 属性
true 表示选中,false 表示没有选中

checkbox.checked = true;

checkbox.checked = false;
for 循环

for(var i=0;i<数组对象.length;i++){
                // 循环
                代码块

            }
实现多选反选,主要是依靠 checked 属性(选中为true)
if(checkbox.checked){checkbox.checked = false;}else{checkbox.checked = true;}
<!DOCTYPE html>
<html lang="en">
<head>
<meta charset="UTF-8">
<title>Title</title>
<style>
.hide{
display: none;
}
.c1{
position: fixed;
left: 0;
top: 0;
right: 0;
bottom: 0;
background-color: black;
opacity: 0.6;
z-index: 9;
}
.c2{
500px;
height: 400px;
background-color: white;
position: fixed;
left: 50%;
top: 50%;
margin-left: -250px;
margin-top: -200px;
z-index: 10;
}
</style>
</head>
<body style="margin: 0;">
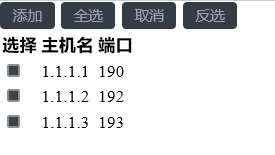
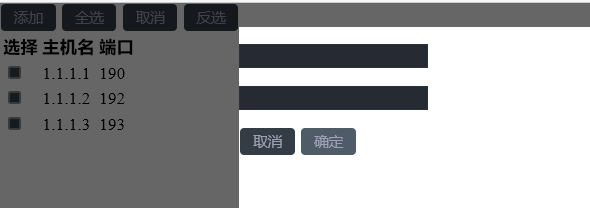
<div>
<input type="button" value="添加" onclick="ShowModel();" />
<input type="button" value="全选" onclick="ChooseAll();" />
<input type="button" value="取消" onclick="CancleAll();" />
<input type="button" value="反选" onclick="ReverseAll();" />
<table>
<thead>
<tr>
<th>选择</th>
<th>主机名</th>
<th>端口</th>
</tr>
</thead>
<tbody id="tb">
<tr>
<td>
<input type="checkbox" />
</td>
<td>1.1.1.1</td>
<td>190</td>
</tr>
<tr>
<td><input type="checkbox"f id="test" /></td>
<td>1.1.1.2</td>
<td>192</td>
</tr>
<tr>
<td><input type="checkbox" /></td>
<td>1.1.1.3</td>
<td>193</td>
</tr>
</tbody>
</table>
</div>
<!-- 遮罩层开始 -->
<div id="i1" class="c1 hide"></div>
<!-- 遮罩层结束 -->
<!-- 弹出框开始 -->
<div id="i2" class="c2 hide">
<p><input type="text" /></p>
<p><input type="text" /></p>
<p>
<input type="button" value="取消" onclick="HideModel();"/>
<input type="button" value="确定"/>
</p>
</div>
<!-- 弹出框结束 -->
<script>
function ShowModel(){
document.getElementById('i1').classList.remove('hide');
document.getElementById('i2').classList.remove('hide');
}
function HideModel(){
document.getElementById('i1').classList.add('hide');
document.getElementById('i2').classList.add('hide');
}
function ChooseAll(){
var tbody = document.getElementById('tb');
// 获取所有的tr
var tr_list = tbody.children;
for(var i=0;i<tr_list.length;i++){
// 循环所有的tr,current_tr
var current_tr = tr_list[i];
var checkbox = current_tr.children[0].children[0];
checkbox.checked = true;
}
}
function CancleAll(){
var tbody = document.getElementById('tb');
// 获取所有的tr
var tr_list = tbody.children;
for(var i=0;i<tr_list.length;i++){
// 循环所有的tr,current_tr
var current_tr = tr_list[i];
var checkbox = current_tr.children[0].children[0];
checkbox.checked = false;
}
}
function ReverseAll(){
var tbody = document.getElementById('tb');
// 获取所有的tr
var tr_list = tbody.children;
for(var i=0;i<tr_list.length;i++){
// 循环所有的tr,current_tr
var current_tr = tr_list[i];
var checkbox = current_tr.children[0].children[0];
if(checkbox.checked){checkbox.checked = false;}else{checkbox.checked = true;}}}
</script>
</body>
</html>
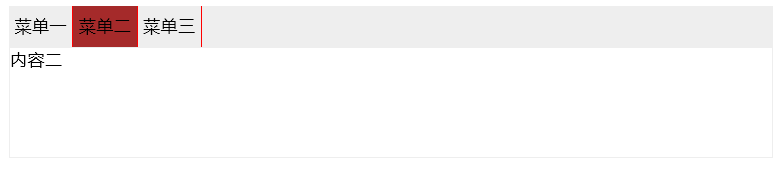
在标签中绑定事件可以添加参数
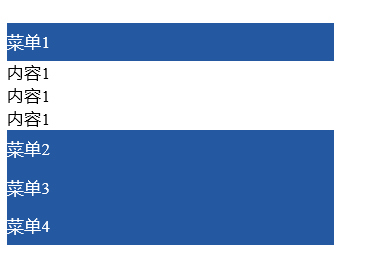
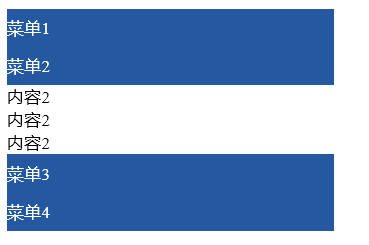
<div id='i1' class="header" onclick="ChangeMenu('i1');">菜单1</div>
function ChangeMenu(nid){
代码块
}
此处,使用nid接收传递过来的 i1 值
实现菜单栏
.parentElement 父节点
.children 孩子节点
.nextElementSibling 下一个元素节点的兄弟节点

var item_list = current_header.parentElement.parentElement.children;

添加样式可以使用索引,指定第几个孩子进行添加 class 样式
current_item.children[1].classList.add('hide');
<!DOCTYPE html>
<html lang="en">
<head>
    <meta charset="UTF-8">
    <title>Title</title>
    <style>
        .hide{
            display: none;
        }
        .item .header{
            height: 35px;
            background-color: #2459a2;
            color: white;
            line-height: 35px;
        }
    </style>
</head>
<body>
    <div style="height: 48px"></div>

    <div style=" 300px">

        <div class="item">
            <div id='i1' class="header" onclick="ChangeMenu('i1');">菜单1</div>
            <div class="content">
                <div>内容1</div>
                <div>内容1</div>
                <div>内容1</div>
            </div>
        </div>
        <div class="item">
            <div id='i2' class="header" onclick="ChangeMenu('i2');">菜单2</div>
            <div class="content hide">
                <div>内容2</div>
                <div>内容2</div>
                <div>内容2</div>
            </div>
        </div>
        <div class="item">
            <div id='i3' class="header" onclick="ChangeMenu('i3');">菜单3</div>
            <div class="content hide">
                <div>内容3</div>
                <div>内容3</div>
                <div>内容3</div>
            </div>
        </div>
        <div class="item">
            <div id='i4' class="header" onclick="ChangeMenu('i4');">菜单4</div>
            <div class="content hide">
                <div>内容4</div>
                <div>内容4</div>
                <div>内容4</div>
            </div>
        </div>


    </div>

    <script>
        function ChangeMenu(nid){
            var current_header = document.getElementById(nid);

            var item_list = current_header.parentElement.parentElement.children;

            for(var i=0;i<item_list.length;i++){
                var current_item = item_list[i];
                current_item.children[1].classList.add('hide');
            }

            current_header.nextElementSibling.classList.remove('hide');
        }
    </script>
</body>
</html>
for 循环的另一种写法
a 为数组 a = [11,22,33,44]

for(var item in a){
                console.log(item);
            }
.getElementsByTagName('div')  通过标签名进行查找
.getElementsByClassName 通过class属性进行查找
.getElementsByName 根据 name 属性进行查找

firstElementChild  第一个子标签元素
lastElementChild  最后一个子标签元素
nextElementtSibling 下一个兄弟标签元素
previousElementSibling 上一个兄弟标签元素
知识点总结

    1、css重用
        <style>
            如果整个页面的宽度 > 900px时:
            {
                .c{
                   共有
                }
                .c1{
                    独有
                }
            }

            .c2{
                独有
            }
        </style>

        <div class='c c1'></div>
        <div class='c c2'></div>

    2、自适应 和 改变大小变形
        左右滚动条的出现
        宽度,百分比
        页面最外层:像素的宽度 => 最外层设置绝对宽度
        自适应:media

    3、默认img标签,有一个1px的边框
        img{
            border: 0;
        }

    1、块级和行内
    2、form标签
            <form action='http://sssss' methed='GET' enctype='multi'>
                <div>asdfasdf</div>
                <input type='text' name='q' />
                <input type='text' name='b' />
                # 上传文件
                <input type='file' name='f' />
                <input type='submit' />
            </form>

            GET: http://sssss?q=用户输入的值
                 http://sssss?q=用户输入的值&b=用户输入的内容

            POST:
                请求头
                请求内容

    3、display: block;inline;inline-block

    4、float:
        <div>
            <div style='float:left;'>f</div>
            <div style='clear:both;'></div>
        </div>

    5、margin: 0 auto;
    6、padding, ---> 自身发生变化

CSS补充
    position:
        a. fiexd => 固定在页面的某个位置

        b. relative + absolute

            <div style='position:relative;'>
                <div style='position:absolute;top:0;left:0;'></div>
            </div>

    opcity: 0.5 透明度
    z-index: 层级顺序
    overflow: hidden,auto
    hover

    background-image:url('image/4.gif'); # 默认,div大,图片重复访
    background-repeat: repeat-y;
    background-position-x:
    background-position-y:

    示例:输入框

JavaScript
    独立的语言,浏览器具有js解释器

    JavaScript代码存在形式:
        - Head中
                <script>
                    //javascript代码
                    alert(123);
                </script>

                <script type="text/javascript">
                    //javascript代码
                    alert(123);
                </script>
        - 文件
            <script src='js文件路径'> </script>

        PS: JS代码需要放置在 <body>标签内部的最下方

    注释
        当行注释 //
        多行注释  /*     */

    变量:
        python:
            name = 'alex'
        JavaScript:
            name = 'alex'     # 全局变量
            var name = 'eric' # 局部变量

    写Js代码:
        - html文件中编写
        - 临时,浏览器的终端 console

    基本数据类型
        数字
            a = 18;
        字符串
            a = "alex"
            a.chartAt(索引位置)
            a.substring(起始位置,结束位置)
            a.lenght    获取当前字符串长度
            ...
        列表(数组)
            a = [11,22,33]

        字典
            a = {'k1':'v1','k2':'v2'}

        布尔类型
            小写

    for循环
        1. 循环时,循环的元素是索引

            a = [11,22,33,44]
            for(var item in a){
                console.log(item);
            }

            a = {'k1':'v1','k2':'v2'}
            for(var item in a){
                console.log(item);
            }

        2.
            for(var i=0;i<10;i=i+1){

            }

            a = [11,22,33,44]
            for(var i=0;i<a.length;i=i+1){

            }

            不支持字典的循环


    条件语句
        if(条件){

        }else if(条件){

        }else if(条件){

        }else{

        }

        ==   值相等
        ===  值和类型都相等
        &&   and
        ||   or

    函数:

        function 函数名(a,b,c){

        }

        函数名(1,2,3)

Dom
    1、找到标签
        获取单个元素        document.getElementById('i1')
        获取多个元素(列表)document.getElementsByTagName('div')
        获取多个元素(列表)document.getElementsByClassName('c1')
        a. 直接找
            document.getElementById             根据ID获取一个标签
            document.getElementsByName          根据name属性获取标签集合
            document.getElementsByClassName     根据class属性获取标签集合
            document.getElementsByTagName       根据标签名获取标签集合

        b. 间接
            tag = document.getElementById('i1')

            parentElement           // 父节点标签元素
            children                // 所有子标签
            firstElementChild       // 第一个子标签元素
            lastElementChild        // 最后一个子标签元素
            nextElementtSibling     // 下一个兄弟标签元素
            previousElementSibling  // 上一个兄弟标签元素

    2、操作标签

        a. innerText
            获取标签中的文本内容
            标签.innerText

            对标签内部文本进行重新赋值
            标签.innerText = ""

        b. className
            tag.className => 直接整体做操作
            tag.classList.add('样式名')   添加指定样式
            tag.classList.remove('样式名')   删除指定样式

            PS:
                <div onclick='func();'>点我</div>
                <script>
                    function func(){

                    }

                </script>

        c. checkbox
                获取值
                checkbox对象.checked
                设置值
                checkbox对象.checked = true
Dom
    找标签
        - 直接找 $('#id')  $('.c1').siblings()
    操作:
        innerText

        checkbox:
            checked

        className
        classList

    事件:
        <div onclick='函数(123)'></div>

        <script>
            代码块
        </script>

    定时器
        setInterval('函数()', 4000)

    其他:
        alert()
        console.log()
onblur="Blur();
当鼠标不在输入框时,会进行的操作
获取指定 id 之后标签的值,使用.value 进行获取

var val=tag.value;

当什么都没有输入时,值为 ""
<!DOCTYPE html>
<html lang="en">
<head>
    <meta charset="UTF-8">
    <title>搜索框请输入关键字</title>
    <style>
        .c_keys{
             200px;
            height: 30px;
        }
    </style>
</head>
<body>
    <div>
        <input id="id1" type="text" class="c_keys" onfocus="Focus();" onblur="Blur();" value="请输入关键字"/>
    </div>

    <script>
        function Focus(){
            var tag=document.getElementById('id1');
            var val=tag.value;
            if(val == "请输入关键字"){
                tag.value="";
            }
        }
        function Blur(){
            var tag=document.getElementById('id1');
            var val=tag.value;
            if(val==""){
                tag.value="请输入关键字";
            }
        }
    </script>
</body>
</html>

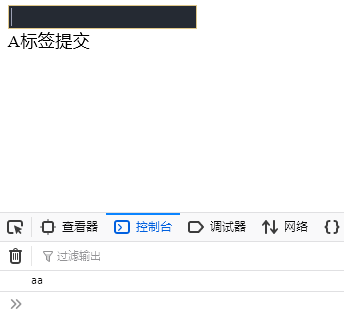
使用 .submit() 进行提交

function submitForm(){
            document.getElementById('form1').submit();
        }
使用 .addEventListener 对事件进行监听
('click',匿名函数)
表示点击之后要进行的操作

var mydiv=document.getElementById('form1');
        mydiv.addEventListener('click',function(){
            console.log('aa');
        },false)
<!DOCTYPE html>
<html lang="en">
<head>
    <meta charset="UTF-8">
    <title>非submit标签提交表单实例</title>
</head>
<body>
    <form id="form1" action="http://www.baidu.com">
        <input type="text" />
    </form>
    <a onclick="submitForm();">A标签提交</a>
    <script>
        function submitForm(){
            document.getElementById('form1').submit();
        }
        var mydiv=document.getElementById('form1');
        mydiv.addEventListener('click',function(){
            console.log('aa');
        },false)
    </script>
</body>
</html>
使用 disabled 表示标签不可用

<input type="text" disabled />

在标签中可以自定义属性
此处定义的是 alex

<a alex='123'>f2</a>
引入 jquery 文件

<script src="jquery-1.12.4.js"></script>
使用 $(dom对象) 后即为 jquery 对象

$("#i1")
<!DOCTYPE html>
<html lang="en">
<head>
    <meta charset="UTF-8">
    <title>Title</title>
    <style>

    </style>

</head>
<body>
    <input type="text" />
    <input type="text" disabled />
    <input type="text" />

    <div id='i10' class='c1'>
        <div>
            <a>asd</a>
        </div>
        <a alex='123'>f2</a>
        <a alex='456'>f2</a>
        <a>f3</a>
        <a>f4</a>
    </div>

    <div class='c1'>
        <a>f</a>
    </div>
    <div class='c1'>
        <div class='c2'> </div>
    </div>

    <script src="jquery-1.12.4.js"></script>
    <script>
        $("#i1")
    </script>
</body>
</html>

td 标签内部可以使用 input 标签

<td><input type="checkbox" /></td>

获取 id 为 tb的标签,属性为 checkbox 的,
使用 prop 设置属性为 true
prop 返回值为 true 或 false,可以用于判断

$('#tb :checkbox').prop('checked',true);
循环时使用 .each(
    function(参数){
        代码块
    }
)
在使用 script 代码时,使用的 this 对象是 dom 对象,
使用 $(this) 转换为 jquery 对象
三元运算
var v = 条件? 真值:假值;

var v = $(this).prop('checked')?false:true;
<!DOCTYPE html>
<html lang="en">
<head>
<meta charset="UTF-8">
<title>Title</title>
</head>
<body>
<input type="button" value="全选" onclick="checkAll();" />
<input type="button" value="反选" onclick="reverseAll();" />
<input type="button" value="取消" onclick="cancleAll();"/>
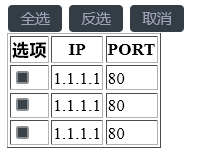
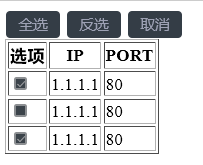
<table border="1">
<thead>
<tr>
<th>选项</th>
<th>IP</th>
<th>PORT</th>
</tr>
</thead>
<tbody id="tb">
<tr>
<td><input type="checkbox" /></td>
<td>1.1.1.1</td>
<td>80</td>
</tr>
<tr>
<td><input type="checkbox" /></td>
<td>1.1.1.1</td>
<td>80</td>
</tr>
<tr>
<td><input type="checkbox" /></td>
<td>1.1.1.1</td>
<td>80</td>
</tr>
</tbody>
</table>
<script src="jquery-1.12.4.js"></script>
<script>
function checkAll() {
$('#tb :checkbox').prop('checked',true);
}
function cancleAll() {
$('#tb :checkbox').prop('checked',false);
}
function reverseAll() {
$(':checkbox').each(function(k){
// this,代指当前循环的每一个元素
// Dom
/*
if(this.checked){
this.checked = false;
}else{
this.checked = true;
}
*/
/*
if($(this).prop('checked')){
$(this).prop('checked', false);
}else{
$(this).prop('checked', true);
}
*/
// 三元运算var v = 条件? 真值:假值
var v = $(this).prop('checked')?false:true;
$(this).prop('checked',v);
})
}
</script>
</body>
</html>
在 script 中 一行代码实现菜单栏

$(this).next().removeClass('hide').parent().siblings().find('.content').addClass('hide')
min-height: 50px; 设置最小高度
script 中 .header 表示 class 为 header 的标签
.click 表示点击时,会进行调用的函数

$('.header').click(function(){
     代码块
}
.addClass('hide') 在 class 属性中添加 hide 样式
.removeClass('hide') 在 class 属性中删除 hide 样式

$(this).next()      下一个
$(this).prev()      上一个
$(this).parent()    父
$(this).children()  孩子
$('#i1').siblings() 兄弟
$('#i1').find('#i1') 查找

#表示寻找 id
<!DOCTYPE html>
<html lang="en">
<head>
<meta charset="UTF-8">
<title>Title</title>
<style>
.header{
background-color: black;
color: wheat;
}
.content{
min-height: 50px;
}
.hide{
display: none;
}
</style>
</head>
<body>
<div style="height:400px; 200px;border: 1px solid #dddddd">
<div class="item">
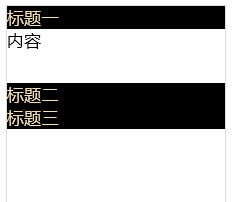
<div class="header">标题一</div>
<div id="i1" class="content hide">内容</div>
</div>
<div class="item">
<div class="header">标题二</div>
<div class="content hide">内容</div>
</div>
<div class="item">
<div class="header">标题三</div>
<div class="content hide">内容</div>
</div>
</div>
<script src="jquery-1.12.4.js"></script>
<script>
$('.header').click(function(){
// 当前点击的标签 $(this)
// 获取某个标签的下一个标签
// 获取某个标签的父标签
// 获取所有的兄弟标签
// 添加样式和移除样式
// $('.i1').addClass('hide')
// $('#i1').removeClass('hide')
// var v = $("this + div");
// $("label + input")
// console.log(v);
// $("afsldkfja;skjdf;aksdjf")
// 筛选器
/*
$(this).next() 下一个
$(this).prev() 上一个
$(this).parent() 父
$(this).children() 孩子
$('#i1').siblings() 兄弟
$('#i1').find('#i1') 子子孙孙中查找
$('#i1').addClass(..)
$('#i1').removeClass(..)
*/
// 链式编程
// $(...).click(function(){
// this..
// })
// $(this).next().removeClass('hide');
// $(this).parent().siblings().find('.content').addClass('hide')
$(this).next().removeClass('hide').parent().siblings().find('.content').addClass('hide')
})
</script>
</body>
</html>

可以进行添加和显示编辑界面,编辑后界面无变化
<!DOCTYPE html>
<html lang="en">
<head>
<meta charset="UTF-8">
<title>Title</title>
<style>
.hide{
display: none;
}
.modal{
position: fixed;
top: 50%;
left: 50%;
500px;
height: 400px;
margin-left: -250px;
margin-top: -250px;
background-color: #eeeeee;
z-index: 10;
}
.shadow{
position: fixed;
top: 0;
left: 0;
right: 0;
bottom: 0;
opacity: 0.6;
background-color: black;
z-index: 9;
}
</style>
</head>
<body>
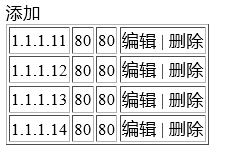
<a onclick="addElement();">添加</a>
<table border="1" id="tb">
<tr>
<td target="hostname">1.1.1.11</td>
<td target="port">80</td>
<td target="ip">80</td>
<td>
<a class="edit">编辑</a> | <a class="del">删除</a>
</td>
</tr>
<tr>
<td target="hostname">1.1.1.12</td>
<td target="port">80</td>
<td target="ip">80</td>
<td>
<a class="edit">编辑</a> | <a class="del">删除</a>
</td>
</tr>
<tr>
<td target="hostname">1.1.1.13</td>
<td target="port">80</td>
<td target="ip">80</td>
<td>
<a class="edit">编辑</a> | <a class="del">删除</a>
</td>
</tr>
<tr>
<td target="hostname">1.1.1.14</td>
<td target="port">80</td>
<td target="ip">80</td>
<td>
<a class="edit">编辑</a> | <a class="del">删除</a>
</td>
</tr>
</table>
<div class="modal hide">
<div>
<input name="hostname" type="text" />
<input name="port" type="text" />
<input name="ip" type="text" />
</div>
<div>
<input type="button" value="取消" onclick="cancelModal();" />
<input type="button" value="确定" onclick="confirmModal();" />
</div>
</div>
<div class="shadow hide"></div>
<script src="jquery-1.12.4.js"></script>
<script>
$('.del').click(function () {
$(this).parent().parent().remove();
});
function confirmModal() {
var tr = document.createElement('tr');
var td1 = document.createElement('td');
td1.innerHTML = "11.11.11.11";
var td2 = document.createElement('td');
td2.innerHTML = "8001";
$(tr).append(td1);
$(tr).append(td2);
$('#tb').append(tr);
$(".modal,.shadow").addClass('hide');
// $('.modal input[type="text"]').each(function () {
// // var temp = "<td>..."
//
//
//
// })
}
function addElement() {
$(".modal,.shadow").removeClass('hide');
}
function cancelModal() {
$(".modal,.shadow").addClass('hide');
$('.modal input[type="text"]').val("");
}
$('.edit').click(function(){
$(".modal,.shadow").removeClass('hide');
// this
var tds = $(this).parent().prevAll();
tds.each(function () {
// 获取td的target属性值
var n = $(this).attr('target');
// 获取td中的内容
var text = $(this).text();
var a1 = '.modal input[name="';
var a2 = '"]';
var temp = a1 + n + a2;
$(temp).val(text);
});
// var port = $(tds[0]).text();
// var host = $(tds[1]).text();
// $('.modal input[name="hostname"]').val(host);
// $('.modal input[name="port"]').val(port);
// 循环获取tds中内容
// 获取 <td>内容</td> 获取中间的内容
// 赋值给input标签中的value
});
</script>
</body>
</html>

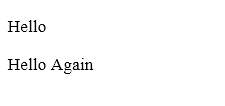
在 div 中使用 span 标签

        <div class="c1">
            <p>
                <span id="i1">Hello</span>
            </p>
            <span>Hello Again</span>
        </div>
.toggleClass(class 内部的样式名称) 实现翻转

使用 #i1 绑定 click 点击事件
<!DOCTYPE html>
<html lang="en">
<head>
<meta charset="UTF-8">
<title>Title</title>
<style>
.hide{
display: none;
}
</style>
</head>
<body>
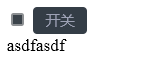
<input type='checkbox' id='i2' />
<input id="i1" type="button" value="开关" />
<div class="c1 hide">asdfasdf</div>
<script src="jquery-1.12.4.js"></script>
<script>
$('#i1').click(function(){
// if($('.c1').hasClass('hide')){
// $('.c1').removeClass('hide');
// }else{
// $('.c1').addClass('hide');
// }
$('.c1').toggleClass('hide');
})
</script>
</body>
</html>

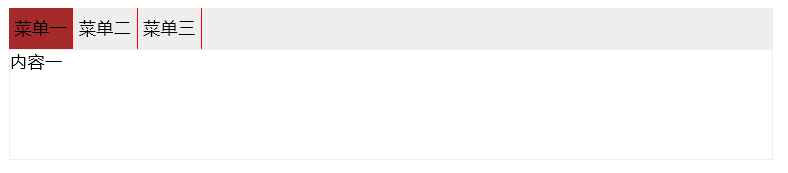
在 style 内设置样式
cursor: pointer; 表示当鼠标移动到该区域时,变换为小手

script 中添加 .attr('a'); 进行设置属性
<!DOCTYPE html>
<html lang="en">
<head>
    <meta charset="UTF-8">
    <title>Title</title>
    <style>
        .hide{
            display: none;
        }
        .menu{
            height: 38px;
            background-color: #eeeeee;
            line-height: 38px;
        }
        .active{
            background-color: brown;
        }
        .menu .menu-item{
            float: left;
            border-right: 1px solid red;
            padding: 0 5px;
            cursor: pointer;
        }
        .content{
            min-height: 100px;
            border: 1px solid #eeeeee;
        }
    </style>
</head>
<body>

    <div style=" 700px;margin:0 auto">

        <div class="menu">
            <div  class="menu-item active" a="1">菜单一</div>
            <div  class="menu-item" a="2">菜单二</div>
            <div  class="menu-item" a="3">菜单三</div>
        </div>
        <div class="content">
            <div b="1">内容一</div>
            <div class="hide"  b="2">内容二</div>
            <div class="hide" b="3">内容三</div>

        </div>

    </div>
    <script src="jquery-1.12.4.js"></script>
    <script>
        $('.menu-item').click(function(){
            $(this).addClass('active').siblings().removeClass('active');
            var target = $(this).attr('a');
            $('.content').children("[b='"+ target+"']").removeClass('hide').siblings().addClass('hide');
        });
    </script>
</body>
</html>

script 使用 .eq(值) 进行判断是否相等
.index() 获取索引值

$('.content').children().eq($(this).index()).removeClass('hide').siblings().addClass('hide');
<!DOCTYPE html>
<html lang="en">
<head>
    <meta charset="UTF-8">
    <title>Title</title>
    <style>
        .hide{
            display: none;
        }
        .menu{
            height: 38px;
            background-color: #eeeeee;
            line-height: 38px;
        }
        .active{
            background-color: brown;
        }
        .menu .menu-item{
            float: left;
            border-right: 1px solid red;
            padding: 0 5px;
            cursor: pointer;
        }
        .content{
            min-height: 100px;
            border: 1px solid #eeeeee;
        }
    </style>
</head>
<body>

    <div style=" 700px;margin:0 auto">

        <div class="menu">
            <div  class="menu-item active" >菜单一</div>
            <div  class="menu-item" >菜单二</div>
            <div  class="menu-item" >菜单三</div>
        </div>
        <div class="content">
            <div >内容一</div>
            <div class="hide" >内容二</div>
            <div class="hide">内容三</div>

        </div>

    </div>
    <script src="jquery-1.12.4.js"></script>
    <script>
        $('.menu-item').click(function(){
            $(this).addClass('active').siblings().removeClass('active');
            $('.content').children().eq($(this).index()).removeClass('hide').siblings().addClass('hide');

        });
    </script>
</body>
</html>
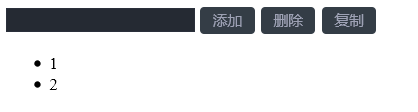
script 获取值 .val()
$('#u1') 为 jquery 对象, jquery 对象可以使用
append 在后面添加元素
prepend 在前面添加元素
after  在后面另起一行添加元素
before 在最开始另起一行添加元素
remove 删除元素
clone 复制元素
empty 移除所有元素
<!DOCTYPE html>
<html lang="en">
<head>
<meta charset="UTF-8">
<title>Title</title>
</head>
<body>
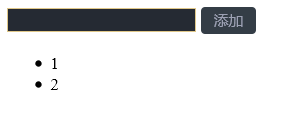
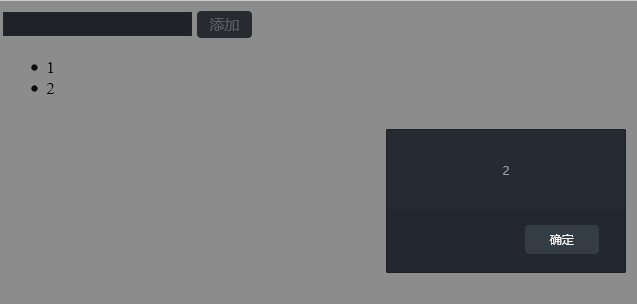
<input id="t1" type="text" />
<input id="a1" type="button" value="添加" />
<input id="a2" type="button" value="删除" />
<input id="a3" type="button" value="复制" />
<ul id="u1">
<li>1</li>
<li>2</li>
</ul>
<script src="jquery-1.12.4.js"></script>
<script>
$('#a1').click(function () {
var v = $('#t1').val();
var temp = "<li>" + v + "</li>";
$('#u1').append(temp);
// $('#u1').prepend(temp);
// $('#u1').after(temp)
//$('#u1').before(temp)
});
$('#a2').click(function () {
var index = $('#t1').val();
$('#u1 li').eq(index).remove();
//$('#u1 li').eq(index).empty();
});
$('#a3').click(function () {
var index = $('#t1').val();
var v = $('#u1 li').eq(index).clone();
$('#u1').append(v);
// $('#u1 li').eq(index).remove();
// $('#u1 li').eq(index).empty();
})
</script>
</body>
</html>
设置 css 样式
$(tag).css('属性名','值');

$(tag).css('fontSize',fontSize + "px");

停止执行
clearInterval(obj);
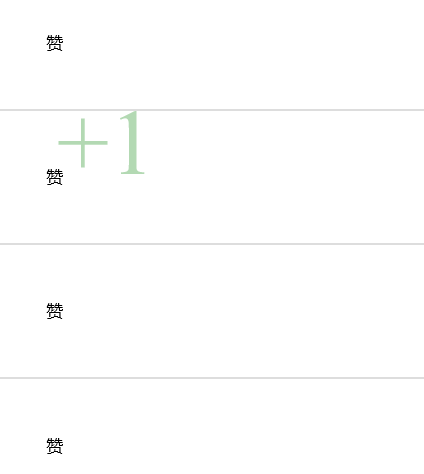
点赞 示例
<!DOCTYPE html>
<html lang="en">
<head>
    <meta charset="UTF-8">
    <title>Title</title>
    <style>
        .container{
            padding: 50px;
            border: 1px solid #dddddd;
        }
        .item{
            position: relative;
             30px;
        }
    </style>
</head>
<body>
    <div class="container">
        <div class="item">
            <span>赞</span>
        </div>
    </div>
    <div class="container">
        <div class="item">
            <span>赞</span>
        </div>
    </div>
    <div class="container">
        <div class="item">
            <span>赞</span>
        </div>
    </div>
    <div class="container">
        <div class="item">
            <span>赞</span>
        </div>
    </div>

    <script src="jquery-1.12.4.js"></script>
    <script>
        $('.item').click(function () {
            AddFavor(this);
        });

        function AddFavor(self) {
            // DOM对象
            var fontSize = 15;
            var top = 0;
            var right = 0;
            var opacity = 1;

            var tag = document.createElement('span');
            $(tag).text('+1');
            $(tag).css('color','green');
            $(tag).css('position','absolute');
            $(tag).css('fontSize',fontSize + "px");
            $(tag).css('right',right + "px");
            $(tag).css('top',top + 'px');
            $(tag).css('opacity',opacity);
            $(self).append(tag);

            var obj = setInterval(function () {
                fontSize = fontSize + 10;
                top = top - 10;
                right = right - 10;
                opacity = opacity - 0.1;

                $(tag).css('fontSize',fontSize + "px");
                $(tag).css('right',right + "px");
                $(tag).css('top',top + 'px');
                $(tag).css('opacity',opacity);
                if(opacity < 0){
                    clearInterval(obj);
                    $(tag).remove();
                }
            }, 40);

        }
    </script>

</body>
</html>
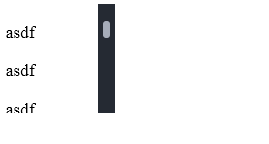
overflow 设置页面内部滚动条

overflow: auto;
<!DOCTYPE html>
<html lang="en">
<head>
    <meta charset="UTF-8">
    <title>Title</title>
</head>
<body>
    <div id="i1"></div>
     <div style="height: 100px;100px;overflow: auto">
            <p>asdf</p><p>asdf</p><p>asdf</p><p>asdf</p><p>asdf</p><p>asdf</p><p>asdf</p>
            <p>asdf</p><p>asdf</p><p>asdf</p><p>asdf</p><p>asdf</p><p>asdf</p><p>asdf</p>
            <p>asdf</p><p>asdf</p><p>asdf</p><p>asdf</p><p>asdf</p><p>asdf</p><p>asdf</p>
            <p>asdf</p><p>asdf</p><p>asdf</p><p>asdf</p><p>asdf</p><p>asdf</p><p>asdf</p>
            <p>asdf</p><p>asdf</p><p>asdf</p><p>asdf</p><p>asdf</p><p>asdf</p><p>asdf</p>
            <p>asdf</p><p>asdf</p><p>asdf</p><p>asdf</p><p>asdf</p><p>asdf</p><p>asdf</p>
        </div>
     <div id="i2"></div>
    <div style="height: 1000px;"></div>
    <script src="jquery-1.12.4.js"></script>
</body>
</html>
实现页面可移动框 示例
<!DOCTYPE html>
<html>
<head lang="en">
    <meta charset="UTF-8">
    <title></title>
</head>
<body>
    <div style="border: 1px solid #ddd; 600px;position: absolute;">
        <div id="title" style="background-color: black;height: 40px;"></div>
        <div style="height: 300px;"></div>
    </div>
<script type="text/javascript" src="jquery-1.12.4.js"></script>
<script>
    $(function(){
        $('#title').mouseover(function(){
            $(this).css('cursor','move');
        });
        $("#title").mousedown(function(e){
            //console.log($(this).offset());
            var _event = e || window.event;
            var ord_x = _event.clientX;
            var ord_y = _event.clientY;

            var parent_left = $(this).parent().offset().left;
            var parent_top = $(this).parent().offset().top;

            $('#title').on('mousemove', function(e){
                var _new_event = e || window.event;
                var new_x = _new_event.clientX;
                var new_y = _new_event.clientY;

                var x = parent_left + (new_x - ord_x);
                var y = parent_top + (new_y - ord_y);

                $(this).parent().css('left',x+'px');
                $(this).parent().css('top',y+'px');

            })
        });
        $("#title").mouseup(function(){
            $("#title").off('mousemove');
        });
    })
</script>
</body>
</html>
.mouseover(function(){})  当鼠标指针在上面时,要进行的操作
.mousedown(function(e){}) 当鼠标放下时,要进行的操作
.clientX 返回水平 x 坐标
.clientY 返回水平 y 坐标
.parent().offset().left 对于当前位置所进行的偏移,左偏
.parent().offset().top; 顶部
获取 id 为 t1 的标签的值

<input id="t1" type="text" />

var v = $('#t1').val();
.delegate 进行事件委托

$('标签名').delegate('标签','click',function () {
            代码块
})
<!DOCTYPE html>
<html lang="en">
<head>
    <meta charset="UTF-8">
    <title>Title</title>
</head>
<body>
    <input id="t1" type="text" />
    <input id="a1" type="button" value="添加" />

    <ul id="u1">
        <li>1</li>
        <li>2</li>
    </ul>
<script src="jquery-1.12.4.js"></script>
    <script>
        $('#a1').click(function () {
            var v = $('#t1').val();
            var temp = "<li>" + v + "</li>";
            $('#u1').append(temp);
        });

//        $('ul li').click(function () {
//            var v = $(this).text();
//            alert(v);
//        })

//        $('ul li').bind('click',function () {
//            var v = $(this).text();
//            alert(v);
//        })

//        $('ul li').on('click', function () {
//            var v = $(this).text();
//            alert(v);
//        })

        $('ul').delegate('li','click',function () {
            var v = $(this).text();
            alert(v);
        })

    </script>
</body>
</html>
在 script 代码函数中使用 return false 会终止,不进行接下来的操作
return true 会继续进行跳转
<!DOCTYPE html>
<html lang="en">
<head>
    <meta charset="UTF-8">
    <title>Title</title>
</head>
<body>
    <a onclick="return ClickOn()"  href="http://www.oldboyedu.com">走你1</a>

    <a id="i1" href="http://www.oldboyedu.com">走你2</a>
    <script src="jquery-1.12.4.js"></script>
    <script>
        function ClickOn() {
            alert(123);
            return true;
        }
        $('#i1').click(function () {
            alert(456);
            return false;
        })
    </script>
</body>
</html>

点击走你2 , 不会进行跳转网页
知识点总结

 switch (){
    case:ddddd:
        console.log(ddd);
        break;
    case:ddddd:
        console.log(ddd);
        break;
    default:
        语句;
 }

 JavaScript
        函数
        普通函数
                function func(arg){

                }

        匿名函数
                没有名字的函数叫匿名函数
                setIntervar(function(){
                        函数体;
                })
       自执行函数:args形参,1为实参
                (function(args){
                        console.log(args);
                )(1)

        序列化:
                JSON.stringify(li) 将对象转化成为字符床

                JSON.parse(s) 将字符串转成对象类型
        转义
        Python
        eval(表达式)
        exec(执行代码) 没有返回值
        javaScript:
                eval 是Python的集合,即:支持表达式和执行代码两块

        时间模块
                var d = new Date()
                d.setMinutes()+4 /* 设置时间*/
                d.getetMinutes() /* 获取时间*/
        作用域
                1、其他语言以{代码块}作为作用域
                2、Python里边的作用域以{函数}为单位
                3、JavaScript的作用域跟Python一样,以函数为单位

    变量向上查找
    xo=1;/*标记1*/
    function func(){
        var xo=2;/*标记2*/
        function inner(){
            var xo = 3;/*标记3*/
            console.log(xo)
        }
    }
    如果标记3的xo有定义,则输出3,如果标记3没定义,标记2有定义,则输出2,同理,如果都没有定义则报错。

    JavaScript面向对象
    function foo(name){
        this.name = name
    }
    var obj=new foo('Guo');
    a、this关键字代指对象
    b、new创建一个对象

DOM学习:
    innerText:
    document.getElementById('i1).innerText 获取文本
    innerHTML:
    document.getElementById('i1).innerHTML 获取全部内容

    value
        input     获取input的值
        select    获取select选中的值
        textarea
              搜索框的示例:
    function Focus(){
        var tag=document.getElementById('id1');
        var val=tag.value;
        if(val == "请输入关键字"){
            tag.value="";
        }
    }
    function Blur(){
        var tag=document.getElementById('id1');
        var val=tag.value;
        if(val==""){
            tag.value="请输入关键字";
        }
    }
               函数方法命名都是驼峰命名,如className,第一个单词首字母小写,之后其他单词首字母大写
    var obj=document.getElementById('id1').classList
    CSS样式操作
    var obj_style=obj.style.

    属性操作:
        getAttribute 获取属性值
        setAttribute 设置属性值
        obj.setAttribute('属性名','属性值')
        obj.setAttribute('属性名','属性值')
    创建标签
        tag.createElement('标签名称')
        a.字符串形式
        b.对象的方式
        tag.createElement('dvi') #创建div标签

    提交表单:
    <script>
        function submitForm(){
            document.getElementById('form1').submit()
        }
    </script>

    其他操作
        confirm:确认框,返回True或者False
        location.href获取当前页面的url
        location.href=""#设置当前url
        location.href=reload #刷新页面
        si=setInterval(function(){},5000)
        clearInterval(si)

        si=setTimeout(function(){},5000)
        clearTimeout(si)

    事件
        onclick 点击
        onblur 光标移开
        onfocus 光标插进去
        绑定事件两种方式
            a.直接标签绑定
            b.先获取Dom对象,然后进行绑定
            document.getElementById('xx').onclick
            document.getElementById('xx').onfocus
        this 当前触发事件的标签
            a.事件的第一种绑定方式
            <input type="button" onclick="clickOn(this)">
            function clickOn(self){
                //self 当前点击的标签
            }
            b.事件的第二种绑定方式
            <input id="i1" type=button>
            document.getElementById('i1').onclick=function(){
                //this代指当前点击的标签
            }
            c.事件的第三种绑定方式
            var mydiv=document.getElementById('form1')
                mydiv.addEventListener('click',function(){
                console.log('aa')
                },false)
            #false:冒泡模型
            #true:捕捉模型,默认不写就是冒泡模型

        //作用域的示例
        var myTrs =document.getElementByTagName('tr');
        var len=myTrs.length;
        for(var i=0;i<len;i++){
            myTrs[i].onmouseover=function(){
                #错误写法 myTrs[i].style.backgoundColor='red'
                this.style.backgoundColor='red'
            }
        }

        作用域-词法分析
            分析完之后,再赋值。
jQuery
    http://jquery.cuishifeng.cn/

    转换:
        jquery对象[0]   => Dom对象
        Dom对象         => $(Dom对象)

    查找元素

        jQuery:
            选择器,直接找到某个或者某类标签
            1. id
                $('#id')

            2. class
                <div class='c1'></div>
                $(".c1")

            3. 标签
                <div id='i10' class='c1'>
                    <a>f</a>
                    <a>f</a>
                </div>
                <div class='c1'>
                    <a>f</a>
                </div>
                <div class='c1'>
                    <div class='c2'> </div>
                </div>

                $('a')

            4. 组合a

                <div id='i10' class='c1'>
                    <a>f</a>
                    <a>f</a>
                </div>
                <div class='c1'>
                    <a>f</a>
                </div>
                <div class='c1'>
                    <div class='c2'> </div>
                </div>

                $('a')
                $('.c2')

                $('a,.c2,#i10')

            5. 层级
                $('#i10 a') 子子孙孙
                $('#i10>a') 儿子

            6. 基本
                :first
                :last
                :eq()
            7. 属性
                $('[alex]')       具有alex属性的所有标签
                $('[alex="123"]') alex属性等于123的标签


                <input type='text'/>
                <input type='text'/>
                <input type='file'/>
                <input type='password'/>

                $("input[type='text']")
                $(':text')

            实例:
                多选,反选,全选
                - 选择权
                -
                    $('#tb:checkbox').prop('checked');        获取值
                    $('#tb:checkbox').prop('checked', true);  设置值
                -
                    jQuery方法内置循环: $('#tb:checkbox').xxxx

                - $('#tb:checkbox').each(function(k){
                        // k当前索引
                        // this,DOM,当前循环的元素 $(this)

                    })
                - var v = 条件 ? 真值 : 假值
            筛选

                $('#i1').next()
                $('#i1').nextAll()
                $('#i1').nextUntil('#ii1')

                <div>
                    <a>asdf</a>
                    <a>asdf</a>
                    <a id='i1'>asdf</a>
                    <a>asdf</a>
                    <a id='ii1'>asdf</a>
                    <a>asdf</a>
                </div>

                $('#i1').prev()
                $('#i1').prevAll()
                $('#i1').prevUntil('#ii1')


                $('#i1').parent()
                $('#i1').parents()
                $('#i1').parentsUntil()

                $('#i1').children()
                $('#i1').siblings()
                $('#i1').find()
                $('li:eq(1)')
                $('li').eq(1)
                first()
                last()
                hasClass(class)

        文本操作:
                $(..).text()           # 获取文本内容
                $(..).text(“<a>1</a>”) # 设置文本内容

                $(..).html()
                $(..).html("<a>1</a>")

                $(..).val()
                $(..).val(..)
        样式操作:
                addClass
                removeClass
                toggleClass

        属性操作:
                # 专门用于做自定义属性
                $(..).attr('n')
                $(..).attr('n','v')
                $(..).removeAttr('n')

                <input type='checkbox' id='i1'  />

                # 专门用于chekbox,radio
                $(..).prop('checked')
                $(..).prop('checked', true)

                PS:
                    index 获取索引位置

        文档处理:
                append
                prepend
                after
                before

                remove
                empty

                clone
        css处理

            $('t1').css('样式名称', '样式值')
            点赞:
                 - $('t1').append()
                 - $('t1').remove()
                 - setInterval
                 - 透明度 1 》 0
                 - position
                 - 字体大小,位置
        位置:
            $(window).scrollTop()  获取
            $(window).scrollTop(0) 设置
            scrollLeft([val])

            offset().left                 指定标签在html中的坐标
            offset().top                  指定标签在html中的坐标

            position()                       指定标签相对父标签(relative)标签的坐标
            <div style='relative'>
                <div>
                    <div id='i1' style='position:absolute;height:80px;border:1px'></div>
                </div>
            </div>


            $('i1').height()           # 获取标签的高度 纯高度
            $('i1').innerHeight()      # 获取边框 + 纯高度 + ?
            $('i1').outerHeight()      # 获取边框 + 纯高度 + ?
            $('i1').outerHeight(true)  # 获取边框 + 纯高度 + ?

            # 纯高度,边框,外边距,内边距

        事件
            DOM: 三种绑定方式
                jQuery:
                    $('.c1').click()
                    $('.c1').....

                    $('.c1').bind('click',function(){

                    })

                    $('.c1').unbind('click',function(){

                    })

                    *******************
                    $('.c').delegate('a', 'click', function(){

                    })
                    $('.c').undelegate('a', 'click', function(){

                    })

                    $('.c1').on('click', function(){

                    })
                    $('.c1').off('click', function(){

                    })

                阻止事件发生
                    return false

                # 当页面框架加载完成之后,自动执行
                $(function(){

                    $(...)

                })

        jQuery扩展:
            - $.extend        $.方法
            - $.fn.extend     $(..).方法

            (function(){
                var status = 1;
                // 封装变量
            })(jQuery)
更多实例:

HTML 实例

https://www.runoob.com/html/html-examples.html

CSS实例

https://www.runoob.com/css/css-examples.html

JavaScript 实例

https://www.runoob.com/js/js-examples.html

jQuery  实例

https://www.runoob.com/jquery/jquery-examples.html
2020-08-08
<a href="网址">内容</a> 跳转到该地址

<a href="http://www.oldboyedu.com">老男孩</a>
<p>内容</p>
使用 p 段落标签,表示段落,可以添加 br 标签,进行换行
<p>12asdfasdfasdfasdfa<br />sdfasdfasdfasdf3</p>

<p>123</p>
hn 系列标签
<h1> 内容 </h1>

    <h1>Alex</h1>
    <h2>Alex</h2>
    <h3>Alex</h3>
    <h4>Alex</h4>
    <h5>Alex</h5>
    <h6>eric</h6>
<span>内容</span>
span 标签,白板,行内标签
<span>hello</span>
<span>hello</span>
<span>hello</span>
<span>hello</span>
<div> 内容,代码块 </div>
div 最常用的白板标签,块级标签

    <div>1</div>
    <div>2</div>
    <div>3</div>
<input type="text" name="需要使用的姓名" />
input 标签,用于用户输入姓名,密码,按钮,文件上传等

<input type="text" name="user" />

type 可以具有
text
password
button
submit
<!DOCTYPE html>
<html lang="en">
<head>
    <meta charset="UTF-8">
    <title>Title</title>
</head>
<body>
    <form action="http://192.168.16.35:8888/index" method="POST">
        <input type="text" name="user" />
        <input type="text" name="email"/>
        <input type="password" name="pwd"/>
        <!--{'user': '用户输入的用户','email': 'xx', 'pwd': 'xx' }-->
        <input type="button"  value="登录1"/>
        <input type="submit"  value="登录2"/>
    </form>
    <br/>
    <form>
        <input type="text" />
        <input type="password" />
        <input type="button"  value="登录1"/>
        <input type="submit"  value="登录2"/>
    </form>
</body>
</html>
多选框
使用 select 和 option 进行创建,selected 为默认选择
multiple 属性为 multiple 表示,进行多选

            <select name="city" size="10" multiple="multiple">
                <option value="1">北京</option>
                <option value="2">上海</option>
                <option value="3" selected="selected">南京</option>
                <option value="4">成都</option>
            </select>
<textarea> 内容 </textarea>
多行文本框,可以输入多行文本

<textarea name="meno" >asdfasdf</textarea>
input 使用 radio 属性,实现单选框(name 值要相同)
checked="checked" 表示进行勾选

            男:<input type="radio" name="gender" value="1"  />
            女:<input type="radio" name="gender" value="2" checked="checked"/>
            Alex:<input type="radio" name="gender" value="3"/>
input 使用 checkbox 属性,实现多选框(name 值要相同)
checked="checked" 表示进行勾选

            篮球:<input type="checkbox" name="favor"  value="1" />
            足球:<input type="checkbox" name="favor"  value="2" checked="checked" />
            皮球:<input type="checkbox" name="favor"  value="3" />
            台球:<input type="checkbox" name="favor"  value="4" checked="checked"/>
            网球:<input type="checkbox" name="favor"  value="5" />
上传文件使用 input 标签的 file 属性
注:在 form 中 添加 enctype="multipart/form-data"

<input type="file" name="fname"/>

<form enctype="multipart/form-data">
重置 使用 input 标签的 type="reset" 属性

<input type="reset" value="重置" />
<!DOCTYPE html>
<html lang="en">
<head>
    <meta charset="UTF-8">
    <title>Title</title>
</head>
<body>
    <form enctype="multipart/form-data">
        <div>

            <textarea name="meno" >asdfasdf</textarea>

            <select name="city" size="10" multiple="multiple">
                <option value="1">北京</option>
                <option value="2">上海</option>
                <option value="3" selected="selected">南京</option>
                <option value="4">成都</option>
            </select>


            <input type="text" name="user" />
            <p>请选择性别:</p>
            男:<input type="radio" name="gender" value="1"  />
            女:<input type="radio" name="gender" value="2" checked="checked"/>
            Alex:<input type="radio" name="gender" value="3"/>
            <p>爱好</p>
            篮球:<input type="checkbox" name="favor"  value="1" />
            足球:<input type="checkbox" name="favor"  value="2" checked="checked" />
            皮球:<input type="checkbox" name="favor"  value="3" />
            台球:<input type="checkbox" name="favor"  value="4" checked="checked"/>
            网球:<input type="checkbox" name="favor"  value="5" />
            <p>技能</p>
            撩妹:<input type="checkbox" name="skill" checked="checked" />
            写代码:<input type="checkbox" name="skill"/>
            <p>上传文件</p>
            <input type="file" name="fname"/>
        </div>

        <input type="submit" value="提交" />
        <input type="reset" value="重置" />
    </form>
</body>
</html>
a 标签根据 id 进行跳转
# id 名称

<a href="#i1">第一章</a>
<div id="i1" style="height:600px;">第一章的内容</div>
<!DOCTYPE html>
<html lang="en">
<head>
    <meta charset="UTF-8">
    <title>Title</title>
</head>
<body>
    <a href="#i1">第一章</a>
    <a href="#i2">第二章</a>
    <a href="#i3">第三章</a>
    <a href="#i4">第四章</a>

    <div id="i1" style="height:600px;">第一章的内容</div>
    <div id="i2" style="height:600px;">第二章的内容</div>
    <div id="i3" style="height:600px;">第三章的内容</div>
    <div id="i4" style="height:600px;">第四章的内容</div>
</body>
</html>
在 a 标签使用 img 图片进行跳转
img 标签中 src 指定文件位置,title 为鼠标停留在上面显示的字段,style 表示应用了样式,alt 为不能正常显示时,会出现的内容
    <a href="http://www.oldboyedu.com">
        <img src="1.jpg" title="大美女" style="height: 200px; 200px;" alt="美女">
    </a>
<ul><li>内容</li></ul>
ul 创建无序列表

    <ul>
        <li>asdf</li>
        <li>asdf</li>
        <li>asdf</li>
        <li>asdf</li>
    </ul>
ol 创建有序列表
此处的 ul 和 ol 都可以进行变换样式

    <ol>
        <li>asdf</li>
        <li>asdf</li>
        <li>asdf</li>
        <li>asdf</li>
    </ol>
使用 dl dt dd 实现类似于菜单界面(分级)

    <dl>
        <dt>ttt</dt>
        <dd>ddd</dd>
        <dd>ddd</dd>
        <dd>ddd</dd>
        <dt>ttt</dt>
        <dd>ddd</dd>
        <dd>ddd</dd>
        <dd>ddd</dd>
    </dl>
table 标签,内部具有 th头 和 td 单元格,tr 换行
在 td 中可以使用 a 标签,进行跳转
a 内的 # 表示当前页面
<table border="1">
    <tr>
        <td>主机名</td>
        <td>端口</td>
        <td>操作</td>
    </tr>
    <tr>
        <td>1.1.1.1</td>
        <td>80</td>
        <td>
            <a href="s2.html">查看详细</a>
            <a href="#">修改</a>
        </td>
    </tr>
    <tr>
        <td>1.1.1.1</td>
        <td>80</td>
        <td>第二行,第3列</td>
    </tr>
</table>
在 table 中使用 thead 和 tbody 并利用 colspan 和 rowspan 进行单元格合并
<table border="1">
    <thead>
        <tr>
            <th>表头1</th>
            <th>表头1</th>
            <th>表头1</th>
            <th>表头1</th>
        </tr>
    </thead>
    <tbody>
        <tr>
            <td>1</td>
            <td colspan="3">1</td>
        </tr>
        <tr>
            <td rowspan="2">1</td>
            <td>1</td>
            <td>1</td>
            <td>1</td>
        </tr>
        <tr>
            <td>1</td>
            <td>1</td>
            <td>1</td>
        </tr>
        <tr>
            <td>1</td>
            <td>1</td>
            <td>1</td>
            <td>1</td>
        </tr>
    </tbody>
</table>
fieldset 登录外的包裹的线

使用 for 保证点击内容跳转到对应的 id 名称处
    <fieldset>
        <legend>登录</legend>
        <label for="username">用户名:</label>
        <input id="username" type="text" name="user" />
        <br />
        <label for="pwd">密码:</label>
        <input id="pwd" type="text" name="user" />
    </fieldset>
head 内的 styly 标签 设置样式

.名称 对应 class 为对应名称的属性

#名称 对应 id 为对应名称的属性

可以多个 class 一起设置,使用
.c1[属性='名称']{ 样式 } 也可以进行设置
.c1 div 表示为 class为 c1 的下一个 div 标签设置样式
<!DOCTYPE html>
<html lang="en">
<head>
    <meta charset="UTF-8">
    <title>Title</title>
    <style>
        /*
        #i1{
            background-color: #2459a2;
            height: 48px;
        }
        #i2{
            background-color: #2459a2;
            height: 48px;
        }
        #i3{
            background-color: #2459a2;
            height: 48px;
        }
        .c1{
            background-color: #2459a2;
            height: 10px;
        }
        */
        /*#c2{*/
            /*background-color: black;*/
            /*color: white;*/
        /*}*/

        /*.c1 div{*/
            /*background-color: black;*/
            /*color: white;*/
        /*}*/
        .i1,.i2,.i3{
             background-color: black;
            color: white;
        }
        .c1[n='alex']{ 100px; height:200px; }
    </style>
</head>
<body>
    <div class="i1">ff</div>
    <div class="i2">ff</div>
    <div class="i3">2</div>
    <input class="c1" type="text" n="alex">
    <input class="c1" type="password">
</body>
</html>
使用 link 标签连接外部 css 样式
<link rel="stylesheet" href="路径/文件名.css" />

<link rel="stylesheet" href="css/commons.css" />
commons.css 内容

.c2{
    font-size: 58px;
    color: black;
}

.c1{
    background-color: red;
    color: white;
}
<!DOCTYPE html>
<html lang="en">
<head>
    <meta charset="UTF-8">
    <title>Title</title>
    <link rel="stylesheet" href="css/commons.css" />
</head>
<body>
    <div class="c1 c2" style="color: pink">asdf</div>
    <div class="c1 c2" style="color: pink">asdf</div>
    <div class="c1 c2" style="color: pink">asdf</div>
    <div class="c1 c2" style="color: pink">asdf</div>
    <div class="c1 c2" style="color: pink">asdf</div>
    <div class="c1 c2" style="color: pink">asdf</div>
    <div class="c1 c2" style="color: pink">asdf</div>
    <div class="c1 c2" style="color: pink">asdf</div>
</body>
</html>
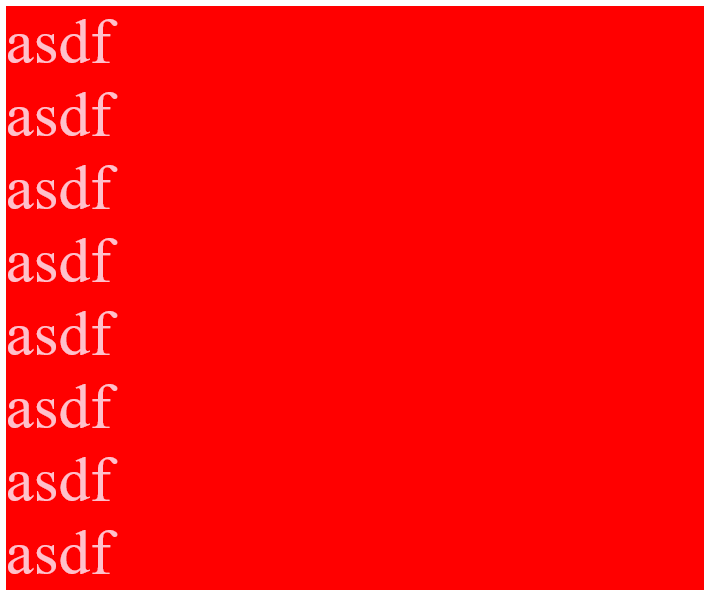
div 标签在 style 属性中 设置边框 border

style="border: 1px solid red;"
style="height: 48px;
    80%;
    border: 1px solid red;
    font-size: 16px;
    text-align: center;
    line-height: 48px;
    font-weight: bold;
    "
属性 注:
height 设置高度
width 宽度
border 边框
font-size 字体大小
text-align 文本位置
line-height 高度
font-weight 粗体
<!DOCTYPE html>
<html lang="en">
<head>
    <meta charset="UTF-8">
    <title>Title</title>
</head>
<body>
    <div style="border: 1px solid red;">
        asdfasdf
    </div>
    <div style="height: 48px;
    80%;
    border: 1px solid red;
    font-size: 16px;
    text-align: center;
    line-height: 48px;
    font-weight: bold;
    ">asdf</div>
</body>
</html>
style 使用 float 属性
width 宽度,20%
float 悬浮,float:left
<body>
    <div style=" 20%;background-color: red;float: left">1</div>
    <div style=" 20%;background-color: black;float: left">2</div>
</body>
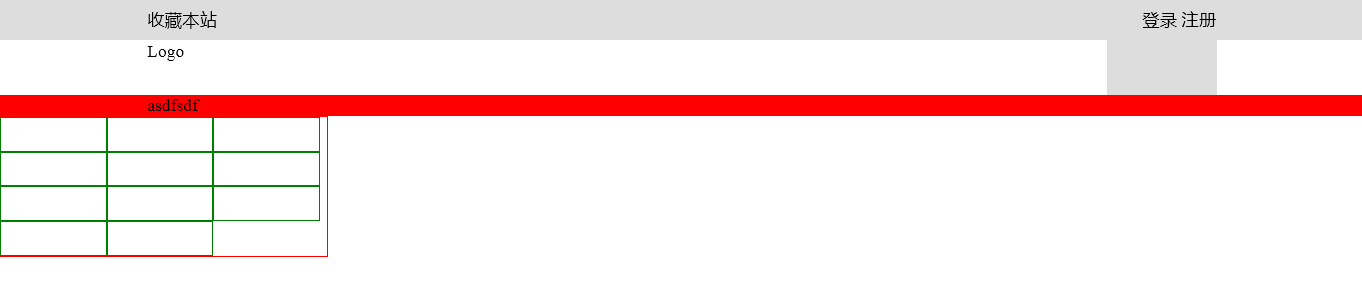
设置 class 为  pg-header 的标签样式

    <style>
        .pg-header{
        样式
        }
    </style>
styly 属性 width 宽度,margin 设置外边距
margin: 0 auto;
float 的两种方式,可以设置在 div 中
float: left;
float: right;
style="clear: both" 在 float 下部编写内容
设置宽度 width ,border 设置边框 , float 页面布局

style=" 300px;border: 1px solid red;"

style=" 96px;height:30px;border: 1px solid green;float: left;
<!DOCTYPE html>
<html lang="en">
<head>
    <meta charset="UTF-8">
    <title>Title</title>
    <style>
        .pg-header{
            height: 38px;
            background-color: #dddddd;
            line-height: 38px;
        }
    </style>
</head>

<body style="margin: 0">
    <div class="pg-header">
        <div style=" 980px;margin: 0 auto;">
            <div style="float: left;">收藏本站</div>
            <div style="float: right;">
                <a>登录</a>
                <a>注册</a>
            </div>
            <div style="clear: both"></div>
        </div>
    </div>
    <div>
        <div style=" 980px;margin: 0 auto;">
            <div style="float: left">
                Logo
            </div>
            <div style="float: right">
                <div style="height: 50px; 100px;background-color: #dddddd"></div>
            </div>
            <div style="clear: both"></div>
        </div>
    </div>
    <div style="background-color: red;">
         <div style=" 980px;margin: 0 auto;">
             asdfsdf
         </div>
    </div>
    <div style=" 300px;border: 1px solid red;">
        <div style=" 96px;height:30px;border: 1px solid green;float: left;"></div>
        <div style=" 96px;height:30px;border: 1px solid green;float: left;"></div>
        <div style=" 96px;height:30px;border: 1px solid green;float: left;"></div>
        <div style=" 96px;height:30px;border: 1px solid green;float: left;"></div>
        <div style=" 96px;height:30px;border: 1px solid green;float: left;"></div>
        <div style=" 96px;height:30px;border: 1px solid green;float: left;"></div>
        <div style=" 96px;height:30px;border: 1px solid green;float: left;"></div>
        <div style=" 96px;height:30px;border: 1px solid green;float: left;"></div>
        <div style=" 96px;height:30px;border: 1px solid green;float: left;"></div>
        <div style=" 96px;height:30px;border: 1px solid green;float: left;"></div>
        <div style=" 96px;height:30px;border: 1px solid green;float: left;"></div>
        <div style="clear: both;"></div>
    </div>
</body>
</html>
style 样式设置 display
display 可以设置
inline , block , inline-block
<!DOCTYPE html>
<html lang="en">
<head>
    <meta charset="UTF-8">
    <title>Title</title>
</head>
<body>
    <div style="background-color: red;display: inline;">asdf</div>
    <span style="background-color: red;display: block;">asdf</span>
    <span style="display:inline-block;background-color: red;height: 50px; 70px;">Alex</span>
    <a style="background-color: red;">Eric</a>
</body>
</html>
知识点总结
HTML
1、一套规则,浏览器认识的规则。
2、开发者:
学习Html规则
开发后台程序:
- 写Html文件(充当模板的作用) ******
- 数据库获取数据,然后替换到html文件的指定位置(Web框架)
3、本地测试
- 找到文件路径,直接浏览器打开
- pycharm打开测试
4、编写Html文件
- doctype对应关系
- html标签,标签内部可以写属性 ====> 只能有一个
- 注释: <!-- 注释的内容 -->
5、标签分类
- 自闭合标签
<meta charset="UTF-8">
- 主动闭合标签
title>老男孩</title>
6、
head标签中
- <meta -> 编码,跳转,刷新,关键字,描述,IE兼容
<meta http-equiv="X-UA-Compatible" content="IE=IE9;IE=IE8;" />
- title标签
7、body标签
- 图标, > <
- p标签,段落
- br,换行
======== 小总结 =====
所有标签分为:
块级标签: div(白板),H系列(加大加粗),p标签(段落和段落之间有间距)
行内标签: span(白板)
标签之间可以嵌套
标签存在的意义,css操作,js操作
ps:chorme审查元素的使用
- 定位
- 查看样式
- h系列
- div
- span
- input系列 + form标签
input type='text' - name属性,value="值"
input type='password' - name属性,value="值"
input type='submit' - value='提交' 提交按钮,表单
input type='button' - value='登录' 按钮
input type='radio' - 单选框 value,checked="checked",name属性(name相同则互斥)
input type='checkbox' - 复选框 value, checked="checked",name属性(批量获取数据)
input type='file' - 依赖form表单的一个属性 enctype="multipart/form-data"
input type='rest' - 重置
<textarea >默认值</textarea> - name属性
select标签 - name,内部option value, 提交到后台,size,multiple
- a标签
- 跳转
- 锚 href='#某个标签的ID' 标签的ID不允许重复
- img
src
alt
title
- 列表
ul
li
ol
li
dl
dt
dd
- 表格
table
thead
tr
th
tbody
tr
td
colspan = ''
rowspan = ''
- label
用于点击文件,使得关联的标签获取光标
<label for="username">用户名:</label>
<input id="username" type="text" name="user" />
- fieldset
legend
- 20个标签
CSS
在标签上设置style属性:
background-color: #2459a2;
height: 48px;
...
编写css样式:
1. 标签的style属性
2. 写在head里面 style标签中写样式
- id选择区
#i1{
background-color: #2459a2;
height: 48px;
}
- class选择器 ******
.名称{
...
}
<标签 class='名称'> </标签>
- 标签选择器
div{
...
}
所有div设置上此样式
- 层级选择器(空格) ******
.c1 .c2 div{
}
- 组合选择器(逗号) ******
#c1,.c2,div{
}
- 属性选择器 ******
对选择到的标签再通过属性再进行一次筛选
.c1[n='alex']{ 100px; height:200px; }
PS:
- 优先级,标签上style优先,编写顺序,就近原则
2.5 css样式也可以写在单独文件中
<link rel="stylesheet" href="commons.css" />
3、注释
/* */
4、边框
- 宽度,样式,颜色 (border: 4px dotted red;)
- border-left
5、
height, 高度 百分比
width, 宽度 像素,百分比
text-align:ceter, 水平方向居中
line-height,垂直方向根据标签高度
color、 字体颜色
font-size、 字体大小
font-weight 字体加粗
6、float
让标签浪起来,块级标签也可以堆叠
老子管不住:
<div style="clear: both;"></div>
7、display
display: none; -- 让标签消失
display: inline;
display: block;
display: inline-block;
具有inline,默认自己有多少占多少
具有block,可以设置无法设置高度,宽度,padding margin
******
行内标签:无法设置高度,宽度,padding margin
块级标签:设置高度,宽度,padding margin
8、padding margin(0,auto)
a 标签内部使用图片,设置样式

<a href="网址">
    <img src="图片路径/图片名.jpg" style="200px;height:300px;">
</a>
<!DOCTYPE html>
<html lang="en">
<head>
    <meta charset="UTF-8">
    <title>Title</title>
    <style>
        img{
            border: 0;
        }
    </style>
</head>
<body>
    <a href="http://www.oldboyedu.com" >asdf</a>
    <a href="http://www.oldboyedu.com">
        <img src="1.jpg" style=" 200px;height: 300px;">
    </a>
</body>
</html>
返回顶部
function GoTop(){
            document.documentElement.scrollTop = 0;
        }
使用 document.documentElement.scrollTop = 0;
<!DOCTYPE html>
<html lang="en">
<head>
    <meta charset="UTF-8">
    <title>Title</title>
</head>
<body>
    <div onclick="GoTop();" style=" 50px;height: 50px;background-color: black;color: white;
    position: fixed;
    bottom:20px;
    right: 20px;
    ">返回顶部</div>
    <div style="height: 5000px;background-color: #dddddd;">
        asdfasdf
    </div>
    <script>
        function GoTop(){
            document.documentElement.scrollTop = 0;
        }
    </script>
</body>
</html>
style 标签内部使用
position: fixed; 固定位置
margin-top: 48px;与上部模块之间的距离
<!DOCTYPE html>
<html lang="en">
<head>
    <meta charset="UTF-8">
    <title>Title</title>
    <style>
        .pg-header{
            height: 48px;
            background-color: black;
            color: #dddddd;
            position: fixed;
            top:0;
            right: 0;
            left: 0;
        }
        .pg-body{
            background-color: #dddddd;
            height: 5000px;
            margin-top: 48px;
        }
    </style>
</head>
<body>
    <div class="pg-header">头部</div>
    <div class="pg-body">内容</div>
</body>
</html>
position 使用绝对定位

position: absolute;
<!DOCTYPE html>
<html lang="en">
<head>
    <meta charset="UTF-8">
    <title>Title</title>
</head>
<body>
    <div style=" 50px;height: 50px;background-color: black;position: absolute;right: 0;bottom: 0;">asdf</div>
    <div style="height: 5000px;background-color: #dddddd;">
        asdfasdf
    </div>
</body>
</html>
使用 div 嵌套使用 position
外层使用 relative,内部使用 absolute
    <div style="position: relative;.......">
        <div style="position: absolute;......."></div>
    </div>
<!DOCTYPE html>
<html lang="en">
<head>
    <meta charset="UTF-8">
    <title>Title</title>
</head>
<body>

    <div style="position: relative; 500px;height: 200px;border: 1px solid red;margin: 0 auto;">
        <div style="position: absolute;left:0;bottom:0; 50px;height: 50px;background-color: black;"></div>
    </div>
    <div style="position: relative; 500px;height: 200px;border: 1px solid red;margin: 0 auto;">

        <div style="position: absolute;right:0;bottom:0; 50px;height: 50px;background-color: black;"></div>
    </div>
    <div style="position: relative; 500px;height: 200px;border: 1px solid red;margin: 0 auto;">

        <div style="position: absolute;right:0;top:0; 50px;height: 50px;background-color: black;"></div>
    </div>
</body>
</html>
style 可以设置属性

style="display:none;z-index:10; position: fixed;top: 50%;left:50%;
    margin-left: -250px;margin-top: -200px; background-color:white;height: 400px;500px;


style="display:none;z-index:9; position: fixed;background-color: black;
    top:0;
    bottom: 0;
    right: 0;
    left: 0;
    opacity: 0.5;
    "
overflow 的两种属性的区别
auto 会加入滚动条

overflow: auto
overflow: hidden
<!DOCTYPE html>
<html lang="en">
<head>
    <meta charset="UTF-8">
    <title>Title</title>
</head>
<body>
    <div style="height: 200px; 300px;overflow: auto">
        <img src="1.jpg">
    </div>

    <div style="height: 200px; 300px;overflow: hidden">
        <img src="1.jpg">
    </div>
</body>
</html>
使用 position: fixed 固定头部
设置高度 line-height: 48px;
设置距离上部距离 margin-top: 50px;
设置块级元素在同一行显示 display: inline-block;
设置鼠标碰到时,发生的变化 :hover

.pg-header .menu:hover{
            background-color: blue;
        }
<!DOCTYPE html>
<html lang="en">
<head>
    <meta charset="UTF-8">
    <title>Title</title>
    <style>
        .pg-header{
            position: fixed;
            right: 0;
            left: 0;
            top: 0;
            height: 48px;
            background-color: #2459a2;
            line-height: 48px;
        }
        .pg-body{
            margin-top: 50px;
        }
        .w{
             980px;
            margin: 0 auto;
        }
        .pg-header .menu{
            display: inline-block;
            padding: 0 10px 0 10px;
            color: white;
        }
        /*当鼠标移动到当前标签上时,以下css属性才生效*/
        .pg-header .menu:hover{
            background-color: blue;
        }
    </style>
</head>
<body>
    <div class="pg-header">
        <div class="w">
            <a class="logo">LOGO</a>
            <a class="menu">全部</a>
            <a class="menu">42区</a>
            <a class="menu">段子</a>
            <a class="menu">1024</a>
        </div>
    </div>
    <div class="pg-body">
        <div class="w">a</div>
    </div>
</body>
</html>
style 样式
background-image: url(icon_18_118.png);
设置图片的 url , 可以为本地图片

background-repeat 设置是否重复背景图像
<!DOCTYPE html>
<html lang="en">
<head>
    <meta charset="UTF-8">
    <title>Title</title>
</head>
<body>
    <div style="height: 100px;"></div>
    <div style="background-image: url(icon_18_118.png);background-repeat:no-repeat;height: 20px;20px;border: 1px solid red;"></div>
</body>
</html>
可以为不同的标签设置相同的 class 属性,但是 id 必须不同
<!DOCTYPE html>
<html lang="en">
<head>
    <meta charset="UTF-8">
    <title>Title</title>
</head>
<body>
    <div>
        <input class="c1" type="radio" name="gender" value="1" />
        <input type="radio" name="gender" value="2" />
    </div>
</body>
</html>
输入框嵌入图片(注:图片目前和输入的内容会重叠)
<!DOCTYPE html>
<html lang="en">
<head>
    <meta charset="UTF-8">
    <title>Title</title>
</head>
<body>

    <div style="height: 35px; 400px;position: relative;">
        <input type="text" style="height: 35px; 400px; margin-right: 20px;" />
        <span style="position:absolute;right:0;top:10px;background-image: url(i_name.jpg);height: 16px; 16px;display: inline-block; "></span>
    </div>
</body>
</html>
在标签中使用 onclick=函数名(); 可以进行调用该函数
onclick="GetData();

使用 document.getElementById('id名称') 可以获取该数据
document.getElementById('user')

        function GetData(){
            var i = document.getElementById('user');
            alert(i.value);
        }
使用 .value 获取值
<!DOCTYPE html>
<html lang="en">
<head>
    <meta charset="UTF-8">
    <title>Title</title>
</head>
<body>
    <input type="text" id="user" >
    <input type="button" onclick="GetData();" value="点我" />
    <script>
        function GetData(){
            var i = document.getElementById('user');
            alert(i.value);
        }
    </script>
</body>
</html>
使用外部 js 文件
<script src="文件名.js"></script>

<script src="commons.js"></script>
可以添加 type="text/javascript" 进行声明 script 语句

    <script type="text/javascript">
        //javascript代码

    </script>
<!DOCTYPE html>
<html lang="en">
<head>
    <meta charset="UTF-8">
    <title>Title</title>
    <script src="commons.js"></script>
    <script type="text/javascript">
        //javascript代码
        alert(123);
    </script>
</head>
<body>

</body>
</html>
声明全局变量
age = "18";

转换为 int 类型使用 parseInt(变量);
i = parseInt(age);

定义局部变量
var name = 'eric'
<!DOCTYPE html>
<html lang="en">
<head>
<meta charset="UTF-8">
<title>Title</title>
</head>
<body>
<h1>sadf</h1>
<script>
/*
name = 'alex';
function func(){
var name = 'eric'
}*/
age = "18";
i = parseInt(age);
</script>
</body>
</html>
setInterval 设置定时器
setInterval("函数名();",毫秒);
函数定义
function 函数名(参数){
代码块;
}
<!DOCTYPE html>
<html lang="en">
<head>
<meta charset="UTF-8">
<title>Title</title>
</head>
<body>
<script>
function f1(){
console.log(1);
}
// 创建一个定时器
//setInterval("alert(123);", 5000);
setInterval("f1();", 1000);
</script>
</body>
</html>
使用 function 定义函数 func 函数名称
var 定义局部变量,需要注意变量的作用域
document.getElementById 通过指定的 id 名称进行获取
.innerText 获取文本内容
.charAt(0) 获取第一个字符
content.substring(1,content.length) 获取第二个字符到最后
使用 + 号进行字符串的拼接
<!DOCTYPE html>
<html lang="en">
<head>
<meta charset="UTF-8">
<title>Title</title>
</head>
<body>
<div id="i1">欢迎老男孩莅临指导</div>
<script>
function func(){
// 根据ID获取指定标签的内容,定于局部变量接受
var tag = document.getElementById('i1');
// 获取标签内部的内容
var content = tag.innerText;
var f = content.charAt(0);
var l = content.substring(1,content.length);
var new_content = l + f;
tag.innerText = new_content;
}
setInterval('func()', 500);
</script>
</body>
</html>
div 内部嵌套 div
<!DOCTYPE html>
<html lang="en">
<head>
<meta charset="UTF-8">
<title>Title</title>
</head>
<body>
<div>
<div></div>
<div>
c1
</div>
</div>
<div>
<div></div>
<div id="i1">
c2
</div>
</div>
<div>
<div></div>
<div>
c3
</div>
</div>
</body>
</html>
position: fixed; 固定位置
opacity: 0.6; 透明度
z-index: 9; 显示的优先级
margin-left: -250px;距离左面距离
margin-top: -200px;距离顶部距离
添加按钮绑定 js 函数
<input type="button" value="功能" onclick="函数名();" />
<input type="button" value="添加" onclick="ShowModel();" />
获取到指定的 id 之后,使用 classList 获取 class 列表,
删除 class 属性使用 remove
添加 class 属性使用 add
document.getElementById('i1').classList.remove('hide');
document.getElementById('i1').classList.add('hide');
多选框选中 使用 checked 属性
true 表示选中,false 表示没有选中
checkbox.checked = true;
checkbox.checked = false;
for 循环
for(var i=0;i<数组对象.length;i++){
// 循环
代码块
}
实现多选反选,主要是依靠 checked 属性(选中为true)
if(checkbox.checked){checkbox.checked = false;}else{checkbox.checked = true;}
<!DOCTYPE html>
<html lang="en">
<head>
<meta charset="UTF-8">
<title>Title</title>
<style>
.hide{
display: none;
}
.c1{
position: fixed;
left: 0;
top: 0;
right: 0;
bottom: 0;
background-color: black;
opacity: 0.6;
z-index: 9;
}
.c2{
500px;
height: 400px;
background-color: white;
position: fixed;
left: 50%;
top: 50%;
margin-left: -250px;
margin-top: -200px;
z-index: 10;
}
</style>
</head>
<body style="margin: 0;">
<div>
<input type="button" value="添加" onclick="ShowModel();" />
<input type="button" value="全选" onclick="ChooseAll();" />
<input type="button" value="取消" onclick="CancleAll();" />
<input type="button" value="反选" onclick="ReverseAll();" />
<table>
<thead>
<tr>
<th>选择</th>
<th>主机名</th>
<th>端口</th>
</tr>
</thead>
<tbody id="tb">
<tr>
<td>
<input type="checkbox" />
</td>
<td>1.1.1.1</td>
<td>190</td>
</tr>
<tr>
<td><input type="checkbox"f id="test" /></td>
<td>1.1.1.2</td>
<td>192</td>
</tr>
<tr>
<td><input type="checkbox" /></td>
<td>1.1.1.3</td>
<td>193</td>
</tr>
</tbody>
</table>
</div>
<!-- 遮罩层开始 -->
<div id="i1" class="c1 hide"></div>
<!-- 遮罩层结束 -->
<!-- 弹出框开始 -->
<div id="i2" class="c2 hide">
<p><input type="text" /></p>
<p><input type="text" /></p>
<p>
<input type="button" value="取消" onclick="HideModel();"/>
<input type="button" value="确定"/>
</p>
</div>
<!-- 弹出框结束 -->
<script>
function ShowModel(){
document.getElementById('i1').classList.remove('hide');
document.getElementById('i2').classList.remove('hide');
}
function HideModel(){
document.getElementById('i1').classList.add('hide');
document.getElementById('i2').classList.add('hide');
}
function ChooseAll(){
var tbody = document.getElementById('tb');
// 获取所有的tr
var tr_list = tbody.children;
for(var i=0;i<tr_list.length;i++){
// 循环所有的tr,current_tr
var current_tr = tr_list[i];
var checkbox = current_tr.children[0].children[0];
checkbox.checked = true;
}
}
function CancleAll(){
var tbody = document.getElementById('tb');
// 获取所有的tr
var tr_list = tbody.children;
for(var i=0;i<tr_list.length;i++){
// 循环所有的tr,current_tr
var current_tr = tr_list[i];
var checkbox = current_tr.children[0].children[0];
checkbox.checked = false;
}
}
function ReverseAll(){
var tbody = document.getElementById('tb');
// 获取所有的tr
var tr_list = tbody.children;
for(var i=0;i<tr_list.length;i++){
// 循环所有的tr,current_tr
var current_tr = tr_list[i];
var checkbox = current_tr.children[0].children[0];
if(checkbox.checked){checkbox.checked = false;}else{checkbox.checked = true;}}}
</script>
</body>
</html>
在标签中绑定事件可以添加参数
<div id='i1' class="header" onclick="ChangeMenu('i1');">菜单1</div>
function ChangeMenu(nid){
代码块
}
此处,使用nid接收传递过来的 i1 值
实现菜单栏
.parentElement 父节点
.children 孩子节点
.nextElementSibling 下一个元素节点的兄弟节点
var item_list = current_header.parentElement.parentElement.children;
添加样式可以使用索引,指定第几个孩子进行添加 class 样式
current_item.children[1].classList.add('hide');
<!DOCTYPE html>
<html lang="en">
<head>
<meta charset="UTF-8">
<title>Title</title>
<style>
.hide{
display: none;
}
.item .header{
height: 35px;
background-color: #2459a2;
color: white;
line-height: 35px;
}
</style>
</head>
<body>
<div style="height: 48px"></div>
<div style=" 300px">
<div class="item">
<div id='i1' class="header" onclick="ChangeMenu('i1');">菜单1</div>
<div class="content">
<div>内容1</div>
<div>内容1</div>
<div>内容1</div>
</div>
</div>
<div class="item">
<div id='i2' class="header" onclick="ChangeMenu('i2');">菜单2</div>
<div class="content hide">
<div>内容2</div>
<div>内容2</div>
<div>内容2</div>
</div>
</div>
<div class="item">
<div id='i3' class="header" onclick="ChangeMenu('i3');">菜单3</div>
<div class="content hide">
<div>内容3</div>
<div>内容3</div>
<div>内容3</div>
</div>
</div>
<div class="item">
<div id='i4' class="header" onclick="ChangeMenu('i4');">菜单4</div>
<div class="content hide">
<div>内容4</div>
<div>内容4</div>
<div>内容4</div>
</div>
</div>
</div>
<script>
function ChangeMenu(nid){
var current_header = document.getElementById(nid);
var item_list = current_header.parentElement.parentElement.children;
for(var i=0;i<item_list.length;i++){
var current_item = item_list[i];
current_item.children[1].classList.add('hide');
}
current_header.nextElementSibling.classList.remove('hide');
}
</script>
</body>
</html>
for 循环的另一种写法
a 为数组 a = [11,22,33,44]
for(var item in a){
console.log(item);
}
.getElementsByTagName('div') 通过标签名进行查找
.getElementsByClassName 通过class属性进行查找
.getElementsByName 根据 name 属性进行查找
firstElementChild 第一个子标签元素
lastElementChild 最后一个子标签元素
nextElementtSibling 下一个兄弟标签元素
previousElementSibling 上一个兄弟标签元素
知识点总结
1、css重用
<style>
如果整个页面的宽度 > 900px时:
{
.c{
共有
}
.c1{
独有
}
}
.c2{
独有
}
</style>
<div class='c c1'></div>
<div class='c c2'></div>
2、自适应 和 改变大小变形
左右滚动条的出现
宽度,百分比
页面最外层:像素的宽度 => 最外层设置绝对宽度
自适应:media
3、默认img标签,有一个1px的边框
img{
border: 0;
}
1、块级和行内
2、form标签
<form action='http://sssss' methed='GET' enctype='multi'>
<div>asdfasdf</div>
<input type='text' name='q' />
<input type='text' name='b' />
# 上传文件
<input type='file' name='f' />
<input type='submit' />
</form>
GET: http://sssss?q=用户输入的值
http://sssss?q=用户输入的值&b=用户输入的内容
POST:
请求头
请求内容
3、display: block;inline;inline-block
4、float:
<div>
<div style='float:left;'>f</div>
<div style='clear:both;'></div>
</div>
5、margin: 0 auto;
6、padding, ---> 自身发生变化
CSS补充
position:
a. fiexd => 固定在页面的某个位置
b. relative + absolute
<div style='position:relative;'>
<div style='position:absolute;top:0;left:0;'></div>
</div>
opcity: 0.5 透明度
z-index: 层级顺序
overflow: hidden,auto
hover
background-image:url('image/4.gif'); # 默认,div大,图片重复访
background-repeat: repeat-y;
background-position-x:
background-position-y:
示例:输入框
JavaScript
独立的语言,浏览器具有js解释器
JavaScript代码存在形式:
- Head中
<script>
//javascript代码
alert(123);
</script>
<script type="text/javascript">
//javascript代码
alert(123);
</script>
- 文件
<script src='js文件路径'> </script>
PS: JS代码需要放置在 <body>标签内部的最下方
注释
当行注释 //
多行注释 /* */
变量:
python:
name = 'alex'
JavaScript:
name = 'alex' # 全局变量
var name = 'eric' # 局部变量
写Js代码:
- html文件中编写
- 临时,浏览器的终端 console
基本数据类型
数字
a = 18;
字符串
a = "alex"
a.chartAt(索引位置)
a.substring(起始位置,结束位置)
a.lenght 获取当前字符串长度
...
列表(数组)
a = [11,22,33]
字典
a = {'k1':'v1','k2':'v2'}
布尔类型
小写
for循环
1. 循环时,循环的元素是索引
a = [11,22,33,44]
for(var item in a){
console.log(item);
}
a = {'k1':'v1','k2':'v2'}
for(var item in a){
console.log(item);
}
2.
for(var i=0;i<10;i=i+1){
}
a = [11,22,33,44]
for(var i=0;i<a.length;i=i+1){
}
不支持字典的循环
条件语句
if(条件){
}else if(条件){
}else if(条件){
}else{
}
== 值相等
=== 值和类型都相等
&& and
|| or
函数:
function 函数名(a,b,c){
}
函数名(1,2,3)
Dom
1、找到标签
获取单个元素 document.getElementById('i1')
获取多个元素(列表)document.getElementsByTagName('div')
获取多个元素(列表)document.getElementsByClassName('c1')
a. 直接找
document.getElementById 根据ID获取一个标签
document.getElementsByName 根据name属性获取标签集合
document.getElementsByClassName 根据class属性获取标签集合
document.getElementsByTagName 根据标签名获取标签集合
b. 间接
tag = document.getElementById('i1')
parentElement // 父节点标签元素
children // 所有子标签
firstElementChild // 第一个子标签元素
lastElementChild // 最后一个子标签元素
nextElementtSibling // 下一个兄弟标签元素
previousElementSibling // 上一个兄弟标签元素
2、操作标签
a. innerText
获取标签中的文本内容
标签.innerText
对标签内部文本进行重新赋值
标签.innerText = ""
b. className
tag.className => 直接整体做操作
tag.classList.add('样式名') 添加指定样式
tag.classList.remove('样式名') 删除指定样式
PS:
<div onclick='func();'>点我</div>
<script>
function func(){
}
</script>
c. checkbox
获取值
checkbox对象.checked
设置值
checkbox对象.checked = true
Dom
找标签
- 直接找 $('#id') $('.c1').siblings()
操作:
innerText
checkbox:
checked
className
classList
事件:
<div onclick='函数(123)'></div>
<script>
代码块
</script>
定时器
setInterval('函数()', 4000)
其他:
alert()
console.log()
onblur="Blur();
当鼠标不在输入框时,会进行的操作
获取指定 id 之后标签的值,使用.value 进行获取
var val=tag.value;
当什么都没有输入时,值为 ""
<!DOCTYPE html>
<html lang="en">
<head>
<meta charset="UTF-8">
<title>搜索框请输入关键字</title>
<style>
.c_keys{
200px;
height: 30px;
}
</style>
</head>
<body>
<div>
<input id="id1" type="text" class="c_keys" onfocus="Focus();" onblur="Blur();" value="请输入关键字"/>
</div>
<script>
function Focus(){
var tag=document.getElementById('id1');
var val=tag.value;
if(val == "请输入关键字"){
tag.value="";
}
}
function Blur(){
var tag=document.getElementById('id1');
var val=tag.value;
if(val==""){
tag.value="请输入关键字";
}
}
</script>
</body>
</html>
使用 .submit() 进行提交
function submitForm(){
document.getElementById('form1').submit();
}
使用 .addEventListener 对事件进行监听
('click',匿名函数)
表示点击之后要进行的操作
var mydiv=document.getElementById('form1');
mydiv.addEventListener('click',function(){
console.log('aa');
},false)
<!DOCTYPE html>
<html lang="en">
<head>
<meta charset="UTF-8">
<title>非submit标签提交表单实例</title>
</head>
<body>
<form id="form1" action="http://www.baidu.com">
<input type="text" />
</form>
<a onclick="submitForm();">A标签提交</a>
<script>
function submitForm(){
document.getElementById('form1').submit();
}
var mydiv=document.getElementById('form1');
mydiv.addEventListener('click',function(){
console.log('aa');
},false)
</script>
</body>
</html>
使用 disabled 表示标签不可用
<input type="text" disabled />
在标签中可以自定义属性
此处定义的是 alex
<a alex='123'>f2</a>
引入 jquery 文件
<script src="jquery-1.12.4.js"></script>
使用 $(dom对象) 后即为 jquery 对象
$("#i1")
<!DOCTYPE html>
<html lang="en">
<head>
<meta charset="UTF-8">
<title>Title</title>
<style>
</style>
</head>
<body>
<input type="text" />
<input type="text" disabled />
<input type="text" />
<div id='i10' class='c1'>
<div>
<a>asd</a>
</div>
<a alex='123'>f2</a>
<a alex='456'>f2</a>
<a>f3</a>
<a>f4</a>
</div>
<div class='c1'>
<a>f</a>
</div>
<div class='c1'>
<div class='c2'> </div>
</div>
<script src="jquery-1.12.4.js"></script>
<script>
$("#i1")
</script>
</body>
</html>
td 标签内部可以使用 input 标签
<td><input type="checkbox" /></td>
获取 id 为 tb的标签,属性为 checkbox 的,
使用 prop 设置属性为 true
prop 返回值为 true 或 false,可以用于判断
$('#tb :checkbox').prop('checked',true);
循环时使用 .each(
function(参数){
代码块
}
)
在使用 script 代码时,使用的 this 对象是 dom 对象,
使用 $(this) 转换为 jquery 对象
三元运算
var v = 条件? 真值:假值;
var v = $(this).prop('checked')?false:true;
<!DOCTYPE html>
<html lang="en">
<head>
<meta charset="UTF-8">
<title>Title</title>
</head>
<body>
<input type="button" value="全选" onclick="checkAll();" />
<input type="button" value="反选" onclick="reverseAll();" />
<input type="button" value="取消" onclick="cancleAll();"/>
<table border="1">
<thead>
<tr>
<th>选项</th>
<th>IP</th>
<th>PORT</th>
</tr>
</thead>
<tbody id="tb">
<tr>
<td><input type="checkbox" /></td>
<td>1.1.1.1</td>
<td>80</td>
</tr>
<tr>
<td><input type="checkbox" /></td>
<td>1.1.1.1</td>
<td>80</td>
</tr>
<tr>
<td><input type="checkbox" /></td>
<td>1.1.1.1</td>
<td>80</td>
</tr>
</tbody>
</table>
<script src="jquery-1.12.4.js"></script>
<script>
function checkAll() {
$('#tb :checkbox').prop('checked',true);
}
function cancleAll() {
$('#tb :checkbox').prop('checked',false);
}
function reverseAll() {
$(':checkbox').each(function(k){
// this,代指当前循环的每一个元素
// Dom
/*
if(this.checked){
this.checked = false;
}else{
this.checked = true;
}
*/
/*
if($(this).prop('checked')){
$(this).prop('checked', false);
}else{
$(this).prop('checked', true);
}
*/
// 三元运算var v = 条件? 真值:假值
var v = $(this).prop('checked')?false:true;
$(this).prop('checked',v);
})
}
</script>
</body>
</html>
在 script 中 一行代码实现菜单栏
$(this).next().removeClass('hide').parent().siblings().find('.content').addClass('hide')
min-height: 50px; 设置最小高度
script 中 .header 表示 class 为 header 的标签
.click 表示点击时,会进行调用的函数
$('.header').click(function(){
代码块
}
.addClass('hide') 在 class 属性中添加 hide 样式
.removeClass('hide') 在 class 属性中删除 hide 样式
$(this).next() 下一个
$(this).prev() 上一个
$(this).parent() 父
$(this).children() 孩子
$('#i1').siblings() 兄弟
$('#i1').find('#i1') 查找
#表示寻找 id
<!DOCTYPE html>
<html lang="en">
<head>
<meta charset="UTF-8">
<title>Title</title>
<style>
.header{
background-color: black;
color: wheat;
}
.content{
min-height: 50px;
}
.hide{
display: none;
}
</style>
</head>
<body>
<div style="height:400px; 200px;border: 1px solid #dddddd">
<div class="item">
<div class="header">标题一</div>
<div id="i1" class="content hide">内容</div>
</div>
<div class="item">
<div class="header">标题二</div>
<div class="content hide">内容</div>
</div>
<div class="item">
<div class="header">标题三</div>
<div class="content hide">内容</div>
</div>
</div>
<script src="jquery-1.12.4.js"></script>
<script>
$('.header').click(function(){
// 当前点击的标签 $(this)
// 获取某个标签的下一个标签
// 获取某个标签的父标签
// 获取所有的兄弟标签
// 添加样式和移除样式
// $('.i1').addClass('hide')
// $('#i1').removeClass('hide')
// var v = $("this + div");
// $("label + input")
// console.log(v);
// $("afsldkfja;skjdf;aksdjf")
// 筛选器
/*
$(this).next() 下一个
$(this).prev() 上一个
$(this).parent() 父
$(this).children() 孩子
$('#i1').siblings() 兄弟
$('#i1').find('#i1') 子子孙孙中查找
$('#i1').addClass(..)
$('#i1').removeClass(..)
*/
// 链式编程
// $(...).click(function(){
// this..
// })
// $(this).next().removeClass('hide');
// $(this).parent().siblings().find('.content').addClass('hide')
$(this).next().removeClass('hide').parent().siblings().find('.content').addClass('hide')
})
</script>
</body>
</html>
可以进行添加和显示编辑界面,编辑后界面无变化
<!DOCTYPE html>
<html lang="en">
<head>
<meta charset="UTF-8">
<title>Title</title>
<style>
.hide{
display: none;
}
.modal{
position: fixed;
top: 50%;
left: 50%;
500px;
height: 400px;
margin-left: -250px;
margin-top: -250px;
background-color: #eeeeee;
z-index: 10;
}
.shadow{
position: fixed;
top: 0;
left: 0;
right: 0;
bottom: 0;
opacity: 0.6;
background-color: black;
z-index: 9;
}
</style>
</head>
<body>
<a onclick="addElement();">添加</a>
<table border="1" id="tb">
<tr>
<td target="hostname">1.1.1.11</td>
<td target="port">80</td>
<td target="ip">80</td>
<td>
<a class="edit">编辑</a> | <a class="del">删除</a>
</td>
</tr>
<tr>
<td target="hostname">1.1.1.12</td>
<td target="port">80</td>
<td target="ip">80</td>
<td>
<a class="edit">编辑</a> | <a class="del">删除</a>
</td>
</tr>
<tr>
<td target="hostname">1.1.1.13</td>
<td target="port">80</td>
<td target="ip">80</td>
<td>
<a class="edit">编辑</a> | <a class="del">删除</a>
</td>
</tr>
<tr>
<td target="hostname">1.1.1.14</td>
<td target="port">80</td>
<td target="ip">80</td>
<td>
<a class="edit">编辑</a> | <a class="del">删除</a>
</td>
</tr>
</table>
<div class="modal hide">
<div>
<input name="hostname" type="text" />
<input name="port" type="text" />
<input name="ip" type="text" />
</div>
<div>
<input type="button" value="取消" onclick="cancelModal();" />
<input type="button" value="确定" onclick="confirmModal();" />
</div>
</div>
<div class="shadow hide"></div>
<script src="jquery-1.12.4.js"></script>
<script>
$('.del').click(function () {
$(this).parent().parent().remove();
});
function confirmModal() {
var tr = document.createElement('tr');
var td1 = document.createElement('td');
td1.innerHTML = "11.11.11.11";
var td2 = document.createElement('td');
td2.innerHTML = "8001";
$(tr).append(td1);
$(tr).append(td2);
$('#tb').append(tr);
$(".modal,.shadow").addClass('hide');
// $('.modal input[type="text"]').each(function () {
// // var temp = "<td>..."
//
//
//
// })
}
function addElement() {
$(".modal,.shadow").removeClass('hide');
}
function cancelModal() {
$(".modal,.shadow").addClass('hide');
$('.modal input[type="text"]').val("");
}
$('.edit').click(function(){
$(".modal,.shadow").removeClass('hide');
// this
var tds = $(this).parent().prevAll();
tds.each(function () {
// 获取td的target属性值
var n = $(this).attr('target');
// 获取td中的内容
var text = $(this).text();
var a1 = '.modal input[name="';
var a2 = '"]';
var temp = a1 + n + a2;
$(temp).val(text);
});
// var port = $(tds[0]).text();
// var host = $(tds[1]).text();
// $('.modal input[name="hostname"]').val(host);
// $('.modal input[name="port"]').val(port);
// 循环获取tds中内容
// 获取 <td>内容</td> 获取中间的内容
// 赋值给input标签中的value
});
</script>
</body>
</html>
在 div 中使用 span 标签
<div class="c1">
<p>
<span id="i1">Hello</span>
</p>
<span>Hello Again</span>
</div>
.toggleClass(class 内部的样式名称) 实现翻转
使用 #i1 绑定 click 点击事件
<!DOCTYPE html>
<html lang="en">
<head>
<meta charset="UTF-8">
<title>Title</title>
<style>
.hide{
display: none;
}
</style>
</head>
<body>
<input type='checkbox' id='i2' />
<input id="i1" type="button" value="开关" />
<div class="c1 hide">asdfasdf</div>
<script src="jquery-1.12.4.js"></script>
<script>
$('#i1').click(function(){
// if($('.c1').hasClass('hide')){
// $('.c1').removeClass('hide');
// }else{
// $('.c1').addClass('hide');
// }
$('.c1').toggleClass('hide');
})
</script>
</body>
</html>
在 style 内设置样式
cursor: pointer; 表示当鼠标移动到该区域时,变换为小手
script 中添加 .attr('a'); 进行设置属性
<!DOCTYPE html>
<html lang="en">
<head>
<meta charset="UTF-8">
<title>Title</title>
<style>
.hide{
display: none;
}
.menu{
height: 38px;
background-color: #eeeeee;
line-height: 38px;
}
.active{
background-color: brown;
}
.menu .menu-item{
float: left;
border-right: 1px solid red;
padding: 0 5px;
cursor: pointer;
}
.content{
min-height: 100px;
border: 1px solid #eeeeee;
}
</style>
</head>
<body>
<div style=" 700px;margin:0 auto">
<div class="menu">
<div class="menu-item active" a="1">菜单一</div>
<div class="menu-item" a="2">菜单二</div>
<div class="menu-item" a="3">菜单三</div>
</div>
<div class="content">
<div b="1">内容一</div>
<div class="hide" b="2">内容二</div>
<div class="hide" b="3">内容三</div>
</div>
</div>
<script src="jquery-1.12.4.js"></script>
<script>
$('.menu-item').click(function(){
$(this).addClass('active').siblings().removeClass('active');
var target = $(this).attr('a');
$('.content').children("[b='"+ target+"']").removeClass('hide').siblings().addClass('hide');
});
</script>
</body>
</html>
script 使用 .eq(值) 进行判断是否相等
.index() 获取索引值
$('.content').children().eq($(this).index()).removeClass('hide').siblings().addClass('hide');
<!DOCTYPE html>
<html lang="en">
<head>
<meta charset="UTF-8">
<title>Title</title>
<style>
.hide{
display: none;
}
.menu{
height: 38px;
background-color: #eeeeee;
line-height: 38px;
}
.active{
background-color: brown;
}
.menu .menu-item{
float: left;
border-right: 1px solid red;
padding: 0 5px;
cursor: pointer;
}
.content{
min-height: 100px;
border: 1px solid #eeeeee;
}
</style>
</head>
<body>
<div style=" 700px;margin:0 auto">
<div class="menu">
<div class="menu-item active" >菜单一</div>
<div class="menu-item" >菜单二</div>
<div class="menu-item" >菜单三</div>
</div>
<div class="content">
<div >内容一</div>
<div class="hide" >内容二</div>
<div class="hide">内容三</div>
</div>
</div>
<script src="jquery-1.12.4.js"></script>
<script>
$('.menu-item').click(function(){
$(this).addClass('active').siblings().removeClass('active');
$('.content').children().eq($(this).index()).removeClass('hide').siblings().addClass('hide');
});
</script>
</body>
</html>
script 获取值 .val()
$('#u1') 为 jquery 对象, jquery 对象可以使用
append 在后面添加元素
prepend 在前面添加元素
after 在后面另起一行添加元素
before 在最开始另起一行添加元素
remove 删除元素
clone 复制元素
empty 移除所有元素
<!DOCTYPE html>
<html lang="en">
<head>
<meta charset="UTF-8">
<title>Title</title>
</head>
<body>
<input id="t1" type="text" />
<input id="a1" type="button" value="添加" />
<input id="a2" type="button" value="删除" />
<input id="a3" type="button" value="复制" />
<ul id="u1">
<li>1</li>
<li>2</li>
</ul>
<script src="jquery-1.12.4.js"></script>
<script>
$('#a1').click(function () {
var v = $('#t1').val();
var temp = "<li>" + v + "</li>";
$('#u1').append(temp);
// $('#u1').prepend(temp);
// $('#u1').after(temp)
//$('#u1').before(temp)
});
$('#a2').click(function () {
var index = $('#t1').val();
$('#u1 li').eq(index).remove();
//$('#u1 li').eq(index).empty();
});
$('#a3').click(function () {
var index = $('#t1').val();
var v = $('#u1 li').eq(index).clone();
$('#u1').append(v);
// $('#u1 li').eq(index).remove();
// $('#u1 li').eq(index).empty();
})
</script>
</body>
</html>
设置 css 样式
$(tag).css('属性名','值');
$(tag).css('fontSize',fontSize + "px");
停止执行
clearInterval(obj);
点赞 示例
<!DOCTYPE html>
<html lang="en">
<head>
<meta charset="UTF-8">
<title>Title</title>
<style>
.container{
padding: 50px;
border: 1px solid #dddddd;
}
.item{
position: relative;
30px;
}
</style>
</head>
<body>
<div class="container">
<div class="item">
<span>赞</span>
</div>
</div>
<div class="container">
<div class="item">
<span>赞</span>
</div>
</div>
<div class="container">
<div class="item">
<span>赞</span>
</div>
</div>
<div class="container">
<div class="item">
<span>赞</span>
</div>
</div>
<script src="jquery-1.12.4.js"></script>
<script>
$('.item').click(function () {
AddFavor(this);
});
function AddFavor(self) {
// DOM对象
var fontSize = 15;
var top = 0;
var right = 0;
var opacity = 1;
var tag = document.createElement('span');
$(tag).text('+1');
$(tag).css('color','green');
$(tag).css('position','absolute');
$(tag).css('fontSize',fontSize + "px");
$(tag).css('right',right + "px");
$(tag).css('top',top + 'px');
$(tag).css('opacity',opacity);
$(self).append(tag);
var obj = setInterval(function () {
fontSize = fontSize + 10;
top = top - 10;
right = right - 10;
opacity = opacity - 0.1;
$(tag).css('fontSize',fontSize + "px");
$(tag).css('right',right + "px");
$(tag).css('top',top + 'px');
$(tag).css('opacity',opacity);
if(opacity < 0){
clearInterval(obj);
$(tag).remove();
}
}, 40);
}
</script>
</body>
</html>
overflow 设置页面内部滚动条
overflow: auto;
<!DOCTYPE html>
<html lang="en">
<head>
<meta charset="UTF-8">
<title>Title</title>
</head>
<body>
<div id="i1"></div>
<div style="height: 100px;100px;overflow: auto">
<p>asdf</p><p>asdf</p><p>asdf</p><p>asdf</p><p>asdf</p><p>asdf</p><p>asdf</p>
<p>asdf</p><p>asdf</p><p>asdf</p><p>asdf</p><p>asdf</p><p>asdf</p><p>asdf</p>
<p>asdf</p><p>asdf</p><p>asdf</p><p>asdf</p><p>asdf</p><p>asdf</p><p>asdf</p>
<p>asdf</p><p>asdf</p><p>asdf</p><p>asdf</p><p>asdf</p><p>asdf</p><p>asdf</p>
<p>asdf</p><p>asdf</p><p>asdf</p><p>asdf</p><p>asdf</p><p>asdf</p><p>asdf</p>
<p>asdf</p><p>asdf</p><p>asdf</p><p>asdf</p><p>asdf</p><p>asdf</p><p>asdf</p>
</div>
<div id="i2"></div>
<div style="height: 1000px;"></div>
<script src="jquery-1.12.4.js"></script>
</body>
</html>
实现页面可移动框 示例
<!DOCTYPE html>
<html>
<head lang="en">
<meta charset="UTF-8">
<title></title>
</head>
<body>
<div style="border: 1px solid #ddd; 600px;position: absolute;">
<div id="title" style="background-color: black;height: 40px;"></div>
<div style="height: 300px;"></div>
</div>
<script type="text/javascript" src="jquery-1.12.4.js"></script>
<script>
$(function(){
$('#title').mouseover(function(){
$(this).css('cursor','move');
});
$("#title").mousedown(function(e){
//console.log($(this).offset());
var _event = e || window.event;
var ord_x = _event.clientX;
var ord_y = _event.clientY;
var parent_left = $(this).parent().offset().left;
var parent_top = $(this).parent().offset().top;
$('#title').on('mousemove', function(e){
var _new_event = e || window.event;
var new_x = _new_event.clientX;
var new_y = _new_event.clientY;
var x = parent_left + (new_x - ord_x);
var y = parent_top + (new_y - ord_y);
$(this).parent().css('left',x+'px');
$(this).parent().css('top',y+'px');
})
});
$("#title").mouseup(function(){
$("#title").off('mousemove');
});
})
</script>
</body>
</html>
.mouseover(function(){}) 当鼠标指针在上面时,要进行的操作
.mousedown(function(e){}) 当鼠标放下时,要进行的操作
.clientX 返回水平 x 坐标
.clientY 返回水平 y 坐标
.parent().offset().left 对于当前位置所进行的偏移,左偏
.parent().offset().top; 顶部
获取 id 为 t1 的标签的值
<input id="t1" type="text" />
var v = $('#t1').val();
.delegate 进行事件委托
$('标签名').delegate('标签','click',function () {
代码块
})
<!DOCTYPE html>
<html lang="en">
<head>
<meta charset="UTF-8">
<title>Title</title>
</head>
<body>
<input id="t1" type="text" />
<input id="a1" type="button" value="添加" />
<ul id="u1">
<li>1</li>
<li>2</li>
</ul>
<script src="jquery-1.12.4.js"></script>
<script>
$('#a1').click(function () {
var v = $('#t1').val();
var temp = "<li>" + v + "</li>";
$('#u1').append(temp);
});
// $('ul li').click(function () {
// var v = $(this).text();
// alert(v);
// })
// $('ul li').bind('click',function () {
// var v = $(this).text();
// alert(v);
// })
// $('ul li').on('click', function () {
// var v = $(this).text();
// alert(v);
// })
$('ul').delegate('li','click',function () {
var v = $(this).text();
alert(v);
})
</script>
</body>
</html>
在 script 代码函数中使用 return false 会终止,不进行接下来的操作
return true 会继续进行跳转
<!DOCTYPE html>
<html lang="en">
<head>
<meta charset="UTF-8">
<title>Title</title>
</head>
<body>
<a onclick="return ClickOn()" href="http://www.oldboyedu.com">走你1</a>
<a id="i1" href="http://www.oldboyedu.com">走你2</a>
<script src="jquery-1.12.4.js"></script>
<script>
function ClickOn() {
alert(123);
return true;
}
$('#i1').click(function () {
alert(456);
return false;
})
</script>
</body>
</html>
点击走你2 , 不会进行跳转网页