1.新建dynamic web project(Maven project也行)
我用的Eclipse + ssm + mysql
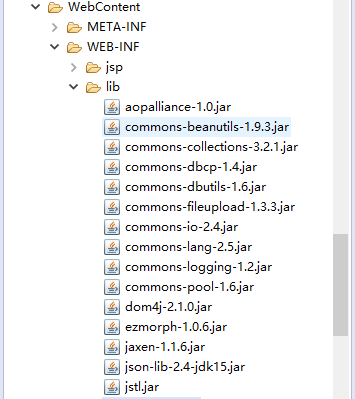
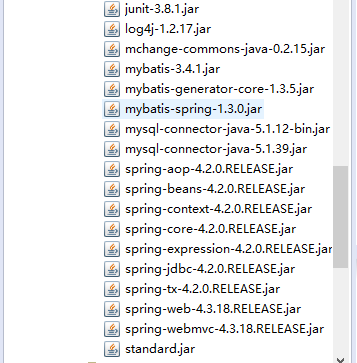
2.准备jar包
整合ssm的包
1. springmvc: ...
2. 数据库连接: mysql-connector-java-5.1.39.jar
3. mybatis: ...
4. spring: spring4.2
5. spring和mybatis整合包: mybatis-spring-1.3.0.jar
6. log4j: ...
7. dbcp数据库连接池: ...
8. jstl表达式: ...
如果用maven,就只要配置好pom.xml即可,否则自己去下jar包,有点麻烦。。。
大概依赖包有这么多,有一点点是多余的。。。
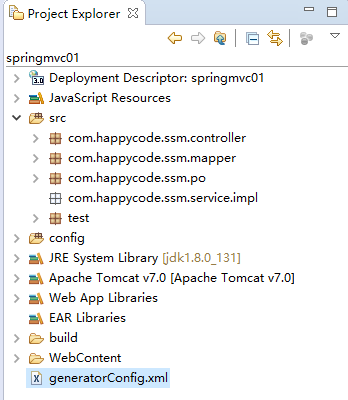
3.建好工程目录
SqlMapConfig.xml - Mybatis的配置文件


<?xml version="1.0" encoding="UTF-8"?>
<!DOCTYPE configuration
        PUBLIC "-//mybatis.org//DTD Config 3.0//EN"
        "http://mybatis.org/dtd/mybatis-3-config.dtd">

<configuration>
  <!-- 加载映射文件 -->
  <mappers>
    <!-- 加载原始dao层开发的配置文件 -->
<!--       <mapper resource="sqlmap/User.xml"/> -->

      <!-- 批量加载mapper
        指定mapper接口的包名,mybatis下自动扫描包下的接口加载
       遵循一些规范:需要将mapper接口类名和mapper.xml名一致,且在一个目录中

       spring扫描过就不需要扫描了
       -->
      <!-- <package name="com.happycode.ssm.mapper"></package> -->
  </mappers>

</configuration>
applicantionContext.xml - spring的配置文件
<?xml version="1.0" encoding="UTF-8"?>
<beans xmlns="http://www.springframework.org/schema/beans"
    xmlns:xsi="http://www.w3.org/2001/XMLSchema-instance"
    xmlns:aop="http://www.springframework.org/schema/aop"
    xmlns:tx="http://www.springframework.org/schema/tx"
    xmlns:context="http://www.springframework.org/schema/context"
    xsi:schemaLocation="
   http://www.springframework.org/schema/beans
   http://www.springframework.org/schema/beans/spring-beans-3.0.xsd
   http://www.springframework.org/schema/aop
   http://www.springframework.org/schema/aop/spring-aop-3.0.xsd
   http://www.springframework.org/schema/tx
   http://www.springframework.org/schema/tx/spring-tx-3.0.xsd
   http://www.springframework.org/schema/context
   http://www.springframework.org/schema/context/spring-context-3.0.xsd">

   <!-- 加载mysql连接配置文件 -->
   <context:property-placeholder location="classpath:db.properties"/>

   <!-- 配置数据源,使用dbcp -->
   <bean id="dataSource" class="org.apache.commons.dbcp.BasicDataSource" destroy-method="close">
     <property name="driverClassName" value="${jdbc.driver}"></property>
     <property name="url" value="${jdbc.url}"></property>
     <property name="username" value="${jdbc.username}"></property>
     <property name="password" value="${jdbc.password}"></property>
     <property name="maxActive" value="10"></property>
     <property name="maxIdle" value="5"></property>
   </bean>

   <!-- 配置sqlSessionFactory -->
   <bean id="sqlSessionFactory" class="org.mybatis.spring.SqlSessionFactoryBean">
     <!-- 加载mybatis配置文件 -->
     <property name="configLocation" value="mybatis/SqlMapConfig.xml"></property>
     <property name="dataSource" ref="dataSource"></property>
   </bean>

   <!-- mapper的批量扫描,从mapper的包中,扫描出mapper接口,自动创建出代理对象,并在spring中注入 -->
   <bean class="org.mybatis.spring.mapper.MapperScannerConfigurer">
     <!-- 如果扫描多个包,用逗号隔开 -->
     <property name="basePackage" value="com.happycode.ssm.mapper"></property>
     <property name="sqlSessionFactoryBeanName" value="sqlSessionFactory"></property>
   </bean>
</beans>
db.properties - 配置数据库连接参数
jdbc.driver=com.mysql.jdbc.Driver
jdbc.url=jdbc:mysql://localhost:3306/mybatis?characterEncoding=utf-8&useSSL=true
jdbc.username=happycode
jdbc.password=twh123
log4j.properties - log4j用于输出运行日志信息
# Global logging configuration
log4j.rootLogger=DEBUG, stdout
# MyBatis logging configuration...
#log4j.logger.org.mybatis.example.BlogMapper=TRACE
# Console output...
log4j.appender.stdout=org.apache.log4j.ConsoleAppender
log4j.appender.stdout.layout=org.apache.log4j.PatternLayout
log4j.appender.stdout.layout.ConversionPattern=%5p [%t] - %m%n
springmvc.xml - springmvc的配置
<?xml version="1.0" encoding="UTF-8"?>

<beans xmlns="http://www.springframework.org/schema/beans"
    xmlns:xsi="http://www.w3.org/2001/XMLSchema-instance"
    xmlns:context="http://www.springframework.org/schema/context"
    xmlns:mvc="http://www.springframework.org/schema/mvc"
    xsi:schemaLocation="http://www.springframework.org/schema/beans http://www.springframework.org/schema/beans/spring-beans.xsd
        http://www.springframework.org/schema/context http://www.springframework.org/schema/context/spring-context-4.1.xsd
        http://www.springframework.org/schema/mvc http://www.springframework.org/schema/mvc/spring-mvc-4.1.xsd">

  <!-- 配置handler
   name 是给第一个映射器用的
   id 是给第二个映射器用的
   -->
  <bean id="ItemController1" name="/queryItems.action" class="com.happycode.ssm.controller.ItemController1"></bean>

  <!-- 另一个Handler -->
  <bean id="ItemController2" class="com.happycode.ssm.controller.ItemController2"></bean>

  <!-- 配置单个注解Handler -->
  <!-- <bean class="com.happycode.ssm.controller.ItemController3"></bean> -->
  <!-- 可以扫描controller,service -->
  <context:component-scan base-package="com.happycode.ssm.controller"></context:component-scan>

  <!-- 处理器映射器,第一种
    x将Bean的name当作url进行查找,需要在配置Handler时指定beanname(就是url)
   -->
  <bean class="org.springframework.web.servlet.handler.BeanNameUrlHandlerMapping"></bean>

  <!-- 处理器映射器,第二种
    x简单url映射
  -->
  <bean class="org.springframework.web.servlet.handler.SimpleUrlHandlerMapping">
    <property name="mappings">
      <props>
        <prop key="/queryItemList.action">ItemController1</prop>
        <!-- 直接配置ItemController2 -->
        <prop key="/queryItemList2.action">ItemController2</prop>
      </props>
    </property>
  </bean>

  <!-- 注解的处理器映射器 -->
  <bean name="org.springframework.web.servlet.mvc.method.annotation.RequestMappingHandlerMapping"></bean>
  <!-- 注解的处理器适配器 -->
  <bean name="org.springframework.web.servlet.mvc.method.annotation.RequestMappingHandlerAdapter"></bean>

  <!-- 使用mvc:annotation-driven代替上边的映射器和适配器
  x默认加载了很多参数绑定方法,比如json转换的解析器
  -->
  <mvc:annotation-driven></mvc:annotation-driven>

  <!-- 处理器适配器,第一种-->
  <bean class="org.springframework.web.servlet.mvc.SimpleControllerHandlerAdapter"></bean>

  <!-- 处理器适配器,第二种 -->
  <bean class="org.springframework.web.servlet.mvc.HttpRequestHandlerAdapter"></bean>

  <!-- 配置视图解析器
    x解析jsp,默认使用jstl
  -->
  <bean class="org.springframework.web.servlet.view.InternalResourceViewResolver"></bean>

</beans>
web.xml - springmvc的前端控制器配置
<?xml version="1.0" encoding="UTF-8"?>
<web-app xmlns:xsi="http://www.w3.org/2001/XMLSchema-instance" xmlns="http://java.sun.com/xml/ns/javaee" xsi:schemaLocation="http://java.sun.com/xml/ns/javaee http://java.sun.com/xml/ns/javaee/web-app_3_0.xsd" version="3.0">
  <display-name>springmvc01</display-name>

  <!-- springmvc前端控制器 -->
  <servlet>
    <servlet-name>springmvc</servlet-name>
    <servlet-class>org.springframework.web.servlet.DispatcherServlet</servlet-class>
    <!-- contextConfigLocation配置springmvc加载
              如果不配置 contextConfigLocation默认加载/WEB-INF/servlet名称-servlet.xml(此例: /WEB-INF/srpingmvc-servlet.xml)
    -->
    <init-param>
      <param-name>contextConfigLocation</param-name>
      <param-value>classpath:springmvc.xml</param-value>
    </init-param>
  </servlet>

  <servlet-mapping>
  <!-- 第一种:*.action访问.action结尾都由DispatcherServlet进行解析
      第二种:/,所有访问的地址都由DispatcherServlet进行解析,对于静态文件无需配置DispatcherServlet进行解析
           第三种/*,这样配置不对,使用这种配置,
           最终转发到一个jsp页面时,任然由DispatcherServlet解析jsp地址,不能根据jsp页面找到handler,会报错
  -->
    <servlet-name>springmvc</servlet-name>
    <url-pattern>*.action</url-pattern>
  </servlet-mapping>

  <welcome-file-list>
    <welcome-file>index.html</welcome-file>
    <welcome-file>index.htm</welcome-file>
    <welcome-file>index.jsp</welcome-file>
    <welcome-file>default.html</welcome-file>
    <welcome-file>default.htm</welcome-file>
    <welcome-file>default.jsp</welcome-file>
  </welcome-file-list>
</web-app>
4.mybatis逆向工程(可选)
这个可以对你规定的单表生成对应的pojo类,并准备好各种sql语句,单表查询极为方便,还可以生成对应的mapper
generatorConfig.xml - 将这个放在项目根目录下
<?xml version="1.0" encoding="UTF-8"?>
<!DOCTYPE generatorConfiguration
  PUBLIC "-//mybatis.org//DTD MyBatis Generator Configuration 1.0//EN"
  "http://mybatis.org/dtd/mybatis-generator-config_1_0.dtd">

<generatorConfiguration>
    <context id="testTables" targetRuntime="MyBatis3">
        <commentGenerator>
            <!-- 是否去除自动生成的注释 true:是 : false:否 -->
            <property name="suppressAllComments" value="true" />
        </commentGenerator>
        <!--数据库连接的信息:驱动类、连接地址、用户名、密码 -->
        <jdbcConnection driverClass="com.mysql.jdbc.Driver"
            connectionURL="jdbc:mysql://localhost:3306/mybatis" userId="happycode"
            password="twh123">
        </jdbcConnection>
        <!-- <jdbcConnection driverClass="oracle.jdbc.OracleDriver"
            connectionURL="jdbc:oracle:thin:@127.0.0.1:1521:yycg"
            userId="yycg"
            password="yycg">
        </jdbcConnection> -->

        <!-- 默认false,把JDBC DECIMAL 和 NUMERIC 类型解析为 Integer,为 true时把JDBC DECIMAL 和
            NUMERIC 类型解析为java.math.BigDecimal -->
        <javaTypeResolver>
            <property name="forceBigDecimals" value="false" />
        </javaTypeResolver>

        <!-- targetProject:生成PO类的位置 -->
        <javaModelGenerator targetPackage="com.happycode.ssm.po"
            targetProject=".src">
            <!-- enableSubPackages:是否让schema作为包的后缀 -->
            <property name="enableSubPackages" value="false" />
            <!-- 从数据库返回的值被清理前后的空格 -->
            <property name="trimStrings" value="true" />
        </javaModelGenerator>
        <!-- targetProject:mapper映射文件生成的位置 -->
        <sqlMapGenerator targetPackage="com.happycode.ssm.mapper"
            targetProject=".src">
            <!-- enableSubPackages:是否让schema作为包的后缀 -->
            <property name="enableSubPackages" value="false" />
        </sqlMapGenerator>
        <!-- targetPackage:mapper接口生成的位置 -->
        <javaClientGenerator type="XMLMAPPER"
            targetPackage="com.happycode.ssm.mapper"
            targetProject=".src">
            <!-- enableSubPackages:是否让schema作为包的后缀 -->
            <property name="enableSubPackages" value="false" />
        </javaClientGenerator>
        <!-- 指定数据库表 -->
        <table schema="" tableName="user"></table>
        <table schema="" tableName="orders"></table>
        <table schema="" tableName="Item"></table>
        <table schema="" tableName="orderdetail"></table>

        <!-- 有些表的字段需要指定java类型
         <table schema="" tableName="">
            <columnOverride column="" javaType="" />
        </table> -->
    </context>
</generatorConfiguration>
执行代码,生成文件:
import java.io.File;
import java.util.ArrayList;
import java.util.List;

import org.mybatis.generator.api.MyBatisGenerator;
import org.mybatis.generator.config.Configuration;
import org.mybatis.generator.config.xml.ConfigurationParser;
import org.mybatis.generator.internal.DefaultShellCallback;

public class GeneratorSqlMap {
    public void generator() throws Exception {
           List<String> warnings = new ArrayList<String>();
           boolean overwrite = true;
           File configFile = new File("generatorConfig.xml");
           ConfigurationParser cp = new ConfigurationParser(warnings);
           Configuration config = cp.parseConfiguration(configFile);
           DefaultShellCallback callback = new DefaultShellCallback(overwrite);
           MyBatisGenerator myBatisGenerator = new MyBatisGenerator(config, callback, warnings);
           myBatisGenerator.generate(null);
    }

    public static void main(String[] args) throws Exception {
        GeneratorSqlMap generatorSqlMap = new GeneratorSqlMap();
        generatorSqlMap.generator();
    }
}