自上一篇文章的基础上,Spring Boot 鉴权之—— JWT 鉴权我做了一波springboot2.0.4+mybatis 的整合。
参考文章: Spring Boot+Spring Security+JWT 实现 RESTful Api 权限控制
源码地址:
码云:https://gitee.com/region/spring-security-oauth-example/tree/master/spring-security-jwt
springboot2.0.4+mybatis pom.xml:
这里由于springboot2.0.4没有默认的passwordencoder,也就是说我们登录不能明文登录,所以为了方便期间,我直接使用了数据库。
<!-- https://mvnrepository.com/artifact/org.apache.commons/commons-lang3 -->
        <dependency>
            <groupId>org.apache.commons</groupId>
            <artifactId>commons-lang3</artifactId>
        </dependency>

         <!-- Spring-Mybatis -->
        <dependency>
            <groupId>org.mybatis.spring.boot</groupId>
            <artifactId>mybatis-spring-boot-starter</artifactId>
            <version>1.3.0</version>
            </dependency>

        <!-- MySQL 连接驱动依赖 -->
        <dependency>
            <groupId>mysql</groupId>
            <artifactId>mysql-connector-java</artifactId>
        </dependency>
config配置修改:
import org.springframework.beans.factory.annotation.Autowired;
import org.springframework.beans.factory.annotation.Qualifier;
import org.springframework.context.annotation.Configuration;
import org.springframework.security.config.annotation.authentication.builders.AuthenticationManagerBuilder;
import org.springframework.security.config.annotation.web.builders.HttpSecurity;
import org.springframework.security.config.annotation.web.builders.WebSecurity;
import org.springframework.security.config.annotation.web.configuration.WebSecurityConfigurerAdapter;
import org.springframework.security.core.userdetails.UserDetailsService;
import org.springframework.security.crypto.bcrypt.BCryptPasswordEncoder;

import com.jwt.server.filter.JwtAuthenticationFilter;
import com.jwt.server.filter.JwtLoginFilter;
import com.jwt.server.provider.CustomAuthenticationProvider;

/**
 * 通过SpringSecurity的配置,将JWTLoginFilter,JWTAuthenticationFilter组合在一起
 *
 * @Order(SecurityProperties.ACCESS_OVERRIDE_ORDER) 在springboot1.5.8的时候该注解是可以用的
 *                                                  具体看源码
 * @author zyl
 *
 */
@Configuration
public class SecurityConfiguration extends WebSecurityConfigurerAdapter {

    @Qualifier("userDetailServiceImpl")
    @Autowired
    private UserDetailsService userDetailsService;

    @Autowired
    private BCryptPasswordEncoder bCryptPasswordEncoder;

    @Override
    public void configure(WebSecurity web) throws Exception {
        super.configure(web);
    }

    @Override
    protected void configure(HttpSecurity http) throws Exception {

        // 自定义 默认
        http.cors().and().csrf().disable().authorizeRequests().antMatchers("/users/signup").permitAll().anyRequest()
                .authenticated().and().addFilter(new JwtLoginFilter(authenticationManager()))// 默认登录过滤器
                .addFilter(new JwtAuthenticationFilter(authenticationManager()));// 自定义过滤器

    }

    // 该方法是登录的时候会进入
    @Override
    public void configure(AuthenticationManagerBuilder auth) throws Exception {
//        auth.userDetailsService(userDetailsService).passwordEncoder(new BCryptPasswordEncoder());
        // 使用自定义身份验证组件   手动注入加密类
        auth.authenticationProvider(new CustomAuthenticationProvider(userDetailsService, bCryptPasswordEncoder));
    }

}
自定义身份验证组件
package com.jwt.server.provider;

import java.util.ArrayList;

import org.springframework.security.authentication.AuthenticationProvider;
import org.springframework.security.authentication.BadCredentialsException;
import org.springframework.security.authentication.UsernamePasswordAuthenticationToken;
import org.springframework.security.core.Authentication;
import org.springframework.security.core.AuthenticationException;
import org.springframework.security.core.GrantedAuthority;
import org.springframework.security.core.userdetails.UserDetails;
import org.springframework.security.core.userdetails.UserDetailsService;
import org.springframework.security.core.userdetails.UsernameNotFoundException;
import org.springframework.security.crypto.bcrypt.BCryptPasswordEncoder;


/**
 * 自定义身份认证验证组件
 * @author zyl
 *
 */
public class CustomAuthenticationProvider implements AuthenticationProvider {

    private UserDetailsService userDetailsService;

    private BCryptPasswordEncoder bCryptPasswordEncoder;

    public CustomAuthenticationProvider(UserDetailsService userDetailsService, BCryptPasswordEncoder bCryptPasswordEncoder){
        this.userDetailsService = userDetailsService;
        this.bCryptPasswordEncoder = bCryptPasswordEncoder;
    }

    @Override
    public Authentication authenticate(Authentication authentication) throws AuthenticationException {
        // 获取认证的用户名 & 密码
        String name = authentication.getName();
        String password = authentication.getCredentials().toString();
        // 认证逻辑
        UserDetails userDetails = userDetailsService.loadUserByUsername(name);
        if (null != userDetails) {
            if (bCryptPasswordEncoder.matches(password, userDetails.getPassword())) {
                // 这里设置权限和角色
                ArrayList<GrantedAuthority> authorities = new ArrayList<>();
                authorities.add( new GrantedAuthorityImpl("ROLE_ADMIN"));
                authorities.add( new GrantedAuthorityImpl("ROLE_API"));
                authorities.add( new GrantedAuthorityImpl("AUTH_WRITE"));
                // 生成令牌 这里令牌里面存入了:name,password,authorities, 当然你也可以放其他内容
                Authentication auth = new UsernamePasswordAuthenticationToken(name, password, authorities);
                return auth;
            } else {
                throw new BadCredentialsException("密码错误");
            }
        } else {
            throw new UsernameNotFoundException("用户不存在");
        }
    }

    /**
     * 是否可以提供输入类型的认证服务
     * @param authentication
     * @return
     */
    @Override
    public boolean supports(Class<?> authentication) {
        return authentication.equals(UsernamePasswordAuthenticationToken.class);
    }

}
权限类型,负责存储权限和角色
package com.jwt.server.provider;

import org.springframework.security.core.GrantedAuthority;

/**
 * 权限类型,负责存储权限和角色
 *
 * @author zyl
 */
public class GrantedAuthorityImpl implements GrantedAuthority {

    /**
     *
     */
    private static final long serialVersionUID = 1L;

    private String authority;

    public GrantedAuthorityImpl(String authority) {
        this.authority = authority;
    }

    public void setAuthority(String authority) {
        this.authority = authority;
    }

    @Override
    public String getAuthority() {
        return this.authority;
    }
}
定义数据库service、dao文件
package com.jwt.server.service;

import com.jwt.server.domain.UserInfo;

/**
 * 用户service
 * @author zyl
 *
 */
public interface UserService {

    /**
     * 根据用户名查询用户是否存在
     * @param username
     * @return
     */
    public UserInfo findByUsername(String username);

    /**
     * 添加用户
     * @param user
     * @return
     */
    public UserInfo save(UserInfo user);

}
package com.jwt.server.service.impl;

import org.springframework.beans.factory.annotation.Autowired;
import org.springframework.stereotype.Service;

import com.jwt.server.domain.UserInfo;
import com.jwt.server.mapper.UserMapper;
import com.jwt.server.service.UserService;

@Service
public class UserServiceImpl implements UserService {

    @Autowired
    private UserMapper  usermapper;

    @Override
    public UserInfo findByUsername(String username) {
        return usermapper.findByUsername(username);
    }

    @Override
    public UserInfo save(UserInfo user) {
        return usermapper.save(user);
    }

}
修改之前定义的UserDetailServiceImpl文件为:
package com.jwt.server.service.impl;

import static java.util.Collections.emptyList;

import org.springframework.beans.factory.annotation.Autowired;
import org.springframework.security.core.userdetails.UserDetails;
import org.springframework.security.core.userdetails.UserDetailsService;
import org.springframework.security.core.userdetails.UsernameNotFoundException;
import org.springframework.stereotype.Service;

import com.jwt.server.domain.UserInfo;
import com.jwt.server.service.UserService;

/**
 *
 * @author zyl
 *
 */
@Service
public class UserDetailServiceImpl implements UserDetailsService {

    @Autowired
    protected UserService userService;

    @Override
    public UserDetails loadUserByUsername(String username) throws UsernameNotFoundException {
        UserInfo user = userService.findByUsername(username);
        if (user == null) {
            throw new UsernameNotFoundException(username);
        }
        return new org.springframework.security.core.userdetails.User(user.getUsername(), user.getPassword(),
                emptyList());
    }
}
增加IdGenerator id生成类
package com.jwt.server.util;


import java.net.InetAddress;
import java.net.UnknownHostException;

import org.apache.commons.lang3.time.DateFormatUtils;

import lombok.extern.slf4j.Slf4j;

/**
 * 与snowflake算法区别,返回字符串id,占用更多字节,但直观从id中看出生成时间
 *
 */
@Slf4j
public enum IdGenerator {
    /**
     * 每个要生成的序号类型对应一个序号
     */
    USER_TRANSID("1");

    private long workerId;   //用ip地址最后几个字节标示
    private long datacenterId = 0L; //可配置在properties中,启动时加载,此处默认先写成0
    private long sequence = 0L;
    private final long twepoch = 1516175710371L;
    private final long workerIdBits = 1L;
    private final long datacenterIdBits = 2L;
    private final long sequenceBits = 3L;
    private final long workerIdShift = sequenceBits;
    private final long datacenterIdShift = sequenceBits + workerIdBits;
    private final long timestampLeftShift = sequenceBits + workerIdBits + datacenterIdBits;
    private long sequenceMask = -1L ^ (-1L << sequenceBits); //4095
    private long lastTimestamp = -1L;

    private String index;

    IdGenerator(String ind) {
        this.index = ind;
        workerId = 0x000000FF & getLastIP();
    }

    public synchronized String nextId() {
        long timestamp = timeGen(); //获取当前毫秒数
        //如果服务器时间有问题(时钟后退) 报错。
        if (timestamp < lastTimestamp) {
            throw new RuntimeException(String.format(
                    "Clock moved backwards.  Refusing to generate id for %d milliseconds", lastTimestamp - timestamp));
        }
        //如果上次生成时间和当前时间相同,在同一毫秒内
        if (lastTimestamp == timestamp) {
            //sequence自增,因为sequence只有12bit,所以和sequenceMask相与一下,去掉高位
            sequence = (sequence + 1) & sequenceMask;
            //判断是否溢出,也就是每毫秒内超过4095,当为4096时,与sequenceMask相与,sequence就等于0
            if (sequence == 0) {
                timestamp = tilNextMillis(lastTimestamp); //自旋等待到下一毫秒
            }
        } else {
            sequence = 0L; //如果和上次生成时间不同,重置sequence,就是下一毫秒开始,sequence计数重新从0开始累加
        }
        lastTimestamp = timestamp;

        long suffix =  ((timestamp - twepoch) << timestampLeftShift) | (datacenterId << datacenterIdShift) | (workerId << workerIdShift) | sequence;

        String datePrefix = DateFormatUtils.format(timeGen(), "yyyyMMddHHmmss");
        return datePrefix +index + suffix;
    }


    private long tilNextMillis(long lastTimestamp) {
        long timestamp = timeGen();
        while (timestamp <= lastTimestamp) {
            timestamp = timeGen();
        }
        return timestamp;
    }

    private long timeGen() {
        return System.currentTimeMillis();
    }

    private byte getLastIP(){
        byte lastip = 0;
        try{
            InetAddress ip = InetAddress.getLocalHost();
            byte[] ipByte = ip.getAddress();
            lastip = ipByte[ipByte.length - 1];
        } catch (UnknownHostException e) {
            log.error("UnknownHostException error:{}", e.getMessage());
        }
        return lastip;
    }

    public static void main(String[] args) {
        IdGenerator id = IdGenerator.USER_TRANSID;
        for (int i = 0; i < 1000; i++) {
            String serialNo = id.nextId();
            System.out.println(serialNo + "===" + serialNo.length());
        }
    }
}
mapper
package com.jwt.server.mapper;


import com.jwt.server.domain.UserInfo;


public interface UserMapper {


    /**

     * 根据用户名查询用户是否存在

     *

     * @param username

     * @return

     */

    public UserInfo findByUsername(String username);


    /**

     * 添加用户

     *

     * @param user

     * @return

     */

    public UserInfo save(UserInfo user);

}
mapper.xml
<?xml version="1.0" encoding="UTF-8"?>
<!DOCTYPE mapper PUBLIC "-//mybatis.org//DTD Mapper 3.0//EN" "http://mybatis.org/dtd/mybatis-3-mapper.dtd">
<mapper namespace="com.jwt.server.mapper.UserMapper">
  <resultMap id="BaseResultMap" type="com.jwt.server.domain.UserInfo">
    <id column="id" jdbcType="VARCHAR" property="id" />
    <result column="username" jdbcType="VARCHAR" property="username" />
    <result column="password" jdbcType="VARCHAR" property="password" />
  </resultMap>

  <!--用户登录查询  -->
  <select id="findByUsername" parameterType="java.lang.String" resultMap="BaseResultMap">
     select id,username,password from tb_user where username=#{username,jdbcType=VARCHAR}
  </select>

  <insert id="save" parameterType="com.jwt.server.domain.UserInfo">
        INSERT INTO tb_user
        (id,username,password) VALUES
        (#{id,jdbcType=VARCHAR},#{username,jdbcType=VARCHAR},#{password,jdbcType=VARCHAR})
  </insert>

</mapper>
mybatis-config.xml
<?xml version="1.0" encoding="UTF-8" ?>
<!DOCTYPE configuration
        PUBLIC "-//mybatis.org//DTD Config 3.0//EN"
        "http://mybatis.org/dtd/mybatis-3-config.dtd">
<configuration>
    <typeAliases>
        <typeAlias alias="Integer" type="java.lang.Integer" />
        <typeAlias alias="Long" type="java.lang.Long" />
        <typeAlias alias="HashMap" type="java.util.HashMap" />
        <typeAlias alias="LinkedHashMap" type="java.util.LinkedHashMap" />
        <typeAlias alias="ArrayList" type="java.util.ArrayList" />
        <typeAlias alias="LinkedList" type="java.util.LinkedList" />
    </typeAliases>
</configuration>
application.yml配置
#公共配置与profiles选择无关 mapperLocations指的路径是src/main/resources
mybatis:
  typeAliasesPackage: com.jwt.server.domain
  mapperLocations: classpath:mapper/*.xml


---

#开发配置

spring:
  datasource:
    driver-class-name: com.mysql.jdbc.Driver
    url: jdbc:mysql://localhost:3306/test?prepStmtCacheSize=517&cachePrepStmts=true&autoReconnect=true&characterEncoding=utf-8&allowMultiQueries=true
    username: root
    password: tiger
修改启动类扫描包
package com.jwt.server;

import org.mybatis.spring.annotation.MapperScan;
import org.springframework.boot.SpringApplication;
import org.springframework.boot.autoconfigure.SpringBootApplication;
import org.springframework.context.annotation.Bean;
import org.springframework.security.crypto.bcrypt.BCryptPasswordEncoder;

@SpringBootApplication
@MapperScan("com.jwt.server.mapper")//
public class SpringJwtApplication {

    public static void main(String[] args) {
        SpringApplication.run(SpringJwtApplication.class, args);
    }

    @Bean
    public BCryptPasswordEncoder bCryptPasswordEncoder() {
        return new BCryptPasswordEncoder();
    }
}
测试:
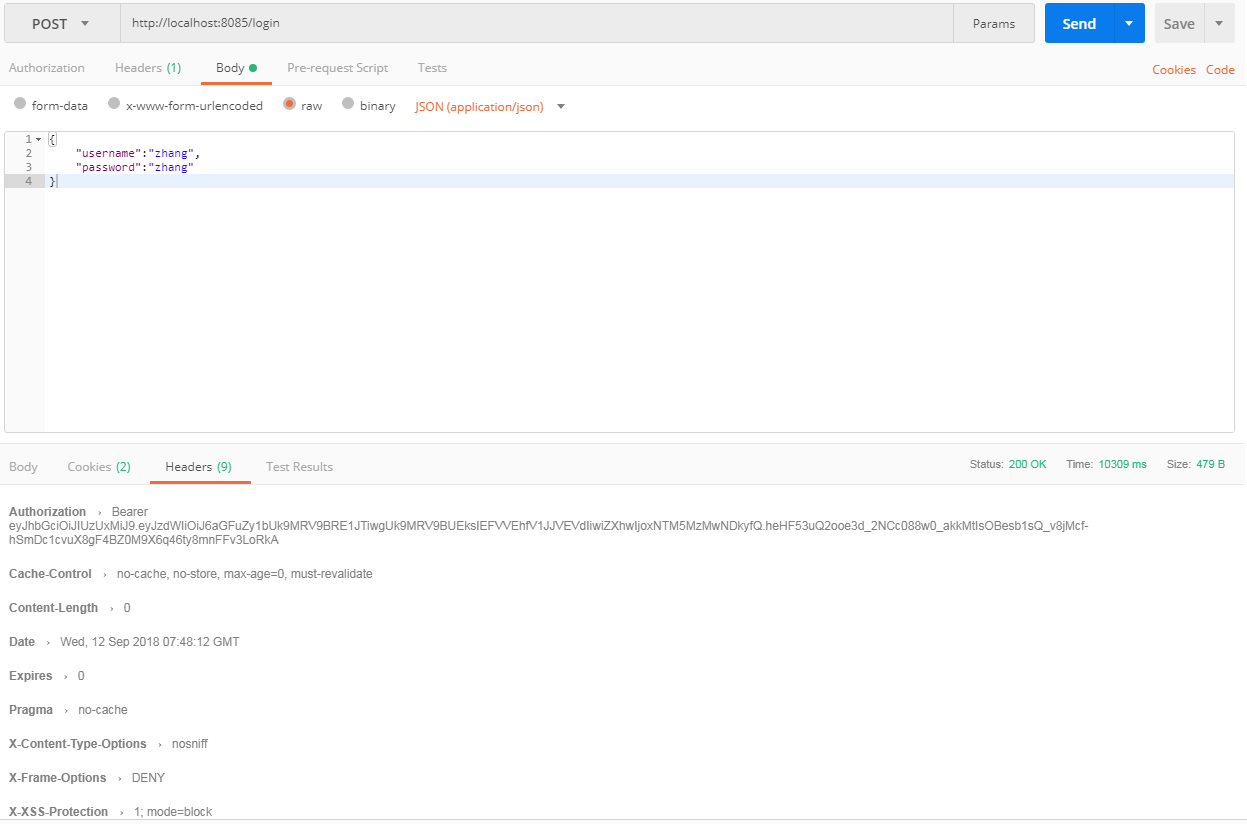
自定义登录测试:
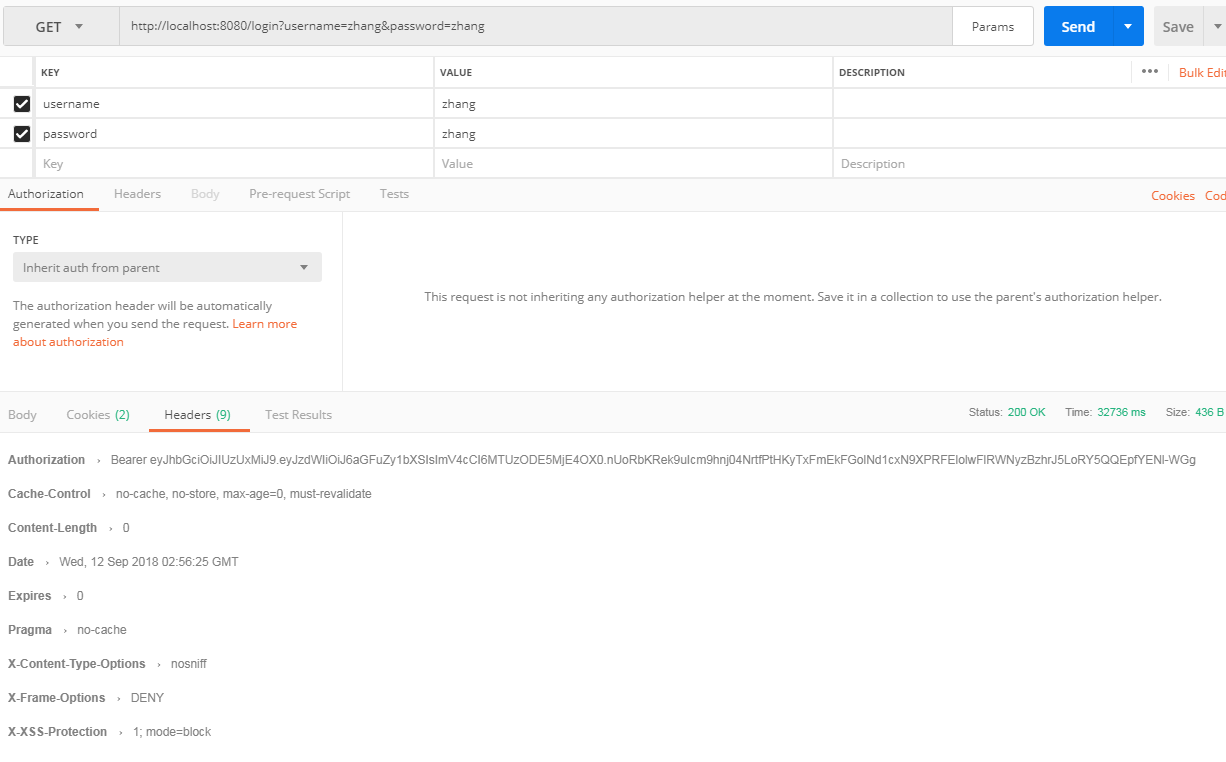
好了ok啦。
需要注意的是:

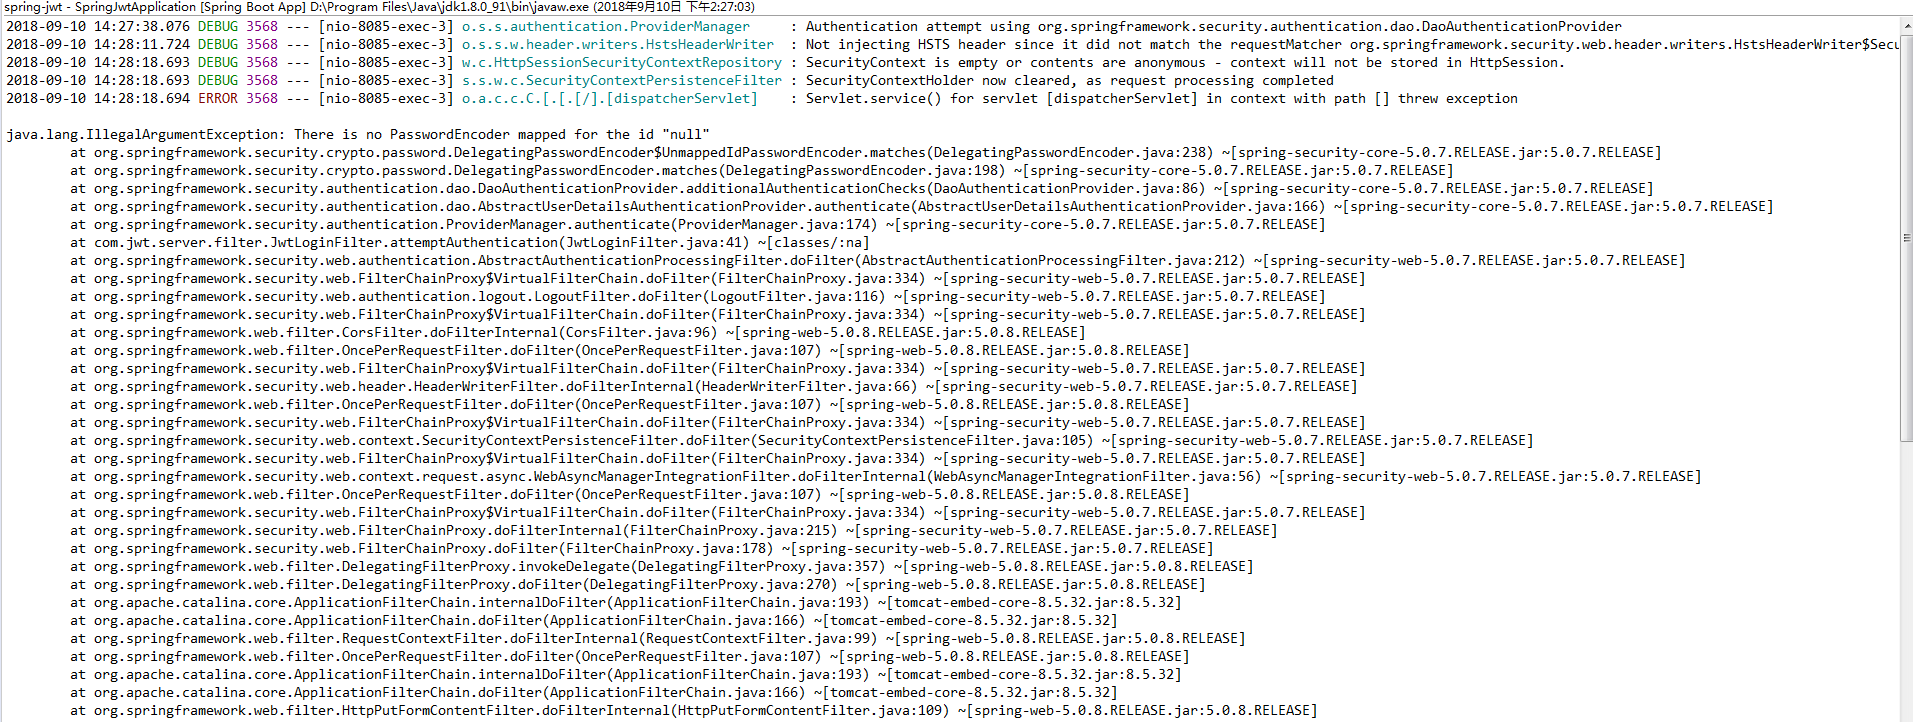
在springboot2.0.4版本的时候由于没有默认的passwordencoder,因此需要手动注入。如果不注入会在鉴权的时候报如下错误
如果测试会会有如下情况,说明你注入后未给密码加密

并且这里如果没有存储我们登录的信息时,可能也会有个坑,就是密码加密后与原密码做对比会报如下错误

一般情况下我们用加密后,在授权的时候回去对比密码
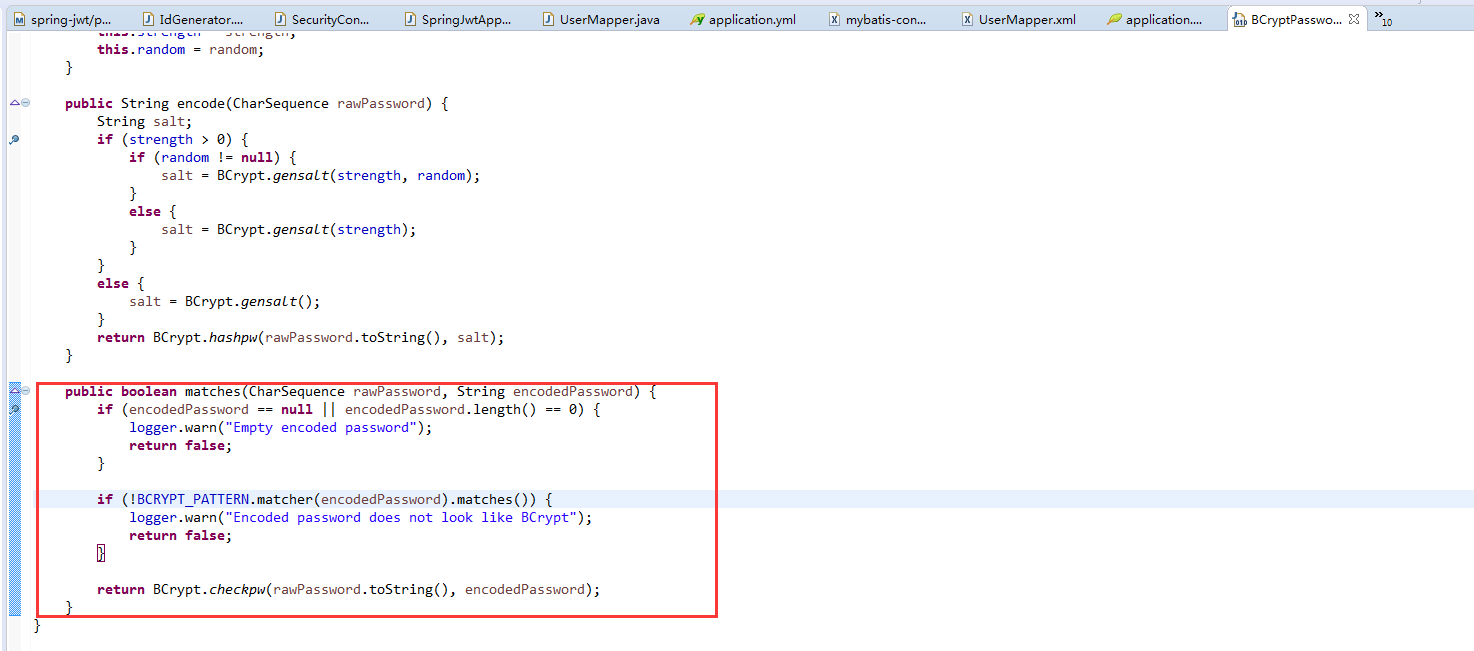
这个错误就是会在这个地方产生的。解决办法
自定义身份验证类
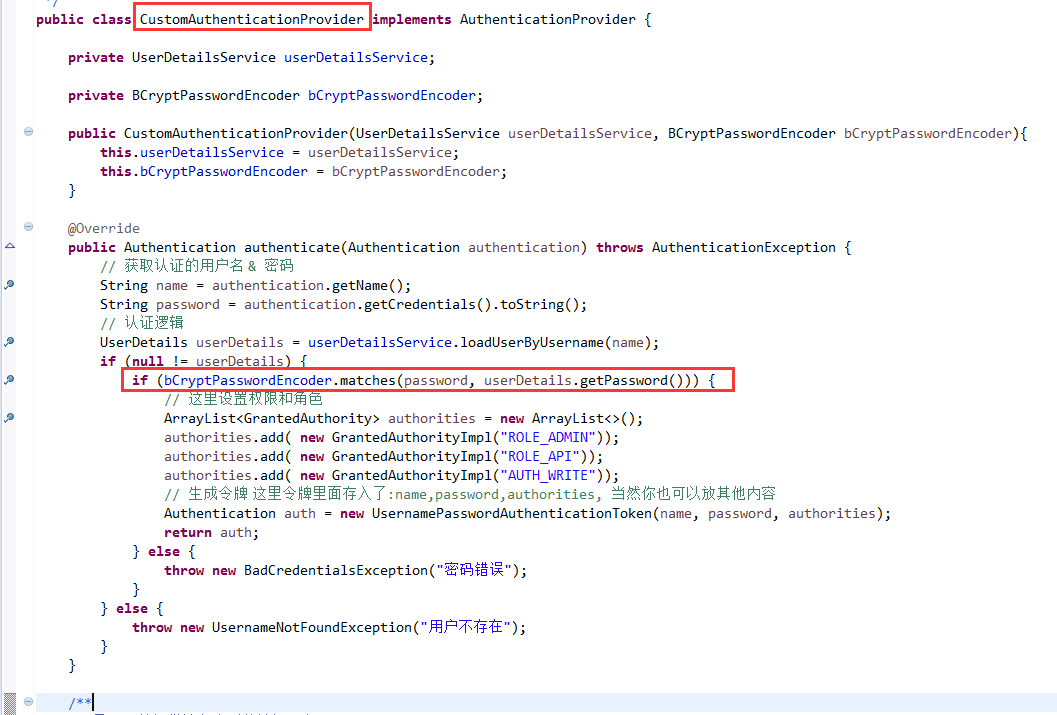
自行调用,确保密码一致就ok。具体请看源码分析。