vue-router面试准备内容
1、路由模式;hash和history
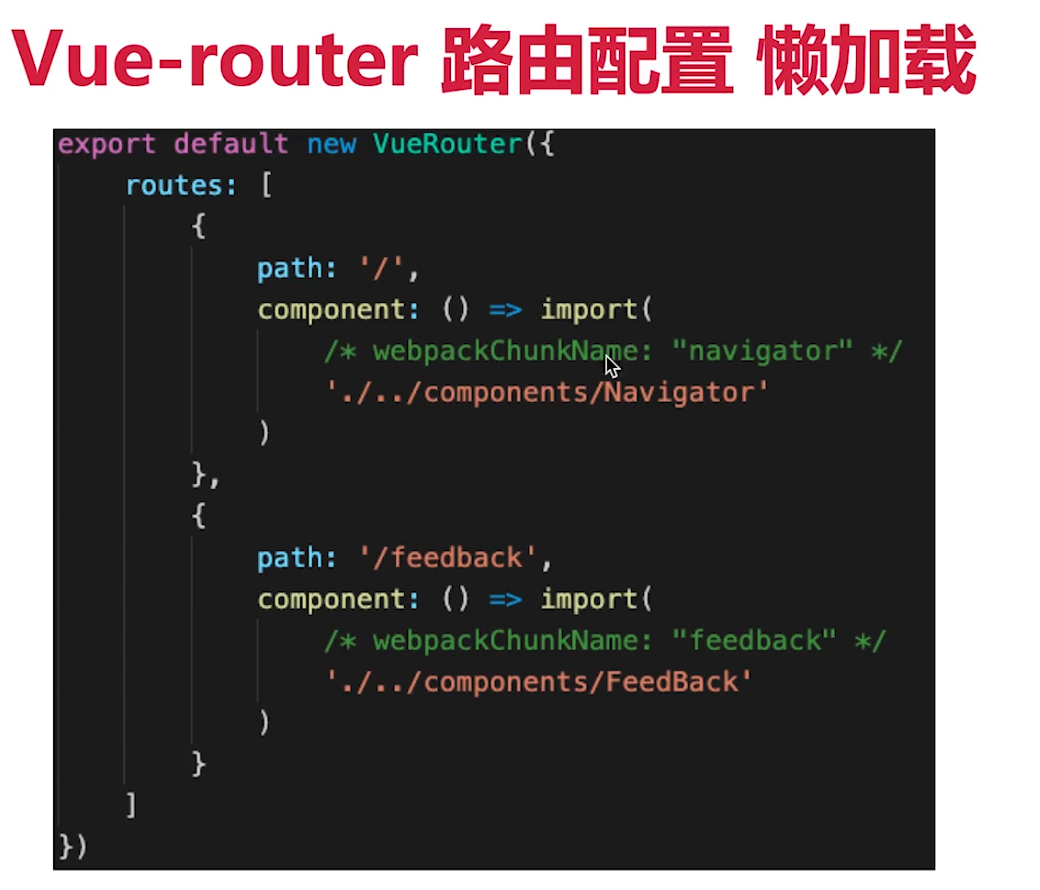
2、路由配置(动态路由、懒加载);动态路由就是动态参数 /user/:id 获取 $router.params.id
路由懒加载
一、路由的简介
1、vue的简单路由
<div id="app">
<!-- 使用 router-link 组件来导航,通过传入 `to` 属性指定链接. -->
<!-- <router-link> 默认会被渲染成一个 `<a>` 标签 -->
<router-link to="/home">
    <button>home</button>
</router-link>
<router-link to="/game">
    <button>game</button>
</router-link>
<!-- router-view 路由出口, 路由匹配到的组件将渲染在这里 -->
<router-view></router-view>
</div>
点击两个按钮匹配到的页面就会在
<router-view></router-view>中渲染出来。

2、复杂的镶套路由
在实际项目中我们会碰到多层嵌套的组件组合而成,但是我们如何实现嵌套路由呢?因此我们需要在 VueRouter 的参数中使用 children 配置,这样就可以很好的实现路由嵌套。
index.html,只有一个路由出口
<div id="app">
    <!-- router-view 路由出口, 路由匹配到的组件将渲染在这里 -->
    <router-view></router-view>
</div>
const router = new VueRouter({
  mode: 'history',
  base: __dirname,
  routes: [
    {
      path: '/',
      component: home
    },
    // 商品店面列表页
    {
      path: '/home',
      component: home,
      children: [
          {path: '/home/', component: goods},
          // 商品页
          {path: '/home/goods', component: goods},
          // 评论也
          {path: '/home/seller', component: seller},
          // 商家也
          {path: '/home/ratings', component: ratings}
      ]
    },
    // 商品详情页
    {
      path: '/detail',
      component: detail
    }
  ]
});
home.vue,点击显示就会将子路由显示在出来,子路由的出口必须在父路由里面,否则子路由无法显示。
<template>
    <div>
        <h3>首页</h3>
        <router-link to="/home/game">
            <button>显示<tton>
        </router-link>
        <router-view></router-view>
    </div>
</template>
在嵌套路由中我们经常会遇到父路由向子路由里面传递参数,传递参数有两种方法,通过 query 或者 params
 <div class="food_pic">
                                <router-link :to="{path: '/detail', query: {num: food}}">
                                    <img :src="food.icon" alt="">
                                </router-link>
                            </div>

可以传递其他的数字等等,这里food 是对象
game.vue 子路由中通过 this.$route.query.num 来显示传递过来的参数
运行后的结果,传递的参数在地址栏中有显示
4、在嵌套路由中,父路由向子路由传值除了query外,还有params,params传值有两种情况,一种是值在url中显示,2是不显示在地址栏
(1):显示在地址栏中:
<div id="app">
    <!-- router-view 路由出口, 路由匹配到的组件将渲染在这里 -->
    <router-view></router-view>
    </div>
main.js params传值是通过 :[参数值] 如path: "/home/game/:num"
<template>
    <div>
        <h3>首页</h3>
        <router-link to="/home/game/123">
            <button>显示</button>
        </router-link>
        <router-view></router-view>
    </div>
</template>
game.vue 在子路由中,通过 this.$route.params.参数名来接受传递过来的值
(b):
不显示在url中,如果在PC端将传递的值显示在url中,这样无形中就存在安全隐患,如果客户不小心修改了url那样就会出错,移动端就无所谓了,如何才能不显示在url中,同样很简单,但是需要给映射的路径起一个别名,通过name来取别名
同样只需将上面的main.js中的定义路由改为如下样子,在子路由中通过name来给路径其一个game1的别名。
//定义路由
const routes = [
    { path: "/", redirect: "/home" },//重定向
    {
        path: "/home", component: home,
        children: [
            { name: "game1", path: "/home/game/", component: game }
        ]
    }
]
home.vue 中router-link修改为:to="{ name:'game1', params: {num: 123} }" params中是要传递的参数,这样传递的参数就不会显示在url中。
<template>
    <div>
        <h3>首页</h3>
        <router-link :to="{ name:'game1', params: {num: 123} }">
            <button>显示</button>
        </router-link>
        <router-view></router-view>
    </div>
</template>
5、vue 动态控制路由跳转
比如html中这样写
<span @click="clickFn">点我</span>
js中这样写
methods:{
    clickFn:function(){
        this.$router.go('/login');//其中login是你定义的一个路由模块
}
或者
this.$router.push({
     path: '/address'
});
二、vue-router query和params传参(接收参数)$router $route的区别
1.query方式传参和接收参数
传参:
this.$router.push({
        path:'/xxx'
        query:{
          id:id
        }
      })

接收参数:
this.$route.query.id
注意:传参是this.$router,接收参数是this.$route,这里千万要看清了!!!
his.$router 和this.$route有何区别?
- 1.$router为VueRouter实例,想要导航到不同URL,则使用$router.push方法
- 2.$route为当前router跳转对象,里面可以获取name、path、query、params
2.params方式传参和接收参数
传参:
this.$router.push({
        name:'xxx'
        params:{
          id:id
        }
      })

接收参数:
this.$route.params.id
注意:params传参,push里面只能是 name:'xxxx',不能是path:'/xxx',因为params只能用name来引入路由,如果这里写成了path,接收参数页面会是undefined!!!
另外,二者还有点区别,直白的来说query相当于get请求,页面跳转的时候,可以在地址栏看到请求参数,而params相当于post请求,参数不会再地址栏中显示
我们发现vue项目的url后边总会有一个 # ,这个是因为理由的模式导致的

