一、CSS选择器
1.基本选择器
标签选择器可以选中所有的标签元素,比如div,ul,li,p 等等,不管标签藏的多深,都能选中,选中的是所有的,而不是某一个,所以说"共性"而不是特性
<!DOCTYPE html>
<html lang="en">
<head>
    <meta charset="UTF-8">
    <title>高级选择器</title>
    <style>
        h4{
            background: green;
        }
        .active{
            font-size: 22px;
        }
        h4.active{
            color:red;
        }
        li.active{
            background: yellow;
        }
    </style>
</head>
<body>
    <ul>
	    <li >
	    	<a href="#">1</a>
	    </li>
	    <li class="active">
	    	<a href="#">2</a>
	    </li>
	    <li>
	    	<a href="#">3</a>
	    </li>
	    <li>
	    	<a href="#">4</a>
	    </li>

	</ul>

    <div>

    </div>


</body>
</html>

注意:li标签是以一行为显示的
2.高级选择器
说明:高级选择器又分为:后代选择器、子代选择器、并集选择器、交集选择器
# 选中id
同一个页面中id不能重复。
任何的标签都可以设置id
id命名规范 要以字母 可以有数字 下划线 - 大小写严格区分 aa和AA是两个不一样的属性值
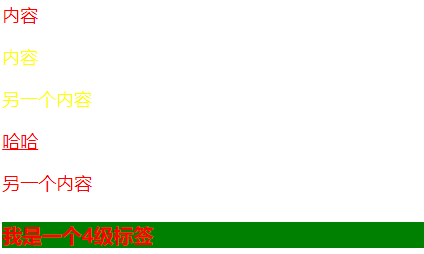
示例:
 <div class="father">
        <div class="item">
            <div class="a">
                <p>内容</p>
            </div>
        </div>

        <p>内容</p>

        <div class="a">
            <p>另一个内容</p>
        </div>
        <a href="#">哈哈</a>

    </div>

    <p>另一个内容</p>
    <h4 class="active">我是一个4级标签</h4>

属性选择器
<!DOCTYPE html>
<html lang="en">
<head>
    <meta charset="UTF-8">
    <title>属性选择器</title>
    <style>
        label[for]{
            color: red;
        }
        input[type='text']{
            background-color: red;
        }
        label[for^='vip']{
            color: blue;
        }
        label[for*='i']{
            color: yellow;
        }
    </style>
</head>
<body>
    <!-- 属性选择器仅限于在表单控件中 -->
    <form>

        <label for="username">用户名</label>
        <label for="vip">vip</label>
        <label for="vvip">vvip</label>

        <input type="text">
        <input type="password">
    </form>
</body>
</html>

后代选择器
使用空格表示后代选择器。顾名思义,父元素的后代(包括儿子,孙子,重孙子)

.container p{
    color: red;
}
.container .item p{
    color: yellow;
}
子代选择器
使用>表示子代选择器。比如div>p,仅仅表示的是当前div元素选中的子代(不包含孙子....)元素p。

.container>p{
     color: yellowgreen;
}
并集选择器
多个选择器之间使用逗号隔开。表示选中的页面中的多个标签。一些共性的元素,可以使用并集选择器

/*并集选择器*/
h3,a{
    color: #008000;
    text-decoration: none;

}
交集选择器
使用.表示交集选择器。第一个标签必须是标签选择器,第二个标签必须是类选择器 语法:div.active
比如有一个<h4 class='active'></h4>这样的标签。

h4{
     100px;
    font-size: 14px;
}
.active{
    color: red;
    text-decoration: underline;
}
/* 交集选择器 */
h4.active{
    background: #00BFFF;
}
它表示两者选中之后元素共有的特性。
伪类选择器
伪类选择器一般会用在超链接a标签中,使用a标签的伪类选择器,我们一定要遵循"爱恨准则"

<!DOCTYPE html>
<html lang="en">
<head>
    <meta charset="UTF-8">
    <title>伪类选择器</title>
    <style type="text/css">
        .box ul li.item a:link{
            color: red;
        }
        .box ul li.item a:visited{
            color: yellow;
        }
        .box ul li.item a:hover{
            color: green;
            font-size: 30px;
        }
        .box ul li.item a:active{
            color: pink;
            background-color: #000;
        }
        span{
            display: block;
             200px;
            height: 200px;
            background-color: yellow;
        }
        span:hover{
            display: block;
             200px;
            height: 200px;
            background-color: yellow;
        }
        span:hover{
            color: red;
            cursor: pointer;
            background-color: #000;
            font-size: 30px;
        }
        input{
             300px;
            height: 200px;
        }
        ul>li{
            height: 100px;
            background-color: red;
        }
        /*
            行内标签:
            a span
            1、在一行内显示
            2、不能设置宽高
            3、宽高 是内容的宽高

            行内块
            1.在一行内显示
            2.可以设置宽高

            块级标签
            div p ul li
            1、独占一行
            2、可以设置标签宽高
            3、如果不设置宽高,默认body100%宽度
        */
    </style>
</head>
<body>
    <span>哈哈哈</span>
    <input type="text">
    <input type="password">
    <ul>
        <li>111</li>
    </ul>

    <div class="box">
        <ul>
            <li class="item">
                <a href="#">超链接</a>
            </li>
        </ul>
    </div>
</body>
</html>

<!DOCTYPE html>
<html lang="en">
<head>
    <meta charset="UTF-8">
    <title>Document</title>
    <style>
        /*ul>li{
            list-style: none;
        }*/
        ul li:first-child{
            color: red;
        }
        ul li:last-child{
            color: red;
        }
        ul li:nth-child(3){
            color: blue;
        }
        ul li:nth-child(n){
            color: yellow;
        }
        ul li:nth-child(3n+1){
            color: green;
        }
    </style>
</head>
<body>

    <ul>
        <li>冯波1</li>
        <li>冯波2</li>
        <li>冯波3</li>
        <li>冯波4</li>
        <li>冯波5</li>
        <li>冯波6</li>
        <li>冯波7</li>
        <li>冯波8</li>
    </ul>

</body>
</html>
CSS3的选择器nth-child()
/*选中第一个元素*/
        div ul li:first-child{
            font-size: 20px;
            color: red;
        }
        /*选中最后一个元素*/
        div ul li:last-child{
            font-size: 20px;
            color: yellow;
        }

        /*选中当前指定的元素  数值从1开始*/
        div ul li:nth-child(3){
            font-size: 30px;
            color: purple;
        }

        /*n表示选中所有,这里面必须是n, 从0开始的  0的时候表示没有选中*/
        div ul li:nth-child(n){
            font-size: 40px;
            color: red;
        }

        /*偶数*/
        div ul li:nth-child(2n){
            font-size: 50px;
            color: gold;
        }
        /*奇数*/
        div ul li:nth-child(2n-1){
            font-size: 50px;
            color: yellow;
        }
        /*隔几换色  隔行换色
             隔4换色 就是5n+1,隔3换色就是4n+1
            */

        div ul li:nth-child(5n+1){
            font-size: 50px;
            color: red;
        }

/*设置第一个首字母的样式*/
        p:first-letter{
            color: red;
            font-size: 30px;

        }

/* 在....之前 添加内容   这个属性使用不是很频繁 了解  使用此伪元素选择器一定要结合content属性*/
        p:before{
            content:'alex';
        }


/*在....之后 添加内容,使用非常频繁 通常与咱们后面要讲到布局 有很大的关联(清除浮动)*/
        p:after{
            content:'&';
            color: red;
            font-size: 40px;
        }
CSS的两大特性:继承性和层叠性
继承性
面向对象语言都会存在继承的概念,在面向对象语言中,继承的特点:继承了父类的属性和方法。那么我们现在主要研究css,css就是在设置属性的。不会牵扯到方法的层面。
继承:给父级设置一些属性,子级继承了父级的该属性,这就是我们的css中的继承。
记住:有一些属性是可以继承下来 : color 、 font-*、 text-*、line-* 。主要是文本级的标签元素。
但是像一些盒子元素属性,定位的元素(浮动,绝对定位,固定定位)不能继承。
层叠性
层叠性: 权重的标签覆盖掉了权重小的标签,说白了 ,就是被干掉了
权重: 谁的权重大,浏览器就会显示谁的属性
谁的权重大? 非常简单就是小学的数数。
数:id的数量 class的数量 标签的数量,顺序不能乱
/*1  0  0 */显示红色
#box{


    color: red;
}
/*0  1  0*/
.container{
    color: yellow;
}
/*0  0  1*/
p{
    color: purple;
}
继承性
有一些属性是可以继承下来 : color 、 font-*、 text-*、line-* 。主要是文本级的标签元素。但是像一些盒子元素属性,定位的元素(浮动,绝对定位,固定定位)不能继承。

<!DOCTYPE html>
<html lang="en">
<head>
    <meta charset="UTF-8">
    <title>继承性</title>
    <style>
        p{
            color: blue;
            background-color: transparent;
        }
        div{
            color: red;
            font-size: 40px;
            background: green;
             300px;
        }
    </style>
</head>
<body>
    <div>
        <p>John</p>
    </div>
</body>
</html>

层叠性

<!DOCTYPE html>
<html lang="en">
<head>
    <meta charset="UTF-8">
    <title>层叠性</title>
    <style>
        #box{
            color: green;
        }
        .container{
            color: yellow;
        }
        p{
            color: red;
        }
    </style>
</head>
<body>
    <p id="box" class="container">
        赵云是什么颜色
    </p>
</body>
</html>


<!DOCTYPE html>
<html lang="en">
<head>
    <meta charset="UTF-8">
    <title>层叠性</title>
    <style>
        #box #box2 p{
            color: red;
        }
        #box1 #box2 .wrap3 p{
            color: green;
        }
        #box1 #box2 #box3 p{
            color: pink;
        }
    </style>
</head>
<body>
    <div id="box1" class="wrap1">
        <div id="box2" class="wrap2">
            <di id="box3" class="wrap3">
                <p>再来猜猜我是什么颜色?</p>
            </di>
        </div>

    </div>
</body>
</html>


<!DOCTYPE html>
<html lang="en">
<head>
    <meta charset="UTF-8">
    <title>Document</title>
    <style>
        #box2 .wrap3 p{
            color: yellow;
        }

        #box1 .wrap2 p{
            color: red;
        }


    </style>
</head>
<body>

    <!-- 当权重一样的 后来者居中 -->
    <div id='box1' class="wrap1">
        <div id="box2" class="wrap2">
            <div id="box3" class="wrap3">
                <p>再来猜猜我是什么颜色?</p>
            </div>
        </div>
    </div>
</body>
</html>

权重深入
说明:
1.先看标签元素有没有被选中,如果选中了,就数数 (id,class,标签的数量) 谁的权重大 就显示谁的属性。权重一样大,后来者居上
2.如果没有被选中标签元素,权重为0。
如果属性都是被继承下来的 权重都是0 。权重都是0:"就近原则" : 谁描述的近,就显示谁的属性
3.继承来的,描述的一样近,数权重
4.继承来的,描述的一样近,权重一样,后来者居上

 1 <!DOCTYPE html>
 2 <html lang="en">
 3 <head>
 4     <meta charset="UTF-8">
 5     <title>权重深入</title>
 6     <style>
 7         #box1.wrap2{
 8             color: red;
 9         }
10         #box2.wrap3{
11             color: yellow;
12         }
13         #box1 .wrap3{
14             color: red;
15         }
16         #box1 .wrap2 .wrap3{
17             color: red !important; /*设置优先级无限大*/
18         }
19         .wrap1 #box2 .wrap3{
20             color: green;
21         }
22     </style>
23 </head>
24 <body>
25     <div id = 'box1' class="wrap1">
26         <div id="box2" class="wrap2">
27             <div id="box3" class="wrap3">
28                 <p style="color: yellow">再来猜猜我是什么颜色?</p>
29             </div>
30         </div>
31     </div>
32 </body>
33 </html>

第一种现象:当权重相同时,以后来设置的属性为准,前提一定要权重相同
#box2 .wrap3 p{
    color: yellow;
}

#box1 .wrap2 p{
    color: red;
}
我们会发现此时显示的是红色的。
第二种现象: 第一个选择器没有选中内层标签,那么它是通过继承来设置的属性,那么它的权重为0。第二个选择器选中了内层标签,有权重。
所以 继承来的元素 权重为0。跟选中的元素没有可比性。
#box1 #box2 .wrap3{
    color: red;
}
#box2 .wrap3 p{
    color: green;
}
我们会发现此时显示的是绿色的。
第三种现象:如果都是继承来的属性,谁描述的近,显示谁的属性。'就近原则'
#box1 #box2 .wrap3{
    color: red;
}
 .wrap1 #box2{
    color: green;
}
!important 的使用。
!important:设置权重为无限大
!important 不影响继承来的权重,只影响选中的元素。不要随便使用!important,因为使用它会影响页面的布局
盒模型
在CSS中,"box model"这一术语是用来设计和布局时使用,然后在网页中基本上都会显示一些方方正正的盒子。我们称为这种盒子叫盒模型。
盒模型有两种:标准模型和IE模型。我们在这里重点讲标准模型。
盒模型示意图

盒模型的属性
width:内容的宽度
height: 内容的高度
padding:内边距,边框到内容的距离
border: 边框,就是指的盒子的宽度
margin:外边距,盒子边框到附近最近盒子的距离
如果让你做一个宽高402*402的盒子,您如何来设计呢?
答案有上万种,甚至上一种。
盒模型的计算
如果一个盒子设置了padding,border,width,height,margin(咱们先不要设置margin,margin有坑,后面课程会讲解)
盒子的真实宽度=width+2*padding+2*border
盒子的真实宽度=height+2*padding+2*border
那么在这里要注意看了。标准盒模型,width不等于盒子真实的宽度。
另外如果要保持盒子真实的宽度,那么加padding就一定要减width,减padding就一定要加width。真实高度一样设置。
padding
padding:就是内边距的意思,它是边框到内容之间的距离
另外padding的区域是有背景颜色的。并且背景颜色和内容的颜色一样。也就是说background-color这个属性将填充所有的border以内的区域
padding的设置
padding有四个方向,分别描述4个方向的padding。
描述的方法有两种
1、写小属性,分别设置不同方向的padding
padding-top: 30px;
padding-right: 30px;
padding-bottom: 30px;
padding-left: 30px;
2、写综合属性,用空格隔开
/*上 右 下 左*/
padding: 20px 30px 40px 50px ;

/*上 左右  下*/
padding: 20px 30px 40px;

/* 上下 左右*/
padding: 20px 30px;

/*上下左右*/
padding: 20px;
一些标签默认有padding
比如ul标签,有默认的padding-left值。
那么我们一般在做站的时候,是要清除页面标签中默认的padding和margin。以便于我们更好的去调整元素的位置。
我们现在初学可以使用通配符选择器
*{
  padding:0;
  margin:0;
}
But,这种方法效率不高。
所以我们要使用并集选择器来选中页面中应有的标签(不同背,因为有人已经给咱们写好了这些清除默认的样式表,reset.css)
边框
border:边框的意思,描述盒子的边框
边框有三个要素: 粗细 线性样式 颜色
border: solid
如果颜色不写,默认是黑色。如果粗细不写,不显示边框。如果只写线性样式,默认的有上下左右 3px的宽度,实体样式,并且黑色的边框。
按照3要素来写border
border- 3px;
border-style: solid;
border-color: red;
/*
border- 5px 10px;
border-style: solid dotted double dashed;
border-color: red green yellow;
*/
按照方向划分
border-top-color: red;
border-top-style: solid;

border-right- 10px;
border-right-color: red;
border-right-style: solid;

border-bottom- 10px;
border-bottom-color: red;
border-bottom-style: solid;

border-left- 10px;
border-left-color: red;
border-left-style:solid;
上面12条语句,相当于 bordr: 10px solid red;
另外还可以这样:
border-top: 10px solid red;
border-right: 10px solid red;
border-bottom: 10px solid red;
border-left: 10pxb solid red;
border:none;
border:0;
表示border没有设置样式。
使用border来制作小三角
/*小三角 箭头指向下方*/
        div{
             0;
            height: 0;
            border-bottom: 20px solid red;
            border-left: 20px solid transparent;
            border-right: 20px solid transparent;
        }
margin
margin:外边距的意思。表示边框到最近盒子的距离。
/*表示四个方向的外边距离为20px*/
margin: 20px;
/*表示盒子向下移动了30px*/
margin-top: 30px;
/*表示盒子向右移动了50px*/
margin-left: 50px;

margin-bottom: 100px;
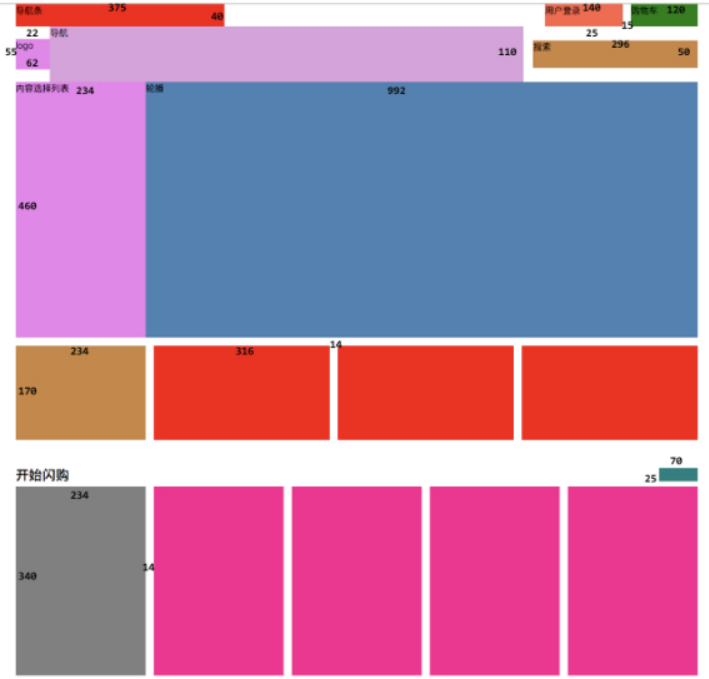
下面演示,做小米官网的简单布局图
先看设计图


<!DOCTYPE html>
<html lang="en">
<head>
    <meta charset="UTF-8">
    <title>Document</title>
    <style>
        *{
            padding: 0;
            margin: 0;
        }
        ul{
            list-style: none;
        }

        /*导航栏的样式*/
        .nav{
             1226px;
            height: 40px;
            /**/
            margin: 0 auto;
        }
        .nav .navt{
             375px;
            height: 40px;
            background-color: red;
            float: left;
        }
        .nav .car{
             120px;
            height: 40px;
            background-color: green;
            float: right;
            margin-left: 15px;
        }
        .nav .login{
             140px;
            height: 40px;
            background-color: pink;
            float: right;
        }
        .wrap{
             1226px;
            height: 110px;
            /*background: #666;*/
            margin: 0 auto;


        }
        .wrap .logo{
             62px;
            height: 55px;
            background-color: purple;
            float: left;
            margin-top: 22px;

        }
        .wrap .nav2{
             850px;
            height: 110px;
            background: pink;
            float: left;

        }
        .wrap .search{
             296px;
            height: 50px;
            float: right;
            background-color: purple;
            margin-top: 30px;
        }
        ul{
             1226px;
            height: 300px;
            margin: 0 auto;
        }
        ul li{
            float: left;
             300px;
            height: 300px;
            background-color:red;
            margin-left: 20px;
        }
    </style>
</head>
<body>

<div class="nav">
    <div class="navt"></div>
    <div class="car"></div>
    <div class="login"></div>
</div>

<div class="wrap">
    <div class="logo"></div>
    <div class="nav2"></div>
    <div class="search"></div>
</div>

<!--<ul>-->
    <!--<li>1</li>-->
    <!--<li>2</li>-->
<!--</ul>-->

</body>
</html>
网页效果:

今日作业:
完成设计图剩余部分
