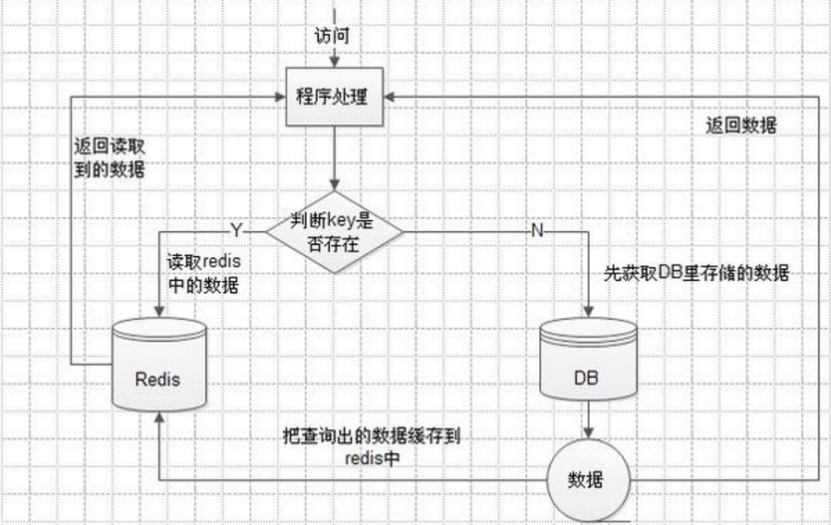
Redis是一种nosql数据库,以键值对<key,value>的形式存储数据,其速度相比于MySQL之类的数据库,相当于内存读写与硬盘读写的差别,所以常常用作缓存,用于少写多读的场景下,直接从缓存拿数据比从数据库(数据库要I/O操作)拿要快得多。Redis目前几乎无处不在,大公司小公司都在用。
Spring cloud 2.x版本后默认Redis客户端连接池类型使用的是lettuce,而Sping cloud 1.5.x使用的jedis。Lettuce 和 Jedis 的都是连接Redis Server的客户端程序。Jedis在实现上是直连redis server,多线程环境下非线程安全,除非使用连接池,为每个Jedis实例增加物理连接;Lettuce基于Netty的连接实例(StatefulRedisConnection),可以在多个线程间并发访问,且线程安全,满足多线程环境下的并发访问,同时它是可伸缩的设计,一个连接实例不够的情况也可以按需增加连接实例。
1、 新建项目sc-redis,对应的pom.xml文件如下
<project xmlns="http://maven.apache.org/POM/4.0.0" xmlns:xsi="http://www.w3.org/2001/XMLSchema-instance"

xsi:schemaLocation="http://maven.apache.org/POM/4.0.0 http://maven.apache.org/xsd/maven-4.0.0.xsd">

<modelVersion>4.0.0</modelVersion>


<groupId>spring-cloud</groupId>

<artifactId>sc-redis</artifactId>

<version>0.0.1-SNAPSHOT</version>

<packaging>jar</packaging>


<name>sc-redis</name>

<url>http://maven.apache.org</url>


<parent>

<groupId>org.springframework.boot</groupId>

<artifactId>spring-boot-starter-parent</artifactId>

<version>2.0.4.RELEASE</version>

</parent>


<dependencyManagement>

<dependencies>

<dependency>

<groupId>org.springframework.cloud</groupId>

<artifactId>spring-cloud-dependencies</artifactId>

<version>Finchley.RELEASE</version>

<type>pom</type>

<scope>import</scope>

</dependency>


</dependencies>

</dependencyManagement>


<properties>

<project.build.sourceEncoding>UTF-8</project.build.sourceEncoding>

<maven.compiler.source>1.8</maven.compiler.source>

<maven.compiler.target>1.8</maven.compiler.target>

</properties>

<dependencies>

<dependency>

<groupId>org.springframework.boot</groupId>

<artifactId>spring-boot-starter-data-redis</artifactId>

</dependency>

<dependency>

    <groupId>org.apache.commons</groupId>

    <artifactId>commons-pool2</artifactId>

</dependency>


<dependency>

<groupId>org.springframework.boot</groupId>

<artifactId>spring-boot-starter-web</artifactId>

</dependency>

</dependencies>

</project>

2、 新建spring boot启动类
package sc.redis;


import org.springframework.boot.SpringApplication;

import org.springframework.boot.autoconfigure.SpringBootApplication;


@SpringBootApplication

public class RedisApplication {


public static void main(String[] args) {

SpringApplication.run(RedisApplication.class, args);

}


}
3、 新建配置文件application.yml
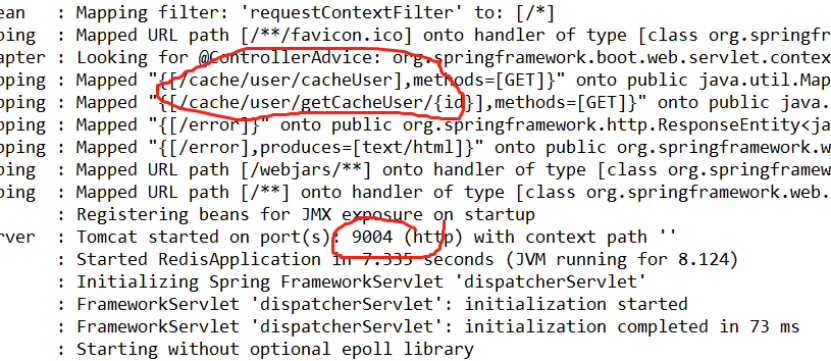
server:

  port: 9004


spring:

  application:

    name: sc-redis

  redis:

    host: 127.0.0.1

    password:

    port: 6379

    timeout: 10000 # 连接超时时间(毫秒)

    database: 0 # Redis默认情况下有16个分片,这里配置具体使用的分片,默认是0

    lettuce:

      pool:

        max-active: 8 # 连接池最大连接数(使用负值表示没有限制) 默认 8

        max-wait: -1 # 连接池最大阻塞等待时间(使用负值表示没有限制) 默认 -1

        max-idle: 8 # 连接池中的最大空闲连接 默认 8

        min-idle: 0 # 连接池中的最小空闲连接 默认 0
备注:reids对用的所有配置项可以在以下类查看
org.springframework.boot.autoconfigure.data.redis.RedisProperties
4、 自定义Reids的Template
默认情况下的模板只能支持RedisTemplate<String, String>,也就是只能存入字符串,这在开发中是不友好的,所以自定义模板是很有必要的,当自定义了模板又想使用String存储这时候就可以使用StringRedisTemplate的方式,它们之间并不冲突。
package sc.redis.config;


import java.io.Serializable;


import org.springframework.boot.autoconfigure.AutoConfigureAfter;

import org.springframework.boot.autoconfigure.data.redis.RedisAutoConfiguration;

import org.springframework.context.annotation.Bean;

import org.springframework.context.annotation.Configuration;

import org.springframework.data.redis.connection.lettuce.LettuceConnectionFactory;

import org.springframework.data.redis.core.RedisTemplate;

import org.springframework.data.redis.serializer.GenericJackson2JsonRedisSerializer;

import org.springframework.data.redis.serializer.StringRedisSerializer;


@Configuration

@AutoConfigureAfter(RedisAutoConfiguration.class)

public class RedisCacheAutoConfiguration {


    @Bean

    public RedisTemplate<String, Serializable> redisCacheTemplate(LettuceConnectionFactory redisConnectionFactory) {

        RedisTemplate<String, Serializable> template = new RedisTemplate<>();

        //键的序列化方式

        template.setKeySerializer(new StringRedisSerializer());

        //值的序列化方式

        template.setValueSerializer(new GenericJackson2JsonRedisSerializer());

        template.setConnectionFactory(redisConnectionFactory);

        return template;

    }

}
5、 新建一个模拟的Controller类
package sc.redis.config;


import java.io.Serializable;

import java.util.HashMap;

import java.util.Map;


import org.springframework.beans.factory.annotation.Autowired;

import org.springframework.data.redis.core.RedisTemplate;

import org.springframework.web.bind.annotation.GetMapping;

import org.springframework.web.bind.annotation.PathVariable;

import org.springframework.web.bind.annotation.ResponseBody;

import org.springframework.web.bind.annotation.RestController;


import sc.redis.model.User;


@RestController

public class UserCacheController {


//@Autowired

//private StringRedisTemplate stringRedisTemplate;


@Autowired

private RedisTemplate<String, Serializable> redisCacheTemplate;


@GetMapping(value = "/cache/user/cacheUser")

@ResponseBody

public Map<String, Object> cacheUser() {

Map<String, Object> result = new HashMap<String, Object>();

result.put("code", "000000");

result.put("msg", "success");

User u = new User();

u.setId(1L);

u.setAge(23);

u.setUserName("huangjinjin");

u.setPosition("cto");

result.put("body", u);

redisCacheTemplate.opsForValue().set(String.valueOf(u.getId()), u);

return result;

}


/**

 * 获取缓存信息

 * @param id

 * @return

 */

@GetMapping(value = "/cache/user/getCacheUser/{id}")

@ResponseBody

public Map<String, Object> getCacheUser(@PathVariable Long id) {

Map<String, Object> result = new HashMap<String, Object>();

result.put("code", "000000");

result.put("msg", "success");

User u =  (User) redisCacheTemplate.opsForValue().get(String.valueOf(1));

System.out.println(u.getUserName());

result.put("body", u);

return result;

}


}
6、 启动sc-redis项目,并验证是否启动成功
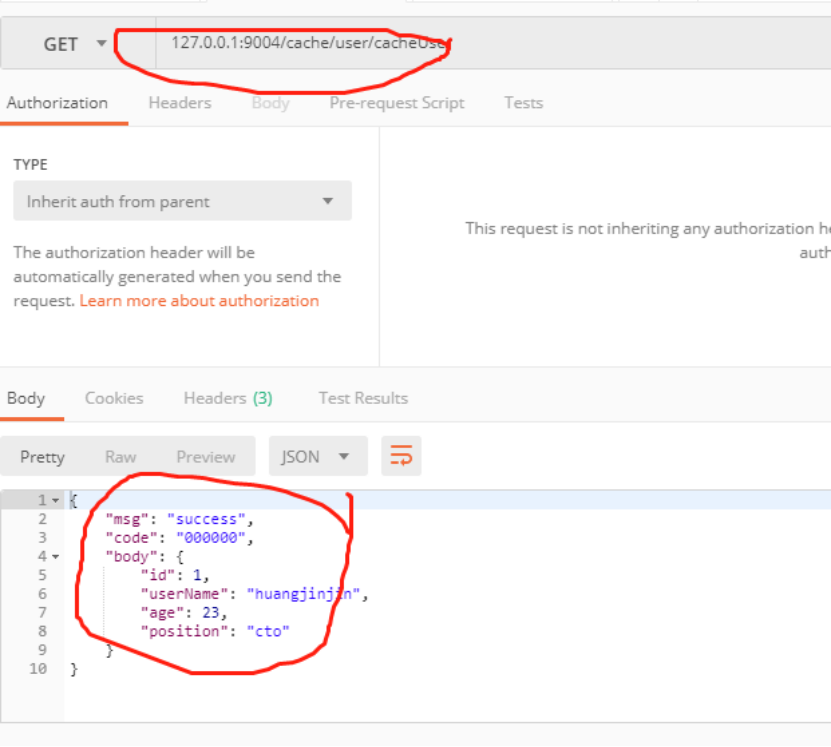
7、 使用postman访问接口
(1) 存储值到redis
http://127.0.0.1:9004/cache/user/cacheUser
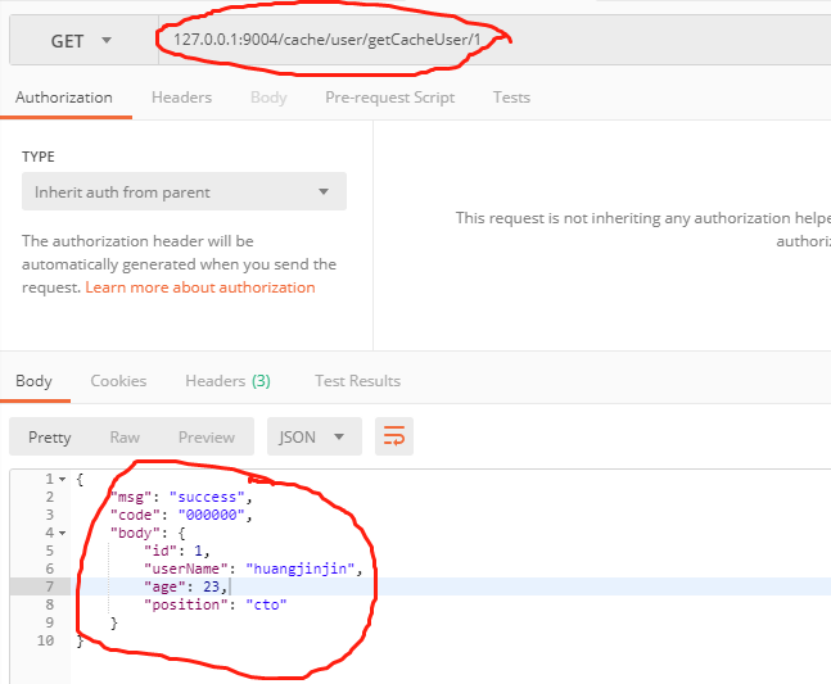
(2) 从redis获取存贮的值
http://127.0.0.1:9004/cache/user/getCacheUser/1
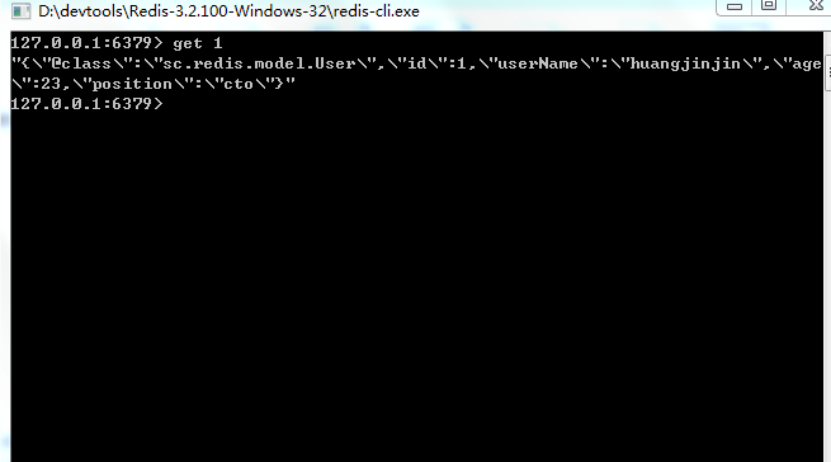
使用redis客户端redis-cli查看是否把相关数据存贮到redis
下列的就是Redis其它类型所对应的操作方式:
opsForValue: 对应 String(字符串)
opsForZSet: 对应 ZSet(有序集合)
opsForHash: 对应 Hash(哈希)
opsForList: 对应 List(列表)
opsForSet: 对应 Set(集合)
opsForGeo: 对应 GEO(地理位置)