结对项目作业
| 项目 | 内容 |
|---|---|
| 这个作业属于那个课程 | 班级博客 |
| 这个作业的要求在哪里 | 结对项目作业 |
| 教学班级 | 006 |
| 我在这个课程的目标是 | 学习软件工程相关知识,增强自己的开发能力。 |
| 这个作业在哪个具体方面帮我实现目标 | 学习结对编程的技巧和方法 |
| github地址 | https://github.com/harrychen23235/MultiIntersect |
一、在文章开头给出教学班级和可克隆的 Github 项目地址(例子如下)。(1')
教学班级:006
项目地址:https://github.com/harrychen23235/MultiIntersect
二、在开始实现程序之前,在下述 PSP 表格记录下你估计将在程序的各个模块的开发上耗费的时间。(0.5')
| PSP2.1 | Personal Software Process Stages | 预估耗时(分钟) | 实际耗时(分钟) |
|---|---|---|---|
| Planning | 计划 | ||
| · Estimate | · 估计这个任务需要多少时间 | 30 | 35 |
| Development | 开发 | ||
| · Analysis | · 需求分析 (包括学习新技术) | 100 | 120 |
| · Design Spec | · 生成设计文档 | 30 | 30 |
| · Design Review | · 设计复审 (和同事审核设计文档) | 20 | 20 |
| · Coding Standard | · 代码规范 (为目前的开发制定合适的规范) | 10 | 10 |
| · Design | · 具体设计 | 30 | 20 |
| · Coding | · 具体编码 | 60 | 80 |
| · Code Review | · 代码复审 | 60 | 90 |
| · Test | · 测试(自我测试,修改代码,提交修改) | 180 | 240 |
| Reporting | 报告 | ||
| · Test Report | · 测试报告 | 40 | 60 |
| · Size Measurement | · 计算工作量 | ||
| · Postmortem & Process Improvement Plan | · 事后总结, 并提出过程改进计划 | 30 | 40 |
| 合计 | 590 | 745 |
三、看教科书和其它资料中关于 Information Hiding,Interface Design,Loose Coupling 的章节,说明你们在结对编程中是如何利用这些方法对接口进行设计的。(5')
-
信息隐藏:在编程中多个小部分合并成大单位时侯,各个部分只显示外部需要的信息,却隐藏看不见的功能。
所有private变量的访问不能直接允许,用类提供的get和set函数。封装(encapsulation) -
接口设计:目的是方便用户与电脑或程序进行沟通,方便使用
我们用继承结构做了设计。
基本类:
class Shape {
public:string mtype;
      Shape(string i_type);
};
然后circle(圆)和line(线)是它的子类关系。
- 松耦合:指系统各构成要素对自身定义的知识不互相共享或利用的状态
每个头文件(.h)间耦合程度不能高。
例如,a和b具有强烈的依赖性。
如果修改b,a也将因此受到严重影响。
这样会给节目带来负面影响。
所以在设计时要放松, 也就是独立地分别设计, 可以防止
四、计算模块接口的设计与实现过程。设计包括代码如何组织,比如会有几个类,几个函数,他们之间关系如何,关键函数是否需要画出流程图?说明你的算法的关键(不必列出源代码),以及独到之处。(7')
核心模块的主要功能包括对于图像的添加,计算交点个数功能。
1、首先是对于具体节点的处理。建立了自定义的point类,并采用unordered_set结构进行储存,内部采用类似java的hashset进行储存。由于采用的为自定义类,同时需要对于浮点数double进行hash,因此重写了equal和hash函数,具体如下所示:
unordered_set<Point*, Hash_Point, Equal_Point> g_allpoint;
struct Hash_Point {
    size_t operator()(const class Point* input1)const {
        long temp1 = floor(input1->x);
        long temp2 = floor(input1->y);
        if (abs(input1->x - (temp1+1)) <= EPS) temp1++;
        if (abs(input1->y- (temp2+1)) <= EPS) temp2++;
        return (temp1 + temp2) * 13 + (temp1 * 1000 % 1000 + temp2 * 1000 % 1000);
    }
};
struct Equal_Point {
    bool operator()(const class Point* input1, const class Point* input2)const {
        return abs(input1->x - input2->x) <= EPS && abs(input1->y - input2->y) <= EPS;
    }
};
需要特别注意的是对于double的处理,在试运行时发现不管是floor还是强制转换为int操作,都可能会出现BUG。例如有概率把(double)1转换成0或者是1,出现二义性。因此在转换完成之后必须新增一步if判断操作。牺牲部分效率确保正确性。
2、其次是对于图形类的具体实现以及图像的添加。对于新增的射线和线段类,让它们继承直线类,射线类新增方向属性以及起始节点,如下所示:
class Seg :public Line {
public:double  mx2, my2, mx1, my1;
      Seg(double input1, double input2, int ifspecial, double input3, double input4, double input5, double input6);
};,而线段类则新增对于2个端点的记录。如下所示:

class Ray :public Line {
public:double mx1, my1, mx2, my2;
    int direction;//1,2,3,4表示延长到的象限位置,-1表示朝x轴正方向延伸,-2,表示朝x轴负方向延伸,-3表示向y轴正方向延伸,-4表示向y轴负方向延伸
    Ray(double input1, double input2, int ifspecial, double input3, double input4, double input5, double input6);
};
图形的产生依然使用工厂模式,在其中增加了对于线段和射线类的处理:
Shape* ShapeFactory::GetShape(string type, double temp1, double temp2, double temp3, double temp4) {
          if (type == "L") {
              if (temp1 == temp3) return new Line(temp1, 0, 1);
              else return new Line((temp4 - temp2) / (temp3 - temp1), temp2 - (temp4 - temp2) / (temp3 - temp1) * temp1, 0);
          }
          else if (type == "R") {
              if (temp1 == temp3) return new Ray(temp1, 0, 1, temp1, temp2, temp3, temp4);
              else return new Ray((temp4 - temp2) / (temp3 - temp1), temp2 - (temp4 - temp2) / (temp3 - temp1) * temp1, 0, temp1, temp2, temp3, temp4);
          }
          else if (type == "S") {
              if (temp1 == temp3) return new Seg(temp1, 0, 1, temp1, temp2, temp3, temp4);
              else return new Seg((temp4 - temp2) / (temp3 - temp1), temp2 - (temp4 - temp2) / (temp3 - temp1) * temp1, 0, temp1, temp2, temp3, temp4);
          }
          else if (type == "C") {
              return new Circle(temp1, temp2, temp3);
          }
          else {
          }
          return NULL;
}
3、对于具体交点的计算,由于新增的线段和射线计算交点的方式和直线计算交点的方式基本相同,因此在架构上完全沿用之前对直线求交点的函数。在交点计算完成后增加一个判断交点是否在射线或线段上的环节。需要注意的是可能会出现线段或射线首尾相连,出现1个交点的特殊情况,因此需要对这种情况进行特殊判断:
void L2L(Line* input1, Line* input2, unordered_set<Point*, Hash_Point, Equal_Point>& g_allpoint) {
    if (input1->mspecial == 0 && input2->mspecial == 0) {
        if (abs(input1->ma - input2->ma) <= EPS) {
            if (abs(input1->mb - input2->mb) <= EPS)
                L2L_Special(input1, input2, 0, g_allpoint);//对于特殊情况的判断处理
            return;
        }
        double x = (input2->mb - input1->mb) / (input1->ma - input2->ma);
        double y = x * input1->ma + input1->mb;
        if (Line_Process(input1, x, y) && Line_Process(input2, x, y))//判断交点是否在线上
            g_allpoint.insert(new Point(x, y));
        return;
    }
    else if (input1->mspecial == 1 && input2->mspecial == 1) {
        if (input1->ma == input2->ma)
            L2L_Special(input1, input2, 1, g_allpoint);
        return;
    }
    else {
        if (input1->mspecial == 1) {
            double x = input1->ma;
            double y = input1->ma * input2->ma + input2->mb;
            if (Line_Process(input1, x, y) && Line_Process(input2, x, y))
                g_allpoint.insert(new Point(x, y));
        }
        else {
            double x = input2->ma;
            double y = input1->ma * input2->ma + input1->mb;
            if (Line_Process(input1, x, y) && Line_Process(input2, x, y))
                g_allpoint.insert(new Point(input2->ma, input1->ma * input2->ma + input1->mb));
        }
    }
}
对于特殊情况处理,这部分代码逻辑较为复杂。主要思路是判断位于同一直线上的射线和线段,射线和射线,线段和线段之间到底是存在一个交点,还是存在覆盖区域,导致无限多个交点产生。代码如下所示:
void L2L_Special(Line* input1, Line* input2, int ifspecial, unordered_set<Point*, Hash_Point, Equal_Point>& g_allpoint) {
    if (input1->mtype == "L" || input2->mtype == "L") throw string("infinite point");
    //如果有一个为直线必定存在无限多个交点
    else if (input1->mtype == "R" && input2->mtype == "R") {
        if (abs(input1->ma - input2->ma) <= EPS && abs(input1->mb - input2->mb) <= EPS) {
            if (((Ray*)input1)->direction == ((Ray*)input2)->direction) {
                throw string("infinite point");
            }//起始节点相同以及方向相同射线必定有无数多个节点
            else {
                g_allpoint.insert(new Point(input1->ma, input1->mb));
                //起始节点相同以及方向相反射线必定只有一个节点
                return;
            }
        }
        else {
            //起始节点不同节点要么有无数多个节点,要么没有节点
            int direction = DirectionGet(((Ray*)input1)->mx1, ((Ray*)input1)->my1, ((Ray*)input2)->mx1, ((Ray*)input2)->my1);
            if (direction == ((Ray*)input1)->direction)throw string("infinite point");
            else return;
        }
    }
    else if (input1->mtype == "R" || input2->mtype == "R") {
        //对于射线和线段的判断
        Ray* r1;
        Seg* s1;
        if (input1->mtype == "R") {
            r1 = (Ray*)input1;
            s1 = (Seg*)input2;
        }
        else {
            r1 = (Ray*)input2;
            s1 = (Seg*)input1;
        }
        int direction1 = DirectionGet(r1->mx1, r1->my1, s1->mx1, s1->my1);
        int direction2 = DirectionGet(r1->mx1, r1->my1, s1->mx2, s1->my2);
        if (direction1 == r1->direction || direction2 == r1->direction) throw string("infinite point");
        else if (direction1 == 0 || direction2 == 0) g_allpoint.insert(new Point(r1->mx1, r1->my1));
        else return;
    }
    else {
         //对于线段和线段的判断
        Seg* s1 = (Seg*)input1;
        Seg* s2 = (Seg*)input2;
        double largex1 = s1->mx1 > s1->mx2 ? s1->mx1 : s1->mx2;
        double smallx1 = s1->mx2 > s1->mx1 ? s1->mx1 : s1->mx2;
        double largex2 = s2->mx1 > s2->mx2 ? s2->mx1 : s2->mx2;
        double smallx2 = s2->mx2 > s2->mx1 ? s2->mx1 : s2->mx2;
        if (abs(smallx1 - largex2) <= EPS) {
            if (abs(smallx1 - s1->mx1) <= EPS) g_allpoint.insert(new Point(s1->mx1, s1->my1));
            else g_allpoint.insert(new Point(s1->mx2, s1->my2));
        }
        else if (abs(largex1 - smallx2) <= EPS) {
            if (abs(largex1 - s1->mx1) <= EPS) g_allpoint.insert(new Point(s1->mx1, s1->my1));
            else g_allpoint.insert(new Point(s1->mx2, s1->my2));
        }
        else if (smallx1 > largex2 || smallx2 > largex1) return;
        else throw string("infinite point");
    }
}
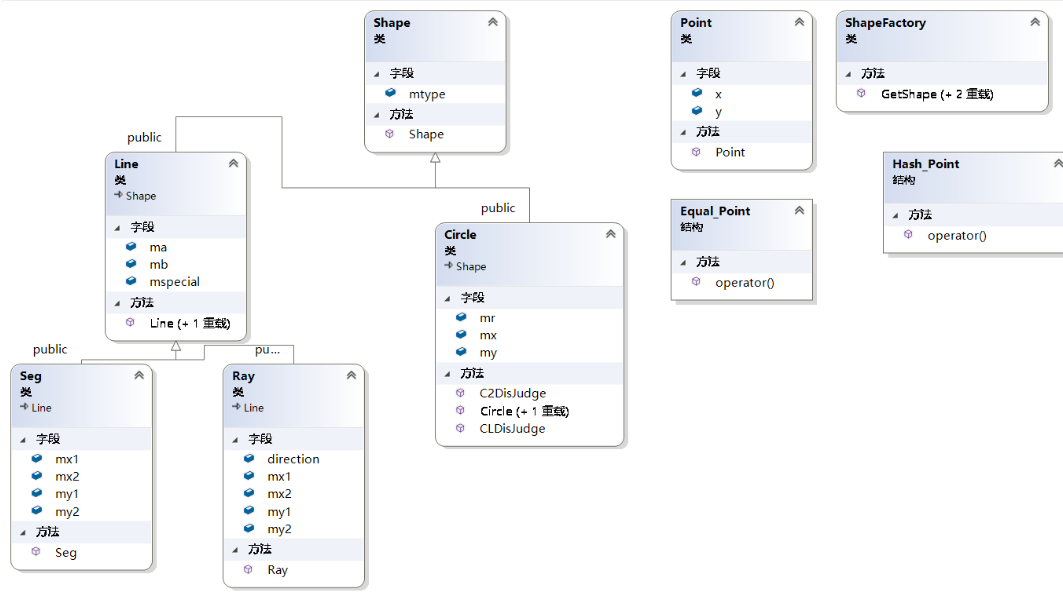
五、阅读有关 UML 的内容:https://en.wikipedia.org/wiki/Unified_Modeling_Language>。画出 UML 图显示计算模块部分各个实体之间的关系(画一个图即可)。(2’)
因为计算的核心模块并非本人所写,所以故引用合作伙伴h87d同学的素材
六、计算模块接口部分的性能改进。记录在改进计算模块性能上所花费的时间,描述你改进的思路,并展示一张性能分析图(由VS 2015/2017的性能分析工具自动生成),并展示你程序中消耗最大的函数。(3')
下表为优化前的具体花费时间,可见当节点数大于1000后增长速度非常不乐观:
| N | 时间(ms) |
|---|---|
| 200 | 45 |
| 400 | 215 |
| 600 | 605 |
| 800 | 920 |
| 1000 | 1754 |
| 2000 | 8410 |
| 3000 | 30360 |
| 4000 | 83956 |

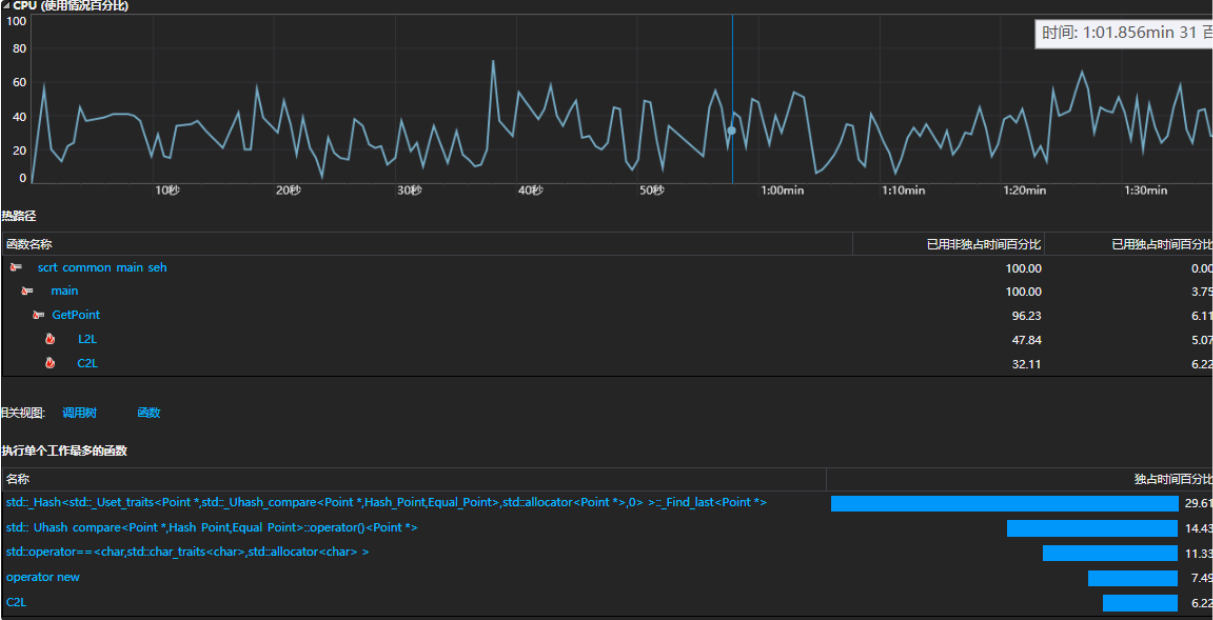
可见调用时间最多的是在unordered_set中的hash和equal函数的使用,因此打算着重对这两个函数进行优化。
对于hash函数将相同变量外提,减少具体代码量,同时改写对hash的生成,减少hash冲突:
    size_t operator()(const class Point* input1)const {
        //return (int)(((int)input1.x) * 1e6 / 10 + ((int)input1.y) * 1e6 / 10);
        double x = input1->x;
        double y = input1->y;
        long temp1 = (long)floor(x);
        long temp2 =(long) floor(y);
        if (abs(x - ((long long)temp1+1)) <= EPS) temp1++;
        if (abs(y- ((long long)temp2+1)) <= EPS) temp2++;
        std::hash<long> long_hash;
        return long_hash.operator()(temp1)+ long_hash.operator()(temp2);
    }
由于equal函数已经为最简形态,无法进行进一步优化。
优化后的结果为:
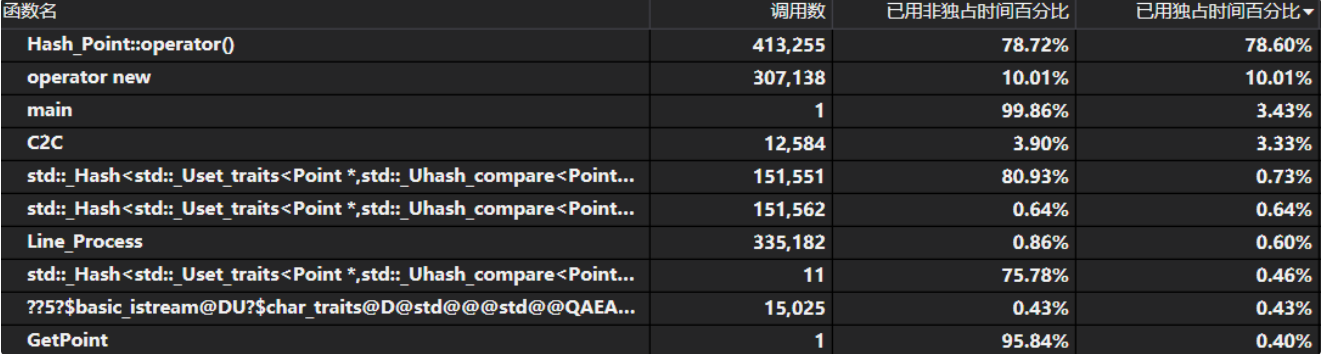
可见hash冲突情况显著下降,同时hash和equal调用次数显著降低。对于4000个图形时的计算时间降低到14208毫秒,效率大幅提升。
七、看 Design by Contract,Code Contract 的内容,描述这些做法的优缺点,说明你是如何把它们融入结对作业中的。(5')
code contract与design by contract通过前置条件,不变式以及后置条件,同时运用动态检查以及静态检查,使函数和接口的正确性得到充分的保证
优点:
- 它可以避免自然语言的二议性,更严格,功能描述更准确。
- 它能帮助别人了解该段代码的作用。
- 明确接口的功能。
- 方便DEBUG调试。
缺点:
- 编写者需要准确理解需求,并覆盖所有情况。
- 在功能非常复杂的时候,规格也可能非常复杂,这样的话难以编写代码。
我们设计接口的时候考虑接口的明确性,所以我们用封装到5个函数,2个变量实体帮助明确接口的功能
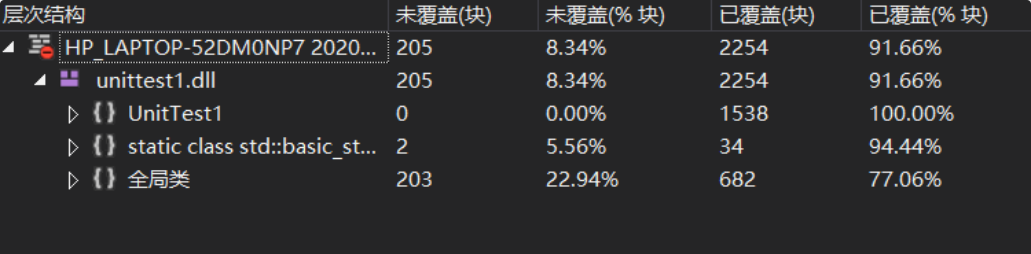
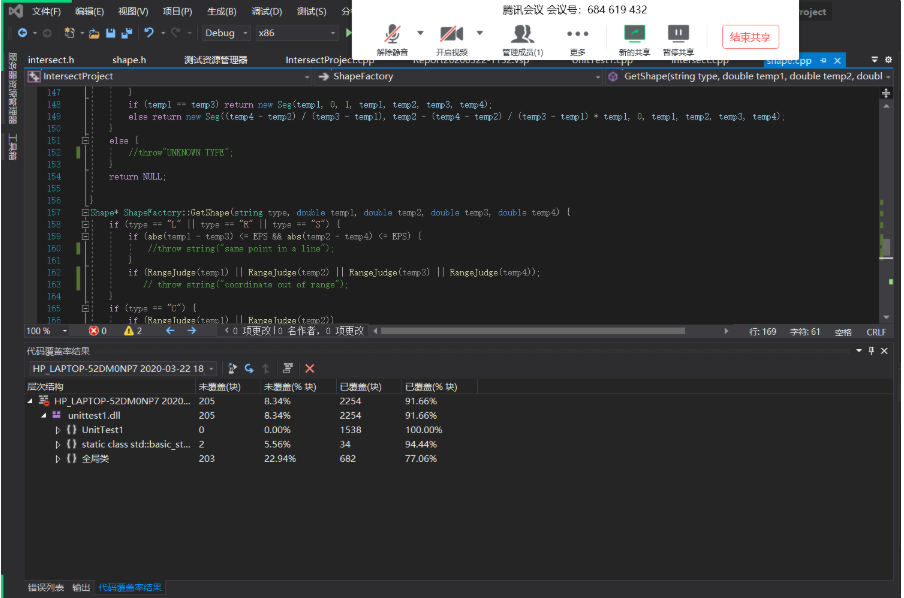
八、计算模块部分单元测试展示。展示出项目部分单元测试代码,并说明测试的函数,构造测试数据的思路。并将单元测试得到的测试覆盖率截图,发表在博客中。要求总体覆盖率到 90% 以上,否则单元测试部分视作无效。(6')
我对本程序的单元测试共分为4个环节。包括对于程序计算函数的单元测试,对于exe文件的单元测试,对于UI接口的单元测试以及对于错误处理的单元测试。
对于计算函数测试部分主要目的是确保底层的准确性,进而确保接口准确性,以下为部分代码:
	TEST_METHOD(TestMethod20) {
		bool b1 = RangeJudge(-100000);
		bool b2 = RangeJudge(100000);
		bool b3 = RangeJudge(-100001);
		bool b4 = RangeJudge(100001);
		bool b5 = RangeJudge(-99999);
		bool b6 = RangeJudge(99999);
		Assert::AreEqual(b1, true);
		Assert::AreEqual(b2, true);
		Assert::AreEqual(b3, true);
		Assert::AreEqual(b4, true);
		Assert::AreEqual(b5, false);
		Assert::AreEqual(b6, false);
对于exe文件部分测试代码如下所示:
TEST_METHOD(TestMethod22)
{
FILE* stream1;
FILE* stream2;
freopen_s(&stream1, "G:\360MoveData\Users\HP\Desktop\nt\input.txt", "w", stdout);
printf("%d
", 3);
printf("L 0 0 1 1
");
printf("L 0 0 1 2
");
printf("L 0 0 1 3
");
fclose(stdout);
PROCESS_INFORMATION ProcessInfo;
STARTUPINFO StartupInfo; //入口参数
ZeroMemory(&StartupInfo, sizeof(StartupInfo));
StartupInfo.cb = sizeof StartupInfo; //分配大小
if (CreateProcess("G:\360MoveData\Users\HP\Desktop\nt\IntersectProject.exe", "G:\360MoveData\Users\HP\Desktop\nt\IntersectProject.exe -i G:\360MoveData\Users\HP\Desktop\nt\input.txt -o G:\360MoveData\Users\HP\Desktop\nt\output.txt",
NULL, NULL, FALSE, HIGH_PRIORITY_CLASS, NULL,
NULL, &StartupInfo, &ProcessInfo))
{
WaitForSingleObject(ProcessInfo.hProcess, INFINITE);
CloseHandle(ProcessInfo.hThread);
CloseHandle(ProcessInfo.hProcess);
}
//WinExec("G:\360MoveData\Users\HP\Desktop\nt\IntersectProject.exe -i G:\360MoveData\Users\HP\Desktop\nt\input.txt -o G:\360MoveData\Users\HP\Desktop\nt\output.txt", SW_HIDE);
int result = 0;
FILE* open = fopen("G:\360MoveData\Users\HP\Desktop\nt\output.txt", "r");
fscanf(open, "%d", &result);
fclose(open);
Assert::AreEqual(1, result);
};
对于错误处理的部分代码如下所示:
	TEST_METHOD(TestMethod46)
	{
		FILE* stream1;
		freopen_s(&stream1, "G:\360MoveData\Users\HP\Desktop\nt\input.txt", "wt", stdout);
		printf("%d
", 1);
		printf("C 0 0 0
");

		fclose(stdout);
		PROCESS_INFORMATION ProcessInfo;
		STARTUPINFO StartupInfo; //入口参数
		ZeroMemory(&StartupInfo, sizeof(StartupInfo));
		StartupInfo.cb = sizeof StartupInfo; //分配大小
		if (CreateProcess("G:\360MoveData\Users\HP\Desktop\nt\IntersectProject.exe", "G:\360MoveData\Users\HP\Desktop\nt\IntersectProject.exe -i G:\360MoveData\Users\HP\Desktop\nt\input.txt -o G:\360MoveData\Users\HP\Desktop\nt\output.txt",
			NULL, NULL, FALSE, HIGH_PRIORITY_CLASS, NULL,
			NULL, &StartupInfo, &ProcessInfo))
		{
			WaitForSingleObject(ProcessInfo.hProcess, INFINITE);
			CloseHandle(ProcessInfo.hThread);
			CloseHandle(ProcessInfo.hProcess);
		}

		//WinExec("G:\360MoveData\Users\HP\Desktop\nt\IntersectProject.exe -i G:\360MoveData\Users\HP\Desktop\nt\input.txt -o G:\360MoveData\Users\HP\Desktop\nt\output.txt", SW_HIDE);
		char result[40];
		FILE* open = fopen("G:\360MoveData\Users\HP\Desktop\nt\output.txt", "r");
		fgets(result, 40, open);
		fclose(open);
		Assert::AreEqual("radius must be greater than 0
", result);

	};
对于UI接口测试的代码如下所示:
TEST_METHOD(TestMethod53) {
		Add_Diagram("C 1 0 2 0", 1);
		Add_Diagram("C 2 2 1 0", 1);
		Add_Diagram("C 3 -2 6 0", 1);
		Add_Diagram("L -1 4 4 -1", 1);
		Calculate();
		Assert::AreEqual(6, (int)myallpoint.size());
		Clear();
		Calculate();
		Assert::AreEqual(0, (int)myallpoint.size());
		Add_Diagram("C 1 0 2 0", 1);
		Add_Diagram("C 2 2 1 0", 1);
		Add_Diagram("C 3 -2 6 0", 1);
		Add_Diagram("L -1 4 4 -1", 1);
		Calculate();
		Assert::AreEqual(6, (int)myallpoint.size());
		Sub_Diagram("C 1 0 2 0", 1);
		Sub_Diagram("C 2 2 1 0", 1);
		Sub_Diagram("C 3 -2 6 0", 1);
		Sub_Diagram("L -1 4 4 -1", 1);
		myallpoint.clear();
		Calculate();
		Assert::AreEqual(0, (int)myallpoint.size());
	}
总共进行了52组不同的测试,且测试覆盖率达到了90%以上,总体上满足了课程要求。
九、计算模块部分异常处理说明。在博客中详细介绍每种异常的设计目标。每种异常都要选择一个单元测试样例发布在博客中,并指明错误对应的场景。(5')
| 错误类型 | 输入(其中一种) | 描述 | 输出(输出在文件中) |
|---|---|---|---|
| 线重合 | 2 L 0 0 1 1 L 0 0 -1 -1 | 线性图形有重叠部分,导致无限多个交点 | infinite point |
| 圆的重合 | 2 C 1 1 1 C 1 1 1 | 两个圆圆心和半径相等 | same circle error |
| 输入点重合 | 1 L 1 1 1 1 | 线性图形2个输入点完全相同 | same point in a line |
| 坐标超限 | 1 L 10000 1000001 1000002 1000003 | 输入点坐标超过限制 | coordinate out of range |
| 半径小于0 | 1 C 0 0 -1 | 输入圆的半径小于-1 | radius must be greater than 0 |
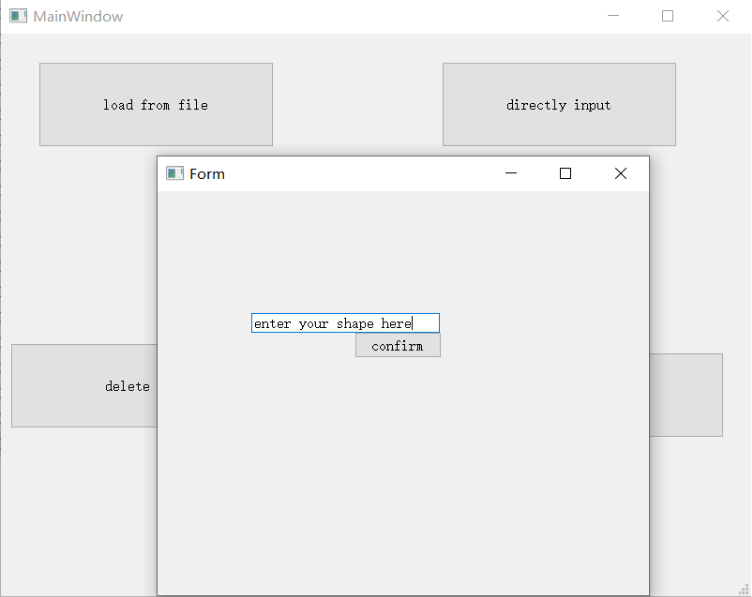
十、界面模块的详细设计过程。在博客中详细介绍界面模块是如何设计的,并写一些必要的代码说明解释实现过程。(5')
本程序使用QT完成界面模块的开发工作。结合之前计算模块给出的接口,同时QT模块中使用了Qcustomplot模组帮助进行了绘画功能的实现。总体上界面由一个主界面和子界面组成。主界面中给出了7种功能,包括从文件中导入图形,手动输入图形,手动删除图形,绘制图形,给出交点个数,清零,退出功能。
为了实现各分功能,在主界面程序中定义了所需要相应的函数,以及对应的信号槽,如下图所示:

private slots:
    void on_input_clicked();
    void F_INPUT();
    void FILE_INPUT();
    void RESULT();
    void CLEAR();
    void SHOWDELETE();
    void myPaint();


 ui->setupUi(this);
    connect(ui->quit, SIGNAL(clicked()), this, SLOT(close()));
    connect(ui->input,SIGNAL(clicked()),this,SLOT(F_INPUT()));
    connect(ui->load,SIGNAL(clicked()),this,SLOT(FILE_INPUT()));
    connect(ui->show_result,SIGNAL(clicked()),this,SLOT(RESULT()));
    connect(ui->clear,SIGNAL(clicked()),this,SLOT(CLEAR()));
    connect(ui->delete_2,SIGNAL(clicked()),SLOT(SHOWDELETE()));
    connect(ui->draw,SIGNAL(clicked()),this,SLOT(myPaint()));
以下为自定义输入界面以及具体的函数,函数中使用了计算模块给出的接口Add_Diagram(),实现了图形的增加操作:
void Form::hand_out(){
string str=ui->first_edit->text().toStdString();
     const char*  ch=str.c_str();
    if(temp==NULL){
        ui->first_edit->setText("illegal input");
    }
    else{
    Add_Diagram((char*)ch,1);
    ui->first_edit->setText("successful insert");}
    //close();}

}
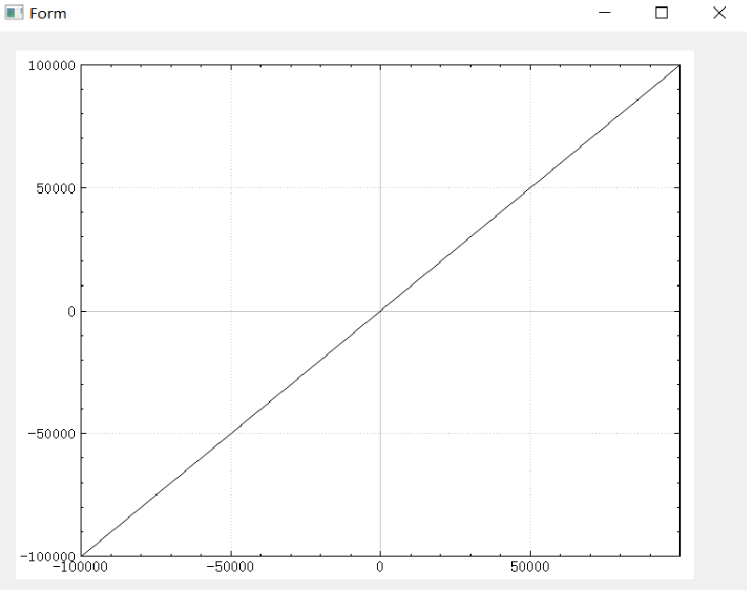
图像绘制部分的函数较为复杂,使用了第三方库Qcustomplot完成。由于绘制部分偏向于UI部分单独完成,因此在UI中定义了一系列的函数帮助进行绘图工作:
void paint::paintEvent(QPaintEvent *){

    QCustomPlot *customPlot = ui->qcustomPlot;
       customPlot->clearItems();
       customPlot->clearGraphs();
       ui->qcustomPlot->addGraph();
       ui->qcustomPlot->graph(0)->setLineStyle(QCPGraph::LineStyle::lsNone);
       ui->qcustomPlot->setInteractions(QCP::iRangeDrag | QCP::iRangeZoom | QCP::iSelectPlottables);
       ui->qcustomPlot->axisRect()->setupFullAxesBox();
       ui->qcustomPlot->rescaleAxes();
       ui->qcustomPlot->xAxis->setRange(-100000,100000);
        ui->qcustomPlot->yAxis->setRange(-100000,100000);
       for (int i = 0 ; i <(int) myallshape.size();i++){
           double x1,y1,x2,y2;
           string type=myallshape.at(i)->mtype;
            if(type=="R"){
           Ray* myray=(Ray*)myallshape.at(i);
           x1= myray->mx1;
           y1 = myray->my1;
           x2 = x1+myray->mx2;
           y2 = y1+ myray->my2;
           paintRay(customPlot,x1,y1,x2,y2);
           }
           else if(type=="S"){
                Seg* myray=(Seg*)myallshape.at(i);
                x1= myray->mx1;
                y1 = myray->my1;
                x2 = x1+myray->mx2;
                y2 = y1+ myray->my2;
                paintSegment(customPlot,x1,y1,x2,y2);
            }
            else if(type=="L"){
                 Line* myline=(Line*)myallshape.at(i);
                  if(myline->mspecial==0){
                      x1=1;
                      y1=myline->ma+myline->mb;
                      x2=2;
                      y2=2*myline->ma+myline->mb;
                      paintLine(customPlot,x1,y1,x2,y2);
                  }
                  if(myline->mspecial==1){
                      x1=myline->ma;
                      y1=1;
                      x2=myline->ma;
                      y2=2;
                      paintLine(customPlot,x1,y1,x2,y2);
                  }
            }
                  else if(type=="C"){
                   Circle* mycircle=(Circle*)myallshape.at(i);
                   x1=mycircle->mx;
                   y1=mycircle->my;
                   x2=mycircle->mr;
                   paintCircle(customPlot,x1-x2,y1+x2,x1+x2,y1-y2);
                  }


           if (i%5 == 0)   customPlot->replot();
       }

       customPlot->replot();

}
其他部分由于篇幅有限,不给出具体UI图片,只给出具体函数代码:
删除操作:
void mydelete::delete_this(){
    string str=ui->lineEdit->text().toStdString();
    const char*  ch=str.c_str();
    Sub_Diagram((char*)ch,1);
   ui->lineEdit->setText("successful delete");
}
求解交点个数并显示:
result::result(QWidget *parent) :
    QMainWindow(parent),
    ui(new Ui::result)
{
    ui->setupUi(this);
    myallpoint.clear();
    Calculate();
   QStandardItemModel* ItemModel = new QStandardItemModel(this);
    int result=myallpoint.size();
    QString string = QString::number(result);
      QStandardItem *item = new QStandardItem(string);
      ItemModel->appendRow(item);
      ui->listView->setModel(ItemModel);
     //ui->listView->setFixedSize(600,600);
}
十一、界面模块与计算模块的对接。详细地描述 UI 模块的设计与两个模块的对接,并在博客中截图实现的功能。(4')
通过计算模块事先给出的接口,UI模块只需要调用这些接口就能够实现求解交点、增加图形、删除图形、清空和处理文件输入的操作,给出的接口如下所示:
extern vector <Shape*> myallshape;
extern unordered_set<Point*, Hash_Point, Equal_Point> myallpoint;
void Add_Diagram(char* input1, int ifoutsource);
void Sub_Diagram(char* input2, int ifoutsource);
void File_InputProcess();
void Clear();
void Calculate();
UI程序通过引入dll程序以及调用.h文件就能快速实现所需要的一系列操作。
load from file中调用了File_Inputprocess()接口函数完成图形导入操作
directly input中调有Add_Diagram()完成手动图形导入操作
show point number通过Calculate()完成交点计算操作
delete通过调用Sub_Diagram()完成图形删除操作
clear通过调用Clear()完成数据清空操作
draw操作调用了myallshape数据变量,进行图像绘制
十二、描述结对的过程,提供两人在讨论的结对图像资料(比如 Live Share 的截图)。关于如何远程进行结对参见作业最后的注意事项。(1')

十三、看教科书和其它参考书,网站中关于结对编程的章节,说明结对编程的优点和缺点。同时描述结对的每一个人的优点和缺点在哪里(要列出至少三个优点和一个缺点)。(5')
| 结对编程 | 我 | 结对伙伴 | |
|---|---|---|---|
| 优点 | 1.结对编程设计是为了进行复杂的工作而设计的方法。2.也可以作为在温补新开发者时传达知识的手段。3.使用整套程序设计可以改善整体质量。 | 尽力做本作业。主动联系跟伙伴 | 他的编码力高,如果我有问题问伙伴的话他认真教我 |
| 缺点 | 1.结对编程设计,比如模式已经确立,或者在制造值客体等日常工作中,可能是过度的方法。2.在使用商务费用的方法方面,两名程序员并不是最佳选择。3.另外,根据开发者的不同,单独工作的时候, 也会更满足,更有生产性 | 编码能力不强。 | 没有主动联系 |
附加题部分
已完成对圆的处理(具体实现略),交换程序部分并没有完成。