一.
没有基础hibernate基础的可以点击这里 ---------->ORM----hibernate入门Demo(无敌详细版)
这里我就不详细介绍了..
二.
hibernat.cfg.xml文件是Hibernate中重要的配置文件,当Spring和Hibernate整合时,由于hibernate.cfg.xml文件中的配置信息可以教育Spring来管理,
所以可以选择是否使用hibernate.cfg.xml文件.
这里将从使用hibernate.cfg.xml文件来讲解Spring和Hibernate的整合
在讲解Spring和Hibernate的整合前,首先需要了解三个重要的对象,具体如下:
1.HibernateTemplate:相当于Hibernate的session可以直接操作PO类,依赖于SessionFactory.
2.LocalSessionFactoryBean:获取SessionFactory.
3.HibernateTransactionManager:Hibernate的事物管理器.
三.实现代码:
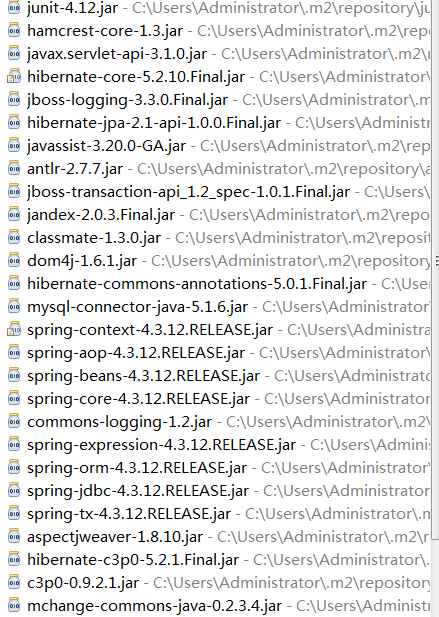
整个项目所需jar包:
1.使用hibernate.cfg.xml文件整合Spring.
1).首先建立一张user表:

2).建立User类
public class User {
  private Integer id;       //用户id
  private String  username;     //用户名称
  private String password;  //用户密码
	public Integer getId() {
		return id;
    }
	public void setId(Integer id) {
		this.id = id;
    }
	public String getUsername() {
		return username;
    }
	public void setUsername(String username) {
		this.username = username;
    }
	public String getPassword() {
	 	return password;
	}
	public void setPassword(String password) {
		this.password = password;
	}
	@Override
	public String toString() {
		return "User [id=" + id + ", username=" + username + ", password=" + password + "]";
	}
}
3).编写对应的User.hbm.xml
<?xml version="1.0" encoding="UTF-8"?>
  <!DOCTYPE hibernate-mapping PUBLIC
	   "-//Hibernate/Hibernate Mapping DTD 3.0//EN"
	   "http://www.hibernate.org/dtd/hibernate-mapping-3.0.dtd">
  <hibernate-mapping>
      <!-- name代表的是实体类名,table代表的是表名 -->
      <class name="com.hck.entity.User" table="user">
          <!-- name=id代表的是user类中属性  column=id代表的是table表中的字段 -->
          <id name="id" column="id">
             <!-- 主键生成策略 -->
             <generator class="native"/>
          </id>
          <!-- 其他属性使用property标签来映射 -->
          <property name="username" column="username" type="string"/>
          <property name="password" column="password" type="string"/>
      </class>
  </hibernate-mapping>
4).编写UserDao接口
public interface UserDao {
  public void save(User user);      //添加用户
  public void update(User user);    //更新用户
  public void delete(User user);    //删除用户
  public User findById(Integer id); //根据用户id查找用户数据
  public List<User>  findAll();     //返回所有用户数据
}
5).编写接口实现类:UserDaoImpl
//开启注解模式,这句相当于在spring中
//<bean name="userDao" class="com.hck.dao.impl.UserDaoImpl"/>
@Repository("userDao")
public class UserDaoImpl implements UserDao {
	//依赖注入
	@Autowired
	private HibernateTemplate hibernateTemplate;
	//插入操作
	public void save(User user) {
          hibernateTemplate.save(user);
	}
    //更新操作
	public void update(User user) {
	      hibernateTemplate.update(user);
	}
    //删除操作
	public void delete(User user) {
		   hibernateTemplate.delete(user);
	}
    //根据ID查找用户
	public User findById(Integer id) {
		return hibernateTemplate.get(User.class, id);
	}
	//返回所有用户数据
	@SuppressWarnings("unchecked")
	public List<User> findAll() {
		return (List<User>) hibernateTemplate.find("from User");
	}
}
6).编写UserService接口
public interface UserService {
      public void save(User user);      //添加用户
      public void update(User user);    //更新用户
      public void delete(User user);    //删除用户
      public User findById(Integer id); //根据用户id查找用户数据
      public List<User>  findAll();     //返回所有用户数据
}
7).编写UserServiceImpl类
//开启注解模式,这句相当于在spring中
//<bean name="userService" class="com.hck.service.impl.UserServiceImpl"/>
@Service("userService")
public class UserServiceImpl implements UserService {
	//依赖注入
	@Autowired
	private UserDao userDao;
	//插入数据
	public void save(User user) {
		userDao.save(user);
	}
    //更新数据
	public void update(User user) {
	    userDao.update(user);
	}
	//删除数据
	public void delete(User user) {
		userDao.delete(user);
	}
    //根据id查找用户
	public User findById(Integer id) {
		return userDao.findById(id);
	}
    //返回所有用户信息
	public List<User> findAll() {
		return userDao.findAll();
	}

}
8).编写核心配置文件hibernate.cfg.xml
<?xml version="1.0" encoding="UTF-8"?>
  <!DOCTYPE hibernate-configuration PUBLIC
	"-//Hibernate/Hibernate Configuration DTD 3.0//EN"
	"http://www.hibernate.org/dtd/hibernate-configuration-3.0.dtd">
  <hibernate-configuration>
         <session-factory>
	          <!--指定方言 -->
	          <property name="hibernate.dialect">
	            org.hibernate.dialect.MySQLDialect
	          </property>
	          <!-- 数据库驱动 -->
	          <property name="hibernate.connection.driver_class">com.mysql.jdbc.Driver</property>
	          <!-- 连接数据库的url -->
	          <property name="hibernate.connection.url">jdbc:mysql://localhost:3306/tb_test</property>
	          <!-- 数据库用户名 -->
	          <property name="hibernate.connection.username">root</property>
	          <!-- 数据库密码 -->
	          <property name="hibernate.connection.password">123456</property>
	          <!-- 其他配置 -->
	          <!-- 显示sql语句 -->
	          <property name="show_sql">true</property>
	          <!-- 配置c3p0 -->
	          <property name="hibernate.connection.provider_class">org.hibernate.c3p0.internal.C3P0ConnectionProvider</property>
	          <!-- 用来关联hbm配置文件 -->
	          <!-- <mapping resource="com/hck/entity/Customer.hbm.xml"/> -->
	          <mapping resource="com/hck/entity/User.hbm.xml"/>
         </session-factory>
  </hibernate-configuration>
9).编写Spring的配置文件applicationContext.xml同样放在src目录下
<?xml version="1.0" encoding="UTF-8"?>
<beans xmlns="http://www.springframework.org/schema/beans"
    xmlns:xsi="http://www.w3.org/2001/XMLSchema-instance"
    xmlns:context="http://www.springframework.org/schema/context"
    xmlns:aop="http://www.springframework.org/schema/aop"
    xmlns:tx="http://www.springframework.org/schema/tx"
    xsi:schemaLocation="http://www.springframework.org/schema/beans
        http://www.springframework.org/schema/beans/spring-beans.xsd
        http://www.springframework.org/schema/aop
        http://www.springframework.org/schema/aop/spring-aop-4.3.xsd
        http://www.springframework.org/schema/tx
        http://www.springframework.org/schema/tx/spring-tx-4.3.xsd
        http://www.springframework.org/schema/context
        http://www.springframework.org/schema/context/spring-context-4.3.xsd">
     <!-- 开启注解 -->
     <context:annotation-config/>
     <!-- 1.配置sessionFactory -->
     <bean id="sessionFactory" class="org.springframework.orm.hibernate5.LocalSessionFactoryBean">
     <!-- 加载Hibernate核心配置文件 -->
     <property name="configLocation" value="classpath:hibernate.cfg.xml"/>
     </bean>
     <!-- 2.配置Hibernate模版 -->
     <bean id="hibernateTemplate" class="org.springframework.orm.hibernate5.HibernateTemplate">
          <!-- 通过工厂获得Session,操作PO类 -->
          <property name="sessionFactory" ref="sessionFactory"/>
     </bean>
     <!-- 事务管理 -->
     <!-- #1事务管理器,就是平台,Sprring工具产生,依赖于使用持久方案 -->
     <bean id="txManager" class="org.springframework.orm.hibernate5.HibernateTransactionManager">
           <property name="sessionFactory" ref="sessionFactory"/>
     </bean>
     <!-- #2通知:增强事务 -->
     <tx:advice id="txAdvice" transaction-manager="txManager">
           <tx:attributes>
                <tx:method name="save*"/>
                <tx:method name="update*"/>
                <tx:method name="delete*"/>
                <!-- 只读 -->
                <tx:method name="find*" read-only="true"/>
           </tx:attributes>
     </tx:advice>
     <!-- #3 切面:将切入点与通知点关联 -->
     <aop:config>
            <aop:pointcut expression="execution(* com.hck.service.*.*(..))" id="allDaoMethod" />
            <aop:advisor advice-ref="txAdvice" pointcut-ref="allDaoMethod"/>
     </aop:config>
     <!-- 包扫描 -->
     <context:component-scan base-package="com.hck"/>
</beans>
10).编写单元测试类:
public class SpringHibernateTest {
	 //定义变量
     ApplicationContext ac;   //读取Spring配置文件,返回上下文对象
     UserService userService; //用于接收一个UserServiceImpl实例
     @Before
     public void setUp(){
    	 ApplicationContext ac=new ClassPathXmlApplicationContext("applicationContext.xml");
    	 userService=(UserService) ac.getBean("userService");
     }
     @Test
     public void insert()
     {
    	 User user=new User();
    	 user.setUsername("张三");
    	 user.setPassword("123456");
    	 userService.save(user);
     }
     @Test
     public void findById()
     {
    	 User user=userService.findById(1);
    	 System.out.println(user);
     }
     //修改用户名
     @Test
     public void update()
     {
    	 User user=new User();
         user.setId(1);
    	 user.setUsername("李四");
    	 user.setPassword("123456");
    	 userService.update(user);
     }
     //先查找再删除
     @Test
     public void delete()
     {
    	 User user=userService.findById(1);
    	 userService.delete(user);
     }
     //查找所有
     @Test
     public void findAll()
     {
    	List<User> list =userService.findAll();
    	for(User user:list)
    	{
    		System.out.println(user);
    	}
     }
}
11)测试结果:
A.插入操作:
控制台打印的sql语句,然后到mysql查看数据是否插入成功;这里我再插入两条信息用户分开显示查询所有用户信息


B.查询操作(查询用户id为1的信息):

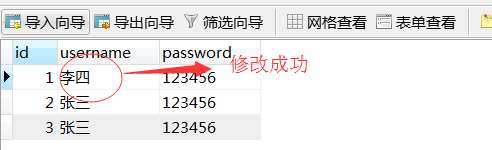
C.更新操作,(将id=1的用户名修改为李四)
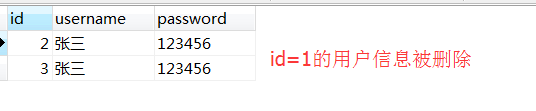
D.删除操作,(将id=1的用户信息删除)

E.查询所有用户信息

四.总结
以上是完整的带hibernate.cfg.xml文件的Spring跟Hibernate的整合过程,如有疑问可以留言~