pytest
1)简介
- 官方文档地址:http://www.pytest.org/en/latest/getting-started.html
- pytest中定义测试用例有三种方式:
1)兼容unittest,已有的unittest库和文件都可以直接进行调用;
2)可以基于简单的类进行定义,如果一个类里边没有初始化方法并且以test开头,系统便会认为这是一个测试用例(不需要继承,直接定义就行)
3)可以直接定义测试函数来定义测试用例
2)安装:
pip install pytest
3)修改配置:
例1:
import pytest

def func(x):
    return x + 1

def test_answer():
    assert func(3) == 5

if __name__ == "__main__":
    pytest.main()
例2:(修改运行方式后,编写代码生效)
import pytest

def func(x):
    return x + 1

def test_answer():
    assert func(3) == 5

class TestFunc:
    def test_answer(self):
        assert func(3) == 5


if __name__ == "__main__":
    pytest.main()
4)pytest的用例识别规则:
用例识别:
- Test* 类包含的所有的test_*方法
- 不在class中的所有test_*函数
- 类中不能初始化方法
文件范围:
- test_*.py
- *_test.py
5)用例执行顺序:
def func(x):
    return x + 1
def test_answer():
    assert func(5) == 6
class TestFunc:
    @classmethod
    def setup_class(cls):
        print("setup_class")
    def setup(self):
        print("setup")
    def test_answer(self):
        assert func(5) == 6
    def test_demo(self):
        assert func(6) == 7
    def teardown(self):
        print("teardown")
    @classmethod
    def teardown_class(cls):
        print("teardown_class")

if __name__ == "__main__":
    pytest.main()

# 输出:
setup_class
setup
.teardown
setup
.teardown
teardown_class
setup_module: 整个类执行的时候执行
setup_function
pytest-order:调整执行的顺序
6)支持分组:(使用mark进行标记)
- pytest.mark.webtest
- pytest.mark.sec
- Pytest -m "webtest and not sec"
import pytest

def func(x):
    return x + 1
class TestFunc:

    @classmethod
    def setup_class(cls):
        print("setup_class")

    def setup(self):
        print("setup")

    @pytest.mark.fail
    def test_answer(self):
        assert func(5) == 7

    @pytest.mark.success
    def test_demo(self):
        print("success")
        assert func(6) == 7

    def test_demo2(self):
        assert func(7) == 8

    def teardown(self):
        print("teardown")

    @classmethod
    def teardown_class(cls):
        print("teardown_class")

if __name__ == "__main__":
    pytest.main()

# 只运行成功的:
pytest -m "success"
7)fixture功能
简介:在测试函数的前后,由pytest执行的一个外壳函数,主要用来将测试前的准备、测试后的清理工作与核心代码进行分离;
【demo】 @pytest.fixture() 装饰器用于声明一个函数是fixture
import pytest

@pytest.fixture()
def some_data():
    return 42

def test_some_data(some_data):
    assert some_data == 42
fixture功能函数范围:
1> 放在单独的测试文件里;
2> 若需要多个测试文件共享fixture,可以放在某个公共目录下新建一个conftest,将fixture放在里面;
test_pytest2.py
def test_some_data(some_data):
    # assert some_data == 43
    print("3333333")
同一级目录下conftest.py
import pytest

@pytest.fixture()
def some_data():
    print("1111111")
    # return 42
    yield
    print("2222222")
3> 使用fixture传递接口数据;
import pytest

@pytest.fixture()
def a_list():
    return [1,2,3,24,5]

def test_a_list(a_list):
    assert a_list[2] == 3
4> fixture作用范围
fixture作用范围从大到小依次是:session>module>class>function
作用于function范围内的fixture:
import pytest
@pytest.fixture()
def first():
    print("
获取用户名")
    a = 'TEST'
    return a

@pytest.fixture(scope="function")
def second():
    print("
获取密码")
    b = "123456"
    return b

def test_1(first):
    "用例传fixture"
    print("测试账号:%s" % first)
    assert first == "TEST"

def test_2(second):
    "用例传fixture"
    print("测试密码:%s" % second)
    assert second == "123456"

# 运行结果
SETUP F first
test_pytest2.py::test_1 (fixtures used: first).
TEARDOWN F first
SETUP F second
test_pytest2.py::test_2 (fixtures used: second).
TEARDOWN F second
用这个命令可以看到具体的执行顺序:pytest --setup-show test_pytest2.py
作用于class范围内的fixture:
import pytest

@pytest.fixture(scope="class")
def first():
    print("
获取用户名,scop为class级别只运行一次")
    a = "TEST"
    return a

class TestCase():
    def test_1(self,first):
        "用例传fixture"
        print("测试账号:%s" % first)
        assert first == "TEST"

    def test_2(self,first):
        "用例传fixture"
        print("测试账号:%s" % first)
        assert first == "TEST"


# 输出:
SETUP C first
test_pytest2.py::TestCase::test_1 (fixtures used: first).
test_pytest2.py::TestCase::test_2 (fixtures used: first).
TEARDOWN C first
作用于module范围内的fixture:
import pytest

@pytest.fixture(scope="module")
def first():
    print("
获取用户名,scop为module级别只运行一次")
    a = "TEST"
    return a

def test_1(first):
    "用例传fixture"
    print("测试账号:%s" % first)
    assert first == "TEST"

class TestCase():
    def test_2(self,first):
        "用例传fixture"
        print("测试账号:%s" % first)
        assert first == "TEST"

# 输出:
 SETUP    M first
      test_pytest2.py::test_1 (fixtures used: first).
      test_pytest2.py::TestCase::test_2 (fixtures used: first).
 TEARDOWN M first
作用于session范围内的fixture: 多个文件调用一次,可以跨.py文件,每个py文件是一个module;
[conftest.py]
import pytest

@pytest.fixture(scope="session")
def first():
    print("
获取用户名,scop为module级别只运行一次")
    a = "TEST"
    return a
[test_pytest2.py]
def test_1(first):
    "用例传fixture"
    print("测试账号:%s" % first)
    assert first == "TEST"
[demo.py]
def test_2(first):
    "用例传fixture"
    print("测试账号:%s" % first)
    assert first == "TEST"
运行:
pytest --setup-show test_pytest2.py demo.py
输出:
SETUP S first
test_pytest2.py::test_1 (fixtures used: first).
demo.py
demo.py::test_2 (fixtures used: first).
TEARDOWN S first
4> fixture参数化
.pytest.fixture():在fixture级别的function处参数化
import pytest
import requests

par_to_test = [{
    "case":"serach a word:haha",
    "headers":{},
    "querystring":{
        "wd":"hh"
    },
    "payload":{},
    "expected":{
        "status_code":200
    }
},
{
    "case":"serach a word2:kuku",
    "headers":{},
    "querystring":{
        "wd":"kuku"
    },
    "payload":{},
    "expected":{
        "status_code":200
    }
    }
]

@pytest.fixture(params=par_to_test)
def class_scope(request):
    print(request.param)
    return request.param

def test_baidu_search(class_scope):
    url = "http://www.baidu.com"
    r = requests.request("GET",url,data=class_scope["payload"],
                         headers=class_scope["headers"],
                         params=class_scope["querystring"])
    assert r.status_code == class_scope["expected"]["status_code"]
@pytest.mark.parametrize:允许在function或class级别的参数化,为特定的测试函数或类提供多个argument/fixture设置
    @pytest.mark.success
    @pytest.mark.parametrize("input,expect",
                             [(5, 6),
                              (7, 8),
                              (2, 2)
                              ])
    def test_demo(self, input, expect):
        print("success")
        assert func(input) == expect
.pytest_generate_tests:实现自定义动态参数化或扩展
略
8)配置文件:
pytest的非测试文件主要有以下几种:
1> pytest.ini : pytest的主要测试文件,可以改变pytest的默认行为,有很多可配置项;
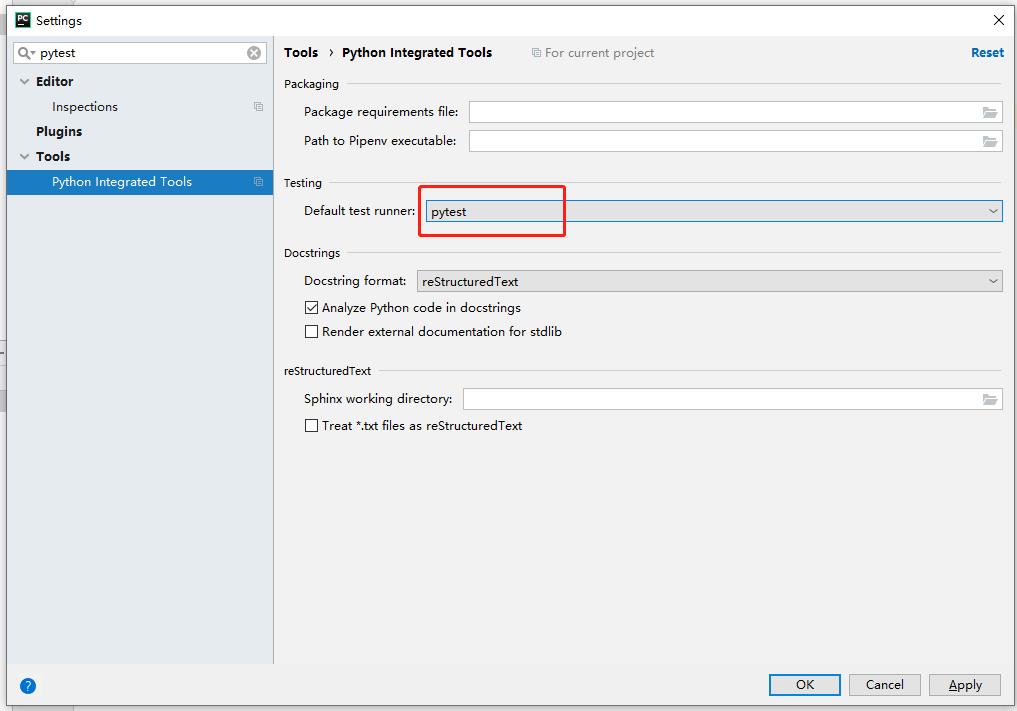
设置默认按照python -v xx.py 的方式运行:

所以allure所需要的报告数据会放置在allure-results文件夹下,执行 allure generate allure-results -o allure,生成报告放在当前目录的allure文件夹下;
为了放置拼写错误,可以再pytest.ini中注册标记: --strict 是一个注册标记,若是运行一个没有注册的marker就会报错
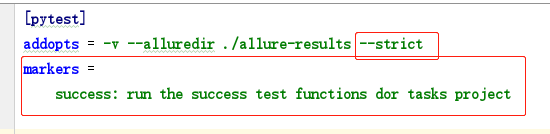
检查是否标记成功: pytest --markers
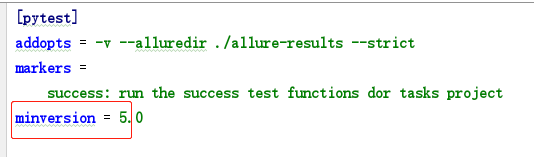
指定pytest的运行最低版本:若是本地安装低于指定版本,运行报错:
指定pytest忽略某些目录,pytest在执行的时候会递归遍历所有的子目录,包括一些没有必要遍历的目录,可以在pytest.ini中指定忽略,进而缩小pytest的搜索范围;

指定访问目录
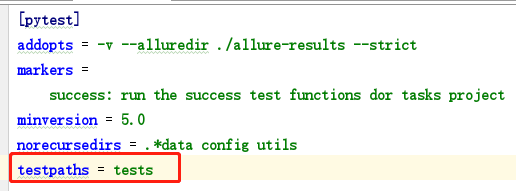
避免文件名冲突
在每一个文件夹下增加__init.py__文件
2> conftest.py : 本地的插件库,其中hook函数和fixture作用于conftest.py文件所在的目录及所有子目录;
3> __init__.py : 每个测试子目录都包含此文件时,那么在多个测试目录中可以出现同名文件;
9)运行
- 设置第N个失败后停止运行:
pytest --maxfail=2 # stop after two failures
- 指定运行类下的某个方法
pytest test_pytest2.py::TestClass::test_one
- 指定运行某个方法,py文件中没有类
pytest test_pytest2.py::test_one
- 运行case名字中包含“baidu”的case,使用 -k 来过滤case;
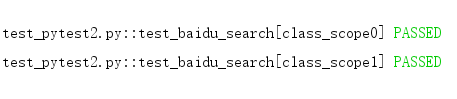
pytest -v -k "baidu" test_pytest2.py
效果:

- 通过标记表达式运行:见6:
pytest -v -m "success" test_pytest2.py
- 展示在给定配置下,哪些case会被运行 --collect-only:
pytest -v -k "baidu" --collect-only test_pytest2.py
- 运行打印详细信息:
pytest -v test_pytest2.py
效果:
- 以安静的报告模式执行测试功能
pytest -q test_sysexit.py
输出:
1 passed in 0.12s
10)报告生成:
生成xml风格的报告:
pytest --junitxml=report.xml
生成兼容Junit风格的报告:
JUnit风格的xml报告:
pytest--junitxml = path
下载:
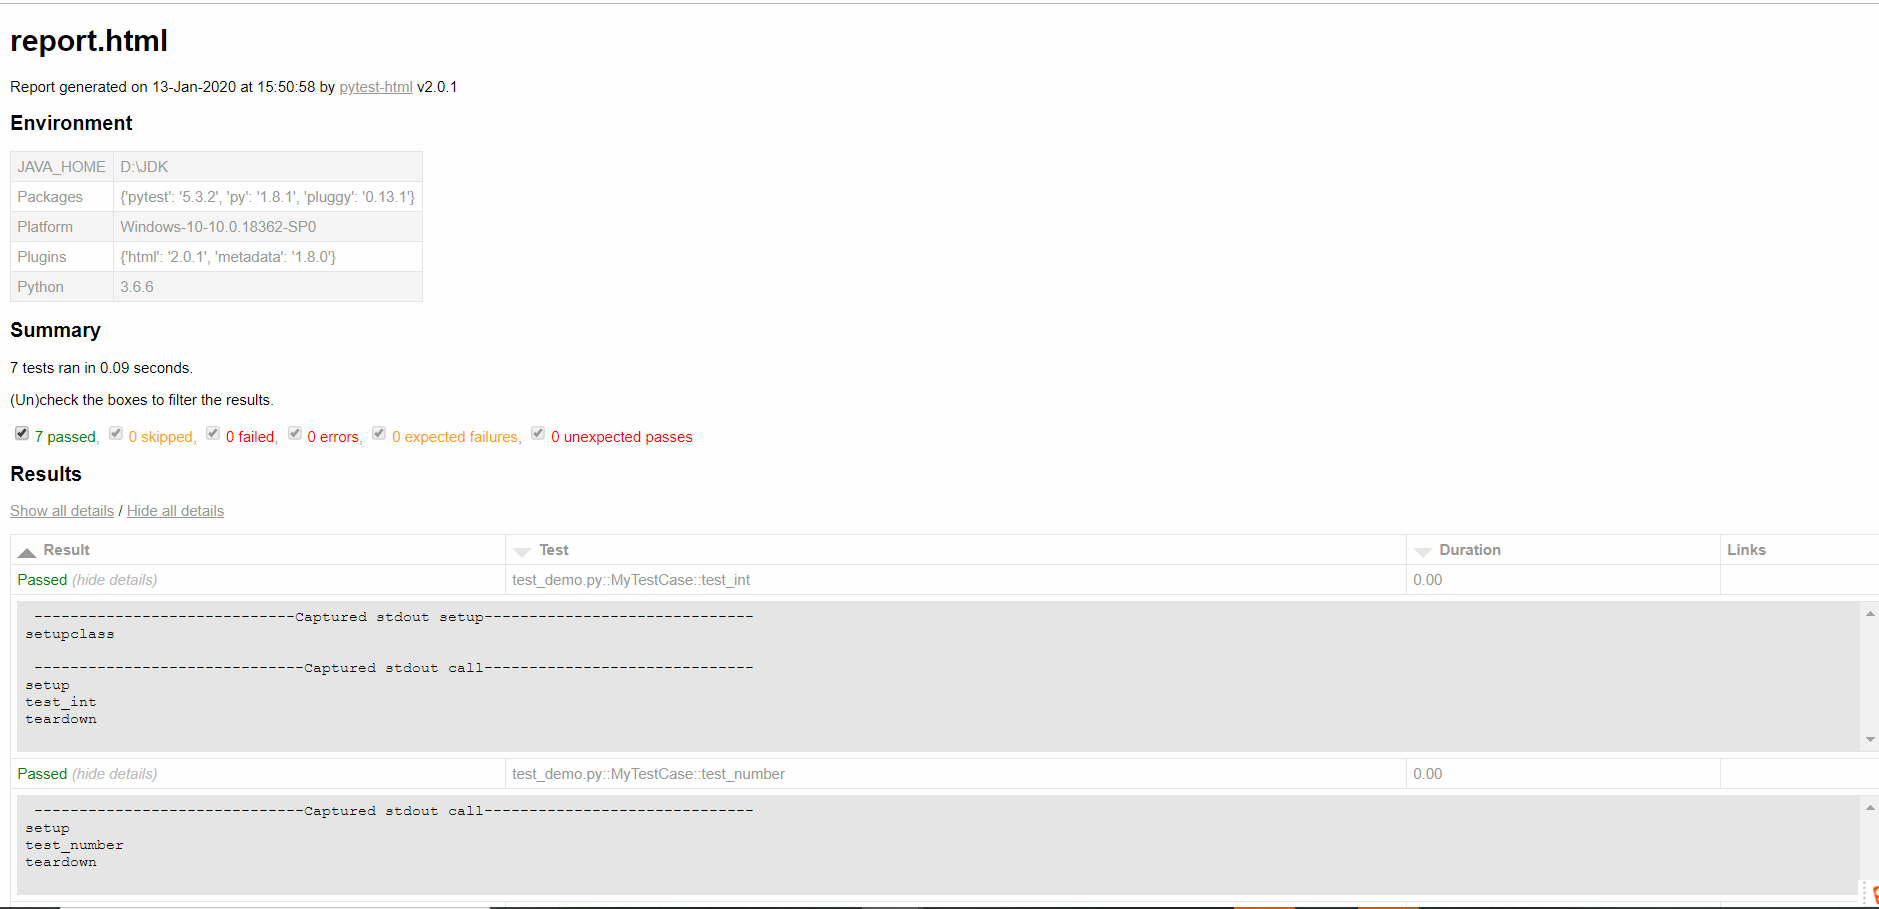
pip install pytest-html
生成HTML风格的报告:
1)pytest-html报告:
pytest--html = report.html
下载:
pip install pytest-html
执行:cd到用例的目录执行:pytest --html=report.html
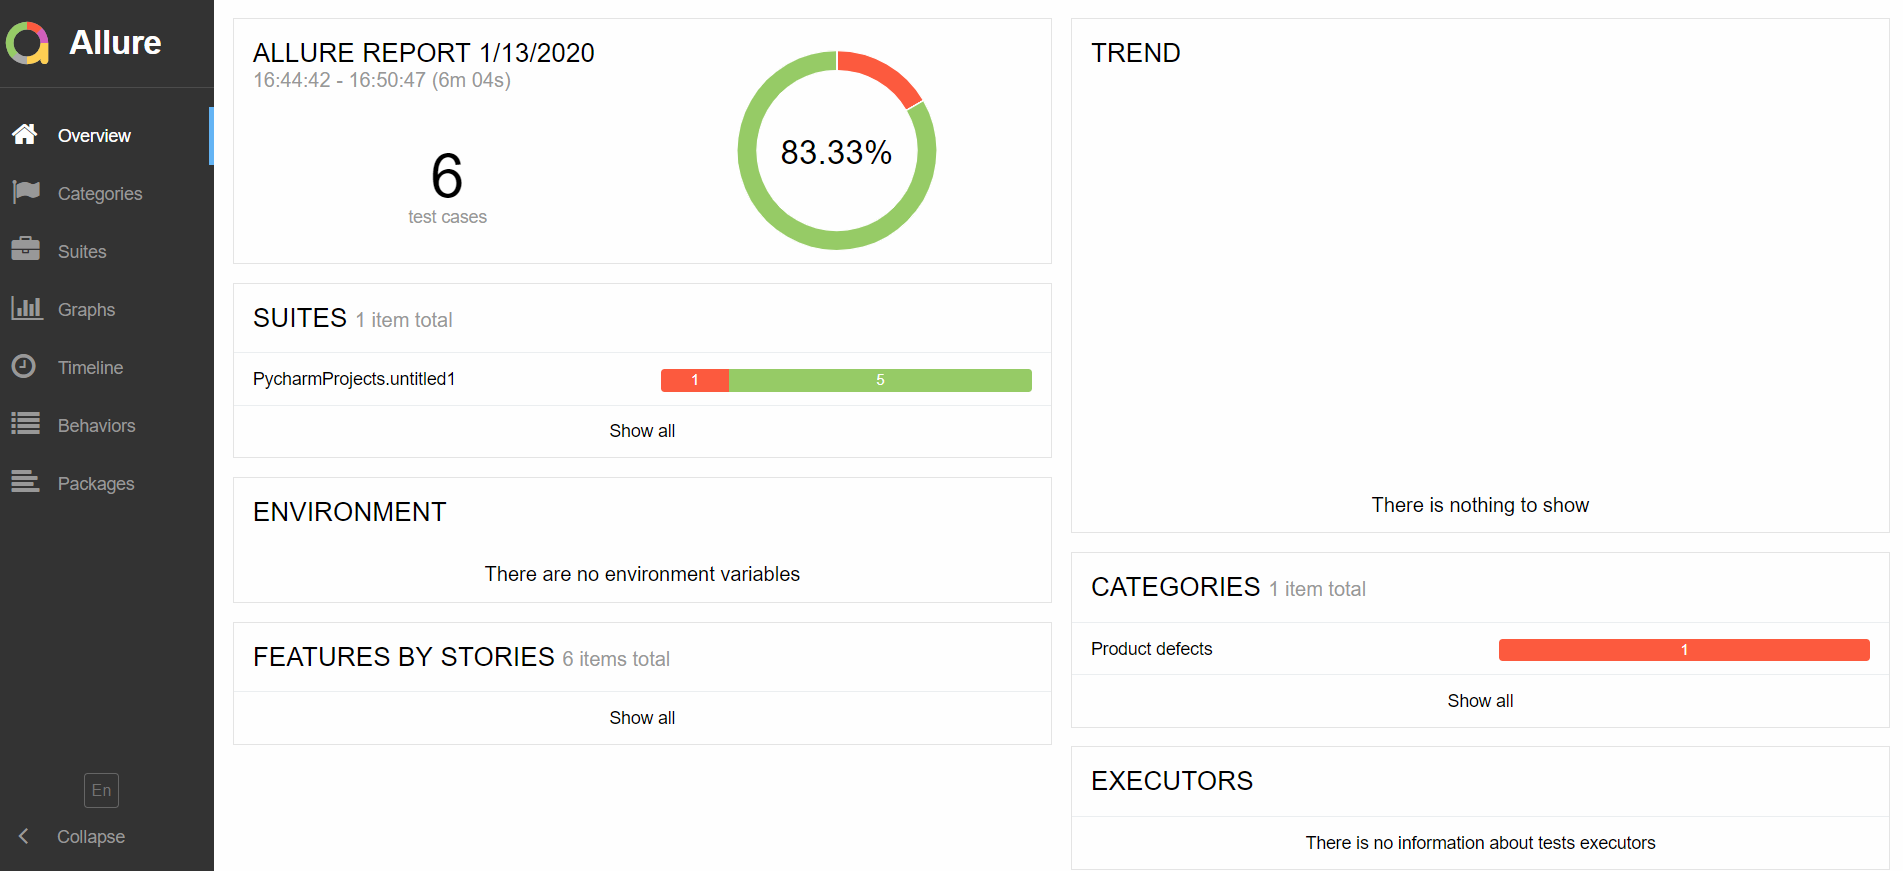
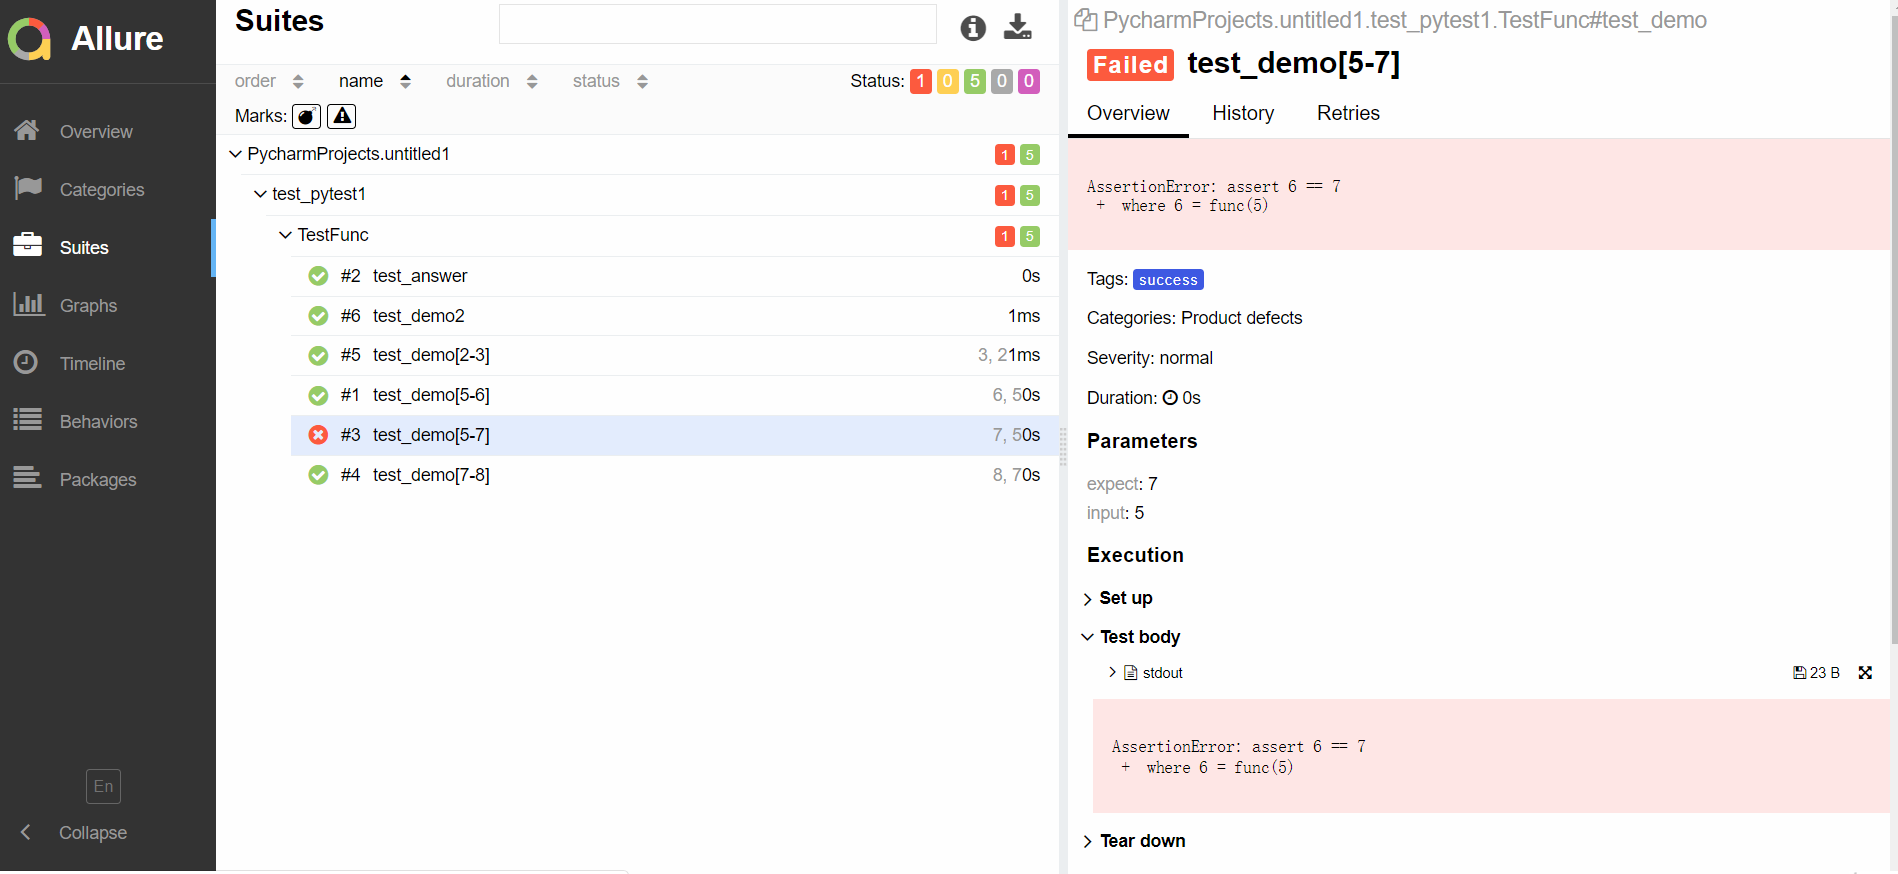
allure2报告:
pytest--alluredir = /tmp/my_allure_results
安装pytest: pip install pytest
安装allure2: 从这个地址 http://repo.maven.apache.org/maven2/io/qameta/allure/allure-commandline/ 下载最新的安装包,解压到python目录下,进入bin目录,配置系统环境变量;
检查:allure --version
运行case:
pytest test_pytest1.py --alluredir allure-report
生成报告:
allure serve allure-report

*** 若有疑问,欢迎讨论,QQ群号:744419090 ***