启动debug调试:
import pdb
#python -m pdb err.py以参数-m pdb启动后,pdb定位到下一步要执行的代码-> s = '0'。输入命令l来查看代码
#p n查看n变量,q退出,n下一步
#运行代码,程序会自动在pdb.set_trace()暂停并进入pdb调试环境,可以用命令p查看变量,或者用命令c继续运行
# debug.py
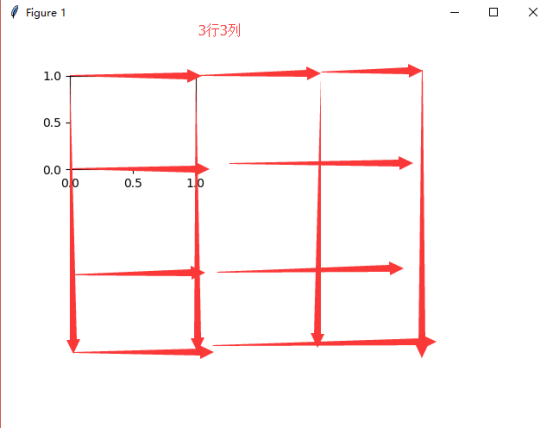
matplotlib.pyplot的用户理解:
import matplotlib.pyplot as plt
# 定义figure
plt.figure()
# figure分成3行3列(将整个界面分成3行3列), 取得第一个子图的句柄, 第一个子图跨度为1行3列, 起点是表格(0, 0)
ax1 = plt.subplot2grid((3, 3), (0, 0), colspan = 3, rowspan = 1)
ax1.plot([0, 1], [0, 1])
ax1.set_title('Test')
# figure分成3行3列, 取得第二个子图的句柄, 第二个子图跨度为1行3列, 起点是表格(1, 0)
ax2 = plt.subplot2grid((3, 3), (1, 0), colspan = 2, rowspan = 1)
ax2.plot([0, 1], [0, 1])
# figure分成3行3列, 取得第三个子图的句柄, 第三个子图跨度为1行1列, 起点是表格(1, 2)
ax3 = plt.subplot2grid((3, 3), (1, 2), colspan = 1, rowspan = 1)
ax3.plot([0, 1], [0, 1])
# figure分成3行3列, 取得第四个子图的句柄, 第四个子图跨度为1行3列, 起点是表格(2, 0)
ax4 = plt.subplot2grid((3, 3), (2, 0), colspan = 3, rowspan = 1)
ax4.plot([0, 1], [0, 1])
plt.show()

跳一跳代码(简单代码理解)
1、点击棋子原始位置点击一下,然后目标位置点击一下,然后勾股定理获取两点直接的距离,在乘以时间系数。
'adb shell input swipe 320 410 320 410 ' + str(press_time)


 1 import numpy as np
 2 import matplotlib.pyplot as plt
 3 import matplotlib.animation as animation
 4 from PIL import Image
 5 import math
 6 import time
 7 import os
 8 import pdb
 9 import time
10
11 def pull_screenshot():
12     os.system('adb shell screencap -p /sdcard/autojump.png')
13     os.system('adb pull /sdcard/autojump.png .')
14
15 def jump(distance):
16     press_time = distance * 1.35
17     press_time = int(press_time)
18     cmd = 'adb shell input swipe 320 410 320 410 ' + str(press_time)
19     print(cmd)
20     os.system(cmd)
21 fig = plt.figure()
22 index = 0
23 cor = [0, 0]
24
25 pull_screenshot()
26 img = np.array(Image.open('autojump.png'))
27
28 update = True
29 click_count = 0
30 cor = []
31
32 def update_data():
33     return np.array(Image.open('autojump.png'))
34
35 im = plt.imshow(img, animated=True)
36
37
38 def updatefig(*args):
39     print (time.time())
40     global update
41     if update:
42         time.sleep(1.5)
43         pull_screenshot()
44         im.set_array(update_data())
45         update = False
46     return im,
47
48 def onClick(event):
49     global update
50     global ix, iy
51     global click_count
52     global cor
53     print('event:',event)
54     # next screenshot
55
56     ix, iy = event.xdata, event.ydata
57     cmd = 'adb shell input tap {x1} {y1}'.format(x1=ix,y1=iy)
58     print(cmd)
59     os.system(cmd)
60     update = True
61     return
62     coords = []
63     coords.append((ix, iy))
64     print('now = ', coords)
65     cor.append(coords)
66
67
68     click_count += 1
69     if click_count > 1:
70         click_count = 0
71
72         cor1 = cor.pop()
73         cor2 = cor.pop()
74
75         distance = (cor1[0][0] - cor2[0][0])**2 + (cor1[0][1] - cor2[0][1])**2
76         distance = distance ** 0.5
77         print('distance = ', distance)
78         jump(distance)
79         update = True
80
81
82
83 fig.canvas.mpl_connect('button_press_event', onClick)
84 ani = animation.FuncAnimation(fig, updatefig, interval=1000, blit=True)
85 plt.show()