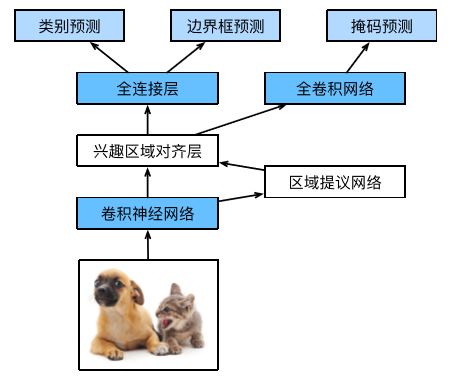
下图Github地址:Mask_RCNN
Mask_RCNN_KeyPoints
『计算机视觉』Mask-RCNN_论文学习
『计算机视觉』Mask-RCNN_项目文档翻译
『计算机视觉』Mask-RCNN_推断网络其一:总览
『计算机视觉』Mask-RCNN_推断网络其二:基于ReNet101的FPN共享网络
『计算机视觉』Mask-RCNN_推断网络其三:RPN锚框处理和Proposal生成
『计算机视觉』Mask-RCNN_推断网络其四:FPN和ROIAlign的耦合
『计算机视觉』Mask-RCNN_推断网络其五:目标检测结果精炼
『计算机视觉』Mask-RCNN_推断网络其六:Mask生成
『计算机视觉』Mask-RCNN_推断网络终篇:使用detect方法进行推断
『计算机视觉』Mask-RCNN_锚框生成
『计算机视觉』Mask-RCNN_训练网络其一:数据集与Dataset类
『计算机视觉』Mask-RCNN_训练网络其二:train网络结构&损失函数
『计算机视觉』Mask-RCNN_训练网络其三:训练Model
原论文中提到过Mask_RCNN是可以进行关键点检测的,不过我们学习的这个工程并没有添加关键点检测分支,而有人基于本工程进行了完善;Mask_RCNN_Humanpose,本文我们将简要的了解如何将关键点识别分支添加进模型,更进一步的,我们将尝试使用Mask_RCNN对实际数据进行识别。
零、配置相关
import os
import numpy as np
import pandas as pd
from PIL import Image

import utils as utils
import model as modellib
from config import Config


PART_INDEX = {'blouse': [0, 1, 2, 3, 4, 5, 6, 9, 10, 11, 12, 13, 14],
              'outwear': [0, 1, 3, 4, 5, 6, 7, 8, 9, 10, 11, 12, 13, 14],
              'dress': [0, 1, 2, 3, 4, 5, 6, 7, 8, 9, 10, 11, 12, 17, 18],
              'skirt': [15, 16, 17, 18],
              'trousers': [15, 16, 19, 20, 21, 22, 23]}
PART_STR = ['neckline_left', 'neckline_right',
            'center_front',
            'shoulder_left', 'shoulder_right',
            'armpit_left', 'armpit_right',
            'waistline_left', 'waistline_right',
            'cuff_left_in', 'cuff_left_out',
            'cuff_right_in', 'cuff_right_out',
            'top_hem_left', 'top_hem_right',
            'waistband_left', 'waistband_right',
            'hemline_left', 'hemline_right',
            'crotch',
            'bottom_left_in', 'bottom_left_out',
            'bottom_right_in', 'bottom_right_out']
IMAGE_CATEGORY = ['blouse', 'outwear', 'dress', 'skirt', 'trousers'][0]


class FIConfig(Config):
    """
    Configuration for training on the toy shapes dataset.
    Derives from the base Config class and overrides values specific
    to the toy shapes dataset.
    """
    # Give the configuration a recognizable name
    NAME = "FI"  # <-----数据集名

    # Train on 1 GPU and 8 images per GPU. We can put multiple images on each
    # GPU because the images are small. Batch size is 8 (GPUs * images/GPU).
    GPU_COUNT = 1
    IMAGES_PER_GPU = 1
    NUM_KEYPOINTS = len(PART_INDEX[IMAGE_CATEGORY])  # <-----关键点数目
    KEYPOINT_MASK_SHAPE = [56, 56]

    # Number of classes (including background)
    NUM_CLASSES = 1 + 1

    RPN_TRAIN_ANCHORS_PER_IMAGE = 100
    VALIDATION_STPES = 100
    STEPS_PER_EPOCH = 1000
    MINI_MASK_SHAPE = (56, 56)
    KEYPOINT_MASK_POOL_SIZE = 7

    # Pooled ROIs
    POOL_SIZE = 7
    MASK_POOL_SIZE = 14
    MASK_SHAPE = [28, 28]
    WEIGHT_LOSS = True
    KEYPOINT_THRESHOLD = 0.005
常量配置记录:数据类、关键点类、数据类和关键点类的对应关系
config类记录的大部分为model设置,无需改动,注意设置一下NAME、NUM_KEYPOINTS匹配上数据集。
一、数据类建立
1、关键点标注形式
回顾一下之前的数据集介绍,在非关键点检测任务中,我们需要的数据有两种:
a、原始的图片文件
b、图片上每个instance的掩码
但是由于Mask_RCNN会对掩码进行一次加工,获取每个instance的坐标框,即实际上还需要:
c、每个instance的坐标框
既然这里要检测关键点,那我们就需要:
d、图像的关键点标注
key_points: num_keypoints coordinates and visibility (x,y,v) [num_person,num_keypoints,3] of num_person
首先我们需要明确,keypoints从属于某个instance,即上面的num_person的由来(人体关键点检测为例,一个instance就是一个人),而一个instance有num_keypoints个关键点,每一个点由3个值组成:横坐标,纵坐标,状态。其中状态有三种:该类不存在此关键点,被遮挡,可见。对于COCO而言,0表示这个关键点没有标注(这种情况下x=y=v=0),1表示这个关键点标注了但是不可见(被遮挡了),2表示这个关键点标注了同时也可见。
在不同的数据集上,可能有不同的数字来表达这三个点,但是在此框架训练中,建议统一到COCO的标准,避免过多的修改model代码(主要是避免修改关键点损失函数中的代码,带来不必要的意外)。
2、服装关键点标注
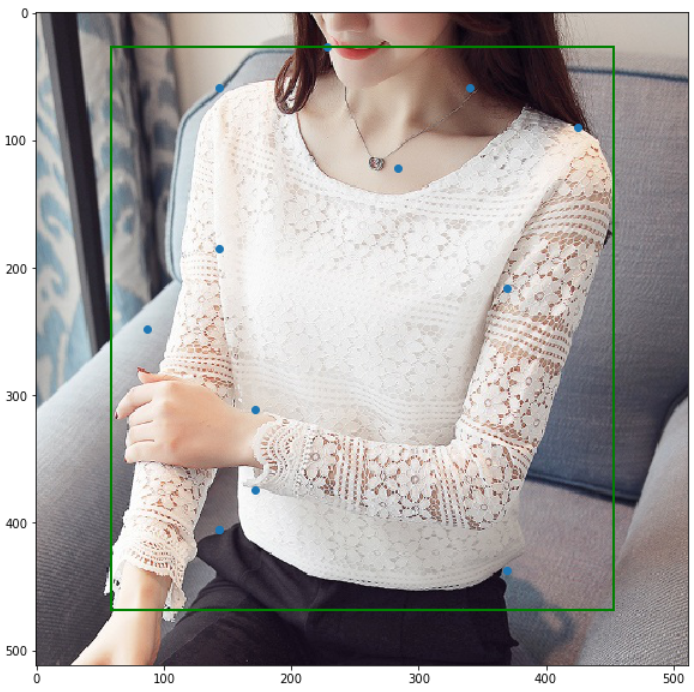
有了这些基础,我们以天池的服饰关键点定位数据为例,看一看如何设计Dataset class。
具体数据说明自行查阅上面说明,本节重点在介绍Mask RCNN关键点加测思路而非数据本身,其文档如下,我们设计的Dataset class(见『计算机视觉』Mask-RCNN_训练网络其一:数据集与Dataset类)目的就是基于文档信息为网络结构输送数据。

a、服装类别和Mask RCNN
值得注意的是,Mask RCNN的分类、检测、Mask生成任务都是多分类,但是关键点识别由于其本身难度更高(一个类别有众多关键点,不同类别关键点类型之间关系不大甚至完全不同),所以建议每一个大类单独训练一个model检测其关键点,实际上pose关键点检测对应过来就是:检测person这一个类的框、Mask,以及每一个instance(每一个人)的不同部位的关键点,实际的class分类值有person和背景两个类。对应到服饰数据集,我们需要训练5次,对框应五种服装。
b、服装检测框
服装数据标注仅有关键点,但是检测框对于Mask RCNN来说是必要的,因为RPN网络需要它(RPN之后的回归网络分支可以注释掉,但是RPN是网络的主干部分,不能注释),所以我们采取Mask RCNN工程的检测框生成思路,利用关键点生成检测框,由于关键点未必在服装边缘(一般是在的),我们的检测框取大一点,尽量完全包含服装,下面的函数见utils.py脚本(暂不涉及这个函数,只是说到了贴上来而已)。
def extract_keypoint_bboxes(keypoints, image_size):
    """
    :param keypoints: [instances, keypoints_per_instance, 3]
    :param image_size: [w, h]
    :return:
    """
    bboxes = np.zeros([keypoints.shape[0], 4], dtype=np.int32)
    for i in range(keypoints.shape[0]):
        x = keypoints[i, :, 0][keypoints[i, :, 0]>0]
        y = keypoints[i, :, 1][keypoints[i, :, 1]>0]
        x1 = x.min()-10 if x.min()-10>0 else 0
        y1 = y.min()-10 if y.min()-10>0 else 0
        x2 = x.max()+11 if x.max()+11<image_size[0] else image_size[0]
        y2 = y.max()+11 if y.max()+11<image_size[1] else image_size[1]
        bboxes[i] = np.array([y1, x1, y2, x2], np.int32)
    return bboxes
c、Mask说明
服装数据是没有Mask信息的,按照Mask RCNN论文的说法,掩码使用关键点位置为1其他位置为0的形式即可,感觉不太靠谱,而在COCO数据集里(即本文参考工程Mask_RCNN_Humanpose),掩码信息使用的是人的掩码(见下图),
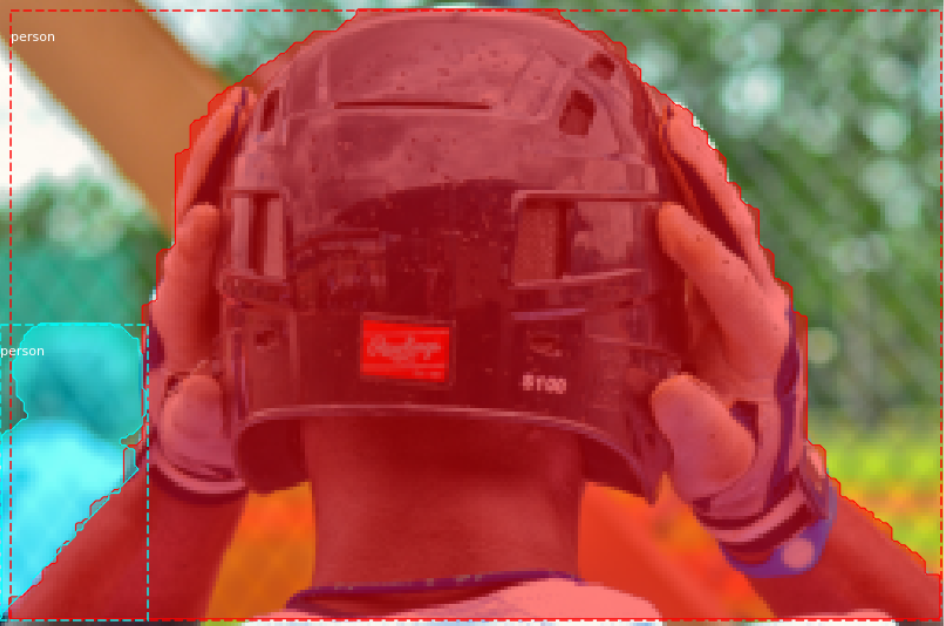
我在Dataset class中生成了掩码信息作为演示,在build网络中取消了Mask分支,下图摘自李沐博士的《手动学习深度学习》,可以很直观的理解我们为什么可以把Mask分支取消掉。
3、class FIDataset
正如Dataset注释所说,要想运行自己的数据集,我们首先要实现一个方法(load_shapes,根据数据集取名即可)收集原始图像、类别信息,然后实现两个方法(load_image、load_mask)分别实现获取单张图片数据、获取单张图片对应的objs的masks和classes,这样基本完成了数据集类的构建。
对于本数据集,
- 我们使用load_FI方法代替load_shapes,调用self.add_class和self.add_image,记录图片、类别信息
- 父类的load_image会去读取self.image_info中每张图片的"path"路径,载入图片,我们不必重写,保证在load_FI中录入了即可
- load_mask被load_keupoints取代(Mask_RCNN_Humanpose做了这个改动,并已经捋顺了相关调用),其注释如下,我们不需要mask信息,返回None占位即可,后面需要将网络中有关Mask信息的调用注释处理掉,这里先不介绍:
"""
Returns:
key_points: num_keypoints coordinates and visibility (x,y,v)  [num_person,num_keypoints,3] of num_person
masks: A bool array of shape [height, width, instance count] with
    one mask per instance.
class_ids: a 1D array of class IDs of the instance masks, here is always equal to [num_person, 1]
"""
至此我们介绍了Dataset class的目的,下面给出实现见FI_train.py ,由于训练时需要验证集,而我截至撰文时没有实现验证集划分(用训练集冒充验证集),所以load_FI的参数train_data没有意义,更新会在github上进行,后续本文不予修改:
class FIDataset(utils.Dataset):
    """Generates the shapes synthetic dataset. The dataset consists of simple
    shapes (triangles, squares, circles) placed randomly on a blank surface.
    The images are generated on the fly. No file access required.
    """
    def load_FI(self, train_data=True):
        """Generate the requested number of synthetic images.
        count: number of images to generate.
        height,  the size of the generated images.
        """
        if train_data:
            csv_data = pd.concat([pd.read_csv('../keypoint_data/train1.csv'),
                                  pd.read_csv('../keypoint_data/train2.csv')],
                                 axis=0,
                                 ignore_index=True  # 忽略索引表示不会直接拼接索引,会重新计算行数索引
                                )
            class_data = csv_data[csv_data.image_category.isin(['blouse'])]

        # Add classes
        self.add_class(source="FI", class_id=1, class_name='blouse')

        # Add images
        for i in range(class_data.shape[0]):
            annotation = class_data.iloc[i]
            img_path = os.path.join("../keypoint_data", annotation.image_id)
            keypoints = np.array([p.split('_')
                                  for p in class_data.iloc[i][2:]], dtype=int)[PART_INDEX[IMAGE_CATEGORY], :]
            keypoints[:, -1] += 1
            self.add_image(source="FI",
                           image_id=i,
                           path=img_path,
                           annotations=keypoints)

    def load_keypoints(self, image_id, with_mask=True):
        """
        Returns:
        key_points: num_keypoints coordinates and visibility (x,y,v)  [num_person,num_keypoints,3] of num_person
        masks: A bool array of shape [height, width, instance count] with
            one mask per instance.
        class_ids: a 1D array of class IDs of the instance masks, here is always equal to [num_person, 1]
        """
        key_points = np.expand_dims(self.image_info[image_id]["annotations"], 0)  # 已知图中仅有一个对象
        class_ids = np.array([1])

        if with_mask:
            annotations = self.image_info[image_id]["annotations"]
            w, h = image_size(self.image_info[image_id]["path"])
            mask = np.zeros([w, h], dtype=int)
            mask[annotations[:, 1], annotations[:, 0]] = 1
            return key_points.copy(), np.expand_dims(mask, -1), class_ids
        return key_points.copy(), None, class_ids
二、数据类读取
为了验证数据类构建的正确性,我们可以直接调用接口model.py中的load_image_gt_keypoints获取original_image, image_meta, gt_class_id, gt_bbox, gt_keypoint等信息,实际上在真正的训练中,程序也是通过这个函数完成Dataset class中的数据到model模型之间的传递。
def load_image_gt_keypoints(dataset, config, image_id, augment=True,
                  use_mini_mask=False):
    """Load and return ground truth data for an image (image, keypoint_mask, keypoint_weight, mask, bounding boxes).

    augment: If true, apply random image augmentation. Currently, only
        horizontal flipping is offered.
    use_mini_mask: If False, returns full-size masks and keypoints that are the same height
        and width as the original image. These can be big, for example
        1024x1024x100 (for 100 instances). Mini masks are smaller, typically,
        224x224 and are generated by extracting the bounding box of the
        object and resizing it to MINI_MASK_SHAPE.

    Returns:
    image: [height, width, 3]
    shape: the original shape of the image before resizing and cropping.
    keypoints:[num_person, num_keypoint, 3] (x, y, v) v value is as belows:
        0: not visible and without annotations
        1: not visible but with annotations
        2: visible and with annotations
    class_ids: [instance_count] Integer class IDs
    bbox: [instance_count, (y1, x1, y2, x2)]
    mask: [height, width, instance_count]. The height and width are those
        of the image unless use_mini_mask is True, in which case they are
        defined in MINI_MASK_SHAPE.
    """
在visualize.py模块中,函数display_keypoints可以对接上面函数的输出,直接可视化Dataset class经由load_image_gt_keypoints提取的结果(当然,并不是直接提取,该函数实际上进行了一系列的图像预处理,这也增加了我们可视化验证正确性的必要),流程代码如下,见FI_train.py:
config = FIConfig()

import visualize
from model import log

dataset = FIDataset()
dataset.load_FI()
dataset.prepare()
original_image, image_meta, gt_class_id, gt_bbox, gt_keypoint =
    modellib.load_image_gt_keypoints(dataset, FIConfig, 0)
log("original_image", original_image)
log("image_meta", image_meta)
log("gt_class_id", gt_class_id)
log("gt_bbox", gt_bbox)
log("gt_keypoint", gt_keypoint)
visualize.display_keypoints(original_image,gt_bbox,gt_keypoint,gt_class_id,dataset.class_names)
输出图片见下,可以明确的看见至少进行了padding个flip两个预处理,并非重点,不提:
实现了自己的Dataset class之后,使用model.load_image_gt_keypoints和visualize.display_keypoints进行验证,保证Dataset class的正确性。
三、修改及运行模型
1、运行模型步骤
data_tra = FIDataset()
data_tra.load_FI()
data_tra.prepare()

data_val = FIDataset()
data_val.load_FI()
data_val.prepare()
model = modellib.MaskRCNN(mode='training', config=config, model_dir='./')
model.load_weights('./mask_rcnn_coco.h5', by_name=True,
                   exclude=["mrcnn_class_logits", "mrcnn_bbox_fc", "mrcnn_bbox", "mrcnn_mask"])
model.train(data_tra, data_val,
            learning_rate=config.LEARNING_RATE/10,
            epochs=400, layers='heads')
2、网络细节修改
服装关键点和Humanpose数据最大的不同就在于我们没有mask掩码数据,所以我们需要对原model进行修改,取消掉设计mask的分支(注意指的是Humanpose代码,而非原版的Mask RCNN,那个改动起来变化太大:1、需要添加keypoint标注数据的整个预处理分支;2、需要实现model有关keypoint的损失函数在内的全部处理步骤)。
下面给出修改之后的build方法,由于Mask RCNN将各个分支损失函数直接相加,所以我们直接注释掉Mask分支即可,不会影响代码逻辑(程序可以直接正常运行)。
    def build(self, mode, config):
        """Build Mask R-CNN architecture.
            input_shape: The shape of the input image.
            mode: Either "training" or "inference". The inputs and
                outputs of the model differ accordingly.
        """
        assert mode in ['training', 'inference']

        # Image size must be dividable by 2 multiple times
        h, w = config.IMAGE_SHAPE[:2]
        if h / 2**6 != int(h / 2**6) or w / 2**6 != int(w / 2**6):
            raise Exception("Image size must be dividable by 2 at least 6 times "
                            "to avoid fractions when downscaling and upscaling."
                            "For example, use 256, 320, 384, 448, 512, ... etc. ")

        # Inputs
        input_image = KL.Input(
            shape=config.IMAGE_SHAPE.tolist(), name="input_image")
        input_image_meta = KL.Input(shape=[None], name="input_image_meta")
        if mode == "training":
            # RPN GT
            input_rpn_match = KL.Input(
                shape=[None, 1], name="input_rpn_match", dtype=tf.int32)
            input_rpn_bbox = KL.Input(
                shape=[None, 4], name="input_rpn_bbox", dtype=tf.float32)

            # Detection GT (class IDs, bounding boxes, and masks)
            # 1. GT Class IDs (zero padded)
            input_gt_class_ids = KL.Input(
                shape=[None], name="input_gt_class_ids", dtype=tf.int32)
            # 2. GT Boxes in pixels (zero padded)
            # [batch, MAX_GT_INSTANCES, (y1, x1, y2, x2)] in image coordinates
            input_gt_boxes = KL.Input(
                shape=[None, 4], name="input_gt_boxes", dtype=tf.float32)
            # Normalize coordinates
            h, w = K.shape(input_image)[1], K.shape(input_image)[2]
            image_scale = K.cast(K.stack([h, w, h, w], axis=0), tf.float32)
            gt_boxes = KL.Lambda(lambda x: x / image_scale,name="gt_boxes")(input_gt_boxes)

            keypoint_scale = K.cast(K.stack([w, h, 1], axis=0), tf.float32)
            input_gt_keypoints = KL.Input(shape=[None, config.NUM_KEYPOINTS, 3])
            gt_keypoints = KL.Lambda(lambda x: x / keypoint_scale, name="gt_keypoints")(input_gt_keypoints)
            # 3. GT Masks (zero padded)
            # [batch, height, width, MAX_GT_INSTANCES]
            # if config.USE_MINI_MASK:
            #     input_gt_masks = KL.Input(
            #         shape=[config.MINI_MASK_SHAPE[0],
            #                config.MINI_MASK_SHAPE[1], None],
            #         name="input_gt_masks", dtype=bool)
            #     # input_gt_keypoint_masks = KL.Input(
            #     #     shape=[config.MINI_MASK_SHAPE[0],
            #     #            config.MINI_MASK_SHAPE[1], None, config.NUM_KEYPOINTS],
            #     #     name="input_gt_keypoint_masks", dtype=bool)
            # else:
            #     input_gt_masks = KL.Input(
            #         shape=[config.IMAGE_SHAPE[0], config.IMAGE_SHAPE[1], None],
            #         name="input_gt_masks", dtype=bool)
                # input_gt_keypoint_masks = KL.Input(
                #     shape=[config.IMAGE_SHAPE[0], config.IMAGE_SHAPE[1], None, config.NUM_KEYPOINTS],
                #     name="input_gt_keypoint_masks", dtype=bool)

            # input_gt_keypoint_weigths = KL.Input(
            #     shape=[None,config.NUM_KEYPOINTS], name="input_gt_keypoint_weights", dtype=tf.int32)


        # Build the shared convolutional layers.
        # Bottom-up Layers
        # Returns a list of the last layers of each stage, 5 in total.
        # Don't create the thead (stage 5), so we pick the 4th item in the list.
        _, C2, C3, C4, C5 = resnet_graph(input_image, "resnet101", stage5=True)
        # Top-down Layers
        # TODO: add assert to varify feature map sizes match what's in config
        P5 = KL.Conv2D(256, (1, 1), name='fpn_c5p5')(C5)
        P4 = KL.Add(name="fpn_p4add")([
            KL.UpSampling2D(size=(2, 2), name="fpn_p5upsampled")(P5),
            KL.Conv2D(256, (1, 1), name='fpn_c4p4')(C4)])
        P3 = KL.Add(name="fpn_p3add")([
            KL.UpSampling2D(size=(2, 2), name="fpn_p4upsampled")(P4),
            KL.Conv2D(256, (1, 1), name='fpn_c3p3')(C3)])
        P2 = KL.Add(name="fpn_p2add")([
            KL.UpSampling2D(size=(2, 2), name="fpn_p3upsampled")(P3),
            KL.Conv2D(256, (1, 1), name='fpn_c2p2')(C2)])
        # Attach 3x3 conv to all P layers to get the final feature maps.
        P2 = KL.Conv2D(256, (3, 3), padding="SAME", name="fpn_p2")(P2)
        P3 = KL.Conv2D(256, (3, 3), padding="SAME", name="fpn_p3")(P3)
        P4 = KL.Conv2D(256, (3, 3), padding="SAME", name="fpn_p4")(P4)
        P5 = KL.Conv2D(256, (3, 3), padding="SAME", name="fpn_p5")(P5)
        # P6 is used for the 5th anchor scale in RPN. Generated by
        # subsampling from P5 with stride of 2.
        P6 = KL.MaxPooling2D(pool_size=(1, 1), strides=2, name="fpn_p6")(P5)

        # Note that P6 is used in RPN, but not in the classifier heads.
        rpn_feature_maps = [P2, P3, P4, P5, P6]
        mrcnn_feature_maps = [P2, P3, P4, P5]

        # Generate Anchors
        self.anchors = utils.generate_pyramid_anchors(config.RPN_ANCHOR_SCALES,
                                                      config.RPN_ANCHOR_RATIOS,
                                                      config.BACKBONE_SHAPES,
                                                      config.BACKBONE_STRIDES,
                                                      config.RPN_ANCHOR_STRIDE)

        # RPN Model
        rpn = build_rpn_model(config.RPN_ANCHOR_STRIDE,
                              len(config.RPN_ANCHOR_RATIOS), 256)
        # Loop through pyramid layers
        layer_outputs = []  # list of lists
        for p in rpn_feature_maps:
            layer_outputs.append(rpn([p]))
        # Concatenate layer outputs
        # Convert from list of lists of level outputs to list of lists
        # of outputs across levels.
        # e.g. [[a1, b1, c1], [a2, b2, c2]] => [[a1, a2], [b1, b2], [c1, c2]]
        output_names = ["rpn_class_logits", "rpn_class", "rpn_bbox"]
        outputs = list(zip(*layer_outputs))
        outputs = [KL.Concatenate(axis=1, name=n)(list(o))
                   for o, n in zip(outputs, output_names)]

        rpn_class_logits, rpn_class, rpn_bbox = outputs

        # Generate proposals
        # Proposals are [batch, N, (y1, x1, y2, x2)] in normalized coordinates
        # and zero padded.
        proposal_count = config.POST_NMS_ROIS_TRAINING if mode == "training"
            else config.POST_NMS_ROIS_INFERENCE
        rpn_rois = ProposalLayer(proposal_count=proposal_count,
                                 nms_threshold=config.RPN_NMS_THRESHOLD,
                                 name="ROI",
                                 anchors=self.anchors,
                                 config=config)([rpn_class, rpn_bbox])

        if mode == "training":
            # Class ID mask to mark class IDs supported by the dataset the image
            # came from.
            _, _, _, active_class_ids = KL.Lambda(lambda x: parse_image_meta_graph(x),
                                                  mask=[None, None, None, None])(input_image_meta)

            if not config.USE_RPN_ROIS:
                # Ignore predicted ROIs and use ROIs provided as an input.
                input_rois = KL.Input(shape=[config.POST_NMS_ROIS_TRAINING, 4],
                                      name="input_roi", dtype=np.int32)
                # Normalize coordinates to 0-1 range.
                target_rois = KL.Lambda(lambda x: K.cast(
                    x, tf.float32) / image_scale[:4])(input_rois)
            else:
                target_rois = rpn_rois

            # Generate detection targets
            # Subsamples proposals and generates target outputs for training
            # Note that proposal class IDs, gt_boxes and gt_masks are zero
            # padded. Equally, returned rois and targets are zero padded.
            #Every rois corresond to one target
            # rois, target_class_ids, target_bbox, target_mask =
            #     DetectionTargetLayer(config, name="proposal_targets")([
            #         target_rois, input_gt_class_ids, gt_boxes, input_gt_masks])

            # Generate detection targets
            # Subsamples proposals and generates target outputs for training
            # Note that proposal class IDs, gt_boxes, gt_keypoint_masks and gt_keypoint_weights are zero
            # padded. Equally, returned rois and targets are zero padded.
            rois, target_class_ids, target_bbox, target_keypoint, target_keypoint_weight =
                DetectionKeypointTargetLayer(config, name="proposal_targets")
                    ([target_rois, input_gt_class_ids, gt_boxes, gt_keypoints])

            # Network Heads
            # TODO: verify that this handles zero padded ROIs
            mrcnn_class_logits, mrcnn_class, mrcnn_bbox =
                fpn_classifier_graph(rois, mrcnn_feature_maps, config.IMAGE_SHAPE,
                                     config.POOL_SIZE, config.NUM_CLASSES)


            # mrcnn_mask = build_fpn_mask_graph(rois, mrcnn_feature_maps,
            #                                   config.IMAGE_SHAPE,
            #                                   config.MASK_POOL_SIZE,
            #                                   config.NUM_CLASSES)

            # shape: batch_size, num_roi, num_keypoint, 56*56
            keypoint_mrcnn_mask = build_fpn_keypoint_graph(rois, mrcnn_feature_maps,
                                              config.IMAGE_SHAPE,
                                              config.KEYPOINT_MASK_POOL_SIZE,
                                              config.NUM_KEYPOINTS)

            # TODO: clean up (use tf.identify if necessary)
            output_rois = KL.Lambda(lambda x: x * 1, name="output_rois")(rois)
            # keypoint_mrcnn_mask = KL.Lambda(lambda x: x * 1, name="keypoint_mrcnn_mask")(keypoint_mrcnn_mask)

            # Losses
            rpn_class_loss = KL.Lambda(lambda x: rpn_class_loss_graph(*x), name="rpn_class_loss")(
                [input_rpn_match, rpn_class_logits])
            rpn_bbox_loss = KL.Lambda(lambda x: rpn_bbox_loss_graph(config, *x), name="rpn_bbox_loss")(
                [input_rpn_bbox, input_rpn_match, rpn_bbox])
            class_loss = KL.Lambda(lambda x: mrcnn_class_loss_graph(*x), name="mrcnn_class_loss")(
                [target_class_ids, mrcnn_class_logits, active_class_ids])
            bbox_loss = KL.Lambda(lambda x: mrcnn_bbox_loss_graph(*x), name="mrcnn_bbox_loss")(
                [target_bbox, target_class_ids, mrcnn_bbox])

            # mask_loss = KL.Lambda(lambda x: mrcnn_mask_loss_graph(*x),
            #                                name="mrcnn_mask_loss")(
            #     [target_mask, target_class_ids, mrcnn_mask])
            keypoint_loss = KL.Lambda(lambda x: keypoint_mrcnn_mask_loss_graph(*x, weight_loss=config.WEIGHT_LOSS), name="keypoint_mrcnn_mask_loss")(
                [target_keypoint, target_keypoint_weight, target_class_ids, keypoint_mrcnn_mask])
            """
            target_keypoints: [batch, TRAIN_ROIS_PER_IMAGE, NUM_KEYPOINTS)
                 Keypoint labels cropped to bbox boundaries and resized to neural
                 network output size. Maps keypoints from the half-open interval [x1, x2) on continuous image
                coordinates to the closed interval [0, HEATMAP_SIZE - 1]

            target_keypoint_weights: [batch, TRAIN_ROIS_PER_IMAGE, NUM_KEYPOINTS), bool type
                 Keypoint_weights, 0: isn't visible, 1: visilble
            """

            # test_target_keypoint_mask = test_keypoint_mrcnn_mask_loss_graph(target_keypoint, target_keypoint_weight,
            #                                                        target_class_ids, keypoint_mrcnn_mask)

            # keypoint_weight_loss = KL.Lambda(lambda x: keypoint_weight_loss_graph(*x), name="keypoint_weight_loss")(
            #     [target_keypoint_weight, keypoint_weight_logits, target_class_ids])


            # Model generated
            # batch_images, batch_image_meta, batch_rpn_match, batch_rpn_bbox, batch_gt_class_ids,
            # batch_gt_boxes, batch_gt_keypoint, batch_gt_masks
            inputs = [input_image, input_image_meta,
                      input_rpn_match, input_rpn_bbox, input_gt_class_ids, input_gt_boxes, input_gt_keypoints]
            if not config.USE_RPN_ROIS:
                inputs.append(input_rois)

            # add "test_target_keypoint_mask" in the output for test the keypoint loss function
            outputs = [rpn_class_logits, rpn_class, rpn_bbox,
                       mrcnn_class_logits, mrcnn_class, mrcnn_bbox, keypoint_mrcnn_mask,
                       rpn_rois, output_rois,
                       rpn_class_loss, rpn_bbox_loss, class_loss, bbox_loss, keypoint_loss]
                       # +  test_target_keypoint_mask for test the keypoint loss graph

            model = KM.Model(inputs, outputs, name='mask_keypoint_mrcnn')
        else:
            # Network Heads
            # Proposal classifier and BBox regressor heads
            mrcnn_class_logits, mrcnn_class, mrcnn_bbox =
                fpn_classifier_graph(rpn_rois, mrcnn_feature_maps, config.IMAGE_SHAPE,
                                     config.POOL_SIZE, config.NUM_CLASSES)

            # Detections
            # output is
            #   detections: [batch, num_detections, (y1, x1, y2, x2, class_id, score)] in image coordinates
            #   keypoint_weights: [batch, num_detections, num_keypoints]
            detections = DetectionLayer(config, name="mrcnn_detection")(
                [rpn_rois, mrcnn_class, mrcnn_bbox,input_image_meta])

            # Convert boxes to normalized coordinates
            # TODO: let DetectionLayer return normalized coordinates to avoid
            #       unnecessary conversions
            h, w = config.IMAGE_SHAPE[:2]
            detection_boxes = KL.Lambda(
                lambda x: x[..., :4] / np.array([h, w, h, w]))(detections)

            # Create masks for detections
            mrcnn_mask = build_fpn_mask_graph(detection_boxes, mrcnn_feature_maps,
                                              config.IMAGE_SHAPE,
                                              config.MASK_POOL_SIZE,
                                              config.NUM_CLASSES)
            keypoint_mrcnn = build_fpn_keypoint_graph(detection_boxes, mrcnn_feature_maps,
                                                           config.IMAGE_SHAPE,
                                                           config.KEYPOINT_MASK_POOL_SIZE,
                                                           config.NUM_KEYPOINTS)

            #shape: Batch, N_ROI, Number_Keypoint, height*width
            keypoint_mcrcnn_prob = KL.Activation("softmax", name="mrcnn_prob")(keypoint_mrcnn)
            model = KM.Model([input_image, input_image_meta],
                             [detections, mrcnn_class, mrcnn_bbox, rpn_rois, rpn_class, rpn_bbox, mrcnn_mask, keypoint_mcrcnn_prob],
                             name='keypoint_mask_rcnn')

        # Add multi-GPU support.
        if config.GPU_COUNT > 1:
            from parallel_model import ParallelModel
            model = ParallelModel(model, config.GPU_COUNT)

        return model
在model.compile方法中,我们可以看到有关损失函数添加的细节:
# Add Losses
# First, clear previously set losses to avoid duplication
self.keras_model._losses = []
self.keras_model._per_input_losses = {}
loss_names = ["rpn_class_loss", "rpn_bbox_loss",
              "mrcnn_class_loss", "mrcnn_bbox_loss", "keypoint_mrcnn_mask_loss"]
for name in loss_names:
    layer = self.keras_model.get_layer(name)
    if layer.output in self.keras_model.losses:
       continue
    self.keras_model.add_loss(
       tf.reduce_mean(layer.output, keepdims=True))

# Add L2 Regularization
# Skip gamma and beta weights of batch normalization layers.
reg_losses = [keras.regularizers.l2(self.config.WEIGHT_DECAY)(w) / tf.cast(tf.size(w), tf.float32)
              for w in self.keras_model.trainable_weights
              if 'gamma' not in w.name and 'beta' not in w.name]
 self.keras_model.add_loss(tf.add_n(reg_losses))
至此,keypoints检测分支添加完毕,直接训练即可。
3、keypoint损失函数
本损失函数也是原版Mask RCNN没有实现,经由Humanpose工程实现的,我们无需改动。
其原理就是将true propose 的目标中的可见关键点进行(稀疏)交叉熵计算,之所以强调是稀疏交叉熵,因为每一个关键点其使用一个56*56的向量表示,大部分位置为0,仅关键点位置为1。
def keypoint_mrcnn_mask_loss_graph(target_keypoints, target_keypoint_weights,
                                   target_class_ids, pred_keypoints_logit,
                                   weight_loss = True, mask_shape=[56,56],
                                   number_point=13):
    """Mask softmax cross-entropy loss for the keypoint head.
    积极区域的关键点才参与loss计算
        真实目标类别 target_class_ids 大于0的位置
    可见点才参与loss运算
        真实关键点权重 target_keypoint_weights 为1的位置
    target_keypoints:     真实关键点坐标
    pred_keypoints_logit: 预测出关键点生成的热图

    target_keypoints: [batch, TRAIN_ROIS_PER_IMAGE, NUM_KEYPOINTS)
         Keypoint labels cropped to bbox boundaries and resized to neural
         network output size. Maps keypoints from the half-open interval [x1, x2) on continuous image
        coordinates to the closed interval [0, HEATMAP_SIZE - 1]

    target_keypoint_weights: [batch, TRAIN_ROIS_PER_IMAGE, NUM_KEYPOINTS), bool type
         Keypoint_weights, 0: isn't visible, 1: visilble

    target_class_ids: [batch, TRAIN_ROIS_PER_IMAGE]. Integer class IDs.

    pred_keypoints_logit: [batch_size, num_roi, num_keypoint, 56*56)

    """

    # Reshape for simplicity. Merge first two dimensions into one.
    #shape:[N]
    target_class_ids = K.reshape(target_class_ids, (-1,))
    # Only positive person ROIs contribute to the loss. And only
    # the people specific mask of each ROI.
    positive_people_ix = tf.where(target_class_ids > 0)[:, 0]
    positive_people_ids = tf.cast(
        tf.gather(target_class_ids, positive_people_ix), tf.int64)

    ###Step 1 Get the positive target and predict keypoint masks
        # reshape target_keypoint_weights to [N, num_keypoints]
    target_keypoint_weights = K.reshape(target_keypoint_weights, (-1, number_point))  # 点的可见度
        # reshape target_keypoint_masks to [N, num_keypoints]
    target_keypoints = K.reshape(target_keypoints, (
        -1,  number_point))  # 点的坐标

    # reshape pred_keypoint_masks to [N, number_point, 56*56]
    pred_keypoints_logit = K.reshape(pred_keypoints_logit,
                                    (-1, number_point, mask_shape[0]*mask_shape[1]))  # 推荐区特征图

        # Gather the keypoint masks (target and predict) that contribute to loss
        # shape: [N_positive, number_point]
    positive_target_keypoints = tf.cast(tf.gather(target_keypoints, positive_people_ix),tf.int32)
        # shape: [N_positive, number_point, 56*56]
    positive_pred_keypoints_logit = tf.gather(pred_keypoints_logit, positive_people_ix)
        # positive target_keypoint_weights to[N_positive, number_point]
    positive_keypoint_weights = tf.cast(
        tf.gather(target_keypoint_weights, positive_people_ix), tf.float32)

    loss = K.switch(tf.size(positive_target_keypoints) > 0,
                    lambda: tf.nn.sparse_softmax_cross_entropy_with_logits(logits=positive_pred_keypoints_logit,
                                                                           labels=positive_target_keypoints),
                    lambda: tf.constant(0.0))
    loss = loss * positive_keypoint_weights

    if(weight_loss):
        loss = K.switch(tf.reduce_sum(positive_keypoint_weights) > 0,
                        lambda: tf.reduce_sum(loss) / tf.reduce_sum(positive_keypoint_weights),
                        lambda: tf.constant(0.0)
                        )
    else:
        loss = K.mean(loss)
    loss = tf.reshape(loss,[1,1])

    return loss
我们随机选择一张图片,运行demo_detect.ipynb脚本查看训练效果: