SpringBoot系列文章简介
SpringBoot源码阅读辅助篇:
SpringBoot启动流程源码分析:
- SpringBoot启动流程分析(一):SpringApplication类初始化过程
- SpringBoot启动流程分析(二):SpringApplication的run方法
- SpringBoot启动流程分析(三):SpringApplication的run方法之prepareContext()方法
- SpringBoot启动流程分析(四):IoC容器的初始化过程
- SpringBoot启动流程分析(五):SpringBoot自动装配原理实现
- SpringBoot启动流程分析(六):IoC容器依赖注入
笔者注释版Spring Framework与SpringBoot源码git传送门:请不要吝啬小星星
第五步:刷新应用上下文
一、前言
在前面的博客中谈到IoC容器的初始化过程,主要分下面三步:
1 BeanDefinition的Resource定位
2 BeanDefinition的载入
3 向IoC容器注册BeanDefinition
在上一篇文章介绍了prepareContext()方法,在准备刷新阶段做了什么工作。本文我们主要从refresh()方法中总结IoC容器的初始化过程。
从run方法的,refreshContext()方法一路跟下去,最终来到AbstractApplicationContext类的refresh()方法。
 1 @Override
 2 public void refresh() throws BeansException, IllegalStateException {
 3     synchronized (this.startupShutdownMonitor) {
 4         // Prepare this context for refreshing.
 5         //刷新上下文环境
 6         prepareRefresh();
 7         // Tell the subclass to refresh the internal bean factory.
 8         //这里是在子类中启动 refreshBeanFactory() 的地方
 9         ConfigurableListableBeanFactory beanFactory = obtainFreshBeanFactory();
10         // Prepare the bean factory for use in this context.
11         //准备bean工厂,以便在此上下文中使用
12         prepareBeanFactory(beanFactory);
13         try {
14             // Allows post-processing of the bean factory in context subclasses.
15             //设置 beanFactory 的后置处理
16             postProcessBeanFactory(beanFactory);
17             // Invoke factory processors registered as beans in the context.
18             //调用 BeanFactory 的后处理器,这些处理器是在Bean 定义中向容器注册的
19             invokeBeanFactoryPostProcessors(beanFactory);
20             // Register bean processors that intercept bean creation.
21             //注册Bean的后处理器,在Bean创建过程中调用
22             registerBeanPostProcessors(beanFactory);
23             // Initialize message source for this context.
24             //对上下文中的消息源进行初始化
25             initMessageSource();
26             // Initialize event multicaster for this context.
27             //初始化上下文中的事件机制
28             initApplicationEventMulticaster();
29             // Initialize other special beans in specific context subclasses.
30             //初始化其他特殊的Bean
31             onRefresh();
32             // Check for listener beans and register them.
33             //检查监听Bean并且将这些监听Bean向容器注册
34             registerListeners();
35             // Instantiate all remaining (non-lazy-init) singletons.
36             //实例化所有的(non-lazy-init)单件
37             finishBeanFactoryInitialization(beanFactory);
38             // Last step: publish corresponding event.
39             //发布容器事件,结束Refresh过程
40             finishRefresh();
41         } catch (BeansException ex) {
42             if (logger.isWarnEnabled()) {
43                 logger.warn("Exception encountered during context initialization - " +
44                         "cancelling refresh attempt: " + ex);
45             }
46             // Destroy already created singletons to avoid dangling resources.
47             destroyBeans();
48             // Reset 'active' flag.
49             cancelRefresh(ex);
50             // Propagate exception to caller.
51             throw ex;
52         } finally {
53             // Reset common introspection caches in Spring's core, since we
54             // might not ever need metadata for singleton beans anymore...
55             resetCommonCaches();
56         }
57     }
58 }
从以上代码中我们可以看到,refresh()方法中所作的工作也挺多,我们没办法面面俱到,主要根据IoC容器的初始化步骤和IoC依赖注入的过程进行分析,围绕以上两个过程,我们主要介绍重要的方法,其他的请看注释。
二、obtainFreshBeanFactory();
在启动流程的第三步:初始化应用上下文。中我们创建了应用的上下文,并触发了GenericApplicationContext类的构造方法如下所示,创建了beanFactory,也就是创建了DefaultListableBeanFactory类。
1 public GenericApplicationContext() {
2     this.beanFactory = new DefaultListableBeanFactory();
3 }
关于obtainFreshBeanFactory()方法,其实就是拿到我们之前创建的beanFactory。
 1 protected ConfigurableListableBeanFactory obtainFreshBeanFactory() {
 2     //刷新BeanFactory
 3     refreshBeanFactory();
 4     //获取beanFactory
 5     ConfigurableListableBeanFactory beanFactory = getBeanFactory();
 6     if (logger.isDebugEnabled()) {
 7         logger.debug("Bean factory for " + getDisplayName() + ": " + beanFactory);
 8     }
 9     return beanFactory;
10 }
从上面代码可知,在该方法中主要做了三个工作,刷新beanFactory,获取beanFactory,返回beanFactory。
首先看一下refreshBeanFactory()方法,跟下去来到GenericApplicationContext类的refreshBeanFactory()发现也没做什么。
1 @Override
2 protected final void refreshBeanFactory() throws IllegalStateException {
3     if (!this.refreshed.compareAndSet(false, true)) {
4         throw new IllegalStateException(
5                 "GenericApplicationContext does not support multiple refresh attempts: just call 'refresh' once");
6     }
7     this.beanFactory.setSerializationId(getId());
8 }
TIPS:
  1,AbstractApplicationContext类有两个子类实现了refreshBeanFactory(),但是在前面第三步初始化上下文的时候,
实例化了GenericApplicationContext类,所以没有进入AbstractRefreshableApplicationContext中的refreshBeanFactory()方法。
  2,this.refreshed.compareAndSet(false, true)
  这行代码在这里表示:GenericApplicationContext只允许刷新一次
  这行代码,很重要,不是在Spring中很重要,而是这行代码本身。首先看一下this.refreshed属性:
private final AtomicBoolean refreshed = new AtomicBoolean();
  java J.U.C并发包中很重要的一个原子类AtomicBoolean。通过该类的compareAndSet()方法可以实现一段代码绝对只实现一次的功能。
感兴趣的自行百度吧。

三、prepareBeanFactory(beanFactory);
从字面意思上可以看出准备BeanFactory。
看代码,具体看看做了哪些准备工作。这个方法不是重点,看注释吧。
 1 protected void prepareBeanFactory(ConfigurableListableBeanFactory beanFactory) {
 2     // Tell the internal bean factory to use the context's class loader etc.
 3     // 配置类加载器:默认使用当前上下文的类加载器
 4     beanFactory.setBeanClassLoader(getClassLoader());
 5     // 配置EL表达式:在Bean初始化完成,填充属性的时候会用到
 6     beanFactory.setBeanExpressionResolver(new StandardBeanExpressionResolver(beanFactory.getBeanClassLoader()));
 7     // 添加属性编辑器 PropertyEditor
 8     beanFactory.addPropertyEditorRegistrar(new ResourceEditorRegistrar(this, getEnvironment()));
 9
10     // Configure the bean factory with context callbacks.
11     // 添加Bean的后置处理器
12     beanFactory.addBeanPostProcessor(new ApplicationContextAwareProcessor(this));
13     // 忽略装配以下指定的类
14     beanFactory.ignoreDependencyInterface(EnvironmentAware.class);
15     beanFactory.ignoreDependencyInterface(EmbeddedValueResolverAware.class);
16     beanFactory.ignoreDependencyInterface(ResourceLoaderAware.class);
17     beanFactory.ignoreDependencyInterface(ApplicationEventPublisherAware.class);
18     beanFactory.ignoreDependencyInterface(MessageSourceAware.class);
19     beanFactory.ignoreDependencyInterface(ApplicationContextAware.class);
20
21     // BeanFactory interface not registered as resolvable type in a plain factory.
22     // MessageSource registered (and found for autowiring) as a bean.
23     // 将以下类注册到 beanFactory(DefaultListableBeanFactory) 的resolvableDependencies属性中
24     beanFactory.registerResolvableDependency(BeanFactory.class, beanFactory);
25     beanFactory.registerResolvableDependency(ResourceLoader.class, this);
26     beanFactory.registerResolvableDependency(ApplicationEventPublisher.class, this);
27     beanFactory.registerResolvableDependency(ApplicationContext.class, this);
28
29     // Register early post-processor for detecting inner beans as ApplicationListeners.
30     // 将早期后处理器注册为application监听器,用于检测内部bean
31     beanFactory.addBeanPostProcessor(new ApplicationListenerDetector(this));
32
33     // Detect a LoadTimeWeaver and prepare for weaving, if found.
34     //如果当前BeanFactory包含loadTimeWeaver Bean,说明存在类加载期织入AspectJ,
35     // 则把当前BeanFactory交给类加载期BeanPostProcessor实现类LoadTimeWeaverAwareProcessor来处理,
36     // 从而实现类加载期织入AspectJ的目的。
37     if (beanFactory.containsBean(LOAD_TIME_WEAVER_BEAN_NAME)) {
38         beanFactory.addBeanPostProcessor(new LoadTimeWeaverAwareProcessor(beanFactory));
39         // Set a temporary ClassLoader for type matching.
40         beanFactory.setTempClassLoader(new ContextTypeMatchClassLoader(beanFactory.getBeanClassLoader()));
41     }
42
43     // Register default environment beans.
44     // 将当前环境变量(environment) 注册为单例bean
45     if (!beanFactory.containsLocalBean(ENVIRONMENT_BEAN_NAME)) {
46         beanFactory.registerSingleton(ENVIRONMENT_BEAN_NAME, getEnvironment());
47     }
48     // 将当前系统配置(systemProperties) 注册为单例Bean
49     if (!beanFactory.containsLocalBean(SYSTEM_PROPERTIES_BEAN_NAME)) {
50         beanFactory.registerSingleton(SYSTEM_PROPERTIES_BEAN_NAME, getEnvironment().getSystemProperties());
51     }
52     // 将当前系统环境 (systemEnvironment) 注册为单例Bean
53     if (!beanFactory.containsLocalBean(SYSTEM_ENVIRONMENT_BEAN_NAME)) {
54         beanFactory.registerSingleton(SYSTEM_ENVIRONMENT_BEAN_NAME, getEnvironment().getSystemEnvironment());
55     }
56 }
四、postProcessBeanFactory(beanFactory);
postProcessBeanFactory()方法向上下文中添加了一系列的Bean的后置处理器。后置处理器工作的时机是在所有的beanDenifition加载完成之后,bean实例化之前执行。简单来说Bean的后置处理器可以修改BeanDefinition的属性信息。
关于这个方法就先这样吧,有兴趣的可以直接百度该方法。篇幅有限,对该方法不做过多介绍。
五、invokeBeanFactoryPostProcessors(beanFactory);(重点)
上面说过,IoC容器的初始化过程包括三个步骤,在invokeBeanFactoryPostProcessors()方法中完成了IoC容器初始化过程的三个步骤。
1,第一步:Resource定位
在SpringBoot中,我们都知道他的包扫描是从主类所在的包开始扫描的,prepareContext()方法中,会先将主类解析成BeanDefinition,然后在refresh()方法的invokeBeanFactoryPostProcessors()方法中解析主类的BeanDefinition获取basePackage的路径。这样就完成了定位的过程。其次SpringBoot的各种starter是通过SPI扩展机制实现的自动装配,SpringBoot的自动装配同样也是在invokeBeanFactoryPostProcessors()方法中实现的。还有一种情况,在SpringBoot中有很多的@EnableXXX注解,细心点进去看的应该就知道其底层是@Import注解,在invokeBeanFactoryPostProcessors()方法中也实现了对该注解指定的配置类的定位加载。
常规的在SpringBoot中有三种实现定位,第一个是主类所在包的,第二个是SPI扩展机制实现的自动装配(比如各种starter),第三种就是@Import注解指定的类。(对于非常规的不说了)
2,第二步:BeanDefinition的载入
在第一步中说了三种Resource的定位情况,定位后紧接着就是BeanDefinition的分别载入。所谓的载入就是通过上面的定位得到的basePackage,SpringBoot会将该路径拼接成:classpath*:org/springframework/boot/demo/**/*.class这样的形式,然后一个叫做PathMatchingResourcePatternResolver的类会将该路径下所有的.class文件都加载进来,然后遍历判断是不是有@Component注解,如果有的话,就是我们要装载的BeanDefinition。大致过程就是这样的了。
TIPS:
    @Configuration,@Controller,@Service等注解底层都是@Component注解,只不过包装了一层罢了。
3、第三个过程:注册BeanDefinition
这个过程通过调用上文提到的BeanDefinitionRegister接口的实现来完成。这个注册过程把载入过程中解析得到的BeanDefinition向IoC容器进行注册。通过上文的分析,我们可以看到,在IoC容器中将BeanDefinition注入到一个ConcurrentHashMap中,IoC容器就是通过这个HashMap来持有这些BeanDefinition数据的。比如DefaultListableBeanFactory 中的beanDefinitionMap属性。
OK,总结完了,接下来我们通过代码看看具体是怎么实现的。
 1 protected void invokeBeanFactoryPostProcessors(ConfigurableListableBeanFactory beanFactory) {
 2     PostProcessorRegistrationDelegate.invokeBeanFactoryPostProcessors(beanFactory, getBeanFactoryPostProcessors());
 3     ...
 4 }
 5 // PostProcessorRegistrationDelegate类
 6 public static void invokeBeanFactoryPostProcessors(
 7         ConfigurableListableBeanFactory beanFactory, List<BeanFactoryPostProcessor> beanFactoryPostProcessors) {
 8     ...
 9     invokeBeanDefinitionRegistryPostProcessors(currentRegistryProcessors, registry);
10     ...
11 }
12 // PostProcessorRegistrationDelegate类
13 private static void invokeBeanDefinitionRegistryPostProcessors(
14         Collection<? extends BeanDefinitionRegistryPostProcessor> postProcessors, BeanDefinitionRegistry registry) {
15
16     for (BeanDefinitionRegistryPostProcessor postProcessor : postProcessors) {
17         postProcessor.postProcessBeanDefinitionRegistry(registry);
18     }
19 }
20 // ConfigurationClassPostProcessor类
21 @Override
22 public void postProcessBeanDefinitionRegistry(BeanDefinitionRegistry registry) {
23     ...
24     processConfigBeanDefinitions(registry);
25 }
26 // ConfigurationClassPostProcessor类
27 public void processConfigBeanDefinitions(BeanDefinitionRegistry registry) {
28     ...
29     do {
30         parser.parse(candidates);
31         parser.validate();
32         ...
33     }
34     ...
35 }
一路跟踪调用栈,来到ConfigurationClassParser类的parse()方法。
 1 // ConfigurationClassParser类
 2 public void parse(Set<BeanDefinitionHolder> configCandidates) {
 3     this.deferredImportSelectors = new LinkedList<>();
 4     for (BeanDefinitionHolder holder : configCandidates) {
 5         BeanDefinition bd = holder.getBeanDefinition();
 6         try {
 7             // 如果是SpringBoot项目进来的,bd其实就是前面主类封装成的 AnnotatedGenericBeanDefinition(AnnotatedBeanDefinition接口的实现类)
 8             if (bd instanceof AnnotatedBeanDefinition) {
 9                 parse(((AnnotatedBeanDefinition) bd).getMetadata(), holder.getBeanName());
10             } else if (bd instanceof AbstractBeanDefinition && ((AbstractBeanDefinition) bd).hasBeanClass()) {
11                 parse(((AbstractBeanDefinition) bd).getBeanClass(), holder.getBeanName());
12             } else {
13                 parse(bd.getBeanClassName(), holder.getBeanName());
14             }
15         } catch (BeanDefinitionStoreException ex) {
16             throw ex;
17         } catch (Throwable ex) {
18             throw new BeanDefinitionStoreException(
19                     "Failed to parse configuration class [" + bd.getBeanClassName() + "]", ex);
20         }
21     }
22     // 加载默认的配置---》(对springboot项目来说这里就是自动装配的入口了)
23     processDeferredImportSelectors();
24 }
看上面的注释,在前面的prepareContext()方法中,我们详细介绍了我们的主类是如何一步步的封装成AnnotatedGenericBeanDefinition,并注册进IoC容器的beanDefinitionMap中的。
TIPS:
  至于processDeferredImportSelectors();方法,后面我们分析SpringBoot的自动装配的时候会详细讲解,各种starter是如何一步步的实现自动装配的。<SpringBoot启动流程分析(五):SpringBoot自动装配原理实现>
继续沿着parse(((AnnotatedBeanDefinition) bd).getMetadata(), holder.getBeanName());方法跟下去
  1 // ConfigurationClassParser类
  2 protected final void parse(AnnotationMetadata metadata, String beanName) throws IOException {
  3     processConfigurationClass(new ConfigurationClass(metadata, beanName));
  4 }
  5 // ConfigurationClassParser类
  6 protected void processConfigurationClass(ConfigurationClass configClass) throws IOException {
  7     ...
  8     // Recursively process the configuration class and its superclass hierarchy.
  9     //递归地处理配置类及其父类层次结构。
 10     SourceClass sourceClass = asSourceClass(configClass);
 11     do {
 12         //递归处理Bean,如果有父类,递归处理,直到顶层父类
 13         sourceClass = doProcessConfigurationClass(configClass, sourceClass);
 14     }
 15     while (sourceClass != null);
 16
 17     this.configurationClasses.put(configClass, configClass);
 18 }
 19 // ConfigurationClassParser类
 20 protected final SourceClass doProcessConfigurationClass(ConfigurationClass configClass, SourceClass sourceClass)
 21         throws IOException {
 22
 23     // Recursively process any member (nested) classes first
 24     //首先递归处理内部类,(SpringBoot项目的主类一般没有内部类)
 25     processMemberClasses(configClass, sourceClass);
 26
 27     // Process any @PropertySource annotations
 28     // 针对 @PropertySource 注解的属性配置处理
 29     for (AnnotationAttributes propertySource : AnnotationConfigUtils.attributesForRepeatable(
 30             sourceClass.getMetadata(), PropertySources.class,
 31             org.springframework.context.annotation.PropertySource.class)) {
 32         if (this.environment instanceof ConfigurableEnvironment) {
 33             processPropertySource(propertySource);
 34         } else {
 35             logger.warn("Ignoring @PropertySource annotation on [" + sourceClass.getMetadata().getClassName() +
 36                     "]. Reason: Environment must implement ConfigurableEnvironment");
 37         }
 38     }
 39
 40     // Process any @ComponentScan annotations
 41     // 根据 @ComponentScan 注解,扫描项目中的Bean(SpringBoot 启动类上有该注解)
 42     Set<AnnotationAttributes> componentScans = AnnotationConfigUtils.attributesForRepeatable(
 43             sourceClass.getMetadata(), ComponentScans.class, ComponentScan.class);
 44     if (!componentScans.isEmpty() &&
 45             !this.conditionEvaluator.shouldSkip(sourceClass.getMetadata(), ConfigurationPhase.REGISTER_BEAN)) {
 46         for (AnnotationAttributes componentScan : componentScans) {
 47             // The config class is annotated with @ComponentScan -> perform the scan immediately
 48             // 立即执行扫描,(SpringBoot项目为什么是从主类所在的包扫描,这就是关键了)
 49             Set<BeanDefinitionHolder> scannedBeanDefinitions =
 50                     this.componentScanParser.parse(componentScan, sourceClass.getMetadata().getClassName());
 51             // Check the set of scanned definitions for any further config classes and parse recursively if needed
 52             for (BeanDefinitionHolder holder : scannedBeanDefinitions) {
 53                 BeanDefinition bdCand = holder.getBeanDefinition().getOriginatingBeanDefinition();
 54                 if (bdCand == null) {
 55                     bdCand = holder.getBeanDefinition();
 56                 }
 57                 // 检查是否是ConfigurationClass(是否有configuration/component两个注解),如果是,递归查找该类相关联的配置类。
 58                 // 所谓相关的配置类,比如@Configuration中的@Bean定义的bean。或者在有@Component注解的类上继续存在@Import注解。
 59                 if (ConfigurationClassUtils.checkConfigurationClassCandidate(bdCand, this.metadataReaderFactory)) {
 60                     parse(bdCand.getBeanClassName(), holder.getBeanName());
 61                 }
 62             }
 63         }
 64     }
 65
 66     // Process any @Import annotations
 67     //递归处理 @Import 注解(SpringBoot项目中经常用的各种@Enable*** 注解基本都是封装的@Import)
 68     processImports(configClass, sourceClass, getImports(sourceClass), true);
 69
 70     // Process any @ImportResource annotations
 71     AnnotationAttributes importResource =
 72             AnnotationConfigUtils.attributesFor(sourceClass.getMetadata(), ImportResource.class);
 73     if (importResource != null) {
 74         String[] resources = importResource.getStringArray("locations");
 75         Class<? extends BeanDefinitionReader> readerClass = importResource.getClass("reader");
 76         for (String resource : resources) {
 77             String resolvedResource = this.environment.resolveRequiredPlaceholders(resource);
 78             configClass.addImportedResource(resolvedResource, readerClass);
 79         }
 80     }
 81
 82     // Process individual @Bean methods
 83     Set<MethodMetadata> beanMethods = retrieveBeanMethodMetadata(sourceClass);
 84     for (MethodMetadata methodMetadata : beanMethods) {
 85         configClass.addBeanMethod(new BeanMethod(methodMetadata, configClass));
 86     }
 87
 88     // Process default methods on interfaces
 89     processInterfaces(configClass, sourceClass);
 90
 91     // Process superclass, if any
 92     if (sourceClass.getMetadata().hasSuperClass()) {
 93         String superclass = sourceClass.getMetadata().getSuperClassName();
 94         if (superclass != null && !superclass.startsWith("java") &&
 95                 !this.knownSuperclasses.containsKey(superclass)) {
 96             this.knownSuperclasses.put(superclass, configClass);
 97             // Superclass found, return its annotation metadata and recurse
 98             return sourceClass.getSuperClass();
 99         }
100     }
101
102     // No superclass -> processing is complete
103     return null;
104 }
看doProcessConfigurationClass()方法。(SpringBoot的包扫描的入口方法,重点哦)
我们先大致说一下这个方法里面都干了什么,然后稍后再阅读源码分析。
TIPS:
  在以上代码的第60行parse(bdCand.getBeanClassName(), holder.getBeanName());会进行递归调用,
因为当Spring扫描到需要加载的类会进一步判断每一个类是否满足是@Component/@Configuration注解的类,
如果满足会递归调用parse()方法,查找其相关的类。
  同样的第68行processImports(configClass, sourceClass, getImports(sourceClass), true);
通过@Import注解查找到的类同样也会递归查找其相关的类。
  两个递归在debug的时候会很乱,用文字叙述起来更让人难以理解,所以,我们只关注对主类的解析,及其类的扫描过程。
上面代码的第29行 for (AnnotationAttributes propertySource : AnnotationConfigUtils.attributesForRepeatable(... 获取主类上的@PropertySource注解(关于该注解是怎么用的请自行百度),解析该注解并将该注解指定的properties配置文件中的值存储到Spring的 Environment中,Environment接口提供方法去读取配置文件中的值,参数是properties文件中定义的key值。
42行 Set<AnnotationAttributes> componentScans = AnnotationConfigUtils.attributesForRepeatable( sourceClass.getMetadata(), ComponentScans.class, ComponentScan.class); 解析主类上的@ComponentScan注解,呃,怎么说呢,42行后面的代码将会解析该注解并进行包扫描。
68行 processImports(configClass, sourceClass, getImports(sourceClass), true); 解析主类上的@Import注解,并加载该注解指定的配置类。
TIPS:
在spring中好多注解都是一层一层封装的,比如@EnableXXX,是对@Import注解的二次封装。@SpringBootApplication注解=@ComponentScan+@EnableAutoConfiguration+@Import+@Configuration+@Component。@Controller,@Service等等是对@Component的二次封装。。。
5.1、看看42-64行干了啥
从上面的42行往下看,来到第49行 Set<BeanDefinitionHolder> scannedBeanDefinitions = this.componentScanParser.parse(componentScan, sourceClass.getMetadata().getClassName());
进入该方法
 1 // ComponentScanAnnotationParser类
 2 public Set<BeanDefinitionHolder> parse(AnnotationAttributes componentScan, final String declaringClass) {
 3     ClassPathBeanDefinitionScanner scanner = new ClassPathBeanDefinitionScanner(this.registry,
 4             componentScan.getBoolean("useDefaultFilters"), this.environment, this.resourceLoader);
 5     ...
 6     // 根据 declaringClass (如果是SpringBoot项目,则参数为主类的全路径名)
 7     if (basePackages.isEmpty()) {
 8         basePackages.add(ClassUtils.getPackageName(declaringClass));
 9     }
10     ...
11     // 根据basePackages扫描类
12     return scanner.doScan(StringUtils.toStringArray(basePackages));
13 }
发现有两行重要的代码
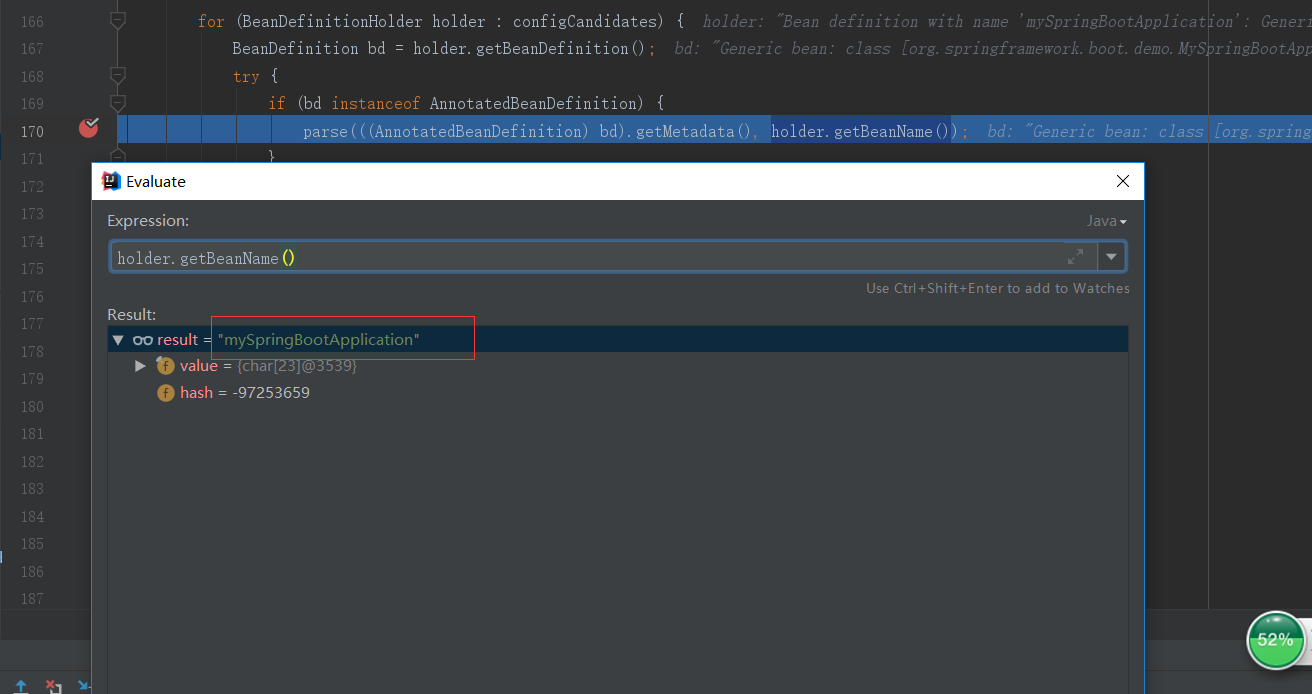
为了验证代码中的注释,debug,看一下declaringClass,如下图所示确实是我们的主类的全路径名。

跳过这一行,继续debug,查看basePackages,该set集合中只有一个,就是主类所在的路径。
TIPS:
  为什么只有一个还要用一个集合呢,因为我们也可以用@ComponentScan注解指定扫描路径。

到这里呢IoC容器初始化三个步骤的第一步,Resource定位就完成了,成功定位到了主类所在的包。
接着往下看 return scanner.doScan(StringUtils.toStringArray(basePackages)); Spring是如何进行类扫描的。进入doScan()方法。
 1 // ComponentScanAnnotationParser类
 2 protected Set<BeanDefinitionHolder> doScan(String... basePackages) {
 3     Assert.notEmpty(basePackages, "At least one base package must be specified");
 4     Set<BeanDefinitionHolder> beanDefinitions = new LinkedHashSet<>();
 5     for (String basePackage : basePackages) {
 6         // 从指定的包中扫描需要装载的Bean
 7         Set<BeanDefinition> candidates = findCandidateComponents(basePackage);
 8         for (BeanDefinition candidate : candidates) {
 9             ScopeMetadata scopeMetadata = this.scopeMetadataResolver.resolveScopeMetadata(candidate);
10             candidate.setScope(scopeMetadata.getScopeName());
11             String beanName = this.beanNameGenerator.generateBeanName(candidate, this.registry);
12             if (candidate instanceof AbstractBeanDefinition) {
13                 postProcessBeanDefinition((AbstractBeanDefinition) candidate, beanName);
14             }
15             if (candidate instanceof AnnotatedBeanDefinition) {
16                 AnnotationConfigUtils.processCommonDefinitionAnnotations((AnnotatedBeanDefinition) candidate);
17             }
18             if (checkCandidate(beanName, candidate)) {
19                 BeanDefinitionHolder definitionHolder = new BeanDefinitionHolder(candidate, beanName);
20                 definitionHolder =
21                         AnnotationConfigUtils.applyScopedProxyMode(scopeMetadata, definitionHolder, this.registry);
22                 beanDefinitions.add(definitionHolder);
23                 //将该 Bean 注册进 IoC容器(beanDefinitionMap)
24                 registerBeanDefinition(definitionHolder, this.registry);
25             }
26         }
27     }
28     return beanDefinitions;
29 }
这个方法中有两个比较重要的方法,第7行 Set<BeanDefinition> candidates = findCandidateComponents(basePackage); 从basePackage中扫描类并解析成BeanDefinition,拿到所有符合条件的类后在第24行 registerBeanDefinition(definitionHolder, this.registry); 将该类注册进IoC容器。也就是说在这个方法中完成了IoC容器初始化过程的第二三步,BeanDefinition的载入,和BeanDefinition的注册。
5.1.1、findCandidateComponents(basePackage);
跟踪调用栈
 1 // ClassPathScanningCandidateComponentProvider类
 2 public Set<BeanDefinition> findCandidateComponents(String basePackage) {
 3     ...
 4     else {
 5         return scanCandidateComponents(basePackage);
 6     }
 7 }
 8 // ClassPathScanningCandidateComponentProvider类
 9 private Set<BeanDefinition> scanCandidateComponents(String basePackage) {
10     Set<BeanDefinition> candidates = new LinkedHashSet<>();
11     try {
12         //拼接扫描路径,比如:classpath*:org/springframework/boot/demo/**/*.class
13         String packageSearchPath = ResourcePatternResolver.CLASSPATH_ALL_URL_PREFIX +
14                 resolveBasePackage(basePackage) + '/' + this.resourcePattern;
15         //从 packageSearchPath 路径中扫描所有的类
16         Resource[] resources = getResourcePatternResolver().getResources(packageSearchPath);
17         boolean traceEnabled = logger.isTraceEnabled();
18         boolean debugEnabled = logger.isDebugEnabled();
19         for (Resource resource : resources) {
20             if (traceEnabled) {
21                 logger.trace("Scanning " + resource);
22             }
23             if (resource.isReadable()) {
24                 try {
25                     MetadataReader metadataReader = getMetadataReaderFactory().getMetadataReader(resource);
26                     // //判断该类是不是 @Component 注解标注的类,并且不是需要排除掉的类
27                     if (isCandidateComponent(metadataReader)) {
28                         //将该类封装成 ScannedGenericBeanDefinition(BeanDefinition接口的实现类)类
29                         ScannedGenericBeanDefinition sbd = new ScannedGenericBeanDefinition(metadataReader);
30                         sbd.setResource(resource);
31                         sbd.setSource(resource);
32                         if (isCandidateComponent(sbd)) {
33                             if (debugEnabled) {
34                                 logger.debug("Identified candidate component class: " + resource);
35                             }
36                             candidates.add(sbd);
37                         } else {
38                             if (debugEnabled) {
39                                 logger.debug("Ignored because not a concrete top-level class: " + resource);
40                             }
41                         }
42                     } else {
43                         if (traceEnabled) {
44                             logger.trace("Ignored because not matching any filter: " + resource);
45                         }
46                     }
47                 } catch (Throwable ex) {
48                     throw new BeanDefinitionStoreException(
49                             "Failed to read candidate component class: " + resource, ex);
50                 }
51             } else {
52                 if (traceEnabled) {
53                     logger.trace("Ignored because not readable: " + resource);
54                 }
55             }
56         }
57     } catch (IOException ex) {
58         throw new BeanDefinitionStoreException("I/O failure during classpath scanning", ex);
59     }
60     return candidates;
61 }
在第13行将basePackage拼接成classpath*:org/springframework/boot/demo/**/*.class,在第16行的getResources(packageSearchPath);方法中扫描到了该路径下的所有的类。然后遍历这些Resources,在第27行判断该类是不是 @Component 注解标注的类,并且不是需要排除掉的类。在第29行将扫描到的类,解析成ScannedGenericBeanDefinition,该类是BeanDefinition接口的实现类。OK,IoC容器的BeanDefinition载入到这里就结束了。
回到前面的doScan()方法,debug看一下结果(截图中所示的就是我定位的需要交给Spring容器管理的类)。
5.1.2、registerBeanDefinition(definitionHolder, this.registry);
查看registerBeanDefinition()方法。是不是有点眼熟,在前面介绍prepareContext()方法时,我们详细介绍了主类的BeanDefinition是怎么一步一步的注册进DefaultListableBeanFactory的beanDefinitionMap中的。在此呢我们就省略1w字吧。完成了BeanDefinition的注册,就完成了IoC容器的初始化过程。此时,在使用的IoC容器DefaultListableFactory中已经建立了整个Bean的配置信息,而这些BeanDefinition已经可以被容器使用了。他们都在BeanbefinitionMap里被检索和使用。容器的作用就是对这些信息进行处理和维护。这些信息是容器简历依赖反转的基础。
1 protected void registerBeanDefinition(BeanDefinitionHolder definitionHolder, BeanDefinitionRegistry registry) {
2     BeanDefinitionReaderUtils.registerBeanDefinition(definitionHolder, registry);
3 }
OK,到这里IoC容器的初始化过程的三个步骤就梳理完了。当然这只是针对SpringBoot的包扫描的定位方式的BeanDefinition的定位,加载,和注册过程。前面我们说过,还有两种方式@Import和SPI扩展实现的starter的自动装配。
5.2、@Import注解的解析过程
相信不说大家也应该知道了,各种@EnableXXX注解,很大一部分都是对@Import的二次封装(其实也是为了解耦,比如当@Import导入的类发生变化时,我们的业务系统也不需要改任何代码)。
呃,我们又要回到上文中的ConfigurationClassParser类的doProcessConfigurationClass方法的第68行processImports(configClass, sourceClass, getImports(sourceClass), true);,跳跃性比较大。上面解释过,我们只针对主类进行分析,因为这里有递归。
processImports(configClass, sourceClass, getImports(sourceClass), true);中configClass和sourceClass参数都是主类相对应的哦。
TIPS:
  在分析这一块的时候,我在主类上加了@EnableCaching注解。

首先看getImports(sourceClass);
1 private Set<SourceClass> getImports(SourceClass sourceClass) throws IOException {
2     Set<SourceClass> imports = new LinkedHashSet<>();
3     Set<SourceClass> visited = new LinkedHashSet<>();
4     collectImports(sourceClass, imports, visited);
5     return imports;
6 }
debug

正是@EnableCaching注解中的@Import注解指定的类。另外两个呢是主类上的@SpringBootApplication中的@Import注解指定的类。不信你可以一层层的剥开@SpringBootApplication注解的皮去一探究竟。
至于processImports()方法,大家自行debug吧,相信看到这里,思路大家都已经很清楚了。
凌晨两点了,睡觉,明天继续上班。
原创不易,转载请注明出处。
如有错误的地方还请留言指正。