概述
-
-
Thymeleaf 在有网络和无网络的环境下皆可运行,即它可以让美工在浏览器查看页面的静态效果,也可以让程序员在服务器查看带数据的动态页面效果。这是由于它支持 html 原型,然后在 html 标签里增加额外 的属性来达到模板 + 数据的展示方式。浏览器解释 html 时会忽略未定义的标签属性,所以 thymeleaf 的模板可以静态地运行;当有数据返回到页面时,Thymeleaf 标签会动态地替换掉静态内容,使页面动态显示。
-
Thymeleaf 开箱即用的特性。它提供标准和 Spring 标准两种方言,可以直接套用模板实现 JSTL、 OGNL 表达式效果,避免每天套模板、改 JSTL、改标签的困扰。同时开发人员也可以扩展和创建自定义的方言。
-
Thymeleaf 提供 Spring 标准方言和一个与 SpringMVC 完美集成的可选模块,可以快速的实现表单绑定、属性编辑器、国际化等功能。
为什么要使用thymeleaf ?
如果希望以 Jar 形式发布模块则尽量不要使用 JSP 相关知识,这是因为 JSP 在内嵌的 Servlet 容器上运行有一些问题 (内嵌 Tomcat、 Jetty 不支持 Jar 形式运行 JSP,Undertow 不支持 JSP)。
Spring Boot 中推荐使用 Thymeleaf 作为模板引擎,因为 Thymeleaf 提供了完美的 Spring MVC 支持
Spring Boot 提供了大量模板引擎,包括:
-
FreeMarker
-
Groovy
-
Mustache
-
Thymeleaf
-
Velocity
-
Beetl
SpringBoot整合Thymeleaf
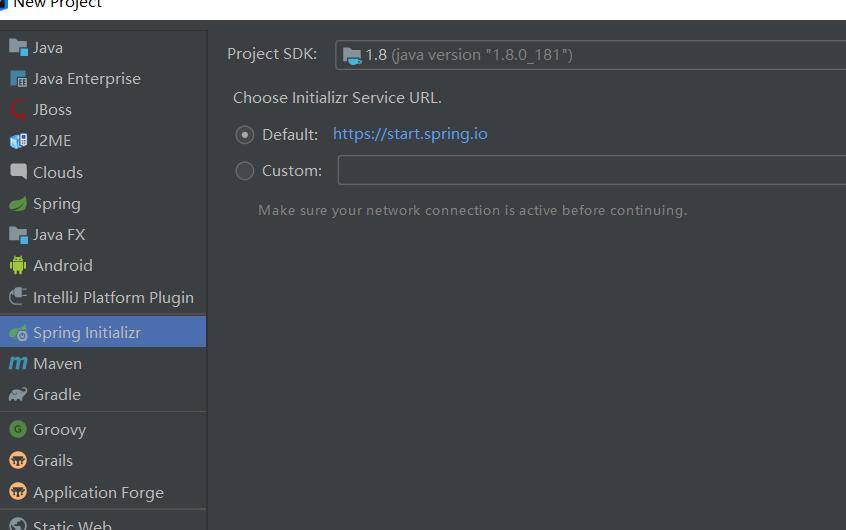
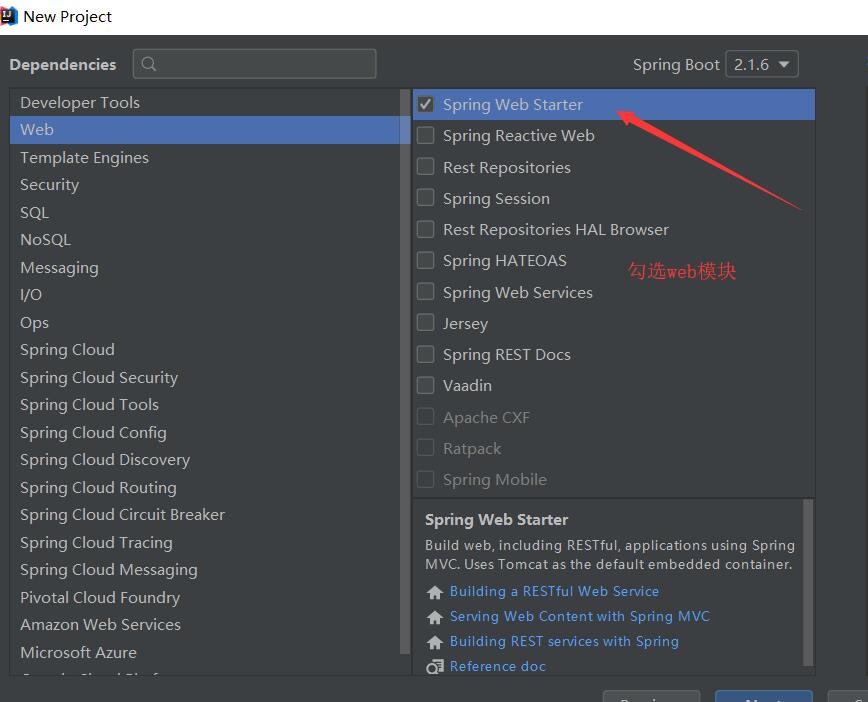
一、使用SpringBoot Initializer创建SpringBoot的web项目
二、引入thymeleaf依赖
         <!--引入thymeleaf依赖-->
        <dependency>
            <groupId>org.springframework.boot</groupId>
            <artifactId>spring-boot-starter-thymeleaf</artifactId>
        </dependency>
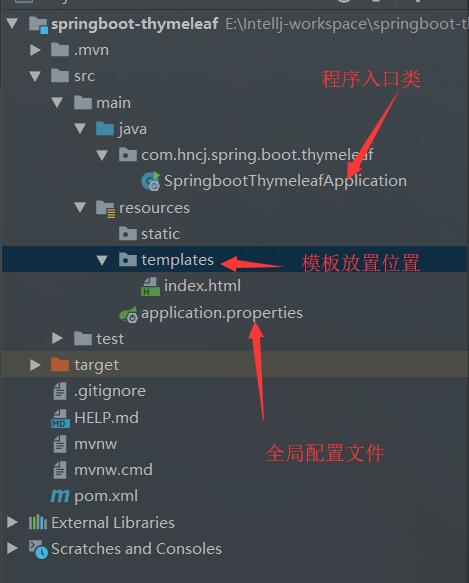
三、创建thymeleaf模板
在templates下新建index.html,内容如下:
<!doctype html>
<!--注意:引入thymeleaf的名称空间-->
<html lang="en" xmlns:th="http://www.thymeleaf.org">
<head>
<meta charset="UTF-8">
<meta name="viewport"
content="width=device-width, user-scalable=no, initial-scale=1.0, maximum-scale=1.0, minimum-scale=1.0">
<meta http-equiv="X-UA-Compatible" content="ie=edge">
<title>Document</title>
</head>
<body>
<p th:text="'hello SpringBoot'">hello thymeleaf</p>
</body>
</html>
四、启动项目
访问http://localhost:8080 ,展示效果如下: 
五、通过控制器定位thymeleaf模板:
在入口类所在目录建立controller包,新建控制器,写法与SpringMVC一致:
package com.hncj.spring.boot.thymeleaf.controller;
import org.springframework.stereotype.Controller;
import org.springframework.web.bind.annotation.GetMapping;
@Controller
public class IndexController {
@GetMapping("home")
public String index() {
return "index";
}
}
访问http://localhost:8080/home,也能显示index.html的内容。
thymeleaf的相关全局配置
SpringBoot支持.properties和.yml两种格式的全局配置,下面给出thymeleaf的yml格式全局配置:
spring:
  thymeleaf:
    enabled: true  #开启thymeleaf视图解析
    encoding: utf-8  #编码
    prefix: classpath:/templates/  #前缀
    cache: false  #是否使用缓存
    mode: HTML  #严格的HTML语法模式
    suffix: .html  #后缀名
thymeleaf常用标签的使用
用到的User实体如下:
package com.hncj.spring.boot.thymeleaf.domain;
import java.util.List;
import java.util.Map;
public class User {
String username;
String password;
List<String> hobbies;
Map<String, String> secrets;
public String getUsername() {
return username;
}
public void setUsername(String username) {
this.username = username;
}
public String getPassword() {
return password;
}
public void setPassword(String password) {
this.password = password;
}
public List<String> getHobbies() {
return hobbies;
}
public void setHobbies(List<String> hobbies) {
this.hobbies = hobbies;
}
public Map<String, String> getSecrets() {
return secrets;
}
public void setSecrets(Map<String, String> secrets) {
this.secrets = secrets;
}
}
具体的属性值为:
package com.hncj.spring.boot.thymeleaf.controller;
import com.hncj.spring.boot.thymeleaf.domain.User;
import org.springframework.stereotype.Controller;
import org.springframework.ui.Model;
import org.springframework.web.bind.annotation.GetMapping;
import java.util.Arrays;
import java.util.HashMap;
import java.util.Map;
@Controller
public class IndexController {
@GetMapping("home")
public String index(Model model) {
User user = new User();
user.setUsername("jack");
user.setPassword("112233");
user.setHobbies(Arrays.asList(new String[]{"singing", "dancing", "football"}));
Map<String, String> maps = new HashMap<>();
maps.put("1", "o");
maps.put("2", "g");
maps.put("3", "a");
maps.put("4", "j");
user.setSecrets(maps);
model.addAttribute("user", user);
return "index";
}
}
测试界面如下:
<!doctype html>
<html lang="en" xmlns:th="http://www.thymeleaf.org">
<head>
<meta charset="UTF-8">
<meta name="viewport"
content="width=device-width, user-scalable=no, initial-scale=1.0, maximum-scale=1.0, minimum-scale=1.0">
<meta http-equiv="X-UA-Compatible" content="ie=edge">
<title>Document</title>
</head>
<body>
<!--字符串输出-->
<p th:text="'hello SpringBoot'">hello thymeleaf</p>
<!--数学运算-->
<p th:text="9 + 10"></p>
<p th:text="10 * 10"></p>
<p th:text="1 - 10"></p>
<p th:text="8 / 3"></p>
<p th:text="3 % 2"></p>
<!--操作域对象-->
<p th:text="${user}"></p>
<p th:text="${user.username}"></p>
<!--遍历数组-->
<table th:each="item, sta:${user.hobbies}">
<tr>
<td th:text="${item}"></td>
<td th:text="${sta.index}"></td>
<td th:text="${sta.odd}"></td>
<td th:text="${sta.size}"></td>
</tr>
</table>
<!--遍历map-->
<div th:each="item:${user.secrets}" th:text="${item.key}"></div>
<!--遍历数组-->
<div th:each="item:${user.hobbies}" th:text="${item}"></div>
<!--设置属性-->
<input type="text" th:attr="value=${user.username}">
<input type="text" th:attr="value=${user.username}, title=${user.username}">
<!--表单数据绑定-->
<form th:action="@{/update}" th:object="${user}">
<input type="text" th:value="*{username}">
<input type="password" th:value="*{password}">
<select>
<option th:each="item:${user.secrets}" th:text="${item.value}" th:selected="'a' eq ${item.value}"></option>
</select>
</form>
<!--解析html文本内容-->
<p th:utext="'<span>html</span>'"></p>
<!--流程控制-->
<p th:if="${user.username} != ${user.password}">yes</p>
<div th:switch="${user.username}">
<p th:case="rose">name is rose</p>
<p th:case="jack">name is jack</p>
</div>
<!--外部引入-->
<link rel="stylesheet" th:href="@{/css/index.css}">
<script th:src="@{/js/index.js}"></script>
<a th:href="@{/home}">home</a>
</body>
</html>