往期回顾:
-
细读Spring源码(一)---refresh()方法概览
-
细读Spring源码(二)---关于Spring中用到的设计模式
-
细读Spring源码(三)---深度剖析动态代理底层实现
-
细读Spring源码(四)---什么是IOC?
-
细读Spring源码(五)---AOP从实战到源码
今天早上又回顾了一下源码,总结出了下面的这张Spring设计思想图,其实网上有很多相关的图,我主要还是按照核心方法refesh的流程总结的,因为这也是Spring容器启动过程中初始化的核心,话不多说,直接上图: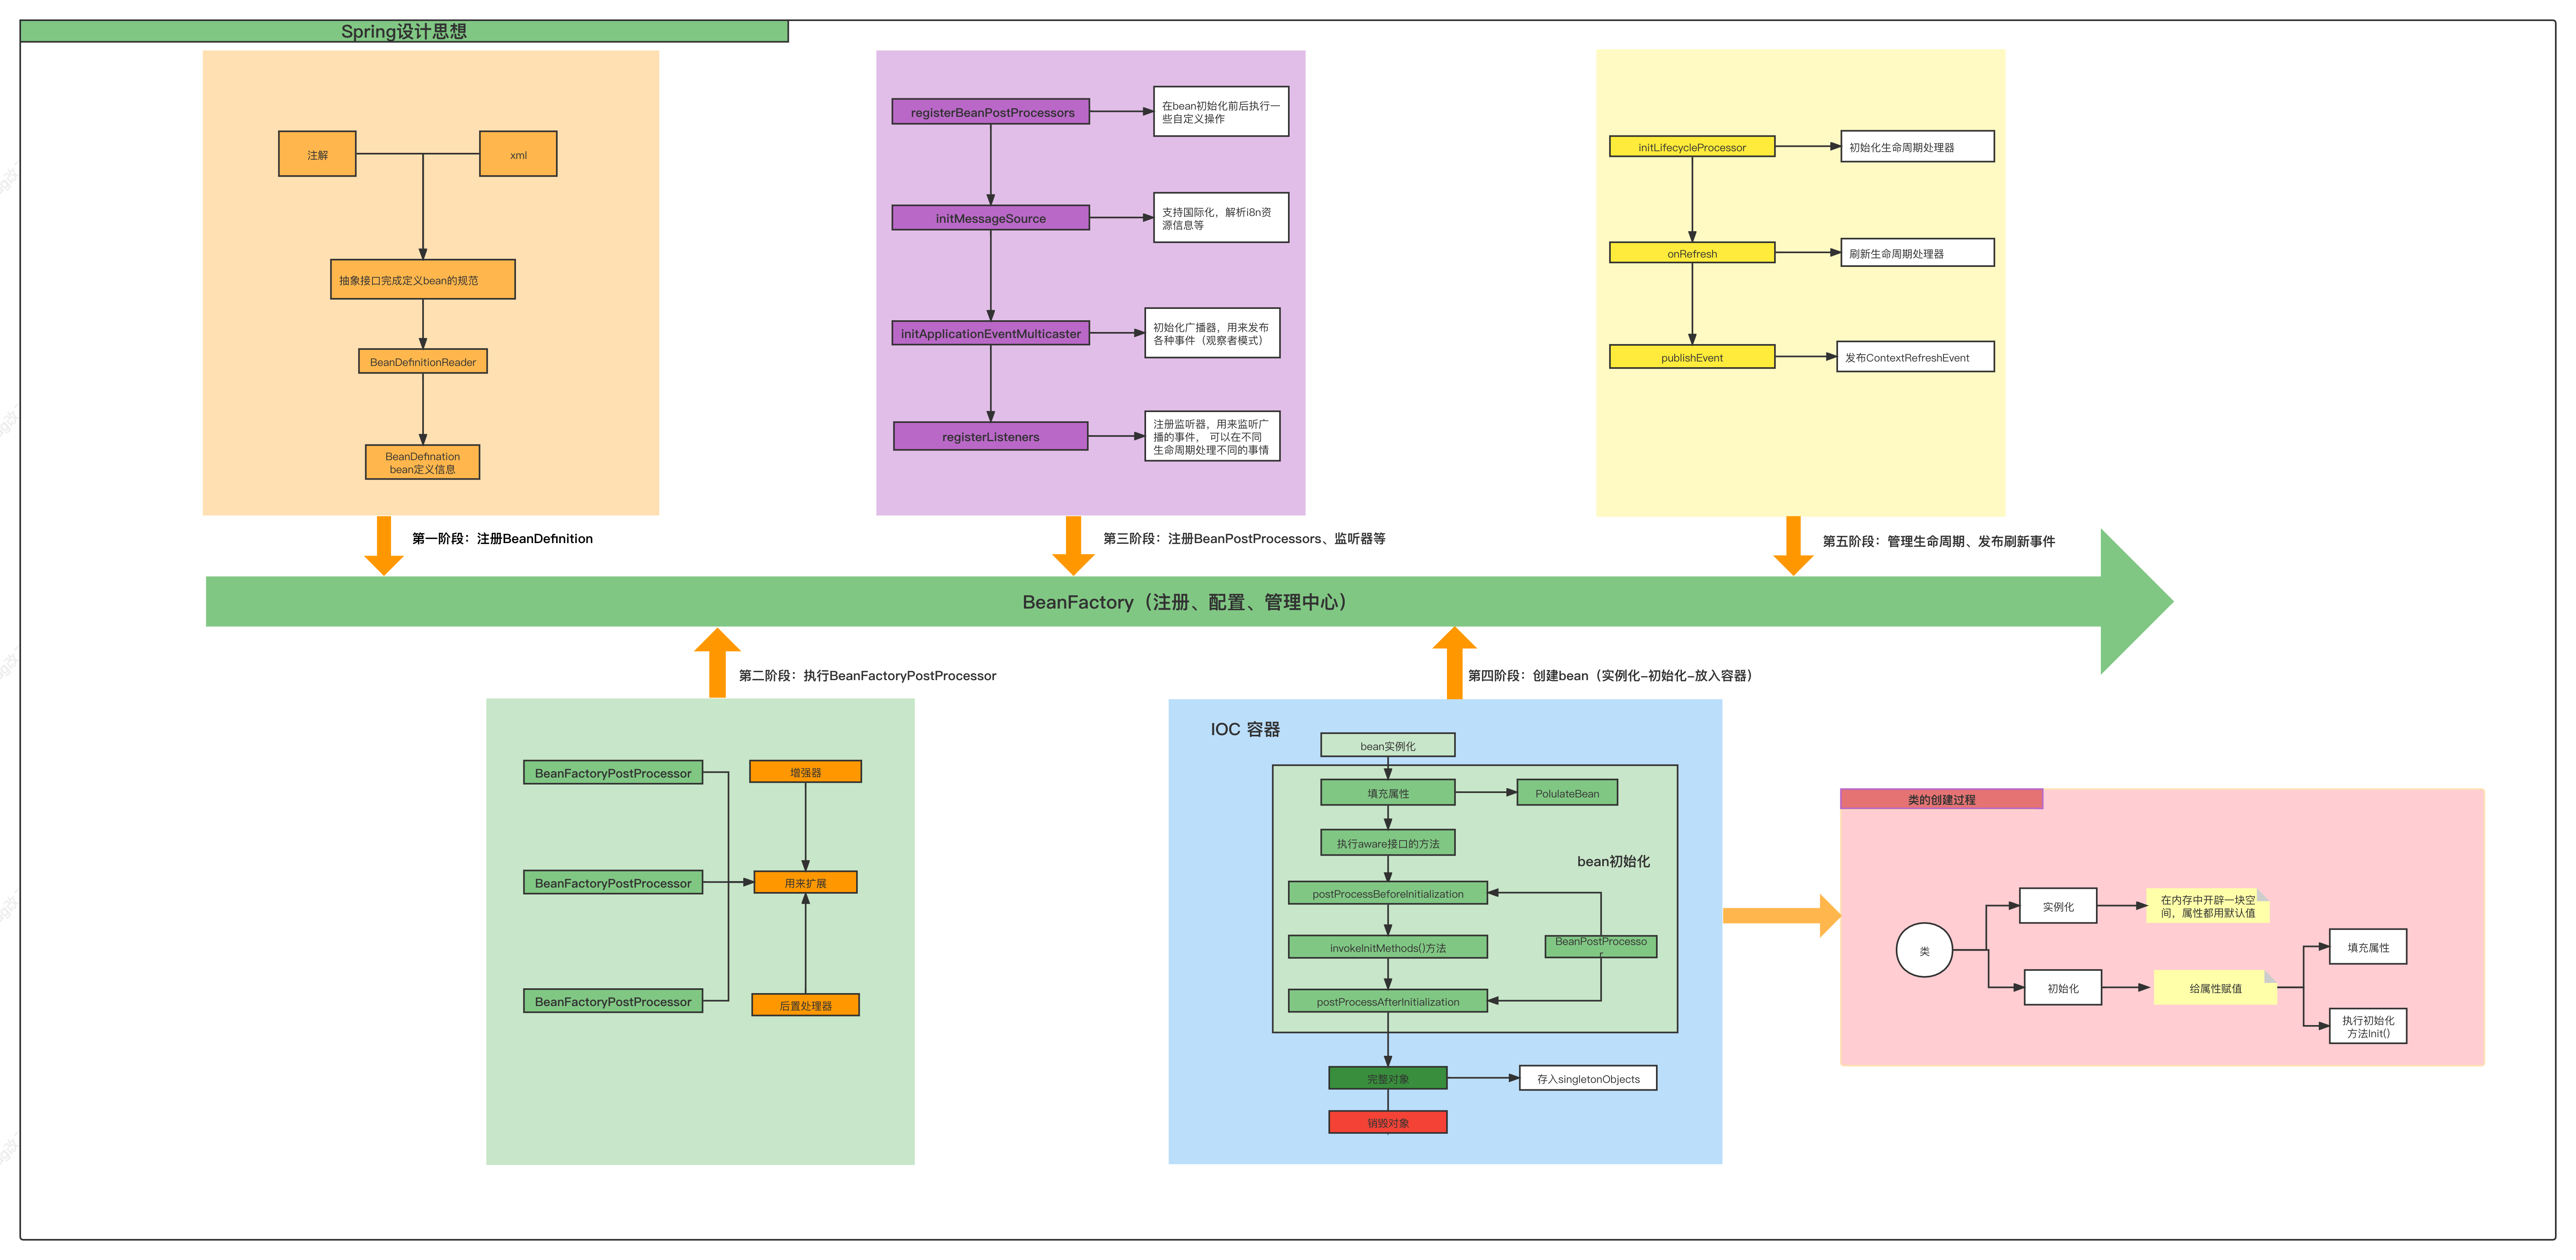
我将容器的启动过程粗略地分成了上面的五个阶段,首先可以看到从始至终都要与BeanFactory进行交互,所以先来看看BeanFactory这个接口:
在源码中是这样描述的:
 1 /**
 2  * The root interface for accessing a Spring bean container.
 3  * 访问Spring bean容器的根接口
 4  *
 5  * <p>This is the basic client view of a bean container;
 6  * further interfaces such as {@link ListableBeanFactory} and
 7  * {@link org.springframework.beans.factory.config.ConfigurableBeanFactory}
 8  * are available for specific purposes.
 9  * BeanFactory是访问Spring bean容器的根接口,这是一个bean容器基本的客户端视图,
10  * 此外还有像ListableBeanFactory和ConfigurableBeanFactory这种为了特定目标使用的接口
11  *
12  * <p>This interface is implemented by objects that hold a number of bean definitions,
13  * each uniquely identified by a String name. Depending on the bean definition,
14  * the factory will return either an independent instance of a contained object
15  * (the Prototype design pattern), or a single shared instance (a superior
16  * alternative to the Singleton design pattern, in which the instance is a
17  * singleton in the scope of the factory). Which type of instance will be returned
18  * depends on the bean factory configuration: the API is the same. Since Spring
19  * 2.0, further scopes are available depending on the concrete application
20  * context (e.g. "request" and "session" scopes in a web environment).
21  * 该接口会被持有大量bean定义的对象实现,每一个都是通过一个字符串类型的name进行唯一标识。
22  * 根据bean的定义信息,工厂既可以返回一个已经存在对象的单独实例实例(原型设计模式),还可以返回一个能够被共享的单例实例(单例模式)
23  * 返回什么类型的实例,将依赖bean工厂中scope的配置:具有相同的API。从Spring2.0开始,可以根据具体的应用上下文使用其他的scope,
24  * 比如web应用中的request和session等
25  *
26  * <p>The point of this approach is that the BeanFactory is a central registry
27  * of application components, and centralizes configuration of application
28  * components (no more do individual objects need to read properties files,
29  * for example). See chapters 4 and 11 of "Expert One-on-One J2EE Design and
30  * Development" for a discussion of the benefits of this approach.
31  * 这种实现方式的精髓在于它让BeanFactory成为应用组件的注册和配置中心,比如单个对象将不再需要去读取属性文件
32  * 在《Expert One-on-One J2EE Design and Development》这本书的第4~11节就能讨论了该方法的优势
33  *
34 /
从上面注释中可以获取三点重要信息:
1、这是访问Spring容器的根接口
2、这个接口被维护BeanDefinition信息的接口所继承,提供了对bean定义信息的管理,通过该接口,可以返回单例或多例的bean实例
3、它就像一个应用组件的注册和配置中心,集中管理容器中的bean,而不需要为了某个单独的bean单独读取配置文件
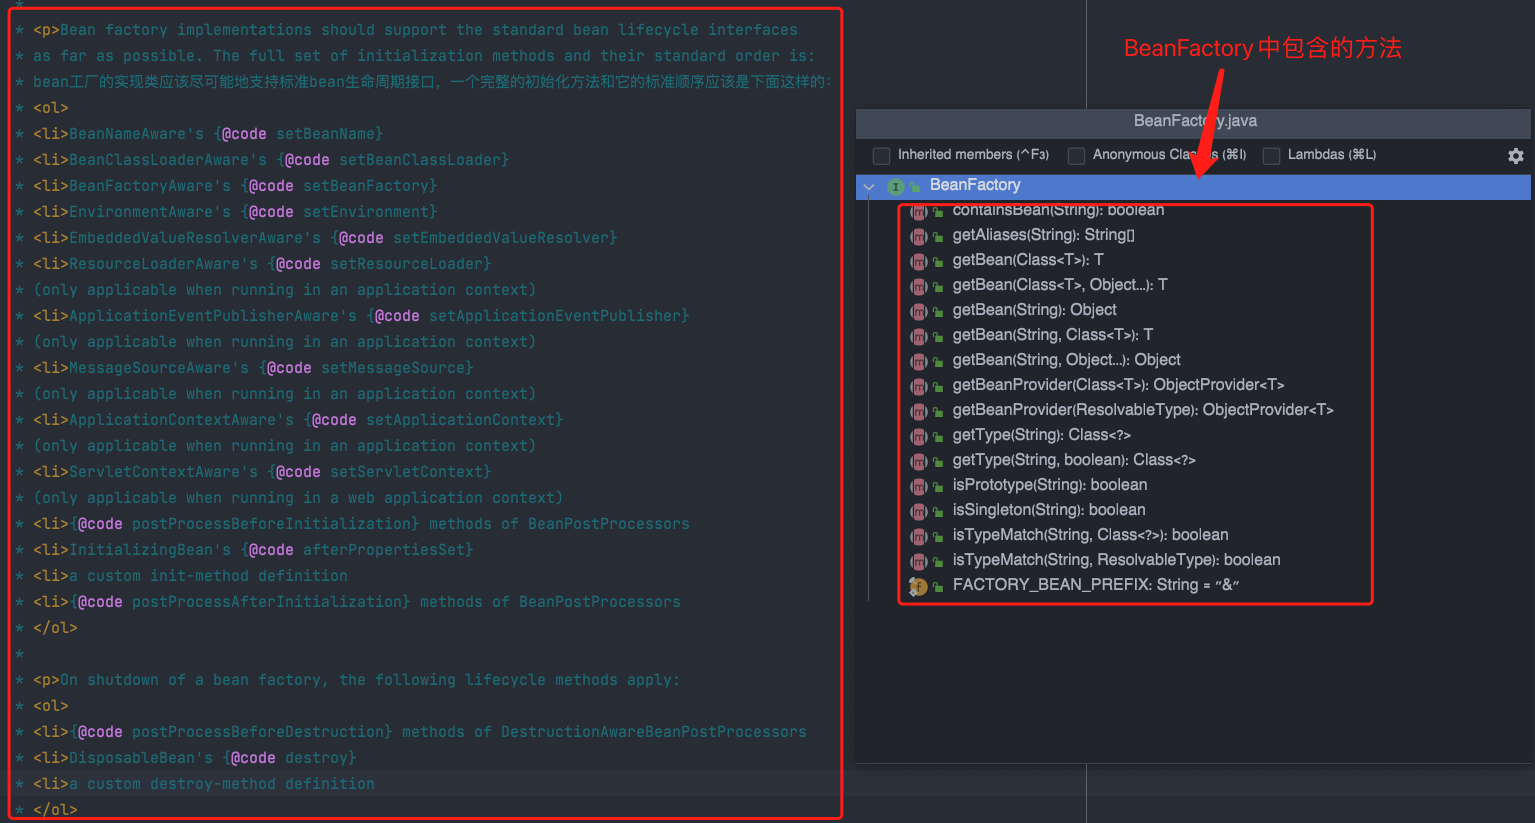
下面这种图中右边部分是该接口中的所有方法,左边注释部分说明实现该接口的工厂必须尽可能地支持标准bean生命周期的接口,同时给出了全部的初始化方法和它们的标准执行顺序,其实主要就是在实例化前后执行的BeanPostProcessor及它们的执行顺序。
接下来看看每个阶段在容器内都发生了什么事情:
第一阶段:注册BeanDefinition

BeanDefinition是一个接口,继承了AttributeAccessor, BeanMetadataElement ,用来管理Bean的属性和元数据,管理的数据有属性、构造器、参数、是否单例、是否懒加载等这些我们平时定义的信息。在这个阶段,主要是扫描我们定义的Java类,定义的方式有基于XML和基于注解两种方式,将每个类的描述信息封装成一个BeanDefinition对象,注册到工厂中,生成一个beanName->BeanDefinition的映射关系,以便后续使用。
第二阶段:执行BeanFactoryPostProcessor
在BeanDefinition中有下面这样一段注释信息:
This is just a minimal interface: The main intention is to allow a BeanFactoryPostProcessor to introspect and modify property values and other bean metadata.
翻译过来意思就是说:BeanDefinition只是一个最小的接口,设计它的主要目的是为了让BeanFactoryPostProcessor内省并修改属性值和其他bean的元信息,所以执行BeanFactoryPostProcessor的主要目的就是可以通过自定义实现对bean定义信息的修改,比如修改属性等。其实这个接口是bean工厂的后置处理器,它的操作范围是整个工厂,通过实现该接口,我们可以获取到工厂中已经注册的所有bean的定义信息,并对任意信息进行修改,下面举个例子:
首先,定义一个bean
 1 package com.spring.reading.bd.processor;
 2
 3 import lombok.AllArgsConstructor;
 4 import lombok.Data;
 5 import lombok.NoArgsConstructor;
 6 import lombok.ToString;
 7 import org.springframework.beans.factory.config.BeanDefinition;
 8 import org.springframework.context.annotation.Scope;
 9 import org.springframework.stereotype.Component;
10
11 /**
12  * @author: cyhua
13  * @createTime: 2021/12/6
14  * @description: 定义一个普通的bean,含有一个属性,scope手动设置原型
15  */
16 @Data
17 @Component
18 @ToString
19 @NoArgsConstructor
20 @AllArgsConstructor
21 @Scope(value = BeanDefinition.SCOPE_PROTOTYPE)
22 public class Company {
23
24     private String name;
25
26
27 }
注意:上面的第21行代码,将scope自定义为原型,即多例,为了在BeanFactoryPostProcessor中对它进行修改!!!
其次,自定义一个BeanFactoryPostProcessor
 1 package com.spring.reading.bd.processor;
 2
 3 import org.apache.commons.lang3.StringUtils;
 4 import org.springframework.beans.BeansException;
 5 import org.springframework.beans.factory.FactoryBean;
 6 import org.springframework.beans.factory.config.BeanDefinition;
 7 import org.springframework.beans.factory.config.BeanFactoryPostProcessor;
 8 import org.springframework.beans.factory.config.ConfigurableListableBeanFactory;
 9 import org.springframework.beans.factory.config.ConstructorArgumentValues;
10 import org.springframework.beans.factory.support.AbstractBeanDefinition;
11 import org.springframework.beans.factory.support.BeanDefinitionBuilder;
12 import org.springframework.stereotype.Component;
13
14 /**
15  * @author: cyhua
16  * @createTime: 2021/12/5
17  * @description: bean工厂后置处理器
18  */
19 @Component
20 public class ReadingBeanFactoryPostProcessor implements BeanFactoryPostProcessor {
21     @Override
22     public void postProcessBeanFactory(ConfigurableListableBeanFactory configurableListableBeanFactory) throws BeansException {
23         AbstractBeanDefinition beanDefinition = (AbstractBeanDefinition) configurableListableBeanFactory.getBeanDefinition("company");
24         //获取构造函数的参数值
25         ConstructorArgumentValues constructorArgumentValues = beanDefinition.getConstructorArgumentValues();
26         //获取是否懒加载配置
27         Boolean lazyInit = beanDefinition.isLazyInit();
28         //获取scope配置
29         String scope = beanDefinition.getScope();
30         //获取注入模式配置:byName或byType
31         int autowireMode = beanDefinition.getAutowireMode();
32         //scope如果为空或多例,则修改scope为单例
33         if (StringUtils.isBlank(scope) || scope.equals(BeanDefinition.SCOPE_PROTOTYPE)) {
34             beanDefinition.setScope(BeanDefinition.SCOPE_SINGLETON);
35         }
36     }
37
38 }
上面代码中获取了几个比较常见的BeanDefinition信息,最后当scope为空或者为多例时,修改为单例。
接下来,写一个测试类,获取两个Company对象,并进行比较
 1 package com.spring.reading.bd.processor;
 2
 3 import org.springframework.context.annotation.AnnotationConfigApplicationContext;
 4
 5 /**
 6  * @author: cyhua
 7  * @createTime: 2021/12/5
 8  * @description:
 9  */
10 public class BeanDefinitionCaller {
11
12
13     public static void main(String[] args) {
14         AnnotationConfigApplicationContext context = new AnnotationConfigApplicationContext(BeanDefinitionConfig.class);
15         Company company1 = context.getBean("company", Company.class);
16         Company company2 = context.getBean("company", Company.class);
17         //比较两个对象是否相同:按道理已经设置成单例,会返回true
18         System.out.println(company1 == company2);
19     }
20 }
上面15、16行代码通过相同的beanName获取了两次bean实例
下面进行debug,看看在BeanFactoryPostProcessor中是否能获取到bean定义信息?
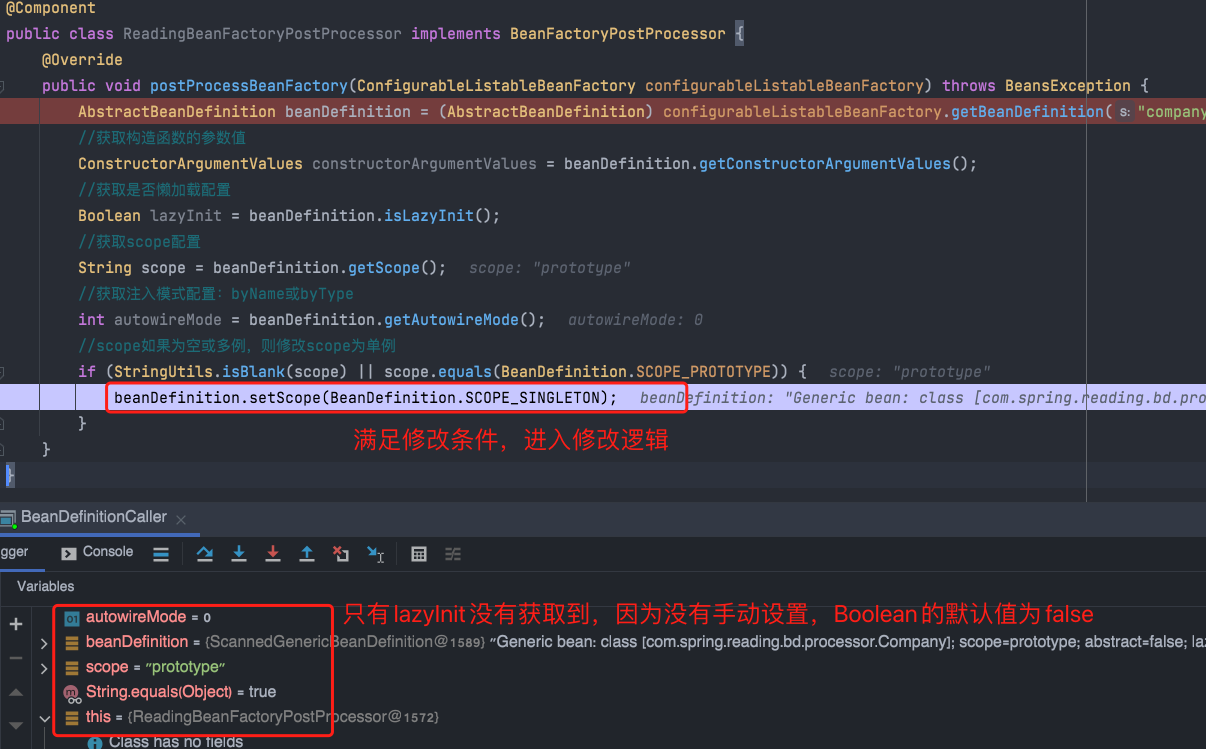
可以看当程序成功进入自定义的bean工厂后置处理器,也获取到了具体的BeanDefinition,下面看下执行结果:
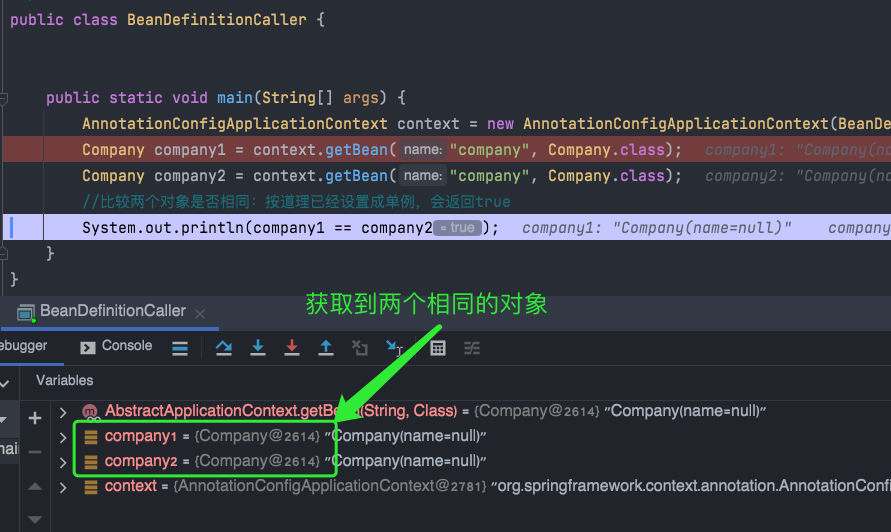
可以看到获取到了两个相同的对象,说明bean工厂后置处理器生效,修改bean定义成功,这就是执行BeanFactoryPostProcessor的作用,主要还是为了处理自定义的逻辑,方便开发者进行扩展,而且整个扩展过程完全满足OCP原则,忍不住想说一句:妙!
第三阶段:注册BeanPostProcessors、监听器等
第三个阶段主要还是准备一些后续需要的特殊bean,比如bean的后置处理器BeanPostProcessor、用户处理国际化的MessageSource、发布事件的广播器ApplicationEventMulticaster以及监听事件的监听器,下面针对这四种特殊的bean进行说明:
1.BeanPostProcessor
BeanPostProcessor就是一个接口,包含两个方法:
 1    /**
 2      * 在bean实例化之后,初始化之前使用,可以对返回对实例进行修改,比如修改属性值
 3      * @param bean   要处理的bean实例
 4      * @param beanName  要处理的bean名称
 5      * @return     返回处理后的实例,默认返回传进来的实例
 6      * @throws BeansException
 7      */
 8     @Nullable
 9     default Object postProcessBeforeInitialization(Object bean, String beanName) throws BeansException {
10         return bean;
11     }
12
13    /**
14      * 在bean初始化之后执行,可以对完成初始化的对象进行进一步的处理,比如生成代理对象,AOP中使用
15      * @param bean 要处理的bean
16      * @param beanName 要处理的bean名称
17      * @return
18      * @throws BeansException 返回处理后的实例,默认返回传进来的实例
19      */
20     @Nullable
21     default Object postProcessAfterInitialization(Object bean, String beanName) throws BeansException {
22         return bean;
23     }
如注释所述,该接口提供了两个默认实现的方法,用于在初始化前后,对已经完成实例化的对象进行处理,虽然是接口,但是因为有了默认实现,开发时无需实现,但是可以通过自定义的后置处理器对bean进行特殊的处理,在AOP中,代理对象的生成就是利用了这里的postProcessAfterInitialization方法。
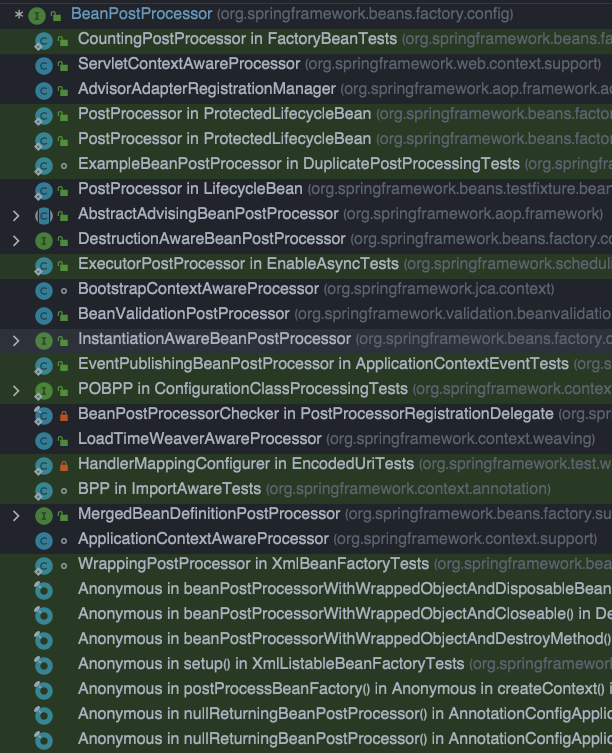
可以看到在spring中,已经又了很多该接口的实现类!
2.MessageSource
用于处理国际化的接口,源码中是这样描述的:
 1 /**
 2  * Strategy interface for resolving messages, with support for the parameterization
 3  * and internationalization of such messages.
 4  *
 5  * <p>Spring provides two out-of-the-box implementations for production:
 6  * <ul>
 7  * <li>{@link org.springframework.context.support.ResourceBundleMessageSource}: built
 8  * on top of the standard {@link java.util.ResourceBundle}, sharing its limitations.
 9  * <li>{@link org.springframework.context.support.ReloadableResourceBundleMessageSource}:
10  * highly configurable, in particular with respect to reloading message definitions.
11  * </ul>
12 /
1、解析消息的策略接口,能够支持消息的参数化和国际化。
2、在Spring中提供了两个开箱即用的实现类:
一个构建在Java标准ResourceBundle之上的类ResourceBundleMessageSource
一个高度可配置的ReloadableResourceBundleMessageSource,值得一提的就是它能够重载消息定义
一般在支持国际化的项目中需要用到,知道有这么个接口即可!
3.ApplicationEventMulticaster
用户发布事件的接口,它的继承关系图如下:

有两个存在继承关系的实现类,这个在之前spring中的设计模式一文中有分析其源码,使用的是观察者模式,这里不再赘述。
4.ApplicationListener
有事件发布,就有事件监听,这个接口跟上面的广播器构成了观察者模式,用来处理spring中各种事件, 在设计模式中也讲过,这里不再赘述!
第四阶段:创建bean(实例化-初始化-放入容器)
下面来到第四个阶段,也是最重要、最复杂的一个阶段,前三个阶段都是在为这个阶段做准备的,在这个阶段,需要有一个意识:就是spring创建一个完整的对象需要经过三个大的步骤:
实例化-->属性填充-->初始化,而在初始化前后又可能会执行一些后置处理器
实例化阶段:只是在内存中开辟了一块空间,底层是通过bean定义信息推断出无参构造函数,然后选择合适的策略进行实例化,最后返回一个被Wrapper包装的实例,核心代码如下,一个位于BeanUtils类中的静态方法:
 1 /**
 2      * Convenience method to instantiate a class using the given constructor.
 3      * <p>Note that this method tries to set the constructor accessible if given a
 4      * non-accessible (that is, non-public) constructor, and supports Kotlin classes
 5      * with optional parameters and default values.
 6      * 使用给定的构造器调用实例化方法,需要注意的是,如果传递的是一个无访问全县的构造器,比如非public的,这个方法首先会尝试开启访问权限
 7      *,而且通过可选参数支持Kotlin类和默认值
 8      * @param ctor the constructor to instantiate  实例化构造器
 9      * @param args the constructor arguments to apply (use {@code null} for an unspecified 构造器参数
10      * parameter, Kotlin optional parameters and Java primitive types are supported)
11      * @return the new instance
12      * @throws BeanInstantiationException if the bean cannot be instantiated
13      * @see Constructor#newInstance
14      */
15     public static <T> T instantiateClass(Constructor<T> ctor, Object... args) throws BeanInstantiationException {
16         Assert.notNull(ctor, "Constructor must not be null");
17         try {
18             //尝试将构造函数设置为可访问的
19             ReflectionUtils.makeAccessible(ctor);
20             if (KotlinDetector.isKotlinReflectPresent() && KotlinDetector.isKotlinType(ctor.getDeclaringClass())) {
21                 return KotlinDelegate.instantiateClass(ctor, args);
22             }
23             else {
24                 //获取构造器中的参数
25                 Class<?>[] parameterTypes = ctor.getParameterTypes();
26                 //判断构造器中的参数个数是否比传进来的参数个数少,多则抛异常
27                 Assert.isTrue(args.length <= parameterTypes.length, "Can't specify more arguments than constructor parameters");
28                 Object[] argsWithDefaultValues = new Object[args.length];
29                 //组装构造器的参数
30                 for (int i = 0 ; i < args.length; i++) {
31                     if (args[i] == null) {
32                         Class<?> parameterType = parameterTypes[i];
33                         argsWithDefaultValues[i] = (parameterType.isPrimitive() ? DEFAULT_TYPE_VALUES.get(parameterType) : null);
34                     }
35                     else {
36                         argsWithDefaultValues[i] = args[i];
37                     }
38                 }
39                 //通过构造方法创建一个bean实例
40                 return ctor.newInstance(argsWithDefaultValues);
41             }
42         }
43         catch (InstantiationException ex) {
44             throw new BeanInstantiationException(ctor, "Is it an abstract class?", ex);
45         }
46         catch (IllegalAccessException ex) {
47             throw new BeanInstantiationException(ctor, "Is the constructor accessible?", ex);
48         }
49         catch (IllegalArgumentException ex) {
50             throw new BeanInstantiationException(ctor, "Illegal arguments for constructor", ex);
51         }
52         catch (InvocationTargetException ex) {
53             throw new BeanInstantiationException(ctor, "Constructor threw exception", ex.getTargetException());
54         }
55     }
属性填充阶段:该阶段是在完成实例化之后,初始化之前执行的,填充属性,就是给属性赋值,比如数据库连接信息中有很多初始化值,就是在这个阶段进行填充
初始化阶段:该阶段是在完成实例化及属性填充之后执行的,而且在执行真正的初始化前后又要执行一些BeanPostProcessor的后置处理器,核心代码如下,调用AbstractAutowireCapableBeanFactory#initializeBean方法:
 1 protected Object initializeBean(String beanName, Object bean, @Nullable RootBeanDefinition mbd) {
 2         if (System.getSecurityManager() != null) {
 3             AccessController.doPrivileged((PrivilegedAction<Object>) () -> {
 4                 invokeAwareMethods(beanName, bean);
 5                 return null;
 6             }, getAccessControlContext());
 7         }
 8         else {
 9             //执行aware:回调实现了Aware接口的方法:设置beanName、classLoader、beanFactory等
10             invokeAwareMethods(beanName, bean);
11         }
12
13         //初始化之前执行
14         Object wrappedBean = bean;
15         if (mbd == null || !mbd.isSynthetic()) {
16             wrappedBean = applyBeanPostProcessorsBeforeInitialization(wrappedBean, beanName);
17         }
18
19         try {
20             //执行自定义初始化方法
21             invokeInitMethods(beanName, wrappedBean, mbd);
22         }
23         catch (Throwable ex) {
24             throw new BeanCreationException(
25                     (mbd != null ? mbd.getResourceDescription() : null),
26                     beanName, "Invocation of init method failed", ex);
27         }
28         //初始化之后执行
29         if (mbd == null || !mbd.isSynthetic()) {
30             wrappedBean = applyBeanPostProcessorsAfterInitialization(wrappedBean, beanName);
31         }
32
33         return wrappedBean;
34     }
第16行,会执行BeanPostProcessor的postProcessBeforeInitialization方法
第21行,会执行初始化方法,这个方法可以自定义,就是在bean定义是指定的init-method
第30行,会执行BeanPostProcessor的postProcessAfterInitialization方法
下面是完成最终初始化的核心代码,调用AbstractAutowireCapableBeanFactory#invokeInitMethods方法:
 1 /**
 2      * Give a bean a chance to react now all its properties are set,
 3      * and a chance to know about its owning bean factory (this object).
 4      * This means checking whether the bean implements InitializingBean or defines
 5      * a custom init method, and invoking the necessary callback(s) if it does.
 6      * 给bean一个反应它所有的属性都完成设置和了解它所属工厂的机会,这意味着不管bean实现了InitializingBean接口还是自定义了一个初始化方法,都会在这个地方被调用
 7      * @param beanName the bean name in the factory (for debugging purposes) :bean在工厂中的名称
 8      * @param bean the new bean instance we may need to initialize:准备去初始化的实例对象
 9      * @param mbd the merged bean definition that the bean was created with 创建该bean的合并bean定义信息
10      * (can also be {@code null}, if given an existing bean instance)
11      * @throws Throwable if thrown by init methods or by the invocation process
12      * @see #invokeCustomInitMethod
13      */
14     protected void invokeInitMethods(String beanName, Object bean, @Nullable RootBeanDefinition mbd)
15             throws Throwable {
16
17         //判断是否实现了InitializingBean接口,如果实现了就去执行afterPropertiesSet方法
18         boolean isInitializingBean = (bean instanceof InitializingBean);
19         if (isInitializingBean && (mbd == null || !mbd.isExternallyManagedInitMethod("afterPropertiesSet"))) {
20             if (logger.isTraceEnabled()) {
21                 logger.trace("Invoking afterPropertiesSet() on bean with name '" + beanName + "'");
22             }
23             if (System.getSecurityManager() != null) {
24                 try {
25                     AccessController.doPrivileged((PrivilegedExceptionAction<Object>) () -> {
26                         ((InitializingBean) bean).afterPropertiesSet();
27                         return null;
28                     }, getAccessControlContext());
29                 }
30                 catch (PrivilegedActionException pae) {
31                     throw pae.getException();
32                 }
33             }
34             else {
35                 ((InitializingBean) bean).afterPropertiesSet();
36             }
37         }
38
39         //执行自定义的初始化方法
40         if (mbd != null && bean.getClass() != NullBean.class) {
41             String initMethodName = mbd.getInitMethodName();
42             if (StringUtils.hasLength(initMethodName) &&
43                     !(isInitializingBean && "afterPropertiesSet".equals(initMethodName)) &&
44                     !mbd.isExternallyManagedInitMethod(initMethodName)) {
45                 invokeCustomInitMethod(beanName, bean, mbd);
46             }
47         }
48     }
如注释所述,初始化其实就是调用用户自定义的init-method方法和afterPropertiesSet方法!
第五阶段:管理生命周期、发布刷新事件
这是最后一个阶段,应该说是容器启动过程,或容器实例化过程中的最后一个阶段,因为完整的过程中最后应该是要执行bean的销毁。
这个阶段主要就是给上下文设置生命周期处理器,以管理这个上下文中bean的生命周期,如果工厂中有,就直接赋值,工厂中没有,就new一个再赋值,核心代码如下,AbstractApplicationContext#initLifecycleProcessor方法:
 1 /**
 2      * Initialize the LifecycleProcessor.
 3      * Uses DefaultLifecycleProcessor if none defined in the context.
 4      *
 5      * @see org.springframework.context.support.DefaultLifecycleProcessor
 6      */
 7     protected void initLifecycleProcessor() {
 8         ConfigurableListableBeanFactory beanFactory = getBeanFactory();
 9         if (beanFactory.containsLocalBean(LIFECYCLE_PROCESSOR_BEAN_NAME)) {
10             this.lifecycleProcessor =
11                     beanFactory.getBean(LIFECYCLE_PROCESSOR_BEAN_NAME, LifecycleProcessor.class);
12             if (logger.isTraceEnabled()) {
13                 logger.trace("Using LifecycleProcessor [" + this.lifecycleProcessor + "]");
14             }
15         } else {
16             DefaultLifecycleProcessor defaultProcessor = new DefaultLifecycleProcessor();
17             defaultProcessor.setBeanFactory(beanFactory);
18             this.lifecycleProcessor = defaultProcessor;
19             beanFactory.registerSingleton(LIFECYCLE_PROCESSOR_BEAN_NAME, this.lifecycleProcessor);
20             if (logger.isTraceEnabled()) {
21                 logger.trace("No '" + LIFECYCLE_PROCESSOR_BEAN_NAME + "' bean, using " +
22                         "[" + this.lifecycleProcessor.getClass().getSimpleName() + "]");
23             }
24         }
25     }
然后将上下文刷新事件通过第三阶段注册的广播器进行广播,在广播方法中,实际调用的是监听器的方法,核心代码如下:
 1 protected void publishEvent(Object event, @Nullable ResolvableType eventType) {
 2         Assert.notNull(event, "Event must not be null");
 3
 4         // Decorate event as an ApplicationEvent if necessary
 5         ApplicationEvent applicationEvent;
 6         if (event instanceof ApplicationEvent) {
 7             applicationEvent = (ApplicationEvent) event;
 8         } else {
 9             applicationEvent = new PayloadApplicationEvent<>(this, event);
10             if (eventType == null) {
11                 eventType = ((PayloadApplicationEvent<?>) applicationEvent).getResolvableType();
12             }
13         }
14
15         // Multicast right now if possible - or lazily once the multicaster is initialized
16         if (this.earlyApplicationEvents != null) {
17             this.earlyApplicationEvents.add(applicationEvent);
18         } else {
19             getApplicationEventMulticaster().multicastEvent(applicationEvent, eventType);
20         }
21
22         // Publish event via parent context as well...
23         if (this.parent != null) {
24             if (this.parent instanceof AbstractApplicationContext) {
25                 ((AbstractApplicationContext) this.parent).publishEvent(event, eventType);
26             } else {
27                 this.parent.publishEvent(event);
28             }
29         }
30     }
第19行,获取广播器并广播事件,广播事件接口会传事件和事件类型:
 1 public void multicastEvent(final ApplicationEvent event, @Nullable ResolvableType eventType) {
 2         //第一步:调用resolveDefaultEventType方法解析事件的类型,会返回类的全限定名
 3         ResolvableType type = (eventType != null ? eventType : resolveDefaultEventType(event));
 4         Executor executor = getTaskExecutor();
 5         //根据事件和事件类型获取监听器
 6         for (ApplicationListener<?> listener : getApplicationListeners(event, type)) {
 7             if (executor != null) {
 8                 //异步执行监听任务
 9                 executor.execute(() -> invokeListener(listener, event));
10             }
11             else if (this.applicationStartup != null) {
12                 StartupStep invocationStep = this.applicationStartup.start("spring.event.invoke-listener");
13                 invokeListener(listener, event);
14                 invocationStep.tag("event", event::toString);
15                 if (eventType != null) {
16                     invocationStep.tag("eventType", eventType::toString);
17                 }
18                 invocationStep.tag("listener", listener::toString);
19                 invocationStep.end();
20             }
21             else {
22                 //将事件event通知给监听器listener
23                 invokeListener(listener, event);
24             }
25         }
26     }
如上代码所示,通过invokeListener(listener, event)完成了事件的监听,具体的逻辑就交给具体的监听器处理了。
到此为止,spring的设计思想梳理的也差不多了,知道了这些,就会对spring有一个更加具体的整体把控了,可能有些地方描述的不够清楚,都是凭自己的理解写的,仅供参考,我也会继续向前深入研究,向后回头反思!