书籍源码:https://github.com/hzy46/Deep-Learning-21-Examples
CNN的发展已经很多了,ImageNet引发的一系列方法,LeNet,GoogLeNet,VGGNet,ResNet每个方法都有很多版本的衍生,tensorflow中带有封装好各方法和网络的函数,只要喂食自己的训练集就可以完成自己的模型,感觉超方便!!!激动!!!因为虽然原理流程了解了,但是要写出来真的。。。。好难,臣妾做不到啊~~~~~~~~
START~~~~
1.数据准备
首先了解下微调的概念: 以VGG为例

他的结构是卷积+全连接,卷积层分为5个部分共13层,conv1~conv5。还有三层全连接,即fc6,fc7,fc8。总共16层,因此被称为VGG16。
a.如果要将VGG16的结构用于一个新的数据集,首先要去掉fc8,因为fc8原本的输出是1000类的概率。需要改为符合自身训练集的输出类别数。
b.训练的时候,网络的参数的初始值并不是随机化生成的,而是采用VGG16在ImageNet上已经训练好的参数作为训练的初始值。因为已经训练过的VGG16中的参数已经包含了大量有用的卷积过滤器,这样做不仅节约大量训练时间,而且有助于分类器性能的提高。
载入VGG16的参数后,即可开始训练。此时需要指定训练层数的范围。一般而言,可以选择以下几种:
- 只训练fc8:训练范围一定要包含fc8这一层。这样的选择一般性能都不会太好,但速度很快;因为他只训练fc8,保持其他层的参数不动,相当于把VGG16当成一个“特征提取器”,用fc7层提取的特征做一个softmax的模型分类。
- 训练所有参数:耗时较慢,但能取得较高性能。
- 训练部分参数:通常是固定浅层参数不变,训练深层参数。如固定conv1、conv2部分的参数不训练,只训练conv3、conv4、conv5、fc6、fc7、fc8的参数。
这种训练方法就是对神经网络做微调。
1.1 切分train&test
书中提供了卫星图像数据集,有6个类别,分别是森林(wood),水域(water),岩石(rock),农田(wetland),冰川(glacier),城市区域(urban)
保存结构为data_prepare/pic,再下层有两个文件夹train和validation,各文件夹下有6个文件夹,放的是该类别下的图片。
1.2 转换成tfrecord格式
python data_convert.py -t pic/
  --train-shards 2
  --validation-shards 2
  --num-threads 2
  --dataset-name satellite
参数解释:
-t pic/ :表示转换pic文件夹下的数据,该文件夹必须与上面的文件结构保持一致
--train-shards 2 :把训练集分成两块,即最后的训练数据就是两个tfrecord格式的文件。若数据集更大,可以分更多数据块
--validation-shards 2 :把验证集分成两块
--num-thread 2 :用两个线程来产生数据。注意线程数必须要能整除train-shards和validation-shards,来保证每个线程处理的数据块是相同的。
--dataset-name :给生成的数据集起个名字,即表示最后生成文件的开头是satellite_train和satellite_validation
运行上述命令后,就可以在 pic 文件夹中找到 5 个新生成的文件 ,分别是:
- 训练数据 satellite_train_00000-of-00002.tfrecord、satellite_train_00001-of-00002.tfrecord,
- 验证数据 satellite_validation_00000-of-00002.tfrecord、satellite_validation_00001-of-00002.tfrecord。
- label.txt 它表示图片的内部标签(数字)到真实类别(字符串)之间的映射顺序 。 如图片在 tfrecord 中的标签为 0 ,那么就对应 label.txt 第一行的类别,在 tfrecord的标签为1,就对应 label.txt 中第二行的类别,依此类推。
2.训练模型
2.1 TensorFlow Slim
Google 公司公布的一个图像分类工具包,它不仅定义了一些方便的接口,还提供了很多 ImageNet 数据集上常用的网络结构和预训练模型 。
截至2017年7月,Slim 提供包括 VGG16、VGG19、Inception V1 ~ V4、ResNet 50、ResNet 101、MobileNet 在内大多数常用模型的结构以及预训练模型,更多的模型还会被持续添加进来。
源码地址: https://github.com/tensorflow/models/tree/master/research/slim
可以通过执行 git clone https://github.corn/tensorflow/models.git 来获取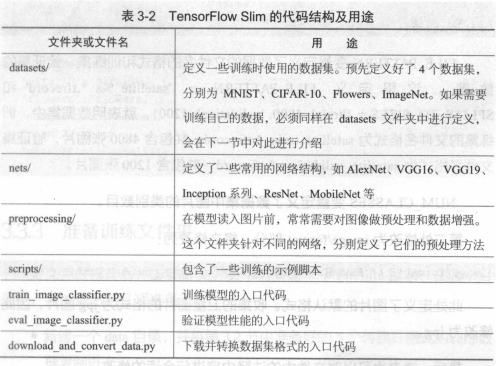
2.2 定义新的datasets文件<修改slim源码>
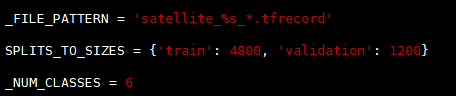
在slim/datasets中,定义了所有可以使用的数据库,为了使用之前生成的 tfrecord 数据进行训练,必须要在datasets 中定义新的数据库。
- 在 datasets/目录下新建一个文件 satellite,并将 flowers.py 文件中的内容复制到 satellite.py 中。
修改两处代码:

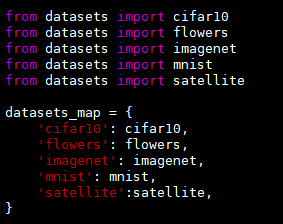
- 在同目录的 dataset_factory. py 文件中注册 satellite 数据库
2.3 准备训练文件夹
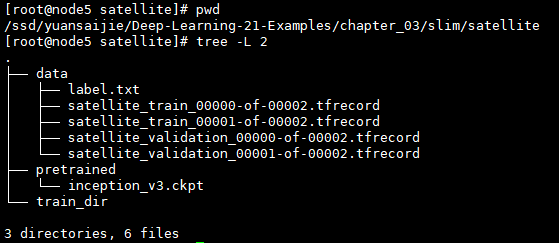
在slim文件下新建satellite文件夹,按照上图结构准备各个文件和数据,模型下载地址:http://download.tensorflow.org/models/inception_v3_2016_08_28.tar.gz,也可以在slim的github地址上找到其他模型的下载链接。
2.4 开始训练
python train_image_classifier.py
  --train_dir=satellite/train_dir
  --dataset_name=satellite
  --dataset_split_name=train
  --dataset_dir=satellite/data
  --model_name=inception_v3
  --checkpoint_path=satellite/pretrained/inception_v3.ckpt
  --checkpoint_exclude_scopes=InceptionV3/Logits,InceptionV3/AuxLogits
  --trainable_scopes=InceptionV3/Logits,InceptionV3/AuxLogits
  --max_number_of_steps=100000
  --batch_size=32
  --learning_rate=0.001
  --learning_rate_decay_type=fixed
  --save_interval_secs=300
  --save_summaries_secs=2
  --log_every_n_steps=10
  --optimizer=rmsprop
  --weight_decay=0.00004
参数解释:
--trainable_scopes=InceptionV3/Logits,InceptionV3/AuxLogits:首先来解释参数trainable_scopes 的作用,因为它非常重要。 trainable_scopes 规定了在模型中微调变量的范围 。这里的设定表示只对InceptionV3/Logits,InceptionV3/AuxLogits 两个变量进行微调,其他变量都保持不动 。InceptionV3/Logits,InceptionV3/AuxLogits 就相当于之前所讲的 fc8 ,它们是 Inception V3 的“末端层” 。如果不设定 trainable_scopes ,就会对模型中所有的参数进行训练。
--train_dir=satellite/train_dir : 表明会在 satellite/train_dir 目录下保存日志和 checkpoint 。可通过tensorboard --logdir satellite/train_dir来可视化参数变化。
--dataset_name=satellite 、--dataset_split_name=train : 指定训练的数据集 。之前定义的新的 dataset 就是在这里发挥用处的 。
--dataset_dir=satellite/data :指定训练数据集保存的位置 。
--model_name=inception_v3 :使用的模型名称 。
--checkpoint_path=satellite/pretrained/inception_v3.ckpt :预训练模型的保存位置 。
--checkpoint_exclude_scopes=InceptionV3/Logits,InceptionV3/AuxLogits : 在恢复预训练模型时,不恢复这两层。正如之前所说,这两层是 InceptionV3 模型的末端层,对应着 ImageNet 数据集的 1000 类,和当前的数据集不符 ,因此不要去恢复它 。
--max_number_of_steps 100000 :最大的执行步数 。
--batch_size=32 :每步使用的 batch 数量 。
--learning_rate=0.001 :学习率 。
--learning_rate_decay_type=fixed :学习率是否自动下降,此处使用固定的学习率 。
--save_interval_secs=300 :每隔 300s ,程序会把当前模型保存到 train_dir 中 。 此处就是目录 satellite/train_dir 。
--save_summaries_secs=2 :每隔 2s ,就会将日志写入到 train_dir 中 。 可以用 TensorBoard 查看该日志 。 此处为了方便观察,设定的时间间隔较多,实际训练时,为了性能考虑,可以设定较长的时间间隔 。
--log_every_n_steps=10 :每隔 10 步,就会在屏幕上打出训练信息。
--optimize=rmsprop:表示选定的优化器 。
--weight_decay=0.00004 :选定的 weight_decay 值 。 即模型中所有参数的二次正则化超参数 。
如果想要对所有层训练,去掉--trainable_scopes参数即可。
训练结果:
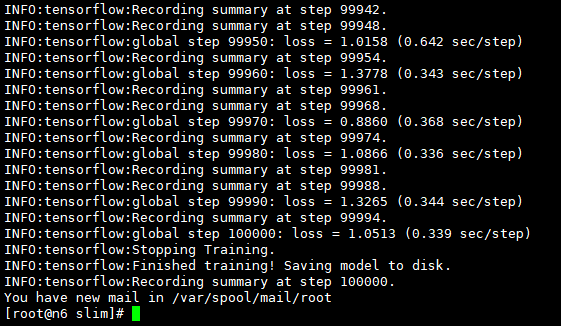
程序开始运行时,会先读取train_dir下的模型,若没有,则去读checkpoint_path目录下的预训练模型,以5min的频率保留模型(仅保留最新的5个模型)。
若程序中断再次训练,读取train_dir下的模型,不存在则依旧去找预训练模型,若存在,则以该模型的参数为起点进行参数微调。
3.验证准确率
python eval_image_classifier.py
  --checkpoint_path=satellite/train_dir
  --eval_dir=satellite/eval_dir
  --dataset_name=satellite
  --dataset_split_name=validation
  --dataset_dir=satellite/data
  --model_name=inception_v3
参数说明:
--checkpoint_path=satellite/train_dir :这个参数既可以接收一个目录的路径,也可以接收一个文件的路径。 如果接收的是一个目录的路径,如这里的 satellite/train_dir ,就会在这个目录中寻找最新保存的模型文件,执行验证。也可以指定一个模型进行验证,以第 300 步的模型为例,在satellite/train_dir 文件夹下它被保存为 model.ckpt-300.meta 、model.ckpt-300.index 、 model.ckpt-300.data-00000-of-OOOO1 三个文件 。 此时,如果要对它执行验证,给 checkpoint_path 传递的参数应该为satellite/train_dir/model.ckpt-300 。
--eval_dir=satellite/eval_dir:执行结果的曰志就保存在 eval_dir 中,同样可以通过 TensorBoard 查看。
--dataset_name=satellite、--dataset_split_name=validation : 指定需要执行的数据集 。 注意此处是使用验证集( validation )执行验证。
--dataset dir=satellite/data :数据集保存的位置 。
--model_name=inception_v3 :使用的模型。
运行结果:
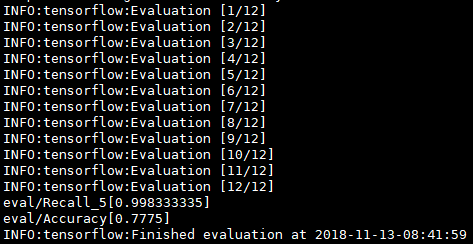
Accuracy表示模型的分类准确率,Recall_5表示Top5的准确率,即输出的各类别概率中,正确的类别只要落在前5个中则算对。由于此处类别数不多,可尝试改成Top2或者Top3.
修改eval_image_classifier.py

可再次执行上述验证语句查看预测结果。
前面有讲到可以训练所有层的参数,再进行测试,发现Accuracy的值,在训练所有层的时候可达82%,效果更佳。
4.导出模型并对单张图片分类
4.1 生成.pb文件
在slim文件夹下有 export_inference_graph.py 文件,运行它会生成一个 inception_v3_inf_graph.pb 文件。该文件中仅保存了Inception V3的网络结构,后续需要把checkpoint中的模型参数保存进来。
python export_inference_graph.py
  --alsologtostderr
  --model_name=inception_v3
  --output_file=satellite/inception_v3_inf_graph.pb
  --dataset_name satellite
4.2 保存模型参数
在chapter_3文件下有 freeze_graph.py 文件,运行它会生成一个 frozen_graph.pb 文件(一个用于识别的模型)。之后就可以用该文件对单张图片进行预测。
python freeze_graph.py
  --input_graph slim/satellite/inception_v3_inf_graph.pb
  --input_checkpoint slim/satellite/train_dir/model.ckpt-5271
  --input_binary true
  --output_node_names InceptionV3/Predictions/Reshape_1
  --output_graph slim/satellite/frozen_graph.pb
需将5271改成train_dir中保存的实际的模型训练步数
--input_graph slim/satellite/inception_v3_inf_graph.pb:这个参数很好理解 ,它表示使用的网络结构文件,即之前已经导出的inception_v3_inf_graph.pb 。
--input_checkpoint slim/satellite/train_dir/model.ckpt-5271:具体将哪一个checkpoint 的参数载入到网络结构中 。这里使用的是训练文件夹 train_dir中的第 5271 步模型文件 。 读者需要根据训练文件夹下 checkpoint 的实际步数,将 5271 修改成对应的数值。
--input_binary true:导入的 inception_v3_inf_graph.pb 实际是一个 protobuf 文件 。 而 protobuf 文件有两种保存格式,一种是文本形式,一种是二进制形式。 inception_v3_inf_graph.pb 是二进制形式,所以对应的参数是--input_binary true。初学的话对此可以不用深究,若有兴趣的话可以参考资料。
--output_node_names InceptionV3/Predictions/Reshape_1:在导出的模型中,指定一个输出结点, InceptionV3/Predictions/Reshape_1是 Inception V3最后的输出层 。
--output_graph slim/satellite/frozen_graph.pb:最后导出的模型保存为 slim/satellite/frozen_graph.pb 文件。
4.3 单张图片预测
python classify_image_inception_v3.py
  --model_path slim/satellite/frozen_graph.pb
  --label_path slim/satellite/data/label.txt
  --image_file test_image.jpg
运行结果如下:
[root@node5 chapter_03]# python3 classify_image_inception_v3.py   --model_path slim/satellite/frozen_graph.pb   --label_path slim/satellite/data/label.txt  --image_file test_image.jpg
2018-11-15 11:21:39.435166: I tensorflow/core/platform/cpu_feature_guard.cc:141] Your CPU supports instructions that this TensorFlow binary was not compiled to use: AVX2 FMA
water (score = 3.25221)
wetland (score = 1.97180)
urban (score = 1.33430)
wood (score = 0.53297)
rock (score = -0.41706)
score是各个类别对应的Logit。
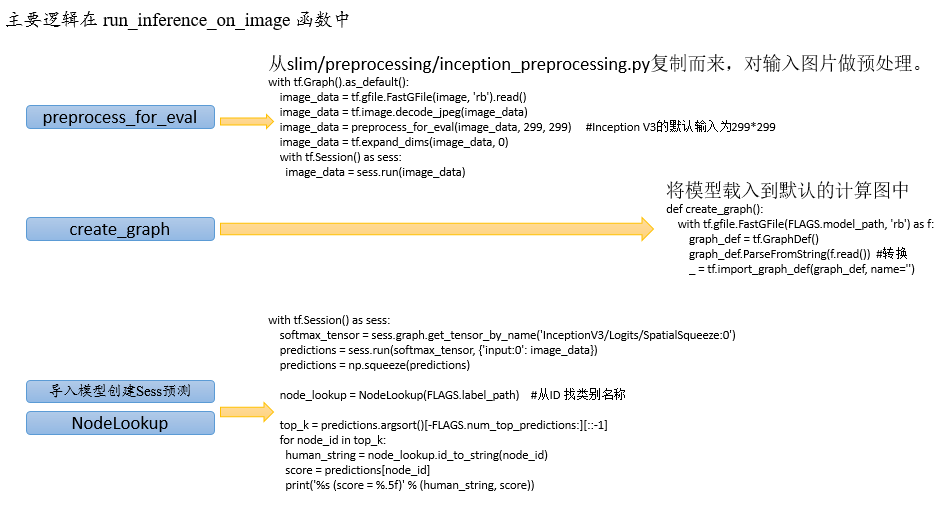
代码逻辑实现:
拓展阅读
- TensorFlow Slim 是TensorFlow 中用于定义、训练和验证复杂网络的 高层API。官方已经使用TF-Slim 定义了一些常用的图像识别模型, 如AlexNet、VGGNet、Inception模型、ResNet等。本章介绍的Inception V3 模型也是其中之一, 详细文档请参考: https://github.com/tensorflow/models/tree/master/research/slim。
- 在第3.2节中,将图片数据转换成了TFRecord文件。TFRecord 是 TensorFlow 提供的用于高速读取数据的文件格式。读者可以参考博文( http://warmspringwinds.github.io/tensorflow/tf-slim/2016/12/21/tfrecords-guide/ )详细了解如何将数据转换为TFRecord 文件,以及 如何从TFRecord 文件中读取数据。
- Inception V3 是Inception 模型(即GoogLeNet)的改进版,可以参考论文Rethinking the Inception Architecture for Computer Vision 了解 其结构细节。
THE END~~~~