虹软人脸识别sdk使用-android(一)在这篇文章中简单的介绍了如何接入SDK,以及如何使用虹软的一些接口,这篇主要介绍如何接入人脸识别框
如何去画人脸框,这里有两种方法,第一种是获得人脸识别后的图像的坐标,然后自己去画Rect,第二种是直接用虹软的人脸框,移植到自己的项目中
一、获得人脸坐标(未完成)
首先我们可以自行查看人脸的坐标,以及或得人脸识别追踪后的画面
人脸坐标:这里展示的显示一个人脸的坐标
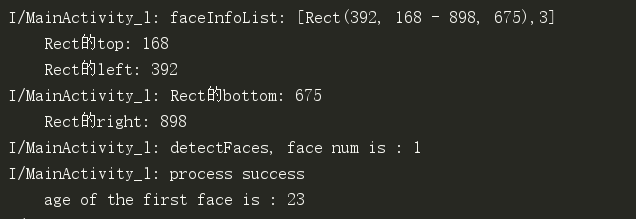
 1 /*
 2                 * 1.6日人脸框实现
 3                 * */
 4                 Rect rect = faceInfoList.get(0).getRect();
 5
 6                 //////这些新的坐标是对的;划重点
 7                 rect1 = adjustRect(rect, previewSize.width, previewSize.height, mAspectLayout.getWidth(), mAspectLayout.getHeight(), 90, Camera.CameraInfo.CAMERA_FACING_FRONT, false, false, false);
 8
 9
10                 /*
11                  * whq1.5日修改,我现在需要将bitmap提取出来,通过NV21来提取
12                  * */
13
14                 Bitmap bitmap = nv21ToBitmap(nv21, previewSize.width, previewSize.height);
15
16
17                 Bitmap bitmap1 = Bitmap.createBitmap(bitmap, rect.left, rect.top,rect.right - rect.left,rect.bottom - rect.top);
18
19                 ///存人脸框
20                 getRGBData(bitmap1);
21                  Log.i(TAG, "faceInfoList: " + faceInfoList);
22                 Log.i(TAG, "Rect的top: " + faceInfoList.get(0).getRect().top);
23                 Log.i(TAG, "Rect的left: " + faceInfoList.get(0).getRect().left);
24                 Log.i(TAG, "Rect的bottom: " + faceInfoList.get(0).getRect().bottom);
25                 Log.i(TAG, "Rect的right: " + faceInfoList.get(0).getRect().right);
这里是对应的打印值,这里的rect的坐标点找到
但是不能对这四个点就行画人脸框,需要重新运算一下,获得rect:
 1 /*
 2     * 1.6日虹软人脸框设计
 3     * */
 4
 5     public Rect adjustRect(Rect ftRect,int mpreviewWidth,int mpreviewHeight, int mcanvasWidth,int mcanvasHeight,int mcameraDisplayOrientation,int mcameraId,boolean misMirror,boolean mmirrorHorizontal,boolean mmirrorVertical) {
 6
 7         int previewWidth = mpreviewWidth;
 8         int previewHeight = mpreviewHeight;
 9         int canvasWidth = mcanvasWidth;
10         int canvasHeight = mcanvasHeight;
11         int cameraDisplayOrientation = mcameraDisplayOrientation;
12         int cameraId = mcameraId;
13         boolean isMirror = false;
14         boolean mirrorHorizontal = false;
15         boolean mirrorVertical = false;
16
17         if (ftRect == null) {
18             return null;
19         }
20
21         Rect rect = new Rect(ftRect);
22         float horizontalRatio;
23         float verticalRatio;
24         if (cameraDisplayOrientation % 180 == 0) {
25             horizontalRatio = (float) canvasWidth / (float) previewWidth;
26             verticalRatio = (float) canvasHeight / (float) previewHeight;
27         } else {
28             horizontalRatio = (float) canvasHeight / (float) previewWidth;
29             verticalRatio = (float) canvasWidth / (float) previewHeight;
30         }
31         rect.left *= horizontalRatio;
32         rect.right *= horizontalRatio;
33         rect.top *= verticalRatio;
34         rect.bottom *= verticalRatio;
35
36         Rect newRect = new Rect();
37         switch (cameraDisplayOrientation) {
38             case 0:
39                 if (cameraId == Camera.CameraInfo.CAMERA_FACING_FRONT) {
40                     newRect.left = canvasWidth - rect.right;
41                     newRect.right = canvasWidth - rect.left;
42                 } else {
43                     newRect.left = rect.left;
44                     newRect.right = rect.right;
45                 }
46                 newRect.top = rect.top;
47                 newRect.bottom = rect.bottom;
48                 break;
49             case 90:
50                 newRect.right = canvasWidth - rect.top;
51                 newRect.left = canvasWidth - rect.bottom;
52                 if (cameraId == Camera.CameraInfo.CAMERA_FACING_FRONT) {
53                     newRect.top = canvasHeight - rect.right;
54                     newRect.bottom = canvasHeight - rect.left;
55                 } else {
56                     newRect.top = rect.left;
57                     newRect.bottom = rect.right;
58                 }
59                 break;
60             case 180:
61                 newRect.top = canvasHeight - rect.bottom;
62                 newRect.bottom = canvasHeight - rect.top;
63                 if (cameraId == Camera.CameraInfo.CAMERA_FACING_FRONT) {
64                     newRect.left = rect.left;
65                     newRect.right = rect.right;
66                 } else {
67                     newRect.left = canvasWidth - rect.right;
68                     newRect.right = canvasWidth - rect.left;
69                 }
70                 break;
71             case 270:
72                 newRect.left = rect.top;
73                 newRect.right = rect.bottom;
74                 if (cameraId == Camera.CameraInfo.CAMERA_FACING_FRONT) {
75                     newRect.top = rect.left;
76                     newRect.bottom = rect.right;
77                 } else {
78                     newRect.top = canvasHeight - rect.right;
79                     newRect.bottom = canvasHeight - rect.left;
80                 }
81                 break;
82             default:
83                 break;
84         }
85
86         return newRect;
87     }
进行打印
1                 //打印新的坐标,这些新的坐标是对的;划重点
2                 Log.i(TAG, "Rect1的top: " + rect1.top);
3                 Log.i(TAG, "Rect1的left: " + rect1.left);
4                 Log.i(TAG, "Rect1的bottom: " + rect1.bottom);
5                 Log.i(TAG, "Rect1的right: " + rect1.right);
这是打印值

接下来对这四个点进行画rect矩形框
 1 package com.example.camera;
 2
 3
 4 import android.content.Context;
 5 import android.graphics.Canvas;
 6 import android.graphics.Paint;
 7 import android.graphics.Rect;
 8 import android.view.View;
 9 import android.graphics.Color;
10 import android.util.AttributeSet;
11
12 public class DrawViewTest extends View{
13
14     private Paint mPaint;
15
16     public DrawViewTest(Context context) {
17         super(context);
18         init();
19     }
20
21
22     public DrawViewTest(Context context, AttributeSet attrs) {
23         super(context, attrs);
24         init();
25     }
26
27     public DrawViewTest(Context context, AttributeSet attrs, int defStyleAttr) {
28         super(context, attrs, defStyleAttr);
29         init();
30     }
31
32
33
34     private void init(){
35         mPaint = new Paint();
36         mPaint.setAntiAlias(true);          //抗锯齿
37         mPaint.setColor(Color.YELLOW);        //画笔颜色,红色
38         mPaint.setStyle(Paint.Style.STROKE);  //画笔风格
39         mPaint.setTextSize(36);             //绘制文字大小,单位px
40         mPaint.setStrokeWidth(5);           //画笔粗细
41     }
42
43     //重写该方法,在这里绘图
44     @Override
45     protected void onDraw(Canvas canvas) {
46         super.onDraw(canvas);
47         drawable(canvas);
48         invalidate();
49     }
50
51     public void drawable(Canvas canvas) {
52
53
54
55         canvas.drawColor(Color.RED);
56 //        // 画实心圆
57 //        canvas.drawCircle(200, 200, 100, mPaint);
58         // 画矩形
59
60         canvas.drawRect(107, 708, 822, 1404, mPaint);///这里的四个点就是转化后的四个点
61
62     }
63
64 }
 1 package com.example.camera;
 2
 3 import androidx.appcompat.app.AppCompatActivity;
 4
 5 import android.content.Intent;
 6 import android.graphics.Canvas;
 7 import android.graphics.Color;
 8 import android.graphics.Paint;
 9 import android.graphics.Rect;
10 import android.os.Bundle;
11 import android.util.Log;
12 import android.view.Window;
13 import android.view.WindowManager;
14
15 public class Main2Activity extends AppCompatActivity {
16
17     private static final String TAG = "Main2Activity";
18
19     private Paint mPaint;
20
21     @Override
22     protected void onCreate(Bundle savedInstanceState) {
23         super.onCreate(savedInstanceState);
24         requestWindowFeature(Window.FEATURE_NO_TITLE);
25         getWindow().setFlags(WindowManager.LayoutParams.FLAG_FULLSCREEN,
26                 WindowManager.LayoutParams.FLAG_FULLSCREEN);
27
28
29         Intent intent = getIntent();
30         int[] rects = intent.getIntArrayExtra("rect");
31         Rect rect = new Rect();
32         rect.set(rects[1],rects[0],rects[3],rects[2]);
33         Log.i(TAG, "onCreate: "+rects[0]);
34         Log.i(TAG, "onCreate: "+rects[1]);
35         Log.i(TAG, "onCreate: "+rects[2]);
36         Log.i(TAG, "onCreate: "+rects[3]);
37
38         setContentView(new DrawViewTest(Main2Activity.this));
39     }
40
41     public void drawrect(Rect rect){
42
43         int left = rect.left;
44         int top = rect.top;
45         int right = rect.right;
46         int bootom = rect.bottom;
47
48         mPaint = new Paint();
49         mPaint.setAntiAlias(true);          //抗锯齿
50         mPaint.setColor(Color.YELLOW);        //画笔颜色,红色
51         mPaint.setStyle(Paint.Style.STROKE);  //画笔风格
52         mPaint.setTextSize(36);             //绘制文字大小,单位px
53         mPaint.setStrokeWidth(5);           //画笔粗细
54
55         Canvas canvas = new Canvas();
56         canvas.drawColor(Color.RED);
57
58         canvas.drawRect(left, top, right, bootom, mPaint);
59
60     }
61
62 }
使用Main2Activity对这四个点进行画矩形框发现是对的。所以必须对rect的四个点进行转化才能画框 。剩下的请读者自行实现
二、移植虹软的人脸框
1、添加文件
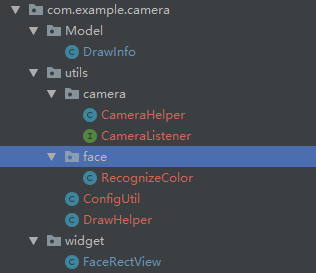
添加如下这几个文件。
2、布局文件
布局文件更改为:


 1 <?xml version="1.0" encoding="utf-8"?>
 2 <FrameLayout xmlns:android="http://schemas.android.com/apk/res/android"
 3     xmlns:tools="http://schemas.android.com/tools"
 4     android:layout_width="match_parent"
 5     android:layout_height="match_parent"
 6     tools:context=".MainActivity_l">
 7
 8     <FrameLayout
 9         android:id="@+id/layout_aspect"
10         android:layout_width="match_parent"
11         android:layout_height="wrap_content">
12
13     </FrameLayout>
14
15     <com.example.camera.widget.FaceRectView
16         android:id="@+id/face_rect_view"
17         android:layout_width="match_parent"
18         android:layout_height="match_parent" />
19
20
21
22     <LinearLayout
23         android:layout_width="match_parent"
24         android:layout_height="wrap_content"
25         android:orientation="horizontal"
26         android:layout_gravity="top"
27         android:gravity="center">
28         <TextView
29             android:id="@+id/face_num"
30             android:layout_width="100dp"
31             android:layout_height="50dp"
32             android:text="人脸数:--"
33             android:textColor="#000000"
34             />
35         <TextView
36             android:id="@+id/age"
37             android:layout_width="100dp"
38             android:layout_height="50dp"
39             android:layout_toRightOf="@id/face_num"
40             android:text="年龄:--"
41             android:textColor="#000000"
42             />
43         <TextView
44             android:id="@+id/gender"
45             android:layout_width="100dp"
46             android:layout_height="50dp"
47             android:layout_toRightOf="@id/age"
48             android:text="性别:--"
49             android:textColor="#000000"
50             />
51         <TextView
52             android:id="@+id/liveness"
53             android:layout_width="100dp"
54             android:layout_height="50dp"
55             android:layout_toRightOf="@id/gender"
56             android:text="活体:--"
57             android:textColor="#000000"
58             />
59
60     </LinearLayout>
61
62
63     <LinearLayout
64         android:layout_width="match_parent"
65         android:layout_height="wrap_content"
66         android:orientation="horizontal"
67         android:layout_gravity="bottom"
68         android:gravity="center">
69         <Button
70             android:id="@+id/btn_init"
71             android:layout_width="wrap_content"
72             android:layout_height="wrap_content"
73             android:text="初始化" />
74
75         <Button
76             android:id="@+id/btn_switch"
77             android:layout_width="wrap_content"
78             android:layout_height="wrap_content"
79             android:text="切换相机" />
80         <Button
81             android:id="@+id/btn_focus"
82             android:layout_width="wrap_content"
83             android:layout_height="wrap_content"
84             android:onClick="focus"
85             android:text="聚焦" />
86
87         <Button
88             android:id="@+id/btn_facerect"
89             android:layout_width="wrap_content"
90             android:layout_height="wrap_content"
91             android:onClick="facerect"
92             android:text="人脸框" />
93
94
95     </LinearLayout>
96
97 </FrameLayout>
3、对FaceRectView就行画框
在initView()中添加:
1 /*
2         * 1.12人脸识别框
3         * */
4         faceRectView = findViewById(R.id.face_rect_view);//
在init()中添加更改为:
 1  /*
 2          * 检测属性
 3          * */
 4
 5         Camera camera = CameraUtils.getmCamera();
 6
 7         /*
 8          * 1.12whq人脸框
 9          * */
10
11         previewSize = camera.getParameters().getPreviewSize();
12         drawHelper = new DrawHelper(previewSize.width, previewSize.height, mCameraSurfaceView.getWidth(), mCameraSurfaceView.getHeight(), 90
13                 , 1, false, false, false);
14
15
16
17
18
19          /*
20                  * 1.12人脸框
21                  * */
22                 if (faceRectView != null && drawHelper != null && faceInfoList.size()>0 && genderInfoList.size()>0 && ageInfoList.size()>0 && livenessInfoList.size()>0) {
23                     List<DrawInfo> drawInfoList = new ArrayList<>();
24                     //System.out.println("参数的数量是:"+ faceInfoList.size());
25                     for (int i = 0; i < faceInfoList.size(); i++) {
26                         drawInfoList.add(new DrawInfo(drawHelper.adjustRect(faceInfoList.get(i).getRect()), genderInfoList.get(i).getGender(), ageInfoList.get(i).getAge(), livenessInfoList.get(i).getLiveness(), RecognizeColor.COLOR_UNKNOWN, null));
27                     }
28                     drawHelper.draw(faceRectView, drawInfoList);
29                 }
添加这两处代码即可
4、查看人脸追踪后的照片
1 String image_test;////用于保存图片
2
3          /*
4          * 用于保存图片
5          * */
6         String rootDir = MainActivity_l.this.getExternalFilesDir("pic").getAbsolutePath();
7         image_test = rootDir + "/test.png";
 1   /*
 2      *whq 保存照片
 3      * */
 4
 5     private void getRGBData(Bitmap bitmap) {
 6         File file = new File(image_test);
 7         try {
 8             file.createNewFile();
 9             FileOutputStream fos = new FileOutputStream(file);
10             bitmap.compress(Bitmap.CompressFormat.PNG, 100, fos);
11             fos.close();
12         } catch (IOException e) {
13             e.printStackTrace();
14         }
15
16
17     }
在安卓的文件管理中找到data,找到这个APP的包的全名,然后一点一点找到,就会发现里面存着人脸的识别后的照片。
以上就是完成了人脸检测及追踪。
完整的代码链接:https://download.csdn.net/download/hequnwang10/14150596