一、实验环境
1.Windows7x64_SP1
2.anaconda2.5.0 + python2.7(anaconda集成,不需单独安装)
3.pyinstaller3.0
二、实验步骤
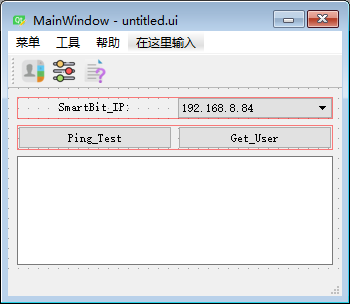
2.1 QT设计师创建主对话框如下
2.3 主程序中调用方式一
2.3.1 使用pyuic5生成untitled.py
pyuic5 -o untitled.py untitled.ui
2.3.2 主程序调用代码
# -*- coding: utf-8 -*-
import os,sys,time,re
import xlrd
from PyQt5.QtWidgets import QMainWindow,QMessageBox
from PyQt5.uic import loadUi
from PyQt5.QtWidgets import QApplication,QDialog
from PyQt5 import QtCore,QtGui
from untitled import Ui_MainWindow


class SmartBit_Tool(QMainWindow):
    host_ip = '192.168.8.85'
    username = 'su'
    password = 'SMB-6000'
    excel_file = 'IP_Name.xlsx'
    smart_ip_list_file = 'smart_ip_list.txt'
    srcFilename = os.path.join('\\192.168.8.123\software', excel_file)
    desFilename = os.path.join(os.getcwd(),excel_file)
    smart_ip_list_file = os.path.join(os.getcwd(),smart_ip_list_file)

    def __init__(self, *args):
        super(SmartBit_Tool, self).__init__(*args)
        self.ret_ping_test = False
        self.ui = Ui_MainWindow()                                                  #实例化窗口
        self.ui.setupUi(self)                                                      #显示窗口
2.4 主程序中调用方式二
# -*- coding: utf-8 -*-
import os,sys,time,re
import xlrd
from PyQt5.QtWidgets import QMainWindow,QMessageBox
from PyQt5.uic import loadUi
from PyQt5.QtWidgets import QApplication,QDialog
from PyQt5 import QtCore,QtGui


class SmartBit_Tool(QMainWindow):
    def __init__(self, *args):
        super(SmartBit_Tool, self).__init__(*args)
        loadUi('untitled.ui', self)
        self.setWindowTitle('SmartBit_Get_User')
如上方式使用loadUI函数直接调用*.ui,未进行pyuic5生成untitled.py,对话框显示跟QT设计排版存在差异,不推荐使用!