一、进程与线程简介
- 进程
进程是程序的一次执行,由进程段、数据段、进程控制块三部分组成。具体三个基本状态,就绪、执行、阻塞,是一个拥有资源的独立单位。
- 线程
属于进程的一个实体,拥有极少的资源。也具有三个基本状态,就绪、执行、拥塞。可以认为是一个情形进程。
- 关系
一个进程可以创建多个线程;一个进程创建的多个线程共享其资源;
进程开销较大,线程开销较小;进程撤销时间长,线程撤销时间短。
- 多进程/线程的运行
由主机的操作系统给每个进程/线程安排一个小时间片,在所有的进程/线程中快速切换,使每个执行单元都能得到CPU的执行时间。
多核系统上多进程分用不同的CPU核心。
- 注意点
python解释器内部使用了全局解释器锁(GIL),现在python进程只能在一个CPU核上运行。
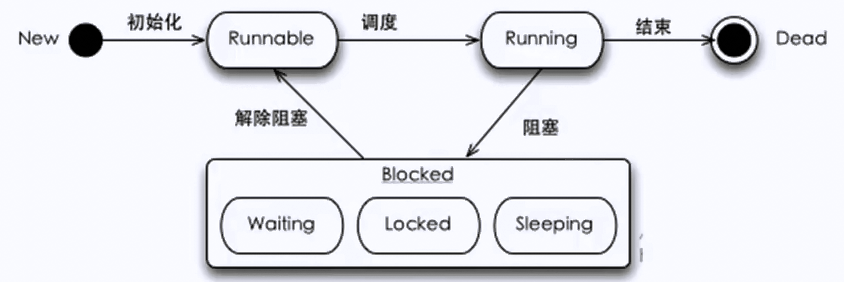
二、进程的生命周期
三、python中threading模块
- Thread对象:用来创建线程
- Thread对象属性:
- start():启动线程
- run():启动线程的方法
- join():等待
- is_alive():返回该线程的活动状态
- name:线程名
- id:线程ID
- deamon:后台标志
- 获取当前线程
current_thread()
- 获取所有活动线程
enumerate()
四、线程的创建方法
1、直接实例化threading中Thread对象,并将线程的参数传入
实例化参数如下:
Thread(target = None,name = None,args = (),kwargs = {})
- target参数为要传入的函数名
- name参数为线程的名称
- args元组行参数
import threading
import time

def calc():
    sum = 0
    for i in range(30):
        sum += i
        time.sleep(0.1)
    print(sum)

if __name__ == '__main__':
    ths = [threading.Thread(target = calc) for i in range(2)]
    for th in ths:
        th.start()
运行结果:
435
435
2、通过继承Threading中的Thread对象,然后实例化并启动它。
注:新定义的Thread中如果定义了__init__(),需要先调用父类的__init__()
import threading
import time

class MyThread(threading.Thread):
    def run(self):
        sum = 0
        for i in range(30):
            sum += i
            time.sleep(0.1)
        print(sum)

if __name__ == '__main__':
    ths = [MyThread() for i in range(2)]
    for th in ths:
        th.start()
五、线程之间的关系
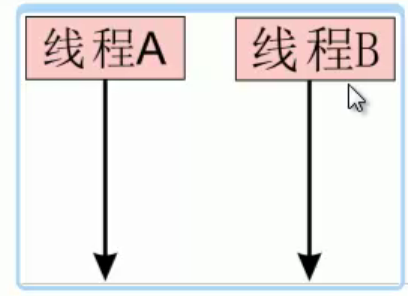
- 独立线程
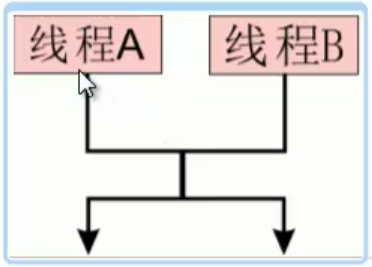
- 等待线程
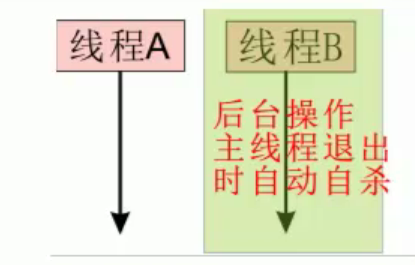
- 后台线程
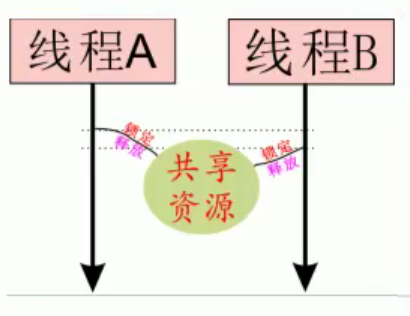
- 线程同步1
共享资源只能被一个线程使用,先到先得。
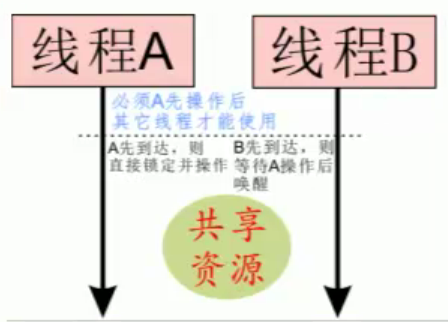
- 线程同步2
操作有先后,典型的例子是生产者与消费者。线程A先操作,做一些初始化动作,线程B才能使用。
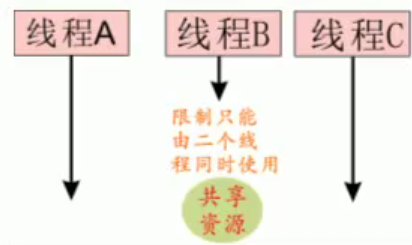
- 线程同步3
资源个数有上限
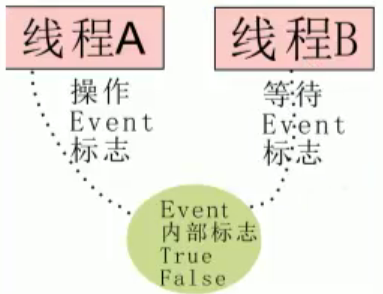
- 线程通信
六、线程各关系的实现
1、等待线程
join方法,被调用join方法的线程一直拥塞调用者的线程,直到自己结束。
也就是一个线程等待另一线程运行完才开始运行
import threading,time

class MyThread(threading.Thread):
    def run(self):
        for i in range(9):
            print('thread:',i)
            time.sleep(0.1)

if __name__ == '__main__':
    m = MyThread()
    m.start()
    m.join()
    for i in range(5):
        print('main:',i)
        time.sleep(0.1)
运行结果:
thread: 0
thread: 1
thread: 2
thread: 3
thread: 4
thread: 5
thread: 6
thread: 7
main: 0
main: 1
main: 2
main: 3
main: 4
2、后台线程
被设置为后台运行的线程,会在主程序退出时自杀
实现步骤:
- 建立线程
- 设置线程的deamon属性为True
- 启动线程
import threading,time

def backthread():
    print('backthread start...')
    time.sleep(3)
    print('backthread end...')

def mainthread():
    print('mainthread start...')
    time.sleep(1)
    print('mainthread end...')

th1 = threading.Thread(target = backthread)
th1.deamon = True

th2 = threading.Thread(target = mainthread)
print('start...')
th1.start()
th2.start()
print('end...')
运行结果:
start...
backthread start...
mainthread start...
end...
mainthread end...
backthread end...
2、线程同步
2.1 指令锁threading.Lock
- 加锁 acquire(blocking = True,timeout = -1)
- 释放锁 release()
import threading,time,random

share = 4
class MyThread(threading.Thread):
    def __init__(self,i):
        super().__init__()
        self.i = i

    def run(self):
        global share
        for i in range(3):
            lock.acquire()
            print(share)
            share += self.i
            time.sleep(random.random())
            print('+',self.i,'=',share)
            lock.release()

lock = threading.Lock()

if __name__ == '__main__':
    m = MyThread(2)
    mm = MyThread(6)
    m.start()
    mm.start()
运行结果:
4
+ 2 = 6
6
+ 2 = 8
8
+ 6 = 14
14
+ 6 = 20
20
+ 6 = 26
26
+ 2 = 28
2.2 可重入锁 threading.RLock
与指令锁的区别,对于已经锁定的资源,在该线程内部还可以在锁一次。
支持的方法:
- acquire(block = Ture,timeout = -1)
- release()
锁定多少次,就要释放多少次!
2.3 条件变量threading.Condition
支持的方法:
- acquire()
- release()
- wait(timeout = None) 释放锁并进入等待拥塞,直到唤醒或者超时,这个线程才会继续运行。
- notify(n = 1) 如果一个线程处于wait状态,使用notify()进行唤醒
- notify_all 唤醒所有线程
使用范围:
实现严格次序操作的线程间通信
典型实例:
生产者/消费者(先生产,后消费)
线程之间可以相互通知,已达到默契的配合
import threading,time

share = 0
share_cond = threading.Condition()

class ProThread(threading.Thread):
    def __init__(self):
        super().__init__()
        self.name = 'produce'

    def run(self):
        global share
        if share_cond.acquire():
            while True:
                if not share:
                    share += 1
                    print(self.name,share)
                    share_cond.notify()
                    share_cond.wait()
                    time.sleep(1)

class CustomTread(threading.Thread):
    def __init__(self):
        super().__init__()
        self.name = 'produce'

    def run(self):
        global share
        if share_cond.acquire():
            while True:
                if share:
                    share -= 1
                    print(self.name,share)
                    share_cond.notify()
                    share_cond.wait()
                    time.sleep(1)

if __name__ == '__main__':
    p = ProThread()
    c = CustomTread()
    p.start()
    c.start()
运行结果:
produce 1
produce 0
#一直循环下去...
2.4 信号量 threading.Semaphore()
实例化是指定使用量
支持的方法:
- acquire(blocking = Ture,timeout = None) 锁定资源
- release() 释放锁
使用其内置计数器,锁定时+1;释放时-1;计数器为0则拥塞
使用范围:
用于实现对稀缺资源的控制,比如需要控制稀缺资源的用户数
import threading,time

sema = threading.Semaphore(2)

class SemaThread(threading.Thread):
    def __init__(self,name):
        super().__init__()
        self.name = name

    def run(self):
        if sema.acquire():
            print(self.name,' get resource.')
            time.sleep(1)
            print(self.name,' release resource.')
            sema.release()

if __name__ == '__main__':
    res = [SemaThread(str(i) + 'sema') for i in range(5)]
    for i in res:
        i.start()
运行结果:
0sema  get resource.
1sema  get resource.
1sema  release resource.
0sema  release resource.
3sema  get resource.
2sema  get resource.
2sema  release resource.
3sema  release resource.
4sema  get resource.
4sema  release resource.
3、线程通信 threading.Event()
作用:
管理一个内部标志,实现一个线程,唤醒其他线程
支持的方法:
- set() 设置内部标志位False
- clear() 设置内部标志为False
- wait([timeout])拥塞线程,直到内部标志位True
import threading,time

eve = threading.Event()

class MyThreadWait(threading.Thread):
    def run(self):
        self.name = 'Wait Thread'
        print(self.name,'waitting...')
        eve.wait()
        print(self.name,'Start...')
        eve.clear()

class MyThreadMain(threading.Thread):
    def run(self):
        time.sleep(3)
        print('Main thread set event flag!')
        eve.set()

if __name__ == '__main__':
    mm = MyThreadMain()
    mw = MyThreadWait()
    mm.start()
    mw.start()
运行结果:
Wait Thread waitting...
Main thread set event flag!
Wait Thread Start...
4、定时执行threading.Timer
使用方法:
threading.Timer(3,start)
说明:
此进程3sec之后运行