对于Hybird Flow,Refresh Token还没了解的,请看第一章:https://www.cnblogs.com/hexsola1314/p/13823421.html
一.安装IDP
1.为了简便,这里的IDP(授权服务器)直接使用官方提供的模板
安装:dotnet new -i IdentityServer4.Templates
正确安装完会出现下,这里我们选择的是shortName:is4inmem的模板

安装后你可能会发现IdentityServer4 4.0 对比之前不再使用ApiResource这个类,而是换成了ApiScope 我们在这里新加个api,并把这个端口设置为5001
 public static IEnumerable<ApiScope> ApiScopes =>
            new ApiScope[]
            {
                //new ApiScope("scope1"),
                //new ApiScope("scope2"),
                new ApiScope("api1")//jwt
            };
2.新添加客户端 hybrid client
                //mvc hybrid Client
                new Client
                {
                    ClientId="hybrid client",
                    ClientName="Asp.net Core hybrid",
                    ClientSecrets = {new Secret("hybrid secret".Sha256())},//因为这里要进行客户端的认证
                    RequirePkce = false,
                    AllowedGrantTypes = GrantTypes.Hybrid,
                    RedirectUris =
                    {
                        "http://localhost:7000/signin-oidc"
                    },
                    //登出的uri
                    PostLogoutRedirectUris =
                    {
                        "http://localhost:7000/signout-callback-oidc"
                    },
                    AllowOfflineAccess = true,  //使用refresh token
                    AccessTokenLifetime = 60, // 60 seconds  默认是1小时
                    AlwaysIncludeUserClaimsInIdToken = true,//useclaim添加到id_token里面 个人喜好  要把jwt的cliam映射给关闭
                    AllowedScopes =
                    {
                        "api1",
                        IdentityServerConstants.StandardScopes.OpenId,
                        IdentityServerConstants.StandardScopes.Profile,
                        IdentityServerConstants.StandardScopes.Address,
                        IdentityServerConstants.StandardScopes.Email,
                        IdentityServerConstants.StandardScopes.Phone
                    }
                }
3.由于上面scopes的变动我们需要在默认的 OpenId,Profile基础上再添加
new IdentityResources.Address(),
new IdentityResources.Email(),
new IdentityResources.Phone()
二.新建HybridClient web服务器 这里设置端口号为7000 ,为了能更好看到ids4的内置信息,我们需要安装IdentityModel这个nuget
这里我们把jwttoken的cliam的映射给关闭,使用well-konw的简单形式
只需要添加以下代码
JwtSecurityTokenHandler.DefaultMapInboundClaims = false;
当然这里我们还是需要把源头指向我们的IDP,scope,cliam这里配置等等 oidc的协议,我们需要在service下添加
 services.AddAuthentication(options =>
            {
                options.DefaultScheme = "Cookies";
                options.DefaultChallengeScheme = OpenIdConnectDefaults.AuthenticationScheme;
            })
            .AddCookie("Cookies", option=>
            {
                option.AccessDeniedPath = "/Authorization/AccessDenied";
            })//身份无权限,错误跳转
            .AddOpenIdConnect(OpenIdConnectDefaults.AuthenticationScheme, options =>
            {
                options.SignInScheme = "Cookies";
                options.Authority = "http://localhost:5001";
                options.RequireHttpsMetadata = false;
                options.ClientId = "hybrid client";
                options.ClientSecret = "hybrid secret";
                options.SaveTokens = true;
                options.ResponseType = "code id_token";//这里要比授权码的类型多了个id_token
                #region Scope 范围
                options.Scope.Clear();
                options.Scope.Add("api1");
                options.Scope.Add("openid");
                options.Scope.Add("profile");
                options.Scope.Add("email");
                options.Scope.Add("address");
                options.Scope.Add("phone");
                options.Scope.Add("roles");
                options.Scope.Add(IdentityModel.OidcConstants.StandardScopes.OfflineAccess);
                #endregion


                #region 集合里的东西 都是要被过滤掉的属性,nbf amr exp...  需要的时候用就行了
                //options.ClaimActions.Remove("nbf");
                //options.ClaimActions.Remove("amr");
                //options.ClaimActions.Remove("exp");
                #endregion
            });
别忘了在中间键加入
app.UseAuthentication();
app.UseAuthorization();
和默认控制器Home中加入【Authorize】
三.这里,我们暂时先不管api这个范围,我们把IDP和HybridClient 启动。你可能会遇到以下报错 (很坑)
1.
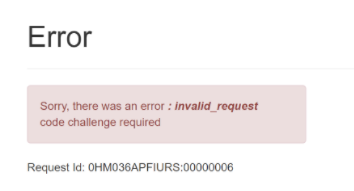
这个时候我们在IDP中加上这段代码 RequirePkce = false,原因是connect/authorize的参数中比Authorization Code Flow时少了一个code_challenge相关的两个参数,这个参数默认是true的,关闭即可
2.如果你两边都使用了https来用的,就可以正常访问,因为ids4 model这个包默认是支持https的当然在官网下的例子也是采用了https,但考虑到很多人是生产环境下,没有证书,所以一般都用了http,
但代码中也加了以下options.RequireHttpsMetadata = false; 代码还是无法正常访问,这是因为谷歌在版本5.1后加入了双重认证SameSite的认证这里我们需要把这个认证关闭就可以了,edge也是使
用了谷歌的内核,所以我们可以输入chrome://flags/

如果你没有遇到上述的问题那就是最好了,大家都省事,哈哈哈哈!
正常启动你会得到下面的页面

这里的账号和密码,你可以参考IDP下默认的两个用户alice和bob 输入后就会跳转到主页了Home/index
四.创建一个接口作为直接和ownResouce做交互,这里需要安装identityModel的nuget包,为了简便我这里直接用官网默认的方式配置
在service下写入以下代码 接口为6001
      .AddJwtBearer("Bearer", options =>
            {
                options.Authority = "http://localhost:5001";
                options.RequireHttpsMetadata = false;
                options.TokenValidationParameters = new TokenValidationParameters
                {
                    ValidateAudience = false
                };
            });
控制器IdentityController
[HttpGet]
        public IActionResult Get()
        {
            return new JsonResult(from c in User.Claims select new { c.Type, c.Value });
        }
下面我们再回到HybirdClient中,我们把请求到的accessToken 放到SetBearerToken中 再去访问接口这个时候就可以拿到api中的资源啦
具体代码如下:
            var client = new HttpClient();
            var disco = await client.GetDiscoveryDocumentAsync("http://localhost:5001");
            if (disco.IsError)
            {
                throw new Exception();
            }

            var accessToken = await HttpContext.GetTokenAsync(OpenIdConnectParameterNames.AccessToken);
            client.SetBearerToken(accessToken);
            var response = await client.GetAsync("http://localhost:6001/identity");
            if (!response.IsSuccessStatusCode)
            {
                 var content = await response.Content.ReadAsStringAsync();
            }
五。为了防止文章过长下一章我们将讨论如何获取refresh Token,同时也希望上诉文章能帮到你,github开源地址会在写完后放上去
若要转载请附上作者原文链接 https://www.cnblogs.com/hexsola1314/p/13825730.html Evan