JDK:1.8.0_212
IDE:STS4(Spring Tool Suit4 Version: 4.3.2.RELEASE)
工程下载:https://files.cnblogs.com/files/xiandedanteng/SpringBootSample01_20190927.rar
具体步骤
1.New->Spring Starter Project
2.在Name中填入SpringBootSample,或是你觉得拉风的任何名字,再点Next。
3.直接点Finish。之后等STS4把工程创建好。
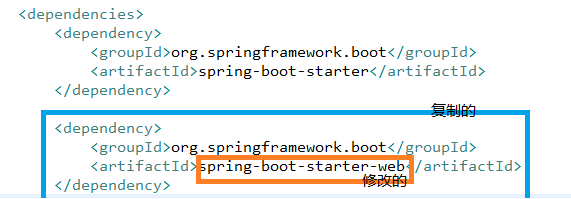
4.打开工程,找到根节点下的pom.xml,找到groupId为org.springframework.boot的dependency,复制一份,在下面粘贴出来,将artifactId从spring-boot-starter修改成spring-boot-starter-web。如下图:

保存后,工程会自动添加依赖,等一会就行了。
5.找到SpringBootSample01Application类所在的包,在包下面添加一个类Ctrl,类名也可以是任何你觉得拉风的名字。
然后把类改写成以下样子:
package com.example.demo;

import org.springframework.web.bind.annotation.RequestMapping;
import org.springframework.web.bind.annotation.RestController;

@RestController
public class Ctrl {
    @RequestMapping("/")
    public String index() {
        return "It works!";
    }

    @RequestMapping("/hello")
    public String hello() {
        return "你好!Spring Boot!";
    }
}
6.启动。在SpringBootSample01Application类上点邮件,在弹出菜单中选Run as->Spring Boot App 或是Run as->Java Application,然后控制台会输出一堆东西。
  .   ____          _            __ _ _
 /\ / ___'_ __ _ _(_)_ __  __ _
( ( )\___ | '_ | '_| | '_ / _` |
 \/  ___)| |_)| | | | | || (_| |  ) ) ) )
  '  |____| .__|_| |_|_| |_\__, | / / / /
 =========|_|==============|___/=/_/_/_/
 :: Spring Boot ::        (v2.1.8.RELEASE)

2019-09-26 19:26:28.229  INFO 5204 --- [           main] c.e.demo.SpringBootSample01Application   : Starting SpringBootSample01Application on DESKTOP-8IDBHPK with PID 5204 (D:workspacests4SpringBootSample01	argetclasses started by horn1 in D:workspacests4SpringBootSample01)
2019-09-26 19:26:28.234  INFO 5204 --- [           main] c.e.demo.SpringBootSample01Application   : No active profile set, falling back to default profiles: default
2019-09-26 19:26:30.722  INFO 5204 --- [           main] o.s.b.w.embedded.tomcat.TomcatWebServer  : Tomcat initialized with port(s): 8080 (http)
2019-09-26 19:26:30.756  INFO 5204 --- [           main] o.apache.catalina.core.StandardService   : Starting service [Tomcat]
2019-09-26 19:26:30.757  INFO 5204 --- [           main] org.apache.catalina.core.StandardEngine  : Starting Servlet engine: [Apache Tomcat/9.0.24]
2019-09-26 19:26:31.031  INFO 5204 --- [           main] o.a.c.c.C.[Tomcat].[localhost].[/]       : Initializing Spring embedded WebApplicationContext
2019-09-26 19:26:31.031  INFO 5204 --- [           main] o.s.web.context.ContextLoader            : Root WebApplicationContext: initialization completed in 2714 ms
2019-09-26 19:26:31.347  INFO 5204 --- [           main] o.s.s.concurrent.ThreadPoolTaskExecutor  : Initializing ExecutorService 'applicationTaskExecutor'
2019-09-26 19:26:31.635  INFO 5204 --- [           main] o.s.b.w.embedded.tomcat.TomcatWebServer  : Tomcat started on port(s): 8080 (http) with context path ''
2019-09-26 19:26:31.639  INFO 5204 --- [           main] c.e.demo.SpringBootSample01Application   : Started SpringBootSample01Application in 3.924 seconds (JVM running for 4.433)
7.看效果
在浏览器输入http://127.0.0.1:8080,你将会看到 It works! 字样。
在浏览器输入 http://127.0.0.1:8080/hello ,你将会看到 你好!Spring Boot! 字样。
好消息,到这里就结束了,恭喜你又在Spring的光辉照耀下又写了一个新版本的Hello World程序。
--END-- 2019年9月26日19:32:31