一:配置php扩展memcached
wget http://memcached.googlecode.com/files/memcached-1.4.9.tar.gz
# tar zvxf memcached-1.4.9.tar.gz
# cd memcached-1.4.9
/usr/bin/phpize #生成configure编译文件
如果这里出现
Can’t find PHP headers in /usr/include/php
The php-devel package is required for use of this command
那么执行 yum install php-devel
 ./configure --with-php-config=/usr/bin/php-config


make && make insll

会提示找到memcache.so位置
Installing shared extensions: /usr/local/webserver/php/lib/php/extensions/no-debug-non-zts-20060613/ [不同的电脑提示也不同]
修改php.ini
先找到Php.ini的位置
find / -name php.ini
vim xxx/xxx/xxx/php.ini
extension=/根据提示的mecached的位置/memcache.so ;

杀死php进程:pkill -9 php

重启php:./usr/bin/php-fpm
最后检查memcached是否安装成功  127.0.0.1 查看是否有memcache 模块。
---------------------------------------------------------
利用telnet 测试memcached
超找memcached的位置 find / -name memcached
./usr/local/memcached/bin/memcached -m 64 -p 11211 -vvv
【注意不能是root用户开启】 ./usr/local/memcached/bin/memcached -u nobody -vv -p 11211
----------------------------------------------------------------------------------------------------------------
如果上面的不能够安装memcached就按这里的方式来安装。
wget -c http://www.memcached.org/files/memcached-1.4.17.tar.gz
tar -zxvf memcached-1.4.17.tar.gz
cd memcached-1.4.17
./configure --prefix=/usr/local/memcached
 make
 sudo make install
第三步:启动memcached
cd /usr/local/memcached
./bin/memcached -d -m 1024 -u root -l 127.0.0.1 -p 11211
第三步:检查是否安装成功
$ps -aux | grep memcache
-----------------------------------------------------------------------------------------------------
测试是否安装了telnet
rpm -q telnet-server 无信息回复表示没安装
安装 telnet
yum install telnet
在linux上打开一个窗口 打开telnet服务
telnet 127.0.0.1 11211 回车
ctrl+] 打开回显回车。
在linux上打开一个窗口 测试mecached
add news 0 0 8 /
12345678 回车
get news 回车
-------------------------------------------------------
二:nginx配置
(1)配置nginx.conf 信息
location / {
#设置key
set $memcached_key "$uri";
#根据key查找对应的服务器
memcached_pass 127.0.0.1:11211;
#出错的时候回调php,查找数据库中的数据
error_page 404 /callback.php;
}
在linux上打开一个窗口 打开telnet服务
telnet 127.0.0.1 11211 回车
ctrl+] 打开回显回车。
在linux上打开一个窗口添加一个memcache key
add /4.html 0 0 10 /
hello word
浏览器上测试:输入 127.0.0.1/4.html
浏览器上显示:hello word
(2)新建测试数据
mysql -uroot -p;
 use  test;

 CREATE TABLE `abc_table` (
`uid` int(10) unsigned NOT NULL AUTO_INCREMENT,
`name` varchar(25) NOT NULL,
PRIMARY KEY (`uid`)
) ENGINE=InnoDB DEFAULT CHARSET=utf8;
insert abc_table values(null,'1.html page');
insert abc_table values(null,'2.html page');
insert abc_table values(null,'3.html page');
insert abc_table values(null,'4.html page');
insert abc_table values(null,'5.html page');
insert abc_table values(null,'6.html page');
insert abc_table values(null,'7.html page');
insert abc_table values(null,'8.html page');
insert abc_table values(null,'9.html page');
insert abc_table values(null,'10.html page');
select * from abc_table
+-----+--------------+
| uid | name |
+-----+--------------+
| 1 | 1.html page |
| 2 | 2.html page |
| 3 | 3.html page |
| 4 | 4.html page |
| 5 | 5.html page |
| 6 | 6.html page |
| 7 | 7.html page |
| 8 | 8.html page |
| 9 | 9.html page |
| 10 | 10.html page |
+-----+--------------+
(3)编写callback.php 要是在nginx的html目录文件夹中编写。
<?php
header("Content-type: text/html; charset=utf-8");
$uri=$_SERVER['REQUEST_URI'];
#/user4243.html
#字符串截取获取数字
$uid=substr($uri,5,strpos($uri,'.')-5);
# echo $uid;die;
#连接数据库并入memcached
$con=mysql_connect("localhost","root","root");
$sql='use test';
mysql_query($sql,$con);
$sql="set names utf8";
$sql="select * from abc_table where uid=".$uid;
# echo $sql ;die;
$rs=mysql_query($sql,$con);
$sql="set names utf8";
$sql="select * from abc_table where uid=".$uid;
# echo $sql ;die;
$rs=mysql_query($sql,$con);
$user=mysql_fetch_assoc($rs);
if(empty($user)){
echo "用户不存在";
}else{
#写入memcached
$men=new memcache();
$men->connect('localhost',11211);
#echo '2222';
$men->add($uri,$user['name'],0,300);
$men->close();
}
(4)测试是否连接成功memcache
浏览器输入:127.0.0.1/user1.html 出现空白
再次刷新 出现数据
可以通过telnet窗口观察其中取值的变化。
--------------------------------------------------------------------------------------------------------------
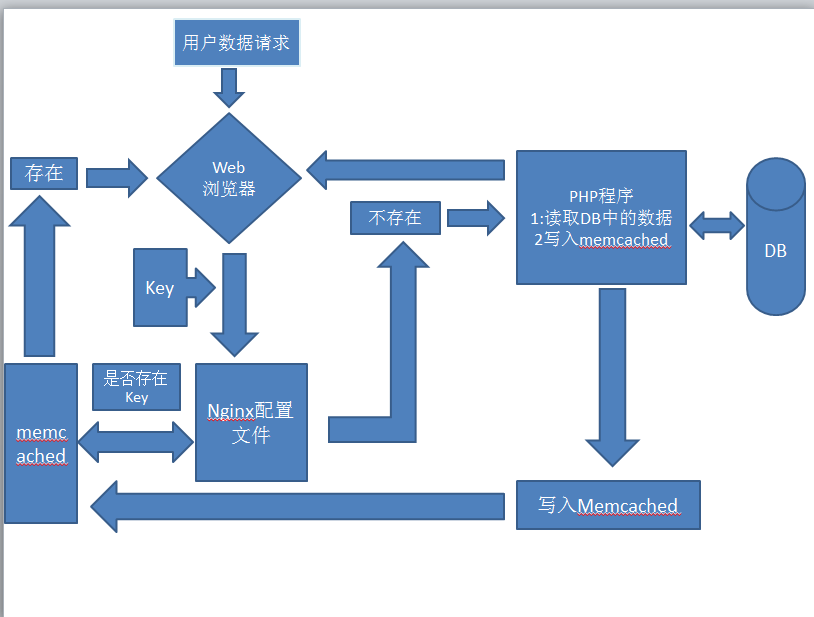
请求过程如下图