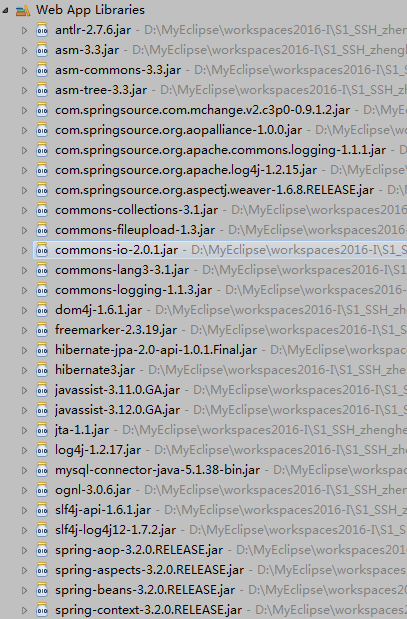
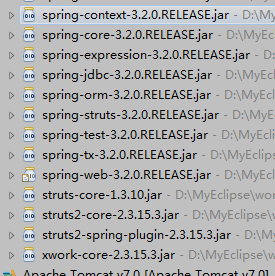
整合ssh需要的jar包:
struts2-core.jar
struts2-convention-plugin-2.*.*.*.jar ------是struts2的注解开发jar包
struts2-spring-plugin-2.*.*.*.jar ------struts2用于整合spring的jar包
(spring中也有一个 spring-struts2的jar包,也是用来整合两个框架的jar包,引入其中一个可以)
Hibernate框架开发的响应的jar:
hibernate-core.*.jar
hibrenate目录下lib
equired*.jar
bibernate目录下libjpa*.jar
日志相关记录: * slf4j整合log4j的jar包
以及数据库驱动包
spring框架开发的响应jar;
ioc:
spring-beans-*.*.*.release.jar
spring-context-*.*.*.release.jar
spring-core-*.*.*.ralease.jar
com.springsource.org.apache.log4j-*.*.*.jar
com.springsource.org.apache.commons.logging-*.*.*.jar
aop:
spring-aop-*.*.*.jar
spring-aspects-*.*.*.release.jar
com.springsource.org.aopalliance-*.*.*.jar
com.springcource.org.aspectj.weaver-*.*.*.release.jar
spring-tx-*.*.*.release.jar spring事务类包
spring-jdbc-*.*.*.release.jar
spring-orm-*.*.*.release.jar (整合hibernate框架)(过期)
已经变成这个spring-springframework-*.*.*.jar
spring-web-*.*.*.jar(整合web的包)
spring-test-*.*.*.release.jar (整合JUnit单元测试)
spring-struts2(与上面的二选一)
c3p0(连接池)
jar包 链接: http://pan.baidu.com/s/1hr3YMu4 密码: tj5u
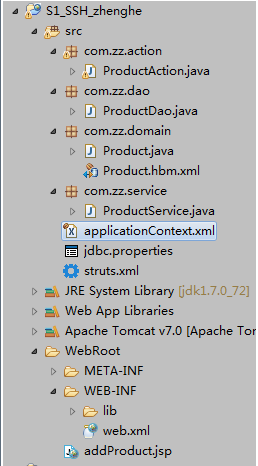
Struts2与Spring整合
web.xml文件配置
(Control + Shift + T 可以打开open type 查找类 第一次用。)下面class中的路径都是可以用type 查找到。
<?xml version="1.0" encoding="UTF-8"?>
<web-app xmlns:xsi="http://www.w3.org/2001/XMLSchema-instance"
            xmlns="http://java.sun.com/xml/ns/javaee"
            xsi:schemaLocation="http://java.sun.com/xml/ns/javaee
            http://java.sun.com/xml/ns/javaee/web-app_3_0.xsd"
            id="WebApp_ID" version="3.0">

    <!-- Spring的框架的核心监听器 -->
    <listener>
        <listener-class>org.springframework.web.context.ContextLoaderListener</listener-class>
    </listener>
    <context-param>
        <!-- 让监听器去加载classpath文件下的applicationContext.xml配置文件 -->
        <param-name>contextConfigLocation</param-name>
        <param-value>classpath:applicationContext.xml</param-value>
    </context-param>

    <!-- Struts2的框架的核心过滤器的配置 -->
    <filter>
        <filter-name>struts</filter-name>
        <filter-class>org.apache.struts2.dispatcher.ng.filter.StrutsPrepareAndExecuteFilter</filter-class>
    </filter>

    <filter-mapping>
        <filter-name>struts</filter-name>
        <url-pattern>/*</url-pattern>
    </filter-mapping>

  <display-name>S1_SSH_zhenghe</display-name>
  <welcome-file-list>
    <welcome-file>index.html</welcome-file>
    <welcome-file>index.htm</welcome-file>
    <welcome-file>index.jsp</welcome-file>
    <welcome-file>default.html</welcome-file>
    <welcome-file>default.htm</welcome-file>
    <welcome-file>default.jsp</welcome-file>
  </welcome-file-list>

</web-app>
applicationContext.xml文件的最全约束 直接粘贴就行了
<?xml version="1.0" encoding="UTF-8"?>

<beans xmlns="http://www.springframework.org/schema/beans"
        xmlns:xsi="http://www.w3.org/2001/XMLSchema-instance"
        xmlns:context="http://www.springframework.org/schema/context"
        xmlns:aop="http://www.springframework.org/schema/aop"
        xmlns:tx="http://www.springframework.org/schema/tx"
        xsi:schemaLocation="http://www.springframework.org/schema/beans
        http://www.springframework.org/schema/beans/spring-beans.xsd
        http://www.springframework.org/schema/context
        http://www.springframework.org/schema/context/spring-context.xsd
        http://www.springframework.org/schema/aop
        http://www.springframework.org/schema/aop/spring-aop.xsd
        http://www.springframework.org/schema/tx
        http://www.springframework.org/schema/tx/spring-tx.xsd">

</beans>
Struts2与Spring整合(两种方法:一种是有Struts2 创建Action 反之则是Spring创建Action
Action类由Struts2自身创建 ( 注意一下配置文件的区别就行了)
applicationContext.xml中
--Service和DAO的配置
<!-- 配置业务层的类 -->
    <bean id="productService" class="com.zz.service.ProductService">
        <property name="productDao" ref="productDao"></property>
    </bean>

    <!-- 配置DAO的类 -->
    <bean id="productDao" class="com.zz.dao.ProductDao"></bean>
struts.xml
   <package name="ssh" extends="struts-default" namespace="/">
       <action name="product_*" class="com.zz.action.ProductAction" method="{1}"></action>
   </package>
Action类交给Spring创建<推荐使用这种方式:能更好的使用aop>
applicationContext.xml中
--action、Service和DAO的配置
  <!-- 配置Action类  因为是默认是单例,所以要加上scope-->
    <bean id="productAction" class="com.zz.action.ProductAction" scope="prototype">
        <!-- 手动注入Service -->
        <property name="productService" ref="productService"></property>
    </bean>
    <!-- 配置业务层的类 -->
    <bean id="productService" class="com.zz.service.ProductService">
        <property name="productDao" ref="productDao"></property>
    </bean>

    <!-- 配置DAO的类 -->
    <bean id="productDao" class="com.zz.dao.ProductDao"></bean>
struts.xml
<!-- 由Spring创建action  class填Spring配置文件中的id-->
   <package name="ssh" extends="struts-default" namespace="/">
           <action name="product_*" class="productAction" method="{1}"></action>
   </package>
与Hibernate整合
jdbc.properties
jdbc.driverClass=com.mysql.jdbc.Driver
jdbc.url=jdbc:mysql://localhost:3306/ssh
jdbc.username=root
jdbc.password=root
applicationContext.xml
<!--  引入外部文件 -->
    <context:property-placeholder location="classpath:jdbc.properties" />
    <!-- 配置连接池 -->
    <bean id="dataSource" class="com.mchange.v2.c3p0.ComboPooledDataSource">
        <property name="driverClass" value="${jdbc.driverClass}"></property>
        <property name="jdbcUrl" value="${jdbc.url}"></property>
        <property name="user" value="${jdbc.username}"></property>
        <property name="password" value="${jdbc.password}"></property>
    </bean>

    <!-- 配置hibernate的相关属性 -->
    <bean id="sessionFactory" class="org.springframework.orm.hibernate3.LocalSessionFactoryBean">
        <!-- 注入连接池 -->
        <property name="dataSource" ref="dataSource"/>
        <!-- 配置hibernate的属性 -->
        <property name="hibernateProperties">
            <props>
                <prop key="hibernate.dialect">org.hibernate.dialect.MySQLDialect</prop>
                <prop key="hibernate.show_sql">true</prop>
                <prop key="hibernate.format_sql">true</prop>
                <prop key="hibernate.hbm2ddl.auto">update</prop>
            </props>
        </property>
        <!-- 加载Hibernate中的映射文件 -->
    <property name="mappingResources">
        <list>
            <value>com/zz/domain/Product.hbm.xml</value>
        </list>
    </property>
    </bean>
配置DAO、事务管理器、开启注解
    <!-- 配置DAO的类 -->
    <bean id="productDao" class="com.zz.dao.ProductDao">
        <property name="sessionFactory" ref="sessionFactory"></property>
    </bean>

    <!-- 配置事务管理器 -->
    <bean id="transactionManager" class="org.springframework.orm.hibernate3.HibernateTransactionManager">
        <property name="sessionFactory"    ref="sessionFactory"></property>
    </bean>

    <!-- 开启注解事务 -->
    <tx:annotation-driven transaction-manager="transactionManager"/>
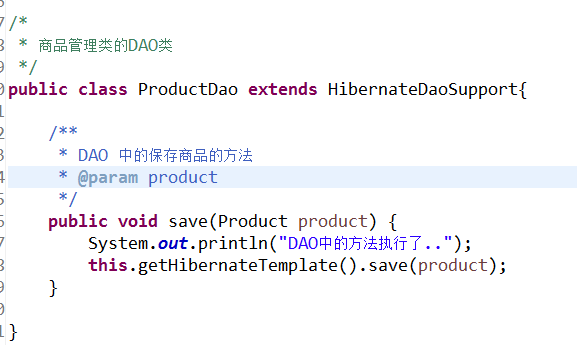
DAO类 extends HibernateDaoSupport 在save方法内不用set方法就可直接调用 (this.getHibernateTemplate().save(product);)
添加注解后 直接在 service类上添加一个 @Transactional 注解
以上就是各个整合的配置了 下面是各个文件及类的全部的总代码
package com.zz.domain;

/*
 * 商品的实体
 */
public class Product {

    private Integer pid;
    private String pname;
    private Double price;

    public Integer getPid() {
        return pid;
    }
    public void setPid(Integer pid) {
        this.pid = pid;
    }
    public String getPname() {
        return pname;
    }
    public void setPname(String pname) {
        this.pname = pname;
    }
    public Double getPrice() {
        return price;
    }
    public void setPrice(Double price) {
        this.price = price;
    }
}
package com.zz.dao;

import com.zz.domain.Product;

/*
 * 商品管理类的DAO类
 */
public class ProductDao extends HibernateDaoSupport{

    /**
     * DAO 中的保存商品的方法
     * @param product
     */
    public void save(Product product) {
        System.out.println("DAO中的方法执行了..");
        this.getHibernateTemplate().save(product);
    }

}
package com.zz.service;

import com.zz.dao.ProductDao;
import com.zz.domain.Product;

/*
 * 商品管理类的业务层类
 */
@Transactional

public class ProductService {

    private ProductDao productDao;

    public void setProductDao(ProductDao productDao) {
        this.productDao = productDao;
    }


    /**
     * 业务层保存商品的方法
     * @param product
     */
    public void save(Product product) {
        System.out.println("Service中的save方法执行了...");
        productDao.save(product);

    }

}
package com.zz.action;
/*
 * 管理类的Action类
 */

import com.opensymphony.xwork2.ActionSupport;
import com.opensymphony.xwork2.ModelDriven;
import com.zz.domain.Product;
import com.zz.service.ProductService;

public class ProductAction extends ActionSupport implements ModelDriven<Product>{

    //模型驱动使用个的类
    private Product product = new Product();
    @Override
    public Product getModel() {
        // TODO Auto-generated method stub
        return product;
    }

    //Struts和Spring整合过程中按名称自动注入的业务层
    private ProductService productService;

    public void setProductService(ProductService productService) {
        this.productService = productService;
    }

    /*
     * 保存商品的执行的方法:save
     */
    public String save(){
        System.out.println("Action中的方法执行了....");
        productService.save(product);
        return NONE;
    }


}
<%@ page language="java" import="java.util.*" pageEncoding="UTF-8"%>
<%
String path = request.getContextPath();
String basePath = request.getScheme()+"://"+request.getServerName()+":"+request.getServerPort()+path+"/";
%>
<%@ taglib uri="/struts-tags" prefix="s" %>

<!DOCTYPE HTML PUBLIC "-//W3C//DTD HTML 4.01 Transitional//EN">
<html>
  <head>
    <base href="<%=basePath%>">

    <title>My JSP 'addProduct.jsp' starting page</title>

    <meta http-equiv="pragma" content="no-cache">
    <meta http-equiv="cache-control" content="no-cache">
    <meta http-equiv="expires" content="0">
    <meta http-equiv="keywords" content="keyword1,keyword2,keyword3">
    <meta http-equiv="description" content="This is my page">
    <!--
    <link rel="stylesheet" type="text/css" href="styles.css">
    -->

  </head>

  <body>
  <h1>保存商品的页面</h1>
    <s:form action="product_save" method="post" namespace="/" theme="simple">
        <table border="1" width="400">
            <tr>
                <td>商品名称</td>
                <td><s:textfield name="pname"/></td>
            </tr>
            <tr>
                <td>商品价格</td>
                <td><s:textfield name="price"/></td>
            </tr>
            <tr>
                <td colspan="2"><input type="submit" value="添加"/></td>
            </tr>
        </table>
    </s:form>
  </body>
<!--addProduct.jsp-->

</html>
web.xml
<?xml version="1.0" encoding="UTF-8"?>
<web-app xmlns:xsi="http://www.w3.org/2001/XMLSchema-instance"
            xmlns="http://java.sun.com/xml/ns/javaee"
            xsi:schemaLocation="http://java.sun.com/xml/ns/javaee
            http://java.sun.com/xml/ns/javaee/web-app_3_0.xsd"
            id="WebApp_ID" version="3.0">

    <!-- Spring的框架的核心监听器 -->
    <listener>
        <listener-class>org.springframework.web.context.ContextLoaderListener</listener-class>
    </listener>
    <context-param>
        <!-- 让监听器去加载classpath文件下的applicationContext.xml配置文件 -->
        <param-name>contextConfigLocation</param-name>
        <param-value>classpath:applicationContext.xml</param-value>
    </context-param>

    <!-- Struts2的框架的核心过滤器的配置 -->
    <filter>
        <filter-name>struts</filter-name>
        <filter-class>org.apache.struts2.dispatcher.ng.filter.StrutsPrepareAndExecuteFilter</filter-class>
    </filter>

    <filter-mapping>
        <filter-name>struts</filter-name>
        <url-pattern>/*</url-pattern>
    </filter-mapping>

  <display-name>S1_SSH_zhenghe</display-name>
  <welcome-file-list>
    <welcome-file>index.html</welcome-file>
    <welcome-file>index.htm</welcome-file>
    <welcome-file>index.jsp</welcome-file>
    <welcome-file>default.html</welcome-file>
    <welcome-file>default.htm</welcome-file>
    <welcome-file>default.jsp</welcome-file>
  </welcome-file-list>

</web-app>
struts.xml
<?xml version="1.0" encoding="UTF-8" ?>

<!DOCTYPE struts PUBLIC
    "-//Apache Software Foundation//DTD Struts Configuration 2.3//EN"
    "http://struts.apache.org/dtds/struts-2.3.dtd">

<struts>
   <!-- <package name="ssh" extends="struts-default" namespace="/">
       <action name="product_*" class="com.zz.action.ProductAction" method="{1}"></action>
   </package> -->
   <!-- 由Spring创建action  class填Spring配置文件中的id-->
   <package name="ssh" extends="struts-default" namespace="/">
           <action name="product_*" class="productAction" method="{1}"></action>
   </package>
</struts>
jdbc.properties
jdbc.driverClass=com.mysql.jdbc.Driver
jdbc.url=jdbc:mysql://localhost:3306/ssh
jdbc.username=root
jdbc.password=root
applicationContext.xml
<?xml version="1.0" encoding="UTF-8"?>

<beans xmlns="http://www.springframework.org/schema/beans"
        xmlns:xsi="http://www.w3.org/2001/XMLSchema-instance"
        xmlns:context="http://www.springframework.org/schema/context"
        xmlns:aop="http://www.springframework.org/schema/aop"
        xmlns:tx="http://www.springframework.org/schema/tx"
        xsi:schemaLocation="http://www.springframework.org/schema/beans
        http://www.springframework.org/schema/beans/spring-beans.xsd
        http://www.springframework.org/schema/context
        http://www.springframework.org/schema/context/spring-context.xsd
        http://www.springframework.org/schema/aop
        http://www.springframework.org/schema/aop/spring-aop.xsd
        http://www.springframework.org/schema/tx
        http://www.springframework.org/schema/tx/spring-tx.xsd">

    <!--  引入外部文件 -->
    <context:property-placeholder location="classpath:jdbc.properties" />
    <!-- 配置连接池 -->
    <bean id="dataSource" class="com.mchange.v2.c3p0.ComboPooledDataSource">
        <property name="driverClass" value="${jdbc.driverClass}"></property>
        <property name="jdbcUrl" value="${jdbc.url}"></property>
        <property name="user" value="${jdbc.username}"></property>
        <property name="password" value="${jdbc.password}"></property>
    </bean>

    <!-- 配置hibernate的相关属性 -->
    <bean id="sessionFactory" class="org.springframework.orm.hibernate3.LocalSessionFactoryBean">
        <!-- 注入连接池 -->
        <property name="dataSource" ref="dataSource"/>
        <!-- 配置hibernate的属性 -->
        <property name="hibernateProperties">
            <props>
                <prop key="hibernate.dialect">org.hibernate.dialect.MySQLDialect</prop>
                <prop key="hibernate.show_sql">true</prop>
                <prop key="hibernate.format_sql">true</prop>
                <prop key="hibernate.hbm2ddl.auto">update</prop>
            </props>
        </property>
        <!-- 加载Hibernate中的映射文件 -->
    <property name="mappingResources">
        <list>
            <value>com/zz/domain/Product.hbm.xml</value>
        </list>
    </property>
    </bean>

    <!-- 配置Action类  因为是默认是单例,所以要加上scope-->
    <bean id="productAction" class="com.zz.action.ProductAction" scope="prototype">
        <!-- 手动注入Service -->
        <property name="productService" ref="productService"></property>
    </bean>
    <!-- 配置业务层的类 -->
    <bean id="productService" class="com.zz.service.ProductService">
        <property name="productDao" ref="productDao"></property>
    </bean>

    <!-- 配置DAO的类 -->
    <bean id="productDao" class="com.zz.dao.ProductDao">
        <property name="sessionFactory" ref="sessionFactory"></property>
    </bean>

    <!-- 配置事务管理器 -->
    <bean id="transactionManager" class="org.springframework.orm.hibernate3.HibernateTransactionManager">
        <property name="sessionFactory"    ref="sessionFactory"></property>
    </bean>

    <!-- 开启注解事务 -->
    <tx:annotation-driven transaction-manager="transactionManager"/>
</beans>