repo init -u https://android.googlesource.com/platform/manifest
repo sync 之后
这样初始化之后,相当于下载了全部的分支,
本想编译源码烧录到手机Nexus 5,编译时才发现找不到aosp_hammerhead_userdebug,毕竟nexus5明确不支持android-7.0
那么如何切换成自己想要的分支
查看可切换的分支
cd .repo/manifests
git branch -a | cut -d / -f 3
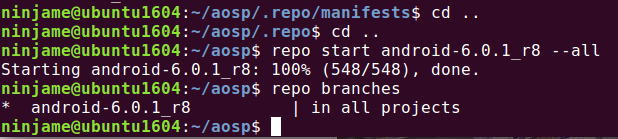
以android-6.0.1_r8为例
repo start android-6.0.1_r8 --all
查看当前的分支
repo branches
示例如下:
但最终还是无法完成编译
其实命令repo start android-6.0.1_r8 --all 只是在每个git库上新建一个分支,代码并不会切到指定分支
repo abandon android-6.0.1_r8 清除本地分支
-----------------------------------分割线-------------------------------------------
上面使用每月初始化包的方式没能通过编译,无奈,老老实实下载吧
1、下载
mkdir aosp
cd aosp
repo init -u https://aosp.tuna.tsinghua.edu.cn/platform/manifest -b android-6.0.1_r3
sh myrepo.sh
myrepo.sh是为避免repo失败过程,对repo sync 重试过程进行的封装,见下方
#!/bin/sh
repo sync -j4
while [ $? -ne 0 ]
do
repo sync -j4
done
同步过程出现 curl: (22) The requested URL returned error: 404 Not Found Server does not provide clone.bundle; ignoring. 直接无视即可
下载完整个目录大小为54G
ninjame@ubuntu1604:~$ du -sh aosp/
54G    aosp/
2、编译
export USE_CCACHE=1
prebuilts/misc/linux-x86/ccache/ccache -M 50G
source build/envsetup.sh

ninjame@ubuntu1604:~/aosp$ lunch

------------------------------
You're building on Linux

Lunch menu... pick a combo:
     1. aosp_arm-eng
     2. aosp_arm64-eng
     3. aosp_mips-eng
     4. aosp_mips64-eng
     5. aosp_x86-eng
     6. aosp_x86_64-eng
     7. aosp_deb-userdebug
     8. aosp_flo-userdebug
     9. full_fugu-userdebug
     10. aosp_fugu-userdebug
     11. mini_emulator_arm64-userdebug
     12. m_e_arm-userdebug
     13. mini_emulator_mips-userdebug
     14. mini_emulator_x86_64-userdebug
     15. mini_emulator_x86-userdebug
     16. aosp_flounder-userdebug
     17. aosp_angler-userdebug
     18. aosp_bullhead-userdebug
     19. aosp_hammerhead-userdebug
     20. aosp_hammerhead_fp-userdebug
     21. aosp_shamu-userdebug

Which would you like? [aosp_arm-eng] 19

------------------------

make -j8
问题记录:
pp frameworks/base/tools/aidl/aidl_language_y.y
build/core/binary.mk:609: recipe for target 'out/host/linux-x86/obj/EXECUTABLES/aidl_intermediates/aidl_language_y.cpp' failed
make: *** [out/host/linux-x86/obj/EXECUTABLES/aidl_intermediates/aidl_language_y.cpp] 断开的管道
make: *** 正在等待未完成的任务....
Lex: aidl <= frameworks/base/tools/aidl/aidl_language_l.l
frameworks/base/tools/aidl/aidl_language_l.l:55: warning, 无法匹配规则
flex-2.5.39:严重内部错误,exec of /usr/bin/m4 failed
build/core/binary.mk:646: recipe for target 'out/host/linux-x86/obj/EXECUTABLES/aidl_intermediates/aidl_language_l.cpp' failed
make: *** [out/host/linux-x86/obj/EXECUTABLES/aidl_intermediates/aidl_language_l.cpp] Error 1
make: *** Deleting file 'out/host/linux-x86/obj/EXECUTABLES/aidl_intermediates/aidl_language_l.cpp'
注: 某些输入文件使用或覆盖了已过时的 API。
注: 有关详细信息, 请使用 -Xlint:deprecation 重新编译。
注: 某些输入文件使用了未经检查或不安全的操作。
注: 有关详细信息, 请使用 -Xlint:unchecked 重新编译。


解决办法:
sudo apt-get install m4
sudo apt-get install  libxml2-utils


clang: error: linker command failed with exit code 1 (use -v to see invocation)
build/core/host_shared_library_internal.mk:51: recipe for target 'out/host/linux-x86/obj/lib/libart.so' failed
make: *** [out/host/linux-x86/obj/lib/libart.so] Error 1
make: *** 正在等待未完成的任务....
据说这个错误只在ubuntu16.04 上出现
1 更换软件源为阿里云
为了更快的安装软件,我们需要更换软件源为国内的软件源,这里推荐使用Ubuntu官方指定的国内软件源阿里云,博主之前使用的是网易的软件源,结果发现OpenJDK7装不上去,于是换成了阿里的,具体方法是:
sudo gedit /etc/apt/sources.list 在文件最前面加入下面代码:
deb http://mirrors.aliyun.com/ubuntu/ quantal main restricted universe multiverse
deb http://mirrors.aliyun.com/ubuntu/ quantal-security main restricted universe multiverse
deb http://mirrors.aliyun.com/ubuntu/ quantal-updates main restricted universe multiverse
deb http://mirrors.aliyun.com/ubuntu/ quantal-proposed main restricted universe multiverse
deb http://mirrors.aliyun.com/ubuntu/ quantal-backports main restricted universe multiverse
deb-src http://mirrors.aliyun.com/ubuntu/ quantal main restricted universe multiverse
deb-src http://mirrors.aliyun.com/ubuntu/ quantal-security main restricted universe multiverse
deb-src http://mirrors.aliyun.com/ubuntu/ quantal-updates main restricted universe multiverse
deb-src http://mirrors.aliyun.com/ubuntu/ quantal-proposed main restricted universe multiverse
deb-src http://mirrors.aliyun.com/ubuntu/ quantal-backports main restricted universe multiverse
2 安装依赖
sudo apt-get install -y git flex bison gperf build-essential libncurses5-dev:i386
sudo apt-get install libx11-dev:i386 libreadline6-dev:i386 libgl1-mesa-dev g++-multilib
sudo apt-get install tofrodos python-markdown libxml2-utils xsltproc zlib1g-dev:i386
sudo apt-get install dpkg-dev libsdl1.2-dev libesd0-dev
sudo apt-get install git-core gnupg flex bison gperf build-essential
sudo apt-get install zip curl zlib1g-dev gcc-multilib g++-multilib
sudo apt-get install libc6-dev-i386
sudo apt-get install lib32ncurses5-dev x11proto-core-dev libx11-dev
sudo apt-get install lib32z-dev ccache
sudo apt-get install libgl1-mesa-dev libxml2-utils xsltproc unzip m4
Ubuntu 16.04请务必使用上面的依赖,Ubuntu 16.04需要的依赖和Ubuntu 14.04所需要的依赖是不同的
3 修改源码
修改 mydroid/art/build/Android.common_build.mk 文件,定位到75行,将下面的代码:
ifneq ($(WITHOUT_HOST_CLANG),true)改为:
ifeq ($(WITHOUT_HOST_CLANG),false)如果不修改这里,会遇到一个比较棘手的编译错误,修改的目的是把CLANG这个编译选项关掉,详见后面的编译记录,百度搜狗都无解,这个错误只会在Ubuntu16.04上遇到,Ubuntu14.04则不存在这个问题,
参考 http://blog.csdn.net/fuchaosz/article/details/51487585
最终编译耗时 1h 22min
Creating filesystem with parameters:
    Size: 1073741824
    Block size: 4096
    Blocks per group: 32768
    Inodes per group: 8192
    Inode size: 256
    Journal blocks: 4096
    Label: system
    Blocks: 262144
    Block groups: 8
    Reserved block group size: 63
Created filesystem with 1511/65536 inodes and 93478/262144 blocks
Install system fs image: out/target/product/hammerhead/system.img
out/target/product/hammerhead/system.img+out/target/product/hammerhead/obj/PACKAGING/recovery_patch_intermediates/recovery_from_boot.p maxsize=1096212480 blocksize=135168 total=367728881 reserve=11083776

#### make completed successfully (01:12:44 (hh:mm:ss)) ####

ninjame@ubuntu1604:~/aosp$ du -sh out/
22G    out/
3、刷机
刷机过程碰到

fastboot reboot
< waiting for any device >

fastboot devices
no permissions (verify udev rules); see [http://developer.android.com/tools/device.html]    fastboot

fastboot命令一直识别不了手机,一开始以为时fastboot版本的问题,后来发现不是这么回事


需要设置usb权限
因为ubuntu这样的系统都是默认以非root身份在运行的,要使用usb调试,需要sudo支持。
fastboot模式下插入手机
$ lsusb
ninjame@ubuntu1604:~$ lsusb
Bus 002 Device 001: ID 1d6b:0003 Linux Foundation 3.0 root hub
Bus 001 Device 002: ID 04d9:a0cd Holtek Semiconductor, Inc.
Bus 001 Device 030: ID 18d1:4ee0 Google Inc.
Bus 001 Device 003: ID 093a:2510 Pixart Imaging, Inc. Optical Mouse
Bus 001 Device 001: ID 1d6b:0002 Linux Foundation 2.0 root hub
$sudo vim /etc/udev/rules.d/60-android.rules   //60-android.rules为新建的。
加入以下内容:
SUBSYSTEM=="usb", ATTRS{idVendor}=="18d1", ATTRS{idProduct}=="4ee0",MODE="0666"

其中的idvendor idProduct指的是USB的ID可以使用lsusb查询得到。
比如我的是:
lsusb

Bus 001 Device 030: ID 18d1:4ee0 Google Inc.

ID 18d1 就是idVendor ,4ee0就是 idProduct
运行命令,重启udev:
$sudo chmod a+rx /etc/udev/rules.d/60-android.rules
$sudo service udev restart
(很重要)拔掉usb重新连上再执行:
fastboot devices

ninjame@ubuntu1604:~$ fastboot devices
0779af0143a66640    fastboot


设置环境变量  sudo vim /etc/profile
export ANDROID_PRODUCT_OUT="/home/ninjame/aosp/out/target/product/hammerhead"
source /etc/profile


ninjame@ubuntu1604:~/aosp/out/target/product/hammerhead$ fastboot -w flashall
target reported max download size of 1073741824 bytes
wiping userdata...
Creating filesystem with parameters:
    Size: 13725835264
    Block size: 4096
    Blocks per group: 32768
    Inodes per group: 8144
    Inode size: 256
    Journal blocks: 32768
    Label:
    Blocks: 3351034
    Block groups: 103
    Reserved block group size: 823
Created filesystem with 11/838832 inodes and 93654/3351034 blocks
wiping cache...
Creating filesystem with parameters:
    Size: 734003200
    Block size: 4096
    Blocks per group: 32768
    Inodes per group: 7472
    Inode size: 256
    Journal blocks: 2800
    Label:
    Blocks: 179200
    Block groups: 6
    Reserved block group size: 47
Created filesystem with 11/44832 inodes and 5813/179200 blocks
--------------------------------------------
Bootloader Version...: HHZ12k
Baseband Version.....: M8974A-2.0.50.2.28
Serial Number........: 0779af0143a66640
--------------------------------------------
checking product...
OKAY [  0.100s]
sending 'boot' (9160 KB)...
OKAY [  0.500s]
writing 'boot'...
OKAY [  0.785s]
sending 'recovery' (10018 KB)...
OKAY [  0.566s]
writing 'recovery'...
OKAY [  0.825s]
erasing 'system'...
OKAY [  1.066s]
sending 'system' (358584 KB)...
OKAY [ 11.452s]
writing 'system'...
OKAY [ 25.345s]
erasing 'userdata'...
OKAY [  7.935s]
sending 'userdata' (137318 KB)...
OKAY [  4.511s]
writing 'userdata'...
OKAY [  9.139s]
erasing 'cache'...
OKAY [  0.584s]
sending 'cache' (13348 KB)...
OKAY [  0.630s]
writing 'cache'...
OKAY [  1.067s]
rebooting...

finished. total time: 65.037s
完成刷机过程