pytesseract是基于Python的OCR工具, 底层使用的是Google的Tesseract-OCR 引擎,支持识别图片中的文字,支持jpeg, png, gif, bmp, tiff等图片格式。本文介绍如何使用pytesseract 实现图片文字识别。
引言
OCR(Optical character recognition,光学字符识别)是一种将图像中的手写字或者印刷文本转换为机器编码文本的技术。通过数字方式存储文本数据更容易保存和编辑,可以存储大量数据,比如1G的硬盘可以存储数百万本书。
OCR技术可以将图片,纸质文档中的文本转换为数字形式的文本。OCR过程一般包括以下步骤:
- 图像预处理
- 文本定位
- 字符分割
- 字符识别
- 后处理
最初由惠普开发,后来Google赞助的开源OCR引擎 tesseract 提供了比较精确的文字识别API,本文将要介绍的Python库Pytesseract就是基于Tesseract-OCR 引擎。
环境配置
环境要求:
- Python 3.6+
- PIL库
- 安装Google Tesseract OCR
- 系统:windows/mac/linux,我的系统是Windows10
1. 安装Google Tesseract
Tesseract OCR github地址:https://github.com/tesseract-ocr/tesseract
Windows Tesseract下载地址:https://digi.bib.uni-mannheim.de/tesseract/
Mac和Linux安装方法参考:https://tesseract-ocr.github.io/tessdoc/Installation.html
安装时可以选择需要的语言包:

安装完成后,添加到环境变量PATH中,我的安装路径是:C:\Program Files\Tesseract-OCR 。
命令行窗口输入:tesseract ,查看是否安装成功。
$ tesseract
Usage:
  tesseract --help | --help-extra | --version
  tesseract --list-langs
  tesseract imagename outputbase [options...] [configfile...]

OCR options:
  -l LANG[+LANG]        Specify language(s) used for OCR.
NOTE: These options must occur before any configfile.

Single options:
  --help                Show this help message.
  --help-extra          Show extra help for advanced users.
  --version             Show version information.
  --list-langs          List available languages for tesseract engine.
2. 安装pytesseract
Python tesseract:https://github.com/madmaze/pytesseract
pip安装pytesseract
pip install pytesseract
另外需要安装一下Pillow库,用于图像处理。
pip install Pillow
文字识别小例子
先准备一张包含英文字符的图片,下面的代码实现提取图片中的中文和英文字符,并识别为字符串:
import pytesseract
try:
    from PIL import Image
except ImportError:
    import Image

# 列出支持的语言
print(pytesseract.get_languages(config=''))

print(pytesseract.image_to_string(Image.open('test.png'), lang='chi_sim+eng'))
识别下面图片中的文字(test.png):

执行结果:
['chi_sim', 'eng', 'osd']
拳 列出支持的语言
print(pytesseract.get_languages (config=”))

print(pytesseract.image_to_string(Image.open('test.png'), lang='chi_sim+eng'))
获取文字位置信息
image_to_boxes() 方法返回识别到的字符及字符边框信息。image_to_data() 返回单词及单词位置信息。下面来看看这两种方法的执行效果,识别下图中的中文字符:
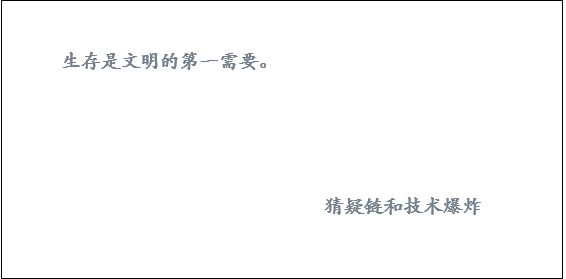
img = Image.open('testimg2.png')
print(pytesseract.image_to_boxes(img, output_type=Output.STRING, lang='chi_sim'))
print("#"*30)
print(pytesseract.image_to_data(img, output_type=Output.STRING, lang='chi_sim'))
执行结果:
生 63 211 80 227 0
存 81 209 118 227 0
是 122 211 139 226 0
文 126 200 154 231 0
明 142 210 157 226 0
的 162 209 197 227 0
第 200 217 218 219 0
一 221 209 236 226 0
需 217 200 253 231 0
要 239 209 259 226 0
。 260 211 266 216 0
猜 325 64 364 82 0
疑 364 64 481 82 0
链 373 54 393 86 0
和 383 54 403 86 0
技 403 54 435 86 0
术 419 54 451 86 0
爆 441 54 477 86 0
炸 469 54 485 86 0

##############################
level	page_num	block_num	par_num	line_num	word_num	left	top	width	height	conf	text
1	1	0	0	0	0	0	0	566	279	-1
2	1	1	0	0	0	63	52	203	18	-1
3	1	1	1	0	0	63	52	203	18	-1
4	1	1	1	1	0	63	52	203	18	-1
5	1	1	1	1	1	63	52	55	18	96	生存
5	1	1	1	1	2	122	53	17	15	96	是
5	1	1	1	1	3	126	48	31	31	96	文明
5	1	1	1	1	4	162	52	35	18	96	的
5	1	1	1	1	5	200	60	18	2	91	第
5	1	1	1	1	6	221	53	15	17	93	一
5	1	1	1	1	7	217	48	42	31	93	需要
5	1	1	1	1	8	260	63	6	5	91	。
2	1	2	0	0	0	325	197	156	18	-1
3	1	2	1	0	0	325	197	156	18	-1
4	1	2	1	1	0	325	197	156	18	-1
5	1	2	1	1	1	325	197	156	18	94	猜疑
5	1	2	1	1	2	373	193	20	32	77	链
5	1	2	1	1	3	383	193	20	32	92	和
5	1	2	1	1	4	403	193	48	32	96	技术
5	1	2	1	1	5	441	193	44	32	94	爆炸
根据image_to_data() 方法返回的位置信息,下面来标出识别出的词语位置。
import numpy as np
import pytesseract
from pytesseract import Output
import cv2

try:
    from PIL import Image
    from PIL import ImageDraw
    from PIL import ImageFont
except ImportError:
    import Image

img = cv2.imread('testimg2.png')

gray = cv2.cvtColor(img, cv2.COLOR_BGR2GRAY)
thresh = cv2.threshold(gray, 0, 255, cv2.THRESH_BINARY_INV + cv2.THRESH_OTSU)[1]
cnts = cv2.findContours(thresh, cv2.RETR_EXTERNAL, cv2.CHAIN_APPROX_SIMPLE)
cnts = cnts[0] if len(cnts) == 2 else cnts[1]

width_list = []
for c in cnts:
	_, _, w, _ = cv2.boundingRect(c)
	width_list.append(w)
wm = np.median(width_list)

tess_text = pytesseract.image_to_data(img, output_type=Output.DICT, lang='chi_sim')
for i in range(len(tess_text['text'])):
	word_len = len(tess_text['text'][i])
	if word_len > 1:
		world_w = int(wm * word_len)
		(x, y, w, h) = (tess_text['left'][i], tess_text['top'][i], tess_text['width'][i], tess_text['height'][i])
		cv2.rectangle(img, (x, y), (x + world_w, y + h), (255, 0, 0), 1)
		im = Image.fromarray(img)
		draw = ImageDraw.Draw(im)
		font = ImageFont.truetype(font="simsun.ttc", size=18, encoding="utf-8")
		draw.text((x, y - 20), tess_text['text'][i], (255, 0, 0), font=font)
		img = cv2.cvtColor(np.array(im), cv2.COLOR_RGB2BGR)

cv2.imshow("TextBoundingBoxes", img)
cv2.waitKey(0)
执行结果:
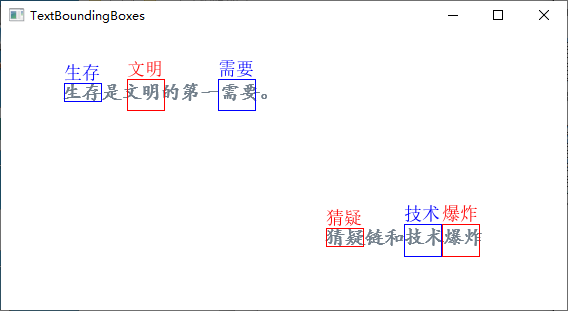
另外说明一下, ImageFont.truetype(font="simsun.ttc", size=18, encoding="utf-8") 用于设置字体及编码格式,原因是draw.text() 默认使用ISO-8859-1(latin-1)编码,中文需要使用UTF-8编码。Windows中,字体存放路径一般为C:\Windows\Fonts ,已经添加到了环境变量,直接写字体名称就可以了,simsun.ttc 表示宋体。
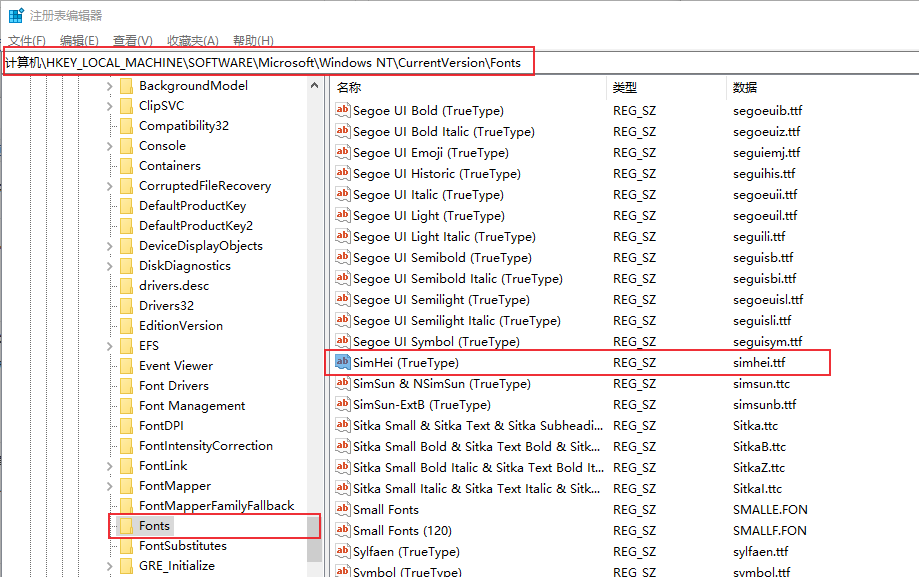
如果不知道字体对应名称可以进入注册表查看:运行窗口或者命令行窗口输入regedit打开注册表,进入如下路径:HKEY_LOCAL_MACHINE\SOFTWARE\Microsoft\Windows NT\CurrentVersion\Fonts ,可以查看对应字体文件名称。
多语言识别
使用方法
图片中可能包含了多种语言,比如在上面的例子中,图片包含了中文和英文,lang='chi_sim+eng' 表示识别简体中文和英文。
简体中文chi_sim是在安装tesseract时勾选的,get_languages() 方法列出了支持的语言,也可以在命令行窗口执行 tesseract --list-langs 查看支持的语言:
$ tesseract --list-langs
List of available languages (3):
chi_sim
eng
osd
除了使用 lang='chi_sim+eng' 方式指定语言外,也可以使用config='-l chi_sim+eng' 形式:
img = Image.open('test.png')
config = r'-l chi_sim+eng --psm 6'
print(pytesseract.image_to_string(img, config=config))
执行结果和前面一样。
训练数据
如果需要下载其它语言包,可以到这里https://tesseract-ocr.github.io/tessdoc/Data-Files下载。
Tesseract 提供了三种训练数据:
| 训练数据 | 训练模型 | 识别速度 | 正确率 |
|---|---|---|---|
| tessdata_fast | LSTM | 最快 | 最低 |
| tessdata_best | LSTM | 最慢 | 最高 |
| tessdata | Legacy + LSTM | 中等 | 略低于tesdata -best |
根据自己的需要下载需要的模型文件,将traineddata文件放在 C:\Program Files\Tesseract-OCR\tessdata 目录(Tesseract安装目录)下就可以了。
tessdata_best可用来再训练字库,训练方法参考文档:https://tesseract-ocr.github.io/tessdoc/tess4/TrainingTesseract-4.00.html。
OCR选项
多语言识别中使用了 -l 和 --psm 选项,tesseract还支持更多的OCR选项。
OCR选项:
--tessdata-dir PATH:Specify the location of tessdata path.--user-words PATH:Specify the location of user words file.--user-patterns PATH:Specify the location of user patterns file.--dpi VALUE:Specify DPI for input image.-l LANG[+LANG]:Specify language(s) used for OCR.-c VAR=VALUE:Set value for config variables. Multiple -c arguments are allowed.--psm NUM:Specify page segmentation mode.--oem NUM:Specify OCR Engine mode.
在pytesseract中的使用方法是添加config参数:config='--psm 0 -c min_characters_to_try=5'
下面介绍一下psm和oem这两个选项。
图片分割模式(PSM)
tesseract有13种图片分割模式(page segmentation mode,psm):
- 0 -- Orientation and script detection (OSD) only. 方向及语言检测(Orientation and script detection,OSD)
- 1 -- Automatic page segmentation with OSD. 自动图片分割
- 2 -- Automatic page segmentation, but no OSD, or OCR. 自动图片分割,没有OSD和OCR
- 3 -- Fully automatic page segmentation, but no OSD. (Default) 完全的自动图片分割,没有OSD
- 4 -- Assume a single column of text of variable sizes. 假设有一列不同大小的文本
- 5 -- Assume a single uniform block of vertically aligned text. 假设有一个垂直对齐的文本块
- 6 -- Assume a single uniform block of text. 假设有一个对齐的文本块
- 7 -- Treat the image as a single text line. 图片为单行文本
- 8 -- Treat the image as a single word. 图片为单词
- 9 -- Treat the image as a single word in a circle. 图片为圆形的单词
- 10 -- Treat the image as a single character. 图片为单个字符
- 11 -- Sparse text. Find as much text as possible in no particular order. 稀疏文本。查找尽可能多的文本,没有特定的顺序。
- 12 -- Sparse text with OSD. OSD稀疏文本
- 13 -- Raw line. Treat the image as a single text line, bypassing hacks that are Tesseract-specific. 原始行。将图像视为单个文本行。
OCR引擎模式(OEM)
有4种OCR引擎模式:
- 0 -- Legacy engine only.
- 1 -- Neural nets LSTM engine only.
- 2 -- Legacy + LSTM engines.
- 3 -- Default, based on what is available.
方向及语言检测OSD
Tesseract支持方向及语言检测(Orientation and script detection,OSD) ,比如检测下面的图片:

osd = pytesseract.image_to_osd('osd-example.png',config='--psm 0 -c min_characters_to_try=5')
print(osd)
其中 min_characters_to_try 表示设置最小字符数,默认为50。
执行结果:
Page number: 0
Orientation in degrees: 90
Rotate: 270
Orientation confidence: 0.74
Script: Han
Script confidence: 0.83
结果是旋转了270度,识别到的语言为中文Han。
提取数字
只提取下面图片中的数字:
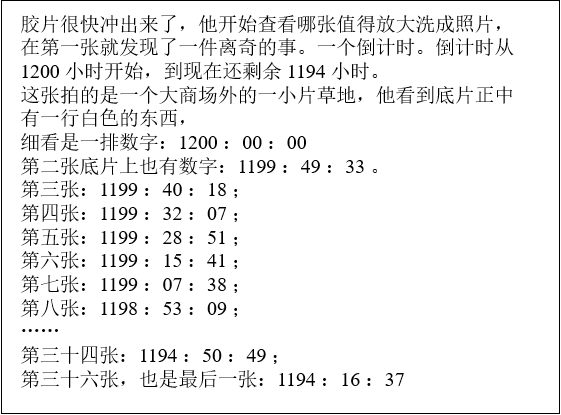
img = Image.open('number-example.png')
config = r'--oem 3 --psm 6 outputbase digits'
osd = pytesseract.image_to_string(img, config=config)
print(osd)
执行结果:
1200-.41194-.
4-.

12000000

11994933.
-119940218

119932207

1199251

119915241

119907238

-119853209
1119450495
.-11941637
字符白名单
只检测特定的字符:只检测数字
img = Image.open('number-example.png')
config = r'-c tessedit_char_whitelist=0123456789 --psm 6'
print(pytesseract.image_to_string(img, config=config))
执行结果:
12001194
12000000
11994933
11994018
11993207
11992851
11991541
11990738
11985309
11945049
11941637
发现识别精度比 outputbase digits 方法更加准确。
字符黑名单
不检测数字:
img = Image.open('number-example.png')
config = r'-c tessedit_char_blacklist=0123456789 --psm 6'
print(pytesseract.image_to_string(img, config=config, lang='chi_sim'))
执行结果:
胶片很快冲出来了,他开始查看哪张值得放大洗成照片,
在第一张就发现了一件离奇的事。一个倒计时。倒计时从
 小时开始,到现在还剩余 小时。

这张拍的是一个大商场外的一小片草地,他看到底片正中
有一行白色的东西,

细看是一排数字:  :  :

第二张底片上也有数字: l]:  :  -。

第三张: l : : lg,

第四张:  :  :  ,

第五张: ] :  : l;

第六张:  : : l,

第七张: l : o : g ;

第八张: lg :  :  ;

第三十四张: : :

第三十六张,也是最后一张:  :  :
格式转换
pytesseract 支持将图片转换为PDF、HOCR以及ALTO XML格式。
pdf = pytesseract.image_to_pdf_or_hocr('testimg2.png', extension='pdf')
with open('test.pdf', 'w+b') as f:
    f.write(pdf)

hocr = pytesseract.image_to_pdf_or_hocr('testimg2.png', extension='hocr')
xml = pytesseract.image_to_alto_xml('testimg2.png')
世人多巧, 心茫茫然。 by 王阳明