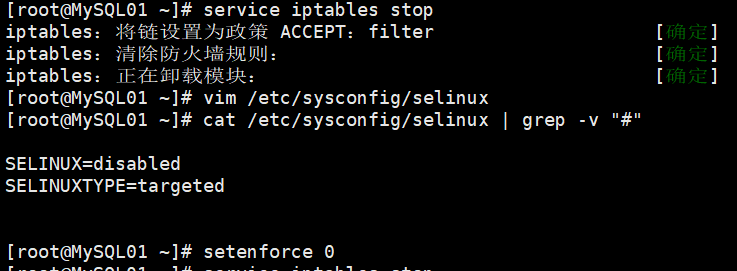
(1)关闭iptables和selinux
(2)主机名映射

(3)安装MySQL(三台都要装)
[root@MySQL01 ~]# yum -y install ncurses-devel
[root@MySQL01 ~]# yum -y install libaio
[root@MySQL01 ~]# tar xf mysql-5.6.17-linux-glibc2.5-x86_64.tar.gz -C /usr/local/
[root@MySQL01 ~]# ln -s /usr/local/mysql-5.6.17-linux-glibc2.5-x86_64 /usr/local/mysql
[root@MySQL01 ~]# useradd mysql -s /sbin/nologin -M
[root@MySQL01 ~]# /usr/local/mysql/scripts/mysql_install_db --user=mysql --basedir=/usr/local/mysql --datadir=/usr/local/mysql/data/
[root@MySQL01 ~]# /bin/cp /usr/local/mysql/support-files/my-default.cnf /etc/my.cnf
[root@MySQL01 ~]# /bin/cp /usr/local/mysql/support-files/mysql.server /etc/init.d/mysqld
[root@MySQL01 ~]# ln -s /usr/local/mysql/bin/* /usr/local/bin/
[root@MySQL01 ~]# which mysqladmin
/usr/local/bin/mysqladmin
加入开机启动并启动MySQL

二:配置基于GTID的主从复制
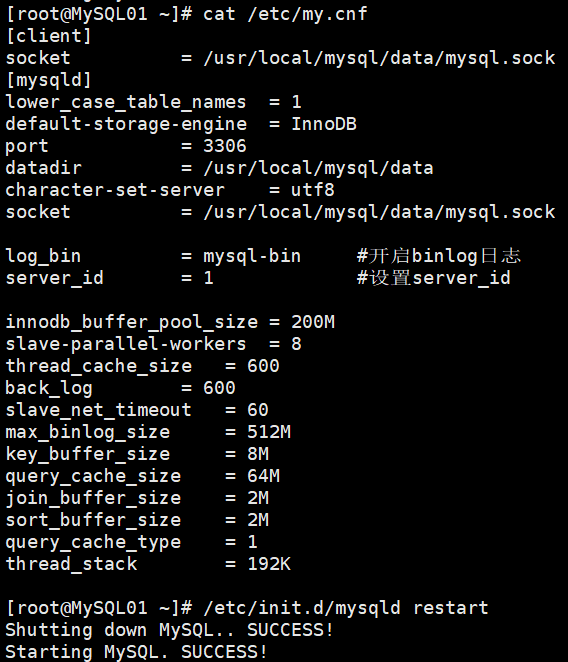
(1)主库操作,修改配置文件
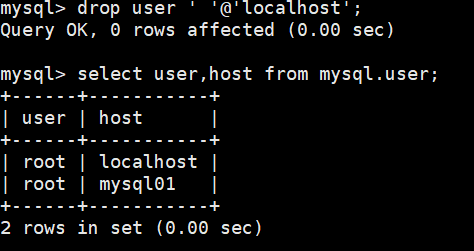
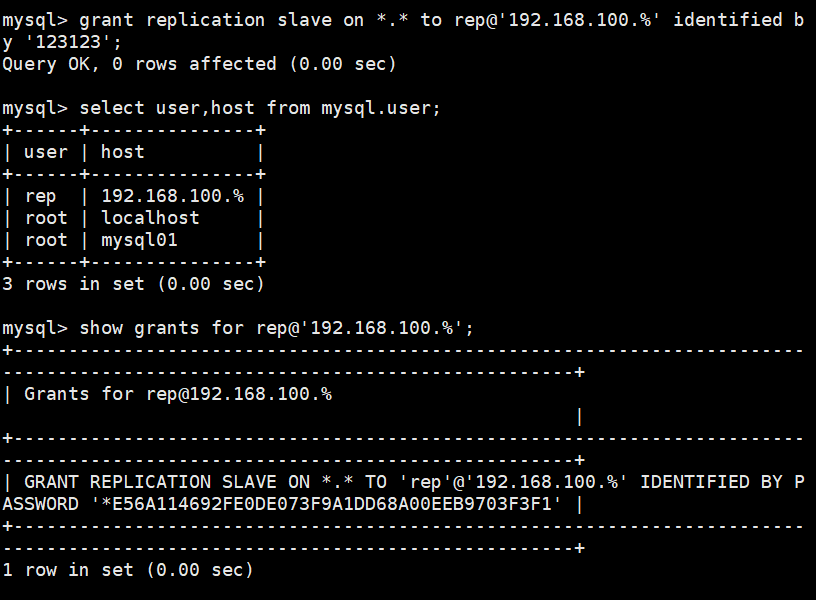
先删除不必要的用户然后再创建主从复制用户
(2)从库操作,修改配置文件(02和03)不过03的配置文件中server_id = 10不可与02重复

开启GTID
(3)然后编辑MySQL的配置文件(主从都得改)
在[mysql]标签下添加如下三行代码:

然后登陆MySQL查看GTID状态(主从都必须开启GTID)
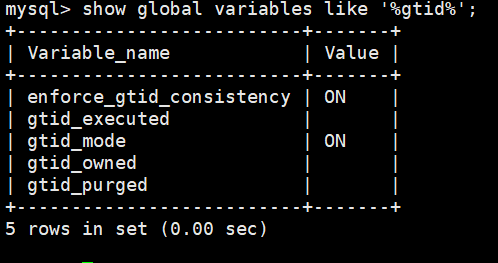
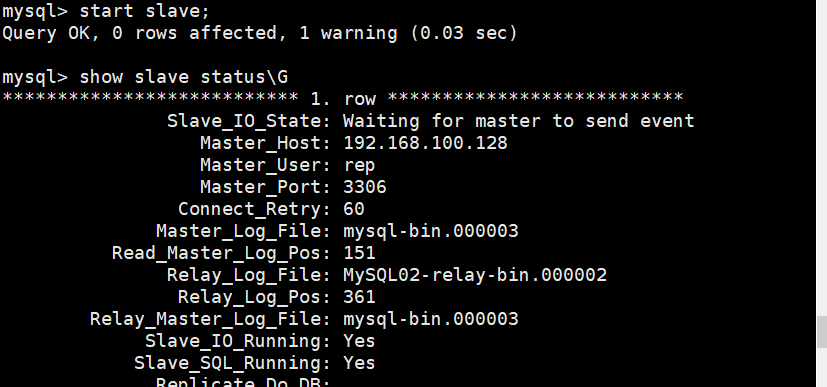
(4)配置主从复制(两个从库)

开启从库的主从复制功能,出现两个Yes为成功
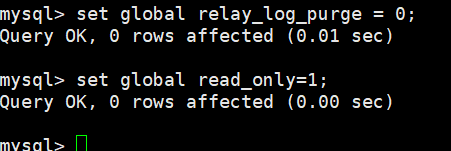
然后两个从开启临时禁用自动删除relay log功能和设置只读
(5)什么是GTID

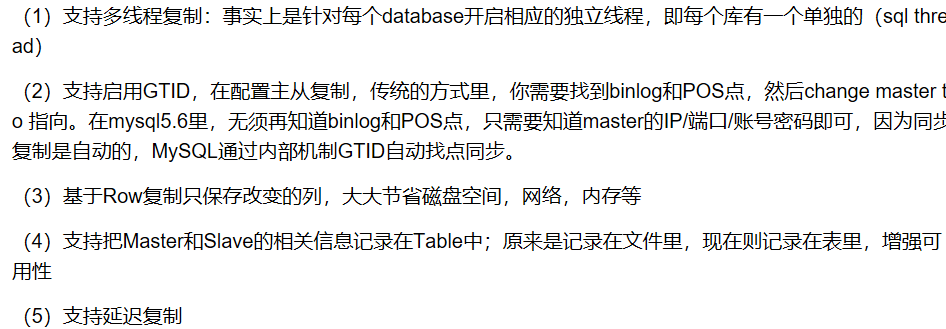
(6)GTID的新特性
三:部署MHA
(1)环境准备(主从全部)
yum -y install perl-DBD-MySQL(依赖包)

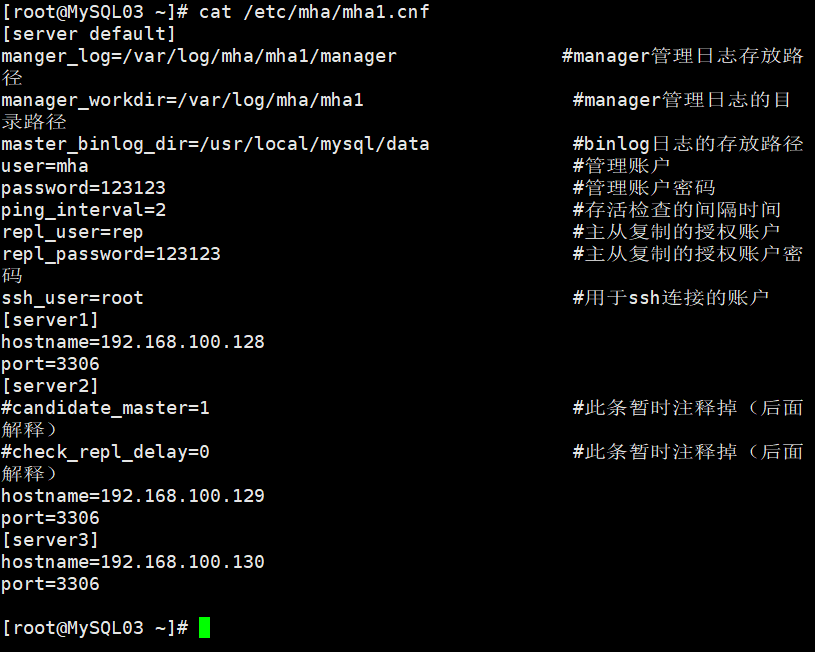
(2)部署管理的节点(从03)
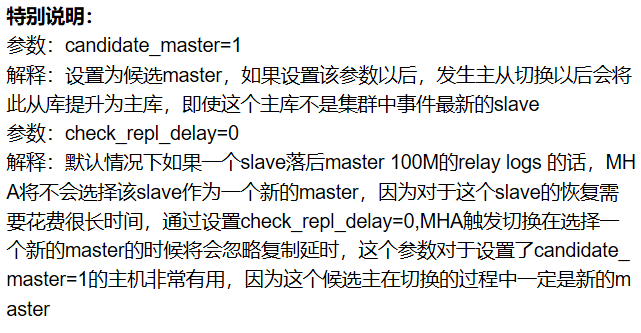
编辑配置文件:

(3)配置ssh信任(所有节点全配)
#创建密钥对
[root@MySQL01 ~]# ssh-keygen -t dsa -P "" -f ~/.ssh/id_dsa >/dev/null 2>&1

#发送MySQL03公钥,包括自己
[root@MySQL03 ~]# ssh-copy-id -i /root/.ssh/id_dsa.pub root@192.168.0.51
[root@MySQL03 ~]# ssh-copy-id -i /root/.ssh/id_dsa.pub root@192.168.0.52
[root@MySQL03 ~]# ssh-copy-id -i /root/.ssh/id_dsa.pub root@192.168.0.53

#发送MySQL02公钥,包括自己
[root@MySQL02 ~]# ssh-copy-id -i /root/.ssh/id_dsa.pub root@192.168.0.51
[root@MySQL02 ~]# ssh-copy-id -i /root/.ssh/id_dsa.pub root@192.168.0.52
[root@MySQL02 ~]# ssh-copy-id -i /root/.ssh/id_dsa.pub root@192.168.0.53

#发送MySQL01公钥,包括自己
[root@MySQL01 ~]# ssh-copy-id -i /root/.ssh/id_dsa.pub root@192.168.0.51
[root@MySQL01 ~]# ssh-copy-id -i /root/.ssh/id_dsa.pub root@192.168.0.52
[root@MySQL01 ~]# ssh-copy-id -i /root/.ssh/id_dsa.pub root@192.168.0.53
启动测试
ssh检查检测:
[root@MySQL03 ~]# masterha_check_ssh --conf=/etc/mha/mha1.cnf    #ssh检查命令
Tue Sep  5 03:01:38 2017 - [warning] Global configuration file /etc/masterha_default.cnf not found. Skipping.
Tue Sep  5 03:01:38 2017 - [info] Reading application default configuration from /etc/mha/mha1.cnf..
Tue Sep  5 03:01:38 2017 - [info] Reading server configuration from /etc/mha/mha1.cnf..
Tue Sep  5 03:01:38 2017 - [info] Starting SSH connection tests..
..中间省略若干行..
Tue Sep  5 03:01:40 2017 - [debug]  Connecting via SSH from root@192.168.0.53(192.168.0.53:22) to root@192.168.0.52(192.168.0.52:22)..
Tue Sep  5 03:01:40 2017 - [debug]   ok.
Tue Sep  5 03:01:40 2017 - [info] All SSH connection tests passed successfully. #出现这个就表示成功
主从复制检测:
先在02,03上添加主从复制的用户:grant replication slave on *.* to rep@'192.168.0.%' identified by '123123';
然后在03上输入主从复制的检测命令:masterha_check_repl --conf=/etc/mha/mha1.cnf
末行出现...is OK. 表示主从复制成功
(4)然后启动MHA
启动
[root@MySQL03 ~]# nohup masterha_manager --conf=/etc/mha/mha1.cnf --remove_dead_master_conf --ignore_last_failover < /dev/null > /var/log/mha/mha1/manager.log 2>&1 &
[root@MySQL03~]# ps -ef | grep perl | grep -v grep
root       4961   4690  0 06:33 pts/2    00:00:00 perl /usr/bin/masterha_manager --conf=/etc/mha/mha1.cnf --remove_dead_master_conf --ignore_last_failover

#说明:
nohup:启动命令
--conf:指定配置文件位置
--remove_dead_master_conf:如果有master down了,就去掉配置文件里该master的部分
(5)进行mha自动切换master的测试
首先登陆03(192.168.100.130)查看信息状态
#登陆数据库MySQL03(192.168.0.53)
[root@MySQL03 ~]#  mysql -uroot -p123123
mysql> show slave statusG
*************************** 1. row ***************************
               Slave_IO_State: Waiting for master to send event
                  Master_Host: 192.168.100.128         #这是主库IP地址
                  Master_User: rep
                  Master_Port: 3306
                Connect_Retry: 60
              Master_Log_File: mysql-bin.000003
          Read_Master_Log_Pos: 1656
               Relay_Log_File: MySQL02-relay-bin.000004
                Relay_Log_Pos: 1796
        Relay_Master_Log_File: mysql-bin.000003
             Slave_IO_Running: Yes
            Slave_SQL_Running: Yes
            ..以下省略若干内容..
然后停掉01(192.168.100.128)上的MySQL服务
[root@MySQL01 ~]# /etc/init.d/mysqld stop
Shutting down MySQL..... SUCCESS!
查看03(192.168.100.130)上的MySQL从库的同步状态及mha进程状态
[root@MySQL03 ~]# mysql -uroot -p123123 -e 'show slave statusG'
Warning: Using a password on the command line interface can be insecure.
*************************** 1. row ***************************
               Slave_IO_State: Waiting for master to send event
                  Master_Host: 192.168.100. 129        #现在的主库IP
                  Master_User: rep
                  Master_Port: 3306
                Connect_Retry: 60
              Master_Log_File: mysql-bin.000006     #binlog日志
          Read_Master_Log_Pos: 777                  #binlog日志位置
               Relay_Log_File: MySQL03-relay-bin.000002
                Relay_Log_Pos: 408
        Relay_Master_Log_File: mysql-bin.000006
             Slave_IO_Running: Yes
            Slave_SQL_Running: Yes
             ..以下省略若干内容..
[root@MySQL03 ~]# ps -ef | grep perl | grep -v grep #查询发现mha进程已经没了
现在查看/etc/mha/mhal.cnf [server1]模块的信息已经消失了
说明:
当作为主库的MySQL01上的MySQL宕机以后,mha通过检测发现MySQL01宕机,那么会将binlog日志最全的从库立刻提升为主库,而其他的从库会指向新的主库进行再次同步。
(6)进行Mha的故障还原测试
由于MySQL01的MySQL服务宕机,因此mha将MySQL02提升为了主库。因此,我们需要将宕机的MySQL01的MySQL服务启动,然后作为主库MySQL02的从库。
第一步:将故障宕机01的MySQL服务启动并授权进行从同步
[root@MySQL01 ~]# /etc/init.d/mysqld start
Starting MySQL. SUCCESS!
[root@MySQL01 ~]# mysql -uroot -p123123
mysql> CHANGE MASTER TO MASTER_HOST='192.168.100.129', MASTER_PORT=3306, MASTER_AUTO_POSITION=1, MASTER_USER='rep', MASTER_PASSWORD='123123';
mysql> start slave;
mysql> show slave statusG          #查看从同步状态
第二步:将mha配置文件里缺失的部分补全
[root@MySQL03 ~]# cat /etc/mha/mha1.cnf
[server default]
manager_log=/var/log/mha/mha1/manager
manager_workdir=/var/log/mha/mha1
master_binlog_dir=/usr/local/mysql/data
password=123123
ping_interval=2
repl_password=123123
repl_user=rep
ssh_user=root
user=mha

[server1]
hostname=192.168.100.128
port=3306

[server2]
hostname=12.168.100.129
port=3306

[server3]
hostname=192.168.100.130
port=3306
第三步:启动mha进程
[root@MySQL03 ~]# nohup masterha_manager --conf=/etc/mha/mha1.cnf --remove_dead_master_conf --ignore_last_failover < /dev/null > /var/log/mha/mha1/manager.log 2>&1 &
[root@MySQL03 ~]# ps -ef | grep perl | grep -v grep
root       5226   4690  0 09:42 pts/2    00:00:00 perl /usr/bin/masterha_manager --conf=/etc/mha/mha1.cnf --remove_dead_master_conf --ignore_last_failover
第四步:停掉02上的MySQL服务
[root@MySQL02 ~]# /etc/init.d/mysqld stop
Shutting down MySQL..... SUCCESS!
第五步:查看03上的主从同步状态
[root@MySQL03 ~]# mysql -uroot -p123123 -e 'show slave statusG'
Warning: Using a password on the command line interface can be insecure.
*************************** 1. row ***************************
               Slave_IO_State: Waiting for master to send event
                  Master_Host: 192.168.100.128             #此时的主库IP切换回了MySQL01
                  Master_User: rep
                  Master_Port: 3306
                Connect_Retry: 60
              Master_Log_File: mysql-bin.000005
          Read_Master_Log_Pos: 231
               Relay_Log_File: MySQL03-relay-bin.000002
                Relay_Log_Pos: 361
        Relay_Master_Log_File: mysql-bin.000005
             Slave_IO_Running: Yes
            Slave_SQL_Running: Yes
            ..以下省略若干行..
第六步:启动02上的MySQL服务
[root@MySQL02 ~]# /etc/init.d/mysqld start
Starting MySQL. SUCCESS!
[root@MySQL02 ~]# mysql -uroot -p123123
mysql> CHANGE MASTER TO MASTER_HOST='192.168.100.128', MASTER_PORT=3306, MASTER_AUTO_POSITION=1, MASTER_USER='rep', MASTER_PASSWORD='123123';
mysql> start slave;
mysql> show slave statusG          #查看从同步状态
第七步:再次补全mha配置文件后,启动mha进程
[root@MySQL03 ~]# cat /etc/mha/mha1.cnf
[server default]
manager_log=/var/log/mha/mha1/manager
manager_workdir=/var/log/mha/mha1
master_binlog_dir=/usr/local/mysql/data
password=123123
ping_interval=2
repl_password=123123
repl_user=rep
ssh_user=root
user=mha

[server1]
hostname=192.168.100.128
port=3306

[server2]
hostname=192.168.100.129
port=3306

[server3]
#andidate_master=1
#check_repl_delay=0
hostname=192.168.100.130
port=3306
[root@MySQL03 ~]# nohup masterha_manager --conf=/etc/mha/mha1.cnf --remove_dead_master_conf --ignore_last_failover < /dev/null > /var/log/mha/mha1/manager.log 2>&1 &
[root@MySQL03 ~]# ps -ef | grep perl | grep -v grep
root       5226   4690  0 09:42 pts/2    00:00:01 perl /usr/bin/masterha_manager --conf=/etc/mha/mha1.cnf --remove_dead_master_conf --ignore_last_failover