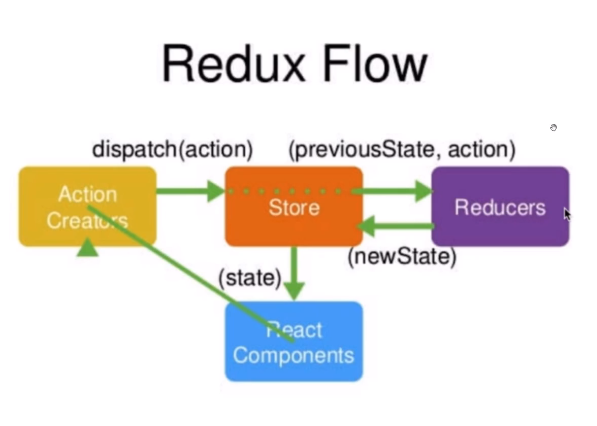
流程图:react组件创建action,通过store.dispatch(action)方法通知store要进行什么操作,因为store本身无法进行改变,需要引入reducer对自身进行管理,reducer进行操作后,返回新的newState给store,store发生改变,组件中数据发生改变。(个人理解,便于复习)
,
1.创建action并使用dispatch方法
import React, { Component } from 'react';
import store from './store'
import TodoListUI from './store/TodoListUI'
import {changeInputAction, addItemAction, deleteItemAction} from './store/actionCreators'

class TodoList extends Component {
    constructor(props){
        super(props)
        console.log(store.getState(),123)
        this.state=store.getState()
        store.subscribe(this.storeChange.bind(this))
        this.changeInputValue=this.changeInputValue.bind(this)
        this.clickBtn=this.clickBtn.bind(this)
        this.deleteItem=this.deleteItem.bind(this)
    }
    render() {
        return (
            <div>
                <TodoListUI
                    inputValue={this.state.inputValue}
                    changeInputValue={this.changeInputValue}
                    clickBtn={this.clickBtn}
                    list={this.state.list}
                    deleteItem={this.deleteItem}
                />
            </div>
         );
    }
    componentDidMount(){

    }
    storeChange(){
        this.setState(store.getState)
    }
    changeInputValue(e){
        const action = changeInputAction(e.target.value)
        store.dispatch(action)
    }
    clickBtn(){
        const action = addItemAction()
        store.dispatch(action)
    }
    deleteItem(index){
        const action=deleteItemAction(index)
        store.dispatch(action)
    }
}

export default TodoList;
TodoListUI组件
import React from 'react';
import 'antd/dist/antd.css'
import { Input, Button, List } from 'antd'

export const TodoListUI =(props)=>{
    return (
        <div style={{ margin: '10px' }}>
            <div>
                <Input
                    placeholder={props.inputValue}
                    style={{  '250px', marginRight: '10px' }}
                    onChange={props.changeInputValue}
                    value={props.inputValue}
                >
                </Input>
                <Button type='primary' onClick={props.clickBtn}>
                    增加
                </Button>
            </div>
            <div style={{ margin: '10px',  '300px' }}>
                <List
                    bordered
                    dataSource={props.list}
                    renderItem={(item, index) => (<List.Item onClick={() => {props.deleteItem(index) }}>{item}</List.Item>)}
                />
            </div>
        </div>

    );
}
export default TodoListUI;
2.创建store引入reducer和react dev Tools
import {createStore} from 'redux';
import reducer from './reducer'
const store = createStore(
    reducer,
    window.__REDUX_DEVTOOLS_EXTENSION__ && window.__REDUX_DEVTOOLS_EXTENSION__() // 创建数据存储仓库,有这个插件则调用这个方法
    );
export default store;
3.reducer对store进行操作
import {CHANGE_INPUT,ADD_ITEM,DELETE_ITEM} from './actionTypes'
const defaultState={
    inputValue:'write something',
    list:[
    'qwewdsfdsfgdg',
    'asdgfasdgfgsg',
    'triyutuettryh',
    ]
}
export default (state = defaultState,action)=>{
    //reducer只能接受state不能改变state
    let newState =JSON.parse(JSON.stringify(state));//深度拷贝
    switch (action.type){
        case CHANGE_INPUT:
            newState.inputValue=action.value;
            return newState
            break;
        case ADD_ITEM:
            newState.list.push(newState.inputValue);
            newState.inputValue='';
            return newState
            break;
        case DELETE_ITEM:
            newState.list.splice(action.index,1);
            return newState
            break;

    }
    return state
}
4.actionType 和actionCreatores
actionType
export const CHANGE_INPUT ='changeInput';
export const ADD_ITEM ='addItem';
export const DELETE_ITEM ='deleteItem';
actionCreatores
import { CHANGE_INPUT, ADD_ITEM, DELETE_ITEM } from './actionTypes'

export const changeInputAction =(value)=>({
    type:CHANGE_INPUT,
    value
})
export const addItemAction =()=>({
    type:ADD_ITEM,
})
export const deleteItemAction =(index)=>({
    type:DELETE_ITEM,
    index
})