zoukankan      html  css  js  c++  java
  • Composer包制作以及发布!

    Composer.json内容


    有可能会用到的bug:

    当使用php5自带的file_get_contents方法来获取远程文件的时候(在我的自动化测试框架中有类似调用需求),有时候会出现file_get_contents(): failed to open stream: HTTP request failed!这个警告信息。


           解决的方法都是修改php.ini,把allow_url_fopen给启用,改成 allow_url_fopen = On


          这样做可以解决某些人的问题,有人说在php.ini中,有这样两个选项:allow_url_fopen =on(表示可以通过url打开远程文件),user_agent="PHP"(表示通过哪种脚本访问网络,默认前面有个 " ; " 去掉即可。)重启服务器。

           但是有些还是会有这个警告信息,想用完美的解决还差一步,还得设置php.ini里面的user_agent,php默认的user_agent是 PHP,我们把它改成Mozilla/4.0 (compatible; MSIE 6.0;Windows NT 5.0)来模拟浏览器就可以了,user_agent=”Mozilla/4.0 (compatible; MSIE 6.0; Windows NT 5.0)”


    Php.ini中:

    根据提醒去掉相关被禁止的函数:

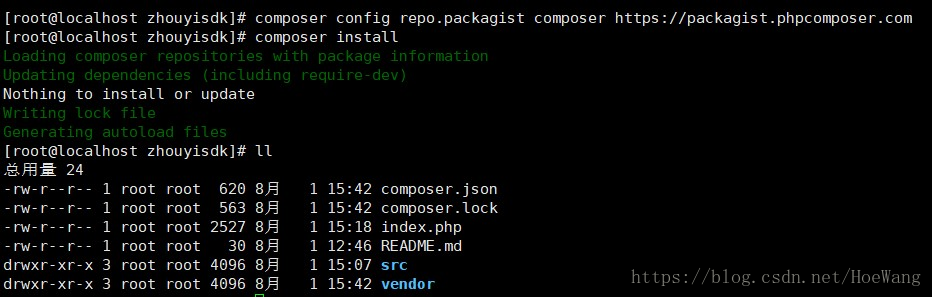
    切换composer的代理:composer config repo.packagist composer https://packagist.phpcomposer.com


    每次composer require *****/****** 某大神写的第三方包,自己都是很感慨,大神厉害,什么时候我自己也可以写一个composer包装装逼,让大家都用我写的代码,自豪感,油然而生,感觉自己才真的是这个圈子里面的人。好了,不废话了,把我昨天创建的包,再来一遍,记录下来,共大家参考。

    1.首先,打开https://github.com/的官网,注册一个账号,之前我早就注册了账号,这里就不展开了,相信大家都会注册账号。

    2.创建自己的github仓库,如图

    https://upload-images.jianshu.io/upload_images/6626109-7373542aed5735e7.png?imageMogr2/auto-orient/strip%7CimageView2/2/w/688


    点击右上角的 “+”号,选择 “ New repository”,出现下面页面:

    https://upload-images.jianshu.io/upload_images/6626109-1357ac82f5869165.png?imageMogr2/auto-orient/strip%7CimageView2/2/w/700


    接下来填写自己的仓库名,开始创建仓库

    https://upload-images.jianshu.io/upload_images/6626109-4343e8b973618521.png?imageMogr2/auto-orient/strip%7CimageView2/2/w/700


    找到仓库地址复制,将仓库克隆到本地,我的是放到 e:/source,如果这一步,你克隆的是git开头的地址,你需要将你机器的ssh公钥,和github绑定上,否则你是无法克隆git开头的仓库地址的,这里注意下,我的早就绑定了,所以,这里可以克隆。你想克隆git开头的地址,你可以本地生成ssh-key,就会在你本地生成几个文件,把那个id_rsa.pub中的全部内容,放到github网站的SSH keys中即可,入口在设置setting里面,设置好,就可以克隆了

    https://upload-images.jianshu.io/upload_images/6626109-13e72185a1e5af9c.png?imageMogr2/auto-orient/strip%7CimageView2/2/w/688

    https://upload-images.jianshu.io/upload_images/6626109-5212b9b372a9c104.png?imageMogr2/auto-orient/strip%7CimageView2/2/w/700

    https://upload-images.jianshu.io/upload_images/6626109-287c150783d9d140.png?imageMogr2/auto-orient/strip%7CimageView2/2/w/700


    https://upload-images.jianshu.io/upload_images/6626109-bc2a049f818bacd9.png?imageMogr2/auto-orient/strip%7CimageView2/2/w/501

    https://upload-images.jianshu.io/upload_images/6626109-d53b7440491d529c.png?imageMogr2/auto-orient/strip%7CimageView2/2/w/526


    切换到abstarfish仓库下面,这就是你的根目录,这是里面只有一个readme.md文件,(只需要记住composer.json在包的哪个目录下面,一般那就是包的根目录了。)

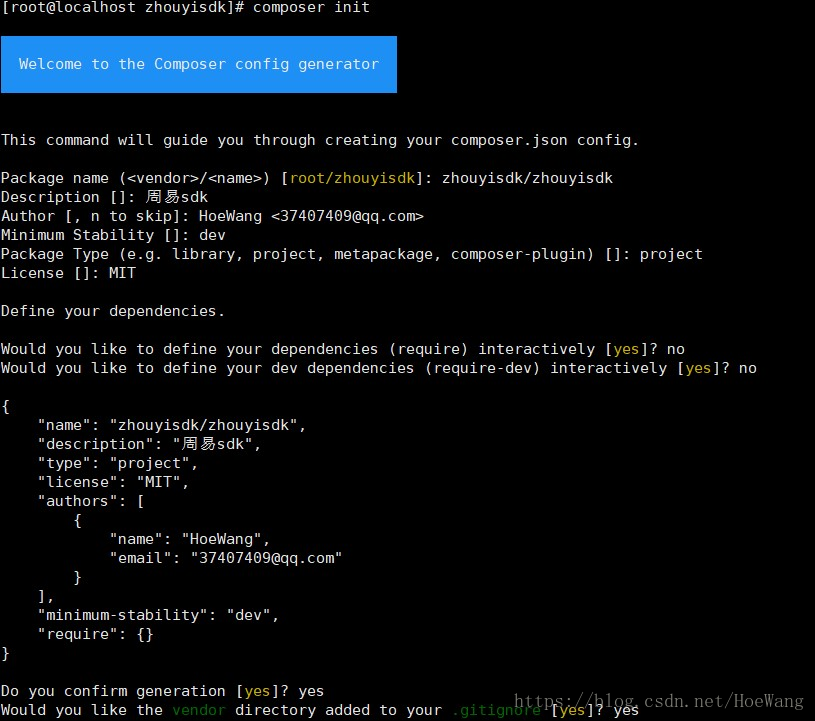
    现在我们还没有composer.json文件,可以根据composer文档生成并编辑它,当然composer贴心的为我们准备了命令行,composer init,根据提示填写


    https://upload-images.jianshu.io/upload_images/6626109-54616f939d813255.png?imageMogr2/auto-orient/strip%7CimageView2/2/w/700

    生成了composer.json文件,但是,还缺自动加载,我们在composer.json中加入自动加载的代码,图:

    https://upload-images.jianshu.io/upload_images/6626109-e06b5f57ef691ad8.png?imageMogr2/auto-orient/strip%7CimageView2/2/w/646


    接下来,按照psr-4的配置在根目录下创建文件夹和文件,这里的文件夹和psr-4配置要一致,我创建了一个Tool类,写了一个静态Hello方法,用于包的第一个版本测试,如图

    https://upload-images.jianshu.io/upload_images/6626109-40f274790a41650f.png?imageMogr2/auto-orient/strip%7CimageView2/2/w/700


    接下来,执行  composer install 包就装好了,如图

    https://upload-images.jianshu.io/upload_images/6626109-29b7f4650468db29.png?imageMogr2/auto-orient/strip%7CimageView2/2/w/608


    然后,根目录下就多了一个vender目录,它就是包的自动加载代码,vendor/composer/autoload_psr4.php中生成命名空间和目录的映射关系

    https://upload-images.jianshu.io/upload_images/6626109-fcd341024638811c.png?imageMogr2/auto-orient/strip%7CimageView2/2/w/700


    psr-4文件


    https://upload-images.jianshu.io/upload_images/6626109-95fc4da9239c6de4.png?imageMogr2/auto-orient/strip%7CimageView2/2/w/700

    vender结构图

    接下来,我们在根目录下创建一个demo.php,测试一下,我的hello方法是否可以用,代码如图

    https://upload-images.jianshu.io/upload_images/6626109-dd1c68e94dadaaee.png?imageMogr2/auto-orient/strip%7CimageView2/2/w/700


    出现hello world 说明我们的包可以用了,然后编辑.gitignore文件,将lock文件放到忽略文件中,如下图:

    https://upload-images.jianshu.io/upload_images/6626109-d4c05eb7273146ad.png?imageMogr2/auto-orient/strip%7CimageView2/2/w/379


    接下来,提交代码到github仓库中,

    现在的仓库中只有一个可怜的readme.md文件,提交命令如图:

    https://upload-images.jianshu.io/upload_images/6626109-377439faf091873c.png?imageMogr2/auto-orient/strip%7CimageView2/2/w/655


    此时,我们的github仓库不在光秃秃,如下图

    https://upload-images.jianshu.io/upload_images/6626109-9a816ce2e0477df7.png?imageMogr2/auto-orient/strip%7CimageView2/2/w/700


    我们的包最后是要提交到
    https://packagist.org/packages/submit 这个网站上,当然,你还要在这个网站上注册一个账号

    然后才可以上传,我们获取github仓库的https的仓库地址,在packagist网站上点击submit菜单栏,菜单栏地址https://packagist.org/packages/submit,

    在packagist网站提交页面,输入github仓库地址,checkout ,之后submit,如图

    https://upload-images.jianshu.io/upload_images/6626109-b5bfd95e236598cc.png?imageMogr2/auto-orient/strip%7CimageView2/2/w/700


    check图

    https://upload-images.jianshu.io/upload_images/6626109-5a7ec182403facfe.png?imageMogr2/auto-orient/strip%7CimageView2/2/w/699


    submit图

    https://upload-images.jianshu.io/upload_images/6626109-ec93c6d26f0facfe.png?imageMogr2/auto-orient/strip%7CimageView2/2/w/700


    包就已经上传完成了,此时,如果你想用这个包,是不可以的,

    你看,我在我的另外一个项目中,加载这个包composer require abstarfish/abstartfish,不能发现如图:

    https://upload-images.jianshu.io/upload_images/6626109-e93b1590e77f76eb.png?imageMogr2/auto-orient/strip%7CimageView2/2/w/694


    那我们怎么办呢,难道就不能用了吗?当然是否定的,git页面我们切换到abstarfish项目根目录,提交修改,打一个v0.1的tag,然后提交tag到远程github仓库,如图

    https://upload-images.jianshu.io/upload_images/6626109-c03a36978727b817.png?imageMogr2/auto-orient/strip%7CimageView2/2/w/693


    点击release,发布一个版本

    https://upload-images.jianshu.io/upload_images/6626109-46882c159d33ce6b.png?imageMogr2/auto-orient/strip%7CimageView2/2/w/700


    https://upload-images.jianshu.io/upload_images/6626109-d441ad1399cb13f5.png?imageMogr2/auto-orient/strip%7CimageView2/2/w/700

    https://upload-images.jianshu.io/upload_images/6626109-3bfe09bfcdf53666.png?imageMogr2/auto-orient/strip%7CimageView2/2/w/700


    对勾一定要打上

    https://upload-images.jianshu.io/upload_images/6626109-9a8b929aa181dc89.png?imageMogr2/auto-orient/strip%7CimageView2/2/w/700

    对勾一定要打上,打上以后就是发布版本了。

    https://upload-images.jianshu.io/upload_images/6626109-f66c6a8e8cbb14f7.png?imageMogr2/auto-orient/strip%7CimageView2/2/w/700


    此时,packagist网站提示,包现在不是自动更新的需要配置 github server hook,接下来配置这个github server hook。回到github仓库,找到settings,如图增加一个server

    https://upload-images.jianshu.io/upload_images/6626109-092e0cbc51a6e30e.png?imageMogr2/auto-orient/strip%7CimageView2/2/w/700

    https://upload-images.jianshu.io/upload_images/6626109-e7c7c4f66efa573d.png?imageMogr2/auto-orient/strip%7CimageView2/2/w/700


    这里选择packagist  

    https://upload-images.jianshu.io/upload_images/6626109-1a0814605b737fa2.png?imageMogr2/auto-orient/strip%7CimageView2/2/w/700

    输入github账号密码

    https://upload-images.jianshu.io/upload_images/6626109-76613620ba97791c.png?imageMogr2/auto-orient/strip%7CimageView2/2/w/673

    输入密码,提交,

    https://upload-images.jianshu.io/upload_images/6626109-76613620ba97791c.png?imageMogr2/auto-orient/strip%7CimageView2/2/w/673


    user 就是你的github账户名,token这里注意,他是你在packagist网站上获取的,如图

    https://upload-images.jianshu.io/upload_images/6626109-fe8af7de8118f054.png?imageMogr2/auto-orient/strip%7CimageView2/2/w/700


    获取到token,回到github网站,填写token,并

    https://upload-images.jianshu.io/upload_images/6626109-fe8af7de8118f054.png?imageMogr2/auto-orient/strip%7CimageView2/2/w/700

    点击test server 测试一下,两个网站的关联


    https://upload-images.jianshu.io/upload_images/6626109-935bc8915a4415e1.png?imageMogr2/auto-orient/strip%7CimageView2/2/w/700

    https://upload-images.jianshu.io/upload_images/6626109-c0504d7c9e9d3033.png?imageMogr2/auto-orient/strip%7CimageView2/2/w/700


    哈哈,到这里,两个网站就建立了关联,我们的包就可以随着github release版本的发布,实现自动发布了,现在可以自动发布了,好高兴,再看,packagist网站提示,没有了

    https://upload-images.jianshu.io/upload_images/6626109-8925b85a687eb96b.png?imageMogr2/auto-orient/strip%7CimageView2/2/w/700


    到这里,咋们的composer包,就做好了。

    我找了自己的一个restful项目,在根目录下 composer require abstarfish/abstarfish 安装咱自己的包

    https://upload-images.jianshu.io/upload_images/6626109-aa073eb56a87c86b.png?imageMogr2/auto-orient/strip%7CimageView2/2/w/539


    项目包,下载下来了,哈哈,在看一下代码,

    https://upload-images.jianshu.io/upload_images/6626109-f42ec12898decccb.png?imageMogr2/auto-orient/strip%7CimageView2/2/w/700


    和我们的github上代码一致,

    https://upload-images.jianshu.io/upload_images/6626109-962873bd2c5e6700.png?imageMogr2/auto-orient/strip%7CimageView2/2/w/700


    然后,就是测试一下,我的包代码到底能不能用,我在我的restful项目中,use 一下Tools类,

    https://upload-images.jianshu.io/upload_images/6626109-08202644bad93a6e.png?imageMogr2/auto-orient/strip%7CimageView2/2/w/582


    将代码传到服务器上,看看是否可以生效,!!!!这里注意一下,我的vender目录是在git的忽略文件里面,所以,我把代码传到服务器上,还是找不到类库,我必须在服务器上 执行composer install,才能将包装在服务器上,刚才只是把包下载到了本地,这个问题,导致我昨天浪费了好多时间调试。大家一定注意。

    https://upload-images.jianshu.io/upload_images/6626109-b4d0ea9a3845b897.png?imageMogr2/auto-orient/strip%7CimageView2/2/w/700


    将abstarfish包装到服务器上在线测试

    https://upload-images.jianshu.io/upload_images/6626109-3fb84586493afda8.png?imageMogr2/auto-orient/strip%7CimageView2/2/w/700


    这里测试通过,可以了,如果不放心,再来发布一个0.2的版本

    我服务器 composer update 的时候,会遇到下图问题,我的是阿里云服务器

    https://upload-images.jianshu.io/upload_images/6626109-38a9922d939cb6ad.png?imageMogr2/auto-orient/strip%7CimageView2/2/w/700


    直接修改composer.json 加上如图的代码:github.com 后面

    https://upload-images.jianshu.io/upload_images/6626109-0e8bcc1247a5accd.png?imageMogr2/auto-orient/strip%7CimageView2/2/w/604

    https://www.cnblogs.com/Hzhihua/archive/2017/06/22/7064976.html 这是解决方法

    然后在composer update,不得不吐槽一下,这个composer真是太慢了,镜像改成国内的,自行搜索吧。


    作者:chinariver
    链接:https://www.jianshu.com/p/280acb6b0b22
    來源:简书
    简书著作权归作者所有,任何形式的转载都请联系作者获得授权并注明出处。


  • 相关阅读:
    每日总结
    团队冲刺9
    团队冲刺8
    团队冲刺7
    团队冲刺6
    团队冲刺5
    团队冲刺4
    团对冲刺3
    团队冲刺2
    每日博客
  • 原文地址:https://www.cnblogs.com/hoewang/p/10257209.html
Copyright © 2011-2022 走看看