结合上一节的内容,分享完整代码。
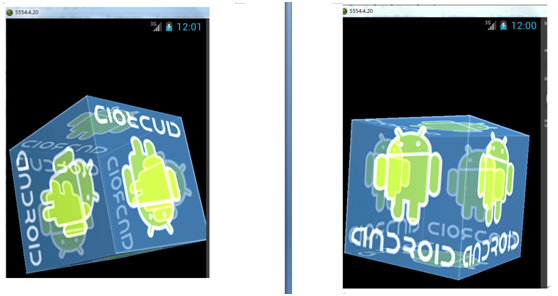
先画一个cube,然后通过OnGestureListener去触发onFling使它旋转起来。
OnGestureListener相关的方法我已经都加了注释,可以参考注释去了解有关的方法是干什么的。
旋转相关随便复制了一个,主要说明OnGestureListener。
简单的触摸操作会用一些OnTouchListener复杂的还是需要用到OnGestureListener。
Acivity & Render:
import javax.microedition.khronos.opengles.GL10;
import javax.microedition.khronos.egl.EGLConfig;
import android.app.Activity;
import android.content.Context;
import android.opengl.GLSurfaceView;
import android.opengl.GLU;
import android.os.Bundle;
import android.view.GestureDetector;
import android.view.GestureDetector.OnGestureListener;
import android.view.MotionEvent;
import android.view.Window;

public class OpenGL extends Activity implements OnGestureListener {
    // 定义旋转角度
    private float anglex = 0f;
    private float angley = 0f;
    static final float ROTATE_FACTOR = 180f;
    // 定义手势检测器实例
    GestureDetector detector;

    @Override
    public void onCreate(Bundle savedInstanceState) {
        super.onCreate(savedInstanceState);
        // 去标题栏
        requestWindowFeature(Window.FEATURE_NO_TITLE);
        // 创建一个GLSurfaceView,用于显示OpenGL绘制的图形
        GLSurfaceView glView = new GLSurfaceView(this);
        // 创建GLSurfaceView的内容绘制器
        GLRenderer myRender = new GLRenderer(this);
        // 为GLSurfaceView设置绘制器
        glView.setRenderer(myRender);
        setContentView(glView);
        // 创建手势检测器
        detector = new GestureDetector(this);
    }

    @Override
    public boolean onTouchEvent(MotionEvent event) {
        // 将该Activity上的触碰事件交给GestureDetector处理
        return detector.onTouchEvent(event);
    }

    // 用户轻触触摸屏,由1个MotionEvent ACTION_DOWN触发
    public boolean onDown(MotionEvent e) {
        // TODO Auto-generated method stub
        System.out.println("onDown");
        return false;
    }

    /*
     * 用户按下触摸屏、快速移动后松开,由1个MotionEvent ACTION_DOWN, 多个ACTION_MOVE,
     * 1个ACTION_UP触发(non-Javadoc)
     * Fling事件的处理代码:除了第一个触发Fling的ACTION_DOWN和最后一个ACTION_MOVE中包含的坐标等信息外
     * ,我们还可以根据用户在X轴或者Y轴上的移动速度作为条件
     * 比如下面的代码中我们就在用户移动超过100个像素,且X轴上每秒的移动速度大于200像素时才进行处理。
     *
     * @see android.view.GestureDetector.OnGestureListener#onFling(android.view.
     * MotionEvent, android.view.MotionEvent, float, float)
     * 这个例子中,tv.setLongClickable( true )是必须的,因为
     * 只有这样,view才能够处理不同于Tap(轻触)的hold(即ACTION_MOVE,或者多个ACTION_DOWN)
     * ,我们同样可以通过layout定义中的android:longClickable来做到这一点
     */
    public boolean onFling(MotionEvent e1, MotionEvent e2, float velocityX,
            float velocityY) {
        System.out.println("onFling");
        // 参数解释:
        // e1:第1个ACTION_DOWN MotionEvent
        // e2:最后一个ACTION_MOVE MotionEvent
        // velocityX:X轴上的移动速度,像素/秒
        // velocityY:Y轴上的移动速度,像素/秒
        velocityX = e1.getX() - e2.getX();
        velocityY = e1.getY() - e2.getY();
        velocityX = velocityX > 4000 ? 4000 : velocityX;
        velocityX = velocityX < -4000 ? -4000 : velocityX;
        velocityY = velocityY > 4000 ? 4000 : velocityY;
        velocityY = velocityY < -4000 ? -4000 : velocityY;
        // 根据横向上的速度计算沿Y轴旋转的角度
        angley += -velocityX * ROTATE_FACTOR / 4000;
        // 根据纵向上的速度计算沿X轴旋转的角度
        anglex += -velocityY * ROTATE_FACTOR / 4000;
        return true;
    }

    // Touch了不移动一直Touch down时触发
    public void onLongPress(MotionEvent arg0) {
        // TODO Auto-generated method stub
        System.out.println("onLongPress");
    }

    // 用户按下触摸屏,并拖动,由1个MotionEvent ACTION_DOWN, 多个ACTION_MOVE触发
    public boolean onScroll(MotionEvent e1, MotionEvent e2, float velocityX,
            float velocityY) {
        // TODO Auto-generated method stub
        System.out.println("onScroll");
        return false;
    }

    /*
     * Touch了还没有滑动时触发 (1)onDown只要Touch Down一定立刻触发 (2)Touch
     * Down后过一会没有滑动先触发onShowPress再触发onLongPress So: Touch Down后一直不滑动,onDown ->
     * onShowPress -> onLongPress这个顺序触发。
     */
    public void onShowPress(MotionEvent arg0) {
        // TODO Auto-generated method stub
        System.out.println("onShowPress");
    }

    /*
     * 两个函数都是在Touch Down后又没有滑动(onScroll),又没有长按(onLongPress),然后Touch Up时触发
     * 点击一下非常快的(不滑动)Touch Up: onDown->onSingleTapUp->onSingleTapConfirmed
     * 点击一下稍微慢点的(不滑动)Touch Up://确认是单击事件触发
     * onDown->onShowPress->onSingleTapUp->onSingleTapConfirmed
     */
    public boolean onSingleTapUp(MotionEvent arg0) {
        // TODO Auto-generated method stub
        System.out.println("onSingleTopUp");
        return false;
    }

    class GLRenderer implements GLSurfaceView.Renderer {
        private final Context context;
        private final GLCube cube = new GLCube();

        GLRenderer(Context context) {
            this.context = context;
        }

        public void onSurfaceCreated(GL10 gl, EGLConfig config) {
            // Define the lighting
            float lightAmbient[] = new float[] { 0.2f, 0.2f, 0.2f, 1 };
            float lightDiffuse[] = new float[] { 1, 1, 1, 1 };
            float[] lightPos = new float[] { 1, 1, 1, 1 };
            gl.glEnable(GL10.GL_LIGHTING);
            gl.glEnable(GL10.GL_LIGHT0);
            gl.glLightfv(GL10.GL_LIGHT0, GL10.GL_AMBIENT, lightAmbient, 0);
            gl.glLightfv(GL10.GL_LIGHT0, GL10.GL_DIFFUSE, lightDiffuse, 0);
            gl.glLightfv(GL10.GL_LIGHT0, GL10.GL_POSITION, lightPos, 0);

            // What is the cube made of?
            float matAmbient[] = new float[] { 1, 1, 1, 1 };
            float matDiffuse[] = new float[] { 1, 1, 1, 1 };
            gl.glMaterialfv(GL10.GL_FRONT_AND_BACK, GL10.GL_AMBIENT,
                    matAmbient, 0);
            gl.glMaterialfv(GL10.GL_FRONT_AND_BACK, GL10.GL_DIFFUSE,
                    matDiffuse, 0);

            // Set up any OpenGL options we need
            gl.glEnable(GL10.GL_DEPTH_TEST);
            gl.glDepthFunc(GL10.GL_LEQUAL);
            gl.glEnableClientState(GL10.GL_VERTEX_ARRAY);

            gl.glDisable(GL10.GL_DEPTH_TEST);
            gl.glEnable(GL10.GL_BLEND);
            gl.glBlendFunc(GL10.GL_SRC_ALPHA, GL10.GL_ONE);

            // Enable textures
            gl.glEnableClientState(GL10.GL_TEXTURE_COORD_ARRAY);
            gl.glEnable(GL10.GL_TEXTURE_2D);

            // Load the cube's texture from a bitmap
            GLCube.loadTexture(gl, context, R.drawable.android);

        }

        public void onSurfaceChanged(GL10 gl, int width, int height) {
            // Define the view frustum
            gl.glViewport(0, 0, width, height);
            gl.glMatrixMode(GL10.GL_PROJECTION);
            gl.glLoadIdentity();
            float ratio = (float) width / height;
            GLU.gluPerspective(gl, 45.0f, ratio, 1, 100f);

        }

        public void onDrawFrame(GL10 gl) {
            // Clear the screen to black
            gl.glClear(GL10.GL_COLOR_BUFFER_BIT | GL10.GL_DEPTH_BUFFER_BIT);

            // Position model so we can see it
            gl.glMatrixMode(GL10.GL_MODELVIEW);
            gl.glLoadIdentity();
            gl.glTranslatef(0, 0, -3.0f);

            gl.glRotatef(angley, 0, 1, 0);
            gl.glRotatef(anglex, 1, 0, 0);

            // Draw the model
            cube.draw(gl);
        }
    }
}
然后是一个Cube:
import java.nio.ByteBuffer;
import java.nio.ByteOrder;
import java.nio.IntBuffer;

import javax.microedition.khronos.opengles.GL10;

import android.content.Context;
import android.graphics.Bitmap;
import android.graphics.BitmapFactory;
import android.opengl.GLUtils;

class GLCube {
   private final IntBuffer mVertexBuffer;


   private final IntBuffer mTextureBuffer;


   public GLCube() {

      int one = 65536;
      int half = one / 2;
      int vertices[] = {
            // FRONT
            -half, -half, half, half, -half, half,
            -half, half, half, half, half, half,
            // BACK
            -half, -half, -half, -half, half, -half,
            half, -half, -half, half, half, -half,
            // LEFT
            -half, -half, half, -half, half, half,
            -half, -half, -half, -half, half, -half,
            // RIGHT
            half, -half, -half, half, half, -half,
            half, -half, half, half, half, half,
            // TOP
            -half, half, half, half, half, half,
            -half, half, -half, half, half, -half,
            // BOTTOM
            -half, -half, half, -half, -half, -half,
            half, -half, half, half, -half, -half, };

      int texCoords[] = {
            // FRONT
            0, one, one, one, 0, 0, one, 0,
            // BACK
            one, one, one, 0, 0, one, 0, 0,
            // LEFT
            one, one, one, 0, 0, one, 0, 0,
            // RIGHT
            one, one, one, 0, 0, one, 0, 0,
            // TOP
            one, 0, 0, 0, one, one, 0, one,
            // BOTTOM
            0, 0, 0, one, one, 0, one, one, };

      ByteBuffer vbb = ByteBuffer.allocateDirect(vertices.length * 4);
      vbb.order(ByteOrder.nativeOrder());
      mVertexBuffer = vbb.asIntBuffer();
      mVertexBuffer.put(vertices);
      mVertexBuffer.position(0);

      ByteBuffer tbb = ByteBuffer.allocateDirect(texCoords.length * 4);
      tbb.order(ByteOrder.nativeOrder());
      mTextureBuffer = tbb.asIntBuffer();
      mTextureBuffer.put(texCoords);
      mTextureBuffer.position(0);

   }


   public void draw(GL10 gl) {
      gl.glVertexPointer(3, GL10.GL_FIXED, 0, mVertexBuffer);

      gl.glTexCoordPointer(2, GL10.GL_FIXED, 0, mTextureBuffer);

      gl.glColor4f(1, 1, 1, 1);
      gl.glNormal3f(0, 0, 1);
      gl.glDrawArrays(GL10.GL_TRIANGLE_STRIP, 0, 4);
      gl.glNormal3f(0, 0, -1);
      gl.glDrawArrays(GL10.GL_TRIANGLE_STRIP, 4, 4);

      gl.glColor4f(1, 1, 1, 1);
      gl.glNormal3f(-1, 0, 0);
      gl.glDrawArrays(GL10.GL_TRIANGLE_STRIP, 8, 4);
      gl.glNormal3f(1, 0, 0);
      gl.glDrawArrays(GL10.GL_TRIANGLE_STRIP, 12, 4);

      gl.glColor4f(1, 1, 1, 1);
      gl.glNormal3f(0, 1, 0);
      gl.glDrawArrays(GL10.GL_TRIANGLE_STRIP, 16, 4);
      gl.glNormal3f(0, -1, 0);
      gl.glDrawArrays(GL10.GL_TRIANGLE_STRIP, 20, 4);
   }


   static void loadTexture(GL10 gl, Context context, int resource) {
      Bitmap bmp = BitmapFactory.decodeResource(
            context.getResources(), resource);
      GLUtils.texImage2D(GL10.GL_TEXTURE_2D, 0, bmp, 0);
      gl.glTexParameterx(GL10.GL_TEXTURE_2D,
            GL10.GL_TEXTURE_MIN_FILTER, GL10.GL_LINEAR);
      gl.glTexParameterx(GL10.GL_TEXTURE_2D,
            GL10.GL_TEXTURE_MAG_FILTER, GL10.GL_LINEAR);
      bmp.recycle();
   }

}
运行:鼠标滑动屏幕,cube会旋转。